 In each house the vacuum cleaner is used for cleaning. Ease of use is undeniable. In case of breakage of the unit have to think about the possibility of self-repair. If the user has the technical skills, you can try to identify the problem by disassembles the vacuum cleaner motor, thereby saving on costly maintenance in Customer Service.
As parse engine cleaner
The content of the article
-
As parse engine cleaner
- Tools & Supplies
- disassembly stages
- What may be a fault
The presence of background noise, crackling or sparks when you turn on a vacuum cleaner suggests the urgent need of repair. First of all remove the housing plastic parts to gain access to the motor a faulty unit.
ATTENTION! When disassembling the plastic housing can not apply a lot of effort pressing the elements connections. They break down quickly, and restore them very difficult.
Tools & Supplies
Each artist has a unique approach to the locksmithing and therefore fit for the task may vary. But dismantling the electric motor, it is desirable to do with the use of the following tools:
- the clutches of a small size;
- a file;
- set of screwdrivers;
- hacksaw;
- pliers;
- several wooden bars;
- set of wrenches.
disassembly stages
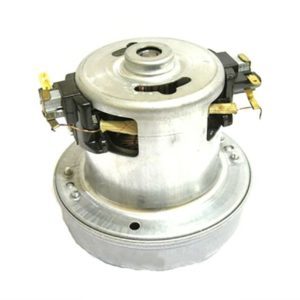
After removing the plastic panels of the cleaner body obtain access to the engine and proceed to disassembly.
- First, disconnect the electrical contacts on the motor terminals.
- Then, using a thin screwdriver, twisting screws, spring clips contact brushes and brush holders. After that, remove the protective fan guard lightly tapped with a hammer on the outer surfaces of the body. To prevent damage to the body, blows with a hammer to do better through a piece of wood.
IMPORTANT! Some models have seamed protection impeller remover that requires to bend the bent housing elements, and then remove the cover.
Next untwist the impeller nut. This is the most difficult and crucial moment of the engine disassembly. Consider applied variants fixing axis on which the nut is located:
- Wedging the space between the stator and the rotor. This method is often used "home handyman". Screwdriver appropriate size is inserted into the cavity between the rotating elements of the motor and propped them. The simplicity of this method are often in failure affects the subsequent operation of the motor, ie. K. Damaged surface of the stator or rotor.

- Clamp in a vise. For correct use of the method, made wooden blocks that are placed in the cavities of the brush holders. Applying the average effort wooden sticks with the motor is compressed in a vise to lock the rotor axis.
- Design features of some models of vacuum cleaners make it possible to propyl on the face of the armature shaft. If the axle protrudes beyond the nut 1 cm or more, it is rational to use such a method. Res on the axis of the anchor needs to be done when the stator is fixed hacksaw or grinder.
Cutting sometimes operate on the shaft and nut simultaneously. But it is impossible nadpilivat nut body, by more than 30% of the thickness.
IMPORTANT! After performing the cut you want to remove all the chips, so she could not get to the rotating elements of the motor. The remaining metal particles may cause a short circuit.
Another method of fixing rotor - application choke. A copper-based wire, nylon rope or cord hard axis is used to immobilize the anchor. To do this, the selected material is folded in half and push in the stator apertures for access to the rotor. Wrap an outer surface of the armature, to withdraw the retaining cord to the opening, and is wound up. Then it is necessary to pass through itself and fix the rotor firmly. This method is very safe, but it is not always effective. Nut can not get loose when using this method, because the friction between the anchor and the cord does not allow to disrupt the tightening force.
After selecting the available method rotor shaft fixing nut unwind and remove the stator impeller.
IMPORTANT! Unlike conventional thread on the anchor shaft is used right-hand thread, so you need to spin clockwise.
Further:
- Opened to access the top bearing plate anchor attachment twisting corresponding screwdriver, often - Phillips. To exit from the slots of the plate, its poddevat flat screwdriver and gradually pulled.
- After separation of the plates for 1-2 centimeters, it is fixed on the support. As a last use blocks of wood that are placed between the plate and the stator housing. Now knock anchored with the bearing of the plate. For this purpose a hammer with a block of wood to preserve the integrity of the thread, which is applied on bumps. When released from the armature bearing mounting plate to pull out the rotor.
vacuum cleaner motor dismantled. After that, inspect all components and identify the cause of the vacuum cleaner removal.
What may be a fault
Visually determine the integrity of all nodes in the unassembled. In case of fault - eliminate:
- Worn bearings. When scrolling through the shaft, before the disassembly, the rotation is accompanied by other sounds. After disassembly is required to ensure the integrity of both bearings. Upon detection of a faulty - replace.

- Extraneous noise, during operation of the vacuum cleaner may be connected with an axial displacement of the impeller. She, after removing the need to carefully examine, in particular, the landing place on the shaft. When detecting irregularities within the planting hole is required to replace the impeller.
- The cause of extraneous sounds during engine operation can be untwisted fastener elements on the stator or rotor. In identifying these places, pick the appropriate fasteners and eliminate defect.
- Sparks, which become visible when the vacuum cleaner is eliminated by replacing the brushes. However, during prolonged work with defective brushes, on the surfaces of rotating surfaces is formed a deposit. This fouling is completely removed for stable operation of the vacuum cleaner.
- Rarely manage accurately determine the presence of damage to the stator winding or the rotor after visual inspection. For accurate diagnosis using the tester, which will give a clear answer. If the coil is faulty, then it should be rewound or replaced with a new one.
After the elimination of identified defects, the electric motor with a vacuum cleaner collected in reverse order and operate in the desired mode.
It is hard to guidance about quality without the use of a helper, like a vacuum cleaner. The ability to disassemble and repair the appliances will save money and do not seek the help of the service centers.


