 Every child wants his toys to make up a special world, similar to the real one. For this, doll houses, cars and other toys are created. But dolls who have a house will probably need a yard around it. And what yard without a bench? In this article, you will learn how to craft a paper bench yourself to please. your child, to prevent common mistakes and make the craft as close as possible to the original.
Tools and materials
The content of the article
- Tools and materials
- Sequencing
- Tips
- Conclusion
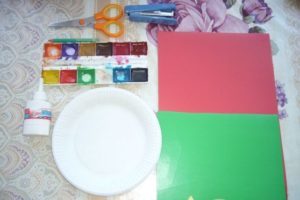
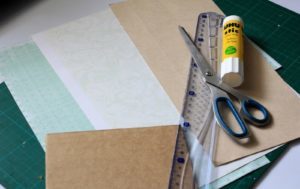 Materials for such crafts can be found in every home, because there is nothing unusual in them. Any adult who has no problems with other activities requiring relative sleight of hand, for example, embroidery or minor household repairs, can make such a toy.
So you will need:
- brown and black colored paper;
- scissors;
- glue;
- skewers for products;
- thick cardboard.
IMPORTANT! Take a picture in advance or search the Internet for a picture of a real bench. If you keep it in front of your eyes, the craft will turn out to be more like a real shop and more believable.
When all the necessary materials are collected, you can begin to work.
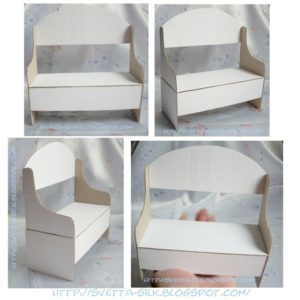
Sequencing
 First, decide on the size of the product. It should not be very large, but at the same time consider how the child will use the bench. Surely in conjunction with other toys, such as dolls. In this case, it will be important to keep proportions relative to them. It will be strange if the bench is larger or much smaller than the dolls or animals that the child wants to put there.
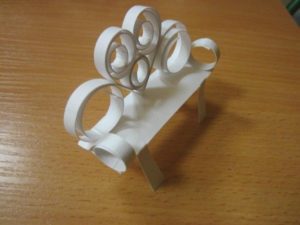
- Depending on the selected dimensions, cut out the necessary components from cardboard and paper. We will give an example of the dimensions of our craft, so that it is convenient for you to understand how the details relate to each other. Add or decrease a few centimeters to make the bench exactly the way you need it.
- Two side parts turned out to be 12 by 8 cm long, several strips centimeter wide - 15 cm. Wooden skewers need to be cut so that their length is about 12 and a half centimeters. Now you can begin, in fact, to make a bench.
- Details should be glued with colored paper, side elements - black, and stripes - brown. By the way, in the absence of colored paper, or simply at will, you can paint them with paints, colored pencils or felt-tip pens.
- Now we make three small holes in the side, it is important to ensure that they are not through, then the craft will be damaged. They need to pour glue and insert wooden skewers into them. If you are afraid to glue the whole part with glue, then you can dip the skewers into it. After the glue has dried, the same must be done with the second part.
- Try to be as accurate as possible or place the sticks parallel to each other. As a result, a kind of bench frame emerges, in which the features of the future product are already guessed.
- After that, it remains only to glue the stripes that depict the boards on the lower part and on the back. With an average size of the toy they fit 3-4 on both sides. After that, check if the elements of the bench come off, shake and twitch. If everything is in order, then the work is over.
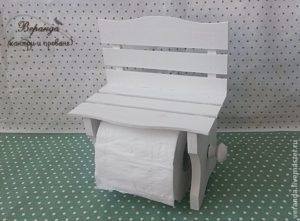
Tips
You can complement the bench with wrought-iron twisted ornaments. To do this, you will need a thick wire with a diameter of 2-3 mm and acrylic paint to give it the desired effect. Pliers give the desired shape to the wire. Parts can be joined using adhesive tape, and then pasted over the “forged” parts of papier-mâché. Thus, the frame of the product will also be strengthened.
The paste, which greases the newspaper pieces, can be prepared from boiled water and flour in the proportion of 3 tablespoons of flour per 500 ml of water, adding a little glue. The resulting mass must be cooled and only then use it to glue the wire. Please note that you will need not one or even two layers, but about 3-4 so that the papier-mâché will turn out to be dense and not break up in the future.
 The next step is to eliminate all the resulting bumps. To do this, use sandpaper, first medium, and then fine grain. After that, the element is covered with self-hardening plastic, which is sold in small packs and freezes quite quickly, then the procedure for removing bumps is repeated. However, here you can not really try, because the roughness may be appropriate for reproducing the effect of "antiquity" and just a more natural looking bench.
Monograms must also be present on the frame, which are also made with plastic. With a knife, you can make them more expressive and deep, as well as give the whole frame greater accuracy and "detail." The last step will be painting. Everything is clear with black paint, but how to give the bench a metal effect? Here you need silver paint. It should be applied with a sponge for washing dishes. Then let the parts dry, cover it with acrylic varnish and attach to other elements.
 Conclusion
As you can see, the last addition is much more difficult to complete than the previously described bench. Such crafts can be used not only as toys for children, but also put up at competitions and win prizes, as well as become a hobby that will delight after a difficult day.
Perhaps the attempt to fulfill the whim of the child will develop into a real passion for this work.