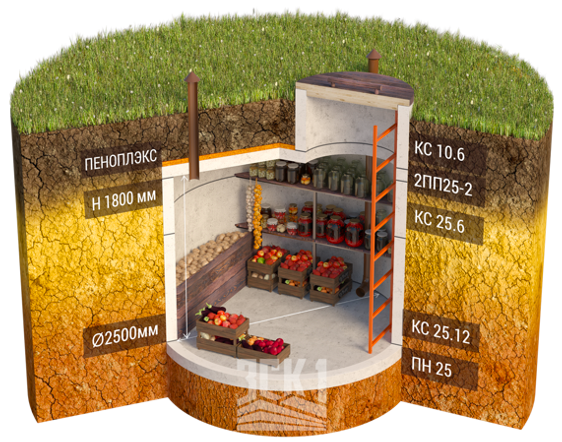
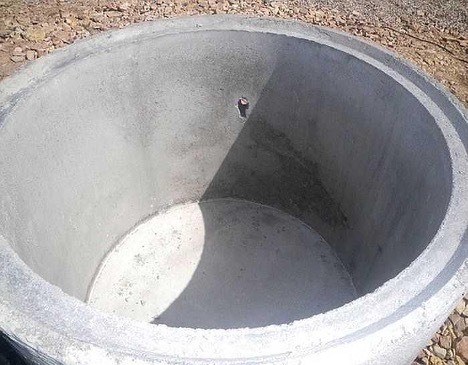
One of the easiest ways to create a cellar is to install a concrete ring. In this case, the walls are already formed, so it remains only to make the floor and put the ceiling with the door. However, you will have to dig a vegetable pit from concrete rings yourself, since the excavator will not be able to drive in. The pros and cons of this technology and how you can implement it step by step are described in this material.
The content of the article
- Pros and cons of concrete rings
-
How to build a cellar: step by step instructions
- foundation pit
- Pit waterproofing
- Floor
- Walls
- Ceiling
- Waterproofing and finishing
Pros and cons of concrete rings
The cellar can be built independently by tearing out the foundation pit and finishing its walls from the inside. But then the question arises of how to dry the vegetable pit in the garage in order to maintain a normal microclimate. To simplify the task, it is recommended to use concrete rings, which have tangible advantages:
- very long service life - at least 20 years;
- do not collapse under the influence of moisture, light or temperature changes;
- resistant to ground pressure from the sides;
- easy to install - in fact, you just need to dig a hole, level the base and put the block.
On the other hand, if you make a vegetable pit in the garage with your own hands, you need to take into account the features of concrete rings, their disadvantages:
- the weight is very large, so a truck crane is required;
- concrete can be severely damaged upon impact, so loading and unloading, as well as installation work, must be done very carefully;
- in order for the ring to last as long as possible, you will need to install heat and waterproofing.
How to build a cellar: step by step instructions
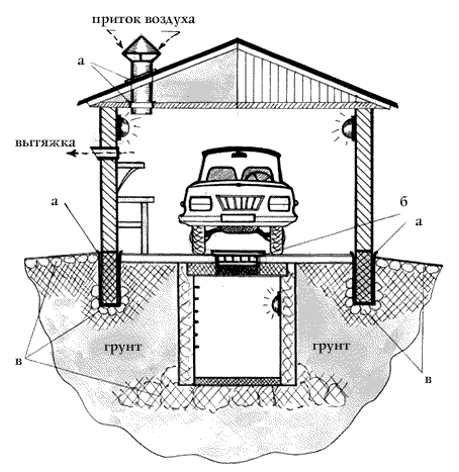
A pit for storing vegetables is built in several stages. In fact, this is a pit in which a concrete block is installed. Moreover, the cellar has a reliable lid, and in the garage they must make a hole in the wall for the hood and in the ceiling for the influx of fresh air, as shown in the diagram. Ventilation of a vegetable pit is most often done using natural technology. Although if there are concerns for the safety of vegetables, high humidity, it is worth making a forced system with a built-in fan.
foundation pit
Instructions on how to make a vegetable pit begin with creating a foundation pit. They dig it out by hand, since the excavator will not be able to enter the small space of the garage. At the same time, the perimeter of the cellar is determined so that it is slightly smaller compared to the main structure, so that the structure is strong.
It should be noted that groundwater often occurs on the site. In order for the vegetable pit to be dry with your own hands in the garden, you should take care of the pump for pumping out the liquid in advance.
Pit waterproofing
Even if there is no groundwater nearby, care should be taken to install waterproofing. It is needed in all cases, even if a vegetable pit is made of bricks with your own hands. For laying bitumen or other material, it is necessary:
- Thoroughly tamp the bottom.
- Cover with clay (layer height 5-7 cm).
- Moisten it with water.
- Press down again until the surface is as dense as possible.
Floor
A do-it-yourself potato pit is built only on a flat floor, so special attention should be paid to its arrangement. The recommended course of action is as follows:
- Lay sand 4-5 cm high on the clay layer.
- Tamp thoroughly.
- Fill in gravel and tamp again.
- Next, the concrete mixture is prepared and the screed is performed in one go.
- In order for a do-it-yourself vegetable pit made of concrete to have a normal floor, you need to fill in a layer with a height of 15 cm or more (optimally 20-25 cm).
- Surfaces are smoothed as thoroughly as possible, but even if small differences remain, they can be eliminated.
- Next, you need to level the floor with a cement-sand mortar.
- Understanding how to equip a vegetable pit is easy. Beacons should be placed directly on the screed, their height is only 1.5 cm. Lighthouses are leveled using the usual building level.
- After finishing the surface, the surface is leveled using a foam grater.
Walls
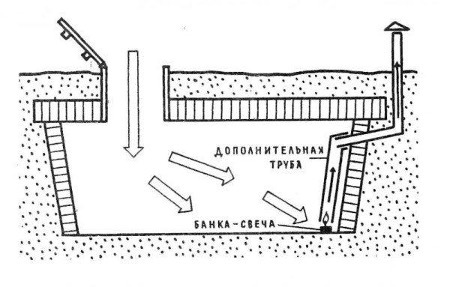
Making a quality floor is important, but this is not the only requirement for a do-it-yourself vegetable storage hole. Pre-equip the ventilation system, as shown in the diagram.
Next, they build the actual walls, acting like this:
- The formwork is formed based on the fact that the thickness of the wall will be about 20 cm. At the same time, it should be at a small distance from the slope of the pit (4-5 cm). Install plywood and support them with boards.
- A pit for storing potatoes with your own hands must have reliable walls. For this, a strapping of reinforcement elements (metal bars) is mounted directly inside the formwork.
- Concrete is kneaded (the composition is similar to that used for the floor) and poured in several approaches - a third, two thirds and the last layer.
- They wait until the concrete dries (about 2 weeks) - this is necessary so that the waterproofing of the vegetable pit from groundwater does not have moisture. Then the formwork is removed.
- The space between the slope and the surface of the wall is filled with sand and rammed - thanks to this, the burial pit will not freeze through.
Ceiling
The next stage is the construction of a monolithic ceiling with a hatch. The step by step instructions are as follows:
- T-type rolled metal or railway rails are laid (the interval between them is from 60 to 100 cm).
- At the bottom put boards for formwork.
- Metal beams are fixed with a strong strapping (reinforcing bars will be needed).
- Assemble the welded frame for the door.
- The concrete mixture is prepared and poured into the formwork in one go so that the height is from 20 cm.
- Wait a few weeks for the concrete to dry completely.
Waterproofing and finishing
Now you need to think about how to insulate the vegetable pit, complete the finish and lay the waterproofing. Start with dust removal. Then all joints between the surface of the walls and the ceiling are primed and covered with mastic. Next, roofing material is laid, which will serve as waterproofing. As for the insulation, you can use mineral wool, and lay a wooden or plastic lining on top of it.
Thus, each stage of construction can be performed independently. It is best if a small team of at least 2 people works. All work is done by hand, but concrete is kneaded on special equipment that can be rented or ordered ready-mixed.