Construction on weak, heaving soil will require the construction of a sufficiently strong and stable foundation. You can try piles, but it is better to pour a monolithic foundation.
The increased volume of work is more than compensated for by higher stability and reliability. Even in conditions of severe watering in summer and heaving of the soil in winter, a house on a monolithic slab will remain standing, while piles often have to be cut and repaired.
The content of the article:
-
General information about the foundation - monolithic slab
- The use of slab foundations, its main advantages and disadvantages
- Typical diagram of a monolithic slab foundation
-
How to calculate a monolithic slab foundation
- Ground load and structure weight
- Thickness of monolithic reinforced slab
- Amendments to the design of a monolithic foundation depending on operating conditions
- A special version of a monolithic foundation
-
Depth of foundation and excavation of the pit
- How to dig a pit for a monolithic foundation
- Preparation for backfilling
- Arrangement of communications
- Sand and gravel cushion for slab foundation
-
Do-it-yourself formwork and foundation waterproofing
- Installation of insulation
- Concrete preparation
-
Reinforcement of slab foundation and pouring concrete
- Pouring concrete mixture
- A simplified version of a monolithic foundation
- Results
General information about the foundation - monolithic slab
The topic of using a slab foundation is always accompanied by a large number of prejudices and speculations. For example, many potential customers do not decide to install a monolithic slab due to the high cost of construction. It is believed that pouring a monolithic slab will cost at least a third of the estimated cost of the house.
You can also come across the opinion that it is impossible to fill a slab foundation without special redevelopment of the site; the slightest slope causes the slab to slide along the ground surface. But the most common misconception is the myth about thermal insulation. It is believed that a monolithic foundation is very cold, damp, and it will take 60% to heat a house than for a building on a regular MZLF.
Before you try to pour your first monolithic foundation, you need to understand its main advantages and disadvantages.
The use of slab foundations, its main advantages and disadvantages
You can start with a list of shortcomings. There are not many of them:
- High labor intensity or high cost of work. Before pouring a monolithic foundation with your own hands, you need to make a simple calculation: what part of the work you can do it yourself and save money, and for which types is it cheaper to use equipment or invite masters
- If you fill a monolithic slab, it will be impossible to create a basement underneath it. As an option, you can build a basement under the slab with an entrance from the street, but such schemes have a bad effect on the durability of the foundation.
- On soil with a high water level, a drainage system is required.
- All details and nuances associated with the introduction of communications inside the building box must be designed and calculated before work begins. Once the concrete is poured, it will be impossible to change the layout of the channels in the foundation.
You can also add that a monolithic foundation slab will require powerful insulation, effective drainage and waterproofing. But essentially all types of concrete foundation systems require protective and insulating barriers. Otherwise, the concrete will collapse from the accumulation of moisture, and then from the expansion of water when freezing.
Advantages of the slab scheme:
- If the slab is properly reinforced and poured, a monolithic foundation will exert less pressure on the ground than any other type of foundation.
- The bearing capacity of a monolith is much higher than that of any other types of foundations. At the same time, the slab is practically not afraid of flooding or severe freezing of the soil under the building.
- When using modern types of thermal insulation, heat loss is usually minimal. They are smaller than those of traditional circuit designs.
- The monolithic slab is interesting not only because it reliably and rigidly ties the building frame to the ground. It significantly increases the rigidity of the walls.
The last point can be considered the most relevant for monolithic slabs and buildings made of aerated concrete or foam concrete. If you fill a monolithic slab correctly, you don’t have to worry about the box spreading in the basement of the building. Although the walls above the base will still have to be reinforced.
The monolith also does not create a cutting effect on the ground. Few people pay attention, but the pressure from a full-size strip foundation, taking into account the weight of the building, often blocks (squeezes) the passages of underground streams and water veins.
As a result, wetlands appear near the house. In a monolithic foundation, the pressure is evenly distributed over the surface, so the slab does not have a cutting effect on groundwater.
It is advisable to pour the monolith on an area with sedimentary and rocky rocks, even with a slope of up to 15O. It is clear that before pouring a monolithic slab, you will need to plan the surface according to the horizon level and prepare the base. On weak sandy and loamy soils, a slight slope of up to 8 is allowed.O, in this case it is recommended to fill the slab with additional stiffeners perpendicular to the drain line.
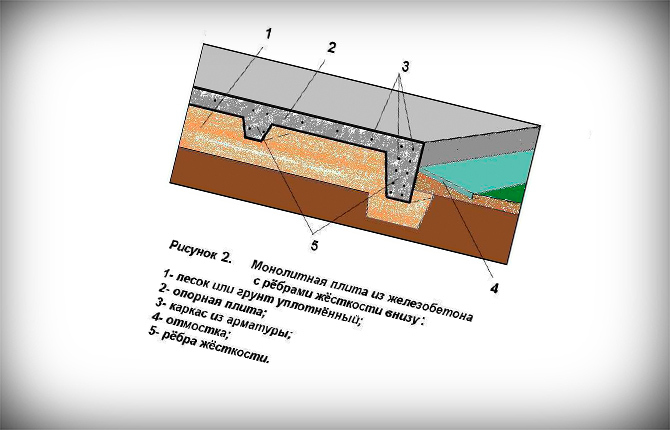
Typical diagram of a monolithic slab foundation
The standard slab design is a flat concrete mass reinforced with at least two or three layers of reinforcement. The slab must be poured into the formwork on top of the sand and gravel cushion (plus waterproofing). This is a standard option, it is the simplest to design and does not require excavation of a large amount of soil. It is used on relatively dry soils with a freezing depth of up to 150 cm.
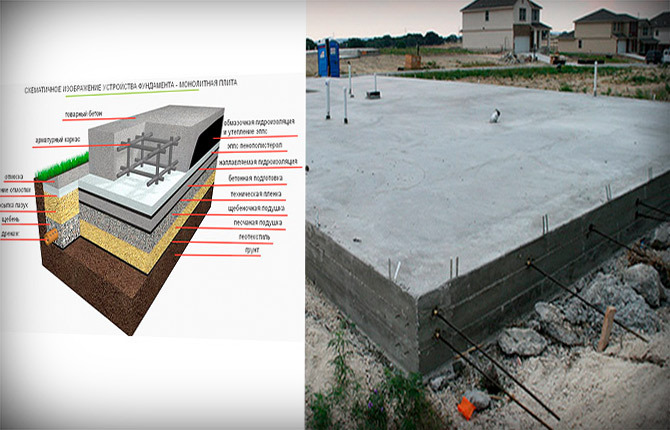
The layer-by-layer structure of a monolithic foundation slab can be divided into several levels:
- The lowest one is processed and compacted soil. In theory, it needs to be cut to a depth of 10 cm, sifted, debris and vegetation removed, mixed with fine gravel screenings, laid on the bottom and compacted. But more often the bottom of the pit is simply compacted.
- The next layer is a geotextile fabric for road construction. Required to protect against the harmful effects of soil on the base of a monolithic foundation.
- The next level is sand filling up to 300 mm thick, used primarily as an intermediate layer, the task of which is to evenly transfer the load from the slab to the compacted soil.
- This is followed by another layer of geotextile, on top of which coarse gravel is first laid, then a layer of fine gravel is poured and leveled. At this stage, you need to correctly plan the surface according to the horizon level.
- Next, you need to pour a leveling layer of concrete 4-5 cm thick. If you pour over small compacted gravel screenings, then usually no films or meshes are required.
- The next two layers are floating waterproofing and insulation with EPS boards.
At the end of the preparatory stage, reinforcement and formwork are installed. Only then can the concrete be poured. This layer will already rise above the pit, so the ends of the monolithic foundation slab must be covered with mastic or built-up glass roofing felt. Upon completion of the work, the monolithic foundation is filled with sand around the perimeter.
On wet soils, a soil water drainage system will be added to the above standard scheme. A trench with a gravel cushion (on a waterproofing lining) is made around the monolithic slab, into which a perforated pipe is laid leading to a collection well.
How to calculate a monolithic slab foundation
You can use construction techniques; they describe in detail and in a very complex way the calculation of the thickness of reinforced concrete foundation slabs. But its algorithm is quite confusing; it requires using a lot of parameters on the bearing capacity of the soil, climate, amount of precipitation, air temperature in a given region in winter, and freezing depth. Typically, specialized construction companies handle the calculations.
For a private house with one and a half to two floors, the calculation can be made according to a simplified scheme. It will be based on the bearing capacity of various types of soil, the magnitude of the optimal load and the weight of the building structure. At the time of determining the thickness of the monolithic foundation slab, you need to have on hand a building design with the calculated weight of the building.
Ground load and structure weight
The optimal pressure loads on the soil of the building (plus the weight of the monolithic foundation is included here), depending on the nature of the soil, are shown in the table below.

For example, for hard sandy loam the optimal pressure is 0.5 kg/cm2 or 500 kg/m2. If the monolithic foundation has an area of 100 m2, then for this type of soil a building weighing 50 tons can be installed.
Typically, for an aerated concrete building 10x10 m, the actual weight is 28-30 tons. The difference between the received and the real one is 50-32 = 22 tons - this is the weight of the monolithic foundation that needs to be poured in order to bring the load on the soil to optimal meaning.
It is not recommended to load more, since sandy loam is not the best option for building a house. It is also impossible to do less, otherwise the monolithic foundation will lose adhesion to the base (soil).
Thickness of monolithic reinforced slab
If the mass and area of the monolith are known, then you can easily calculate the thickness of the slab that needs to be poured over the prepared gravel-sand bed.
The density of concrete is 2.1 tons, which means that the volume of the slab is only 11-12 m3. That is, taking into account waterproofing, the thickness of the monolith will be only 12 cm. In this example, the weakest soil and the lightest aerated concrete version of the building were chosen.
Amendments to the design of a monolithic foundation depending on operating conditions
For one-story lightweight aerated concrete and frame structures with a simple gable roof, a reinforced foundation 12 cm thick can be poured. This will be quite enough for reliable fixation on the ground.
But often the thickness of the monolith has to be increased to increase the rigidity of the monolith:
- If the building has a high windage due to the design features of the roof or individual superstructures. In this case, reinforcement ribs are added to the flat slab of calculated thickness at the base of the foundation. They are made of the same thickness as the main part of the monolithic foundation.
- On highly heaving soils, increase the number of layers of reinforcement for a monolithic foundation. This is necessary to avoid cracks when individual sections of the monolithic slab subsidence or lift.
Monolithic foundations are often used in Scandinavia, where the soil often contains large amounts of moisture and the climate is very harsh. In this case, the monolithic foundation is cast according to the Finnish scheme with insulation and tape.
A special version of a monolithic foundation
When calculating the Finnish version of a monolithic slab, an additional element is included in the structure - a concrete strip formed along the perimeter of the foundation.
It is necessary to fill the tape in order to relieve the central part of the slab, which is pressing on the insulation. The main part of the load from the weight of the building and the monolithic foundation itself is transferred to the tape. Therefore, the calculation of the load-bearing capacity of the Finnish version of the slab is carried out comprehensively. Approximately 80% is considered as MZLF, the remaining 20% is considered according to the method for a slab foundation.
This scheme was not chosen by chance. The fact is that according to the instructions, the concrete needs to be poured over a fairly thick layer of insulation - up to 20 cm, plus channels for a heating system such as a warm floor are laid. Therefore, the main load was transferred to the periphery (ribbon) of the foundation. Some experts call the Finnish version of the monolith a strip one with an additional concrete screed for the first floor floor.
The load capacity of the soil when calculating the thickness of the slab is selected as for swampy, heavily watered soils. If we take into account the powerful insulation, the monolithic foundation of a Finnish one-story house turns out to be severely underloaded, almost floating. Therefore, it would be wrong to pour communications in concrete; they need to be done remotely, in insulated boxes.
Depth of foundation and excavation of the pit
The dimensions of the preparatory layers are determined based on external factors, regardless of the thickness of the monolithic reinforced slab planned to be poured.
The layout of the bookmark is approximately the same in all cases. But sometimes you have to take additional measures. For example, for an ordinary one-and-a-half-story private house, the monolith can be poured without an intermediate leveling screed, called concrete preparation. Whereas for taller buildings, leveling the surface with concrete under a monolithic slab is a prerequisite.
Mandatory elements are waterproofing and insulation. The insulating layer should be 30 cm above the maximum water level in the soil. The thickness of the insulation for middle latitudes does not exceed 75 mm, but it can be made less if the soil mostly consists of coarse sand.
Preparation is always made from a depth of 90-100 cm for submerged slab foundations and 60-70 cm for cases where the slab is planned to be poured on the surface of a dirt site.

How to dig a pit for a monolithic foundation
To make a monolithic foundation, first of all you need to dig control holes (holes). It is worth making sure that there is no groundwater outlet in this area or accurately determining its location before starting work.
If there is a suspicion of the existence of an underground spring (stream), then you need to find it, open it, make a drain for water, lay drainage pipes and equip a well for collection. In this way, it is possible to reduce the water level in the ground, which means that machinery can be used for excavation.
You need to dig a pit no later than August, before the start of the rainy season. Most of the soil is opened with a bulldozer. In one day of operation, the machine will remove soil to a depth of 70 cm. The rest of the work (cleaning and dumping rock outside the site for the foundation) can be done manually. In addition, you will need to manually clean and level the edges, and remove the bumps at the bottom of the pit.
Preparation for backfilling
If there are a lot of stones, clay, or remains of tree roots in the soil, then it is better to cut off the top layer to a depth of at least 10 cm. Such a bottom is very difficult to compact and level. Therefore, if you need to pour a high-quality foundation, it is better to rent a mini-tractor with a soil cutter and process the bottom of the pit in a couple of hours. You can select remaining organic matter, roots, stones and debris manually. The soil is compacted using a vibrating machine.
In the process of compacting the soil surface for the cushion of the future monolithic foundation, you must not forget to check the surface level using a level. There should be no holes or humps.
Arrangement of communications
Pipes for sewer drains, always in an insulated cover, as well as a channel for water supply can be laid at the bottom, in the ground. But most often communications are placed in the sandy layer of the foundation cushion.
Sewer pipes wrapped in polypropylene foam are fixed with slats, channels for water supply are taken out beyond the sand layer and also reinforced with wooden and plastic scaffolds. The necks are brought up, closed with plugs and tied with plastic wrap. Communications can also be poured directly into the monolithic foundation slab.
Sand and gravel cushion for slab foundation
The admixture of clay in the soil at the bottom holds moisture well, so a couple of hours after compaction is completed, you need to start laying sand. It is recommended to first cover the bottom with a sheet of geotextile. The edges of the panels must overlap the sides of the pit. Geotextiles should not be used for growing seedlings, but for road work.
You will need a lot of sand. For example, for a monolithic foundation 10x10 m, even if you plan to pour a slab with a thickness of only 12 cm, the sand cushion is made at least 20-25 cm. This is at least 2.5-3 cubic meters of sand, cleared of clay and crushed stone.
The sand should be slightly damp. The material is applied in three layers, 70-100 mm each, with mandatory intermediate tamping of the surface with a vibrating machine. You also need to control the horizon and plane of the site.
The next layer is filled with gravel of a fraction of 15-25 mm. Layer thickness is approximately 100 mm. If you plan to pour a thin and wide slab for a monolithic foundation of a two-story house, then the layer is made 150-180 mm thick.
It is recommended to fill the last 20-30 mm with gravel screenings or fine crushed stone. With this material it is much easier to plan the foundation cushion according to the horizon level. The crushed stone layer is also compacted with a vibrating machine to the condition of a road cushion before laying the asphalt.
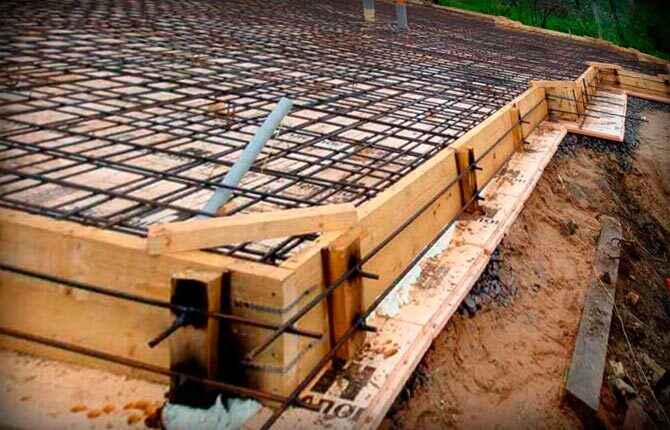
Do-it-yourself formwork and foundation waterproofing
One of the problems faced when laying a foundation is rain. It is much easier to fill a strip foundation with concrete and protect it from summer thunderstorms than a monolithic one. It is quite difficult to stretch the film over a large crushed stone cushion. In practice, this is only possible for small areas and only with a surface slab.
Therefore, all stages of preparing the cushion and installing the formwork should be done simultaneously, thereby reducing the time the cushion is idle in the open air. You can't let your preparations get caught in the rain. Even a small amount of water can fill a layer of sand and crushed stone, partially wash it away and thereby deform the sandy base.
Therefore, as soon as the work with soil compaction and sand filling is completed, the missing formwork parts are installed, the insulation is laid out and the concrete preparation proceeds.
To speed up work, you can use ready-made prefabricated formwork kits. They are installed along the contour of the foundation. With this formwork it is easier to level the pad and pour concrete. In a budget option, the circuit can be assembled from shields on wooden stakes with supports.
It is more difficult to pour a monolithic foundation into homemade formwork, especially if the slab is planned on the ground surface. The shields have to be carefully aligned and sewn together with horizontal beams. Most of the problems are with the joints at the corners.
You can install metal hook locks, but most often wooden beams are nailed to the ends of the shields, the ends of which are simply tied at the corners with soft wire. Even if you pour the concrete quickly, the wire locks will not open.
Since quite heavy concrete has to be poured, struts alone are not enough to hold the formwork walls in a vertical position. You have to prop it up with concrete blocks, hammer in steel welded triangles or additional stakes.
Installation of insulation
If you need to pour an insulated monolithic foundation, then after gravel filling it is recommended to make an intermediate layer of gravel sand: a mixture of coarse sand and crushed stone screenings with a fraction of up to 1 mm. Another layer of geotextile is laid on top.
It is not recommended to lay polystyrene foam insulation directly on clean gravel. The weight of the building plus the mass of the monolithic foundation (even if poured to a minimum) can deform (push through) the insulation layer. But the worst thing is that the sharp edges of individual stones under pressure cut relatively soft polystyrene foam like a knife.
Important!Sometimes customers save money and try to pour a reinforced slab directly over the EPS insulation. It is much stronger, but still this scheme is only suitable for monolithic foundations of one-story frame houses. You can pour an insulated floor inside the building, nothing more.
The insulation is laid out according to the scheme used when arranging the thermal insulation of the walls of a house, in two or three layers with bandaging of the seams. On the top layer, the joints will need to be sealed with tape.
Concrete preparation
The gravel-sand cushion and insulation for the monolithic foundation are almost ready. You can already pour concrete, but the following problem arises. The surface of the thermal insulation or the top layer of the pillow is far from ideal. It is possible to install supports for reinforcement cages, but then, in order to pour concrete, you need to limit the supply of the mixture to small portions so as not to topple the reinforcement.
The moment when the chute begins to pour the mixture is quite critical; a stream of concrete hits the plastic stands on which the reinforcement is hung. To damage a monolithic foundation, it is enough for at least one support under the reinforcing mesh to fall or sag.
In addition, you need to make high-quality waterproofing. There is no point in gluing it onto thermal insulation; a rigid and solid base is required, then surfacing materials such as glass roofing material can be used. Although customers often save on waterproofing and simply lay a thick polyethylene film on the concrete.
In order to properly align the reinforcement on a gravel-sand cushion (with insulation), preliminary screed or concrete preparation is done. The layer thickness is only 5 cm. That is, for a monolithic foundation 100 m2 For preparation you will need to pour only three to five cubes of concrete. For concrete preparation, relatively low-quality grades B7-B10 are used.
Advice! Before pouring the concrete preparation, the thermal insulation layer must be covered with a thick plastic film. This will improve the protection of soft polystyrene foam from horizontal shear sliding of the concrete mass of the monolith.
A day after the concrete preparation has set, a primer is applied to its surface and glass roofing material is fused.
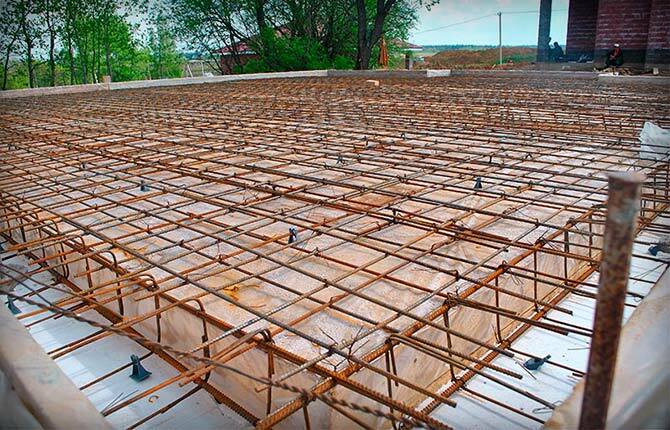
Reinforcement of slab foundation and pouring concrete
The next step is to assemble the reinforcement frame of the future monolith. If you plan to pour a monolithic foundation with a thickness of 120-150 mm, then it will be enough to lay two layers of reinforcing bars with square cells of 200-220 mm. According to the instructions, the distance from the rods to the nearest plane of the slab should be within 4-5 cm.
To reinforce monolithic foundation slabs, a 10-16 mm reinforcing rod is used. If the foundation is supposed to be poured for a frame or aerated concrete one-story house, then the AIII steel rod can be replaced with 8-10 mm fiberglass reinforcement.
On heaving soils, the upper plane of the monolith is heavily reinforced. For heavy brick buildings, two-layer reinforcement is made or the predominantly bottom layer of a monolithic foundation is strengthened.
This stage of pouring a monolithic foundation is characterized by increased labor intensity. To properly assemble a reinforcement cage, you need to be able to knit the reinforcement with wire using a special wrench. If you need to fill quickly, then it is better to invite a couple of professional builders to assemble the reinforcement. At the same time, there is an opportunity to learn and do some of the work with your own hands.
For monolithic foundation schemes with stiffeners, the frame will need to be reinforced with box-shaped assemblies made of 8 mm reinforcement. The ribs will need to be poured first; the main slab of the monolithic foundation will be filled after curing. The time difference between the two procedures should not exceed 90 minutes.
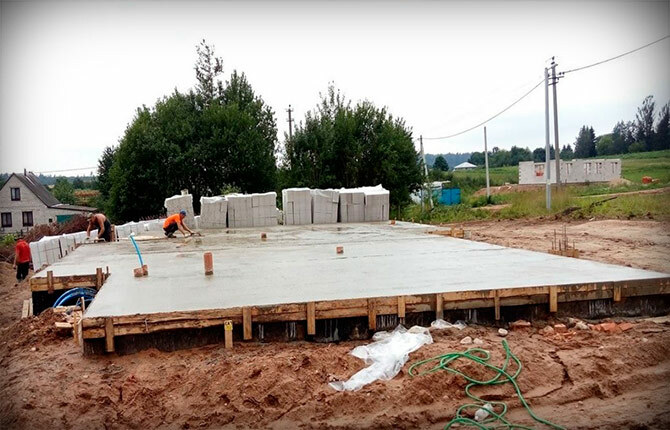
Pouring concrete mixture
It is better to fill the formwork with purchased concrete M300-350 (B22.5-B25). Manually preparing the required amount of mixture for a monolithic foundation is too time-consuming and difficult. One automixer can hold up to 3.5 cubic meters. That is, to pour a monolithic foundation, you will need two or three concrete mixers.
The main difficulty of this stage is that the monolithic foundation must be poured immediately, without interruptions in time. Although according to GOSTs and SNiPs a break between filling strips is allowed for up to 1.5 hours.
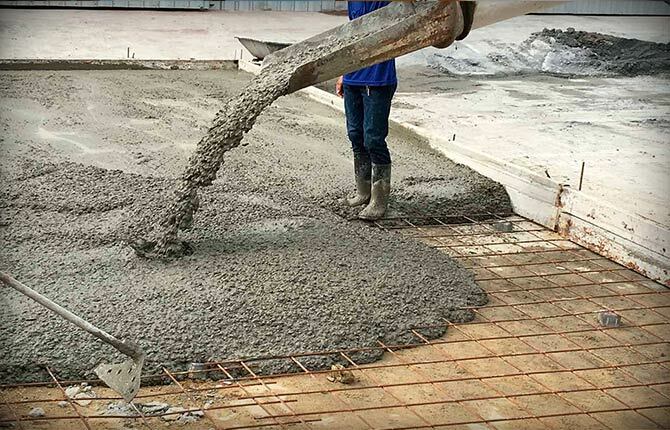
To fill the formwork you will need a team of three people:
- one worker will monitor the release of concrete and try to evenly fill the free space;
- the second is to level the concrete mass in the formwork with a shovel;
- the third is to pierce the concrete with a mold or vibrator to prevent the formation of cavities and bubbles.
When fully depleted, it is possible to fill the mold with concrete from one mixer in 4-5 hours. Therefore, a second machine must be ordered from a concrete manufacturing company with a slight time shift, at least 5 hours.
Advice!When ordering concrete, you need to especially emphasize the conditions for the delivery of concrete.
Typically, a company that sells ready-mixed concrete violates the conditions and dispenses the concrete mixture in several machines simultaneously. The consumer has to look for a way to pour concrete mixture from two machines at once, in a hurry, which always affects the quality of the monolithic foundation.
After filling the mold, the plate is covered with plastic film. Over the next 4-5 days, every morning, the film will need to be lifted and the concrete surface sprayed with water. This is necessary to avoid the formation of cracks. In general, it takes a week to pour the formwork and get the result.
A simplified version of a monolithic foundation
For private construction conditions, monolithic versions of foundations are often replaced with prefabricated monolithic ones. This design requires lower costs, is easier to assemble, and is almost as load-bearing as a monolithic one.
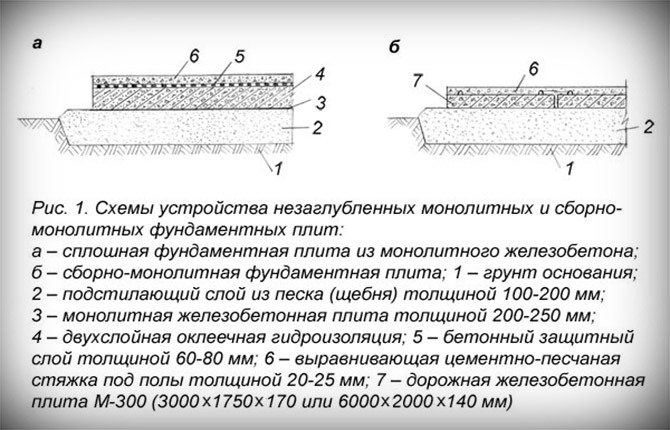
To make a prefabricated monolithic foundation with your own hands, follow the step-by-step instructions:
- For the prefabricated version of the foundation, preparing the pit and filling the cushion is carried out according to the same scheme. The main difference is that the load-bearing base is assembled from ready-made reinforced concrete road slabs M300, 3x1.75 m in size, 17 cm thick. The quality of precast slab concrete is much higher than that which was poured on site.
- After leveling and tying the slabs on top of the assembled monolithic precast foundation, you need to pour a cement-sand screed. Thickness - 5-6 cm. It can be filled with a water heating circuit for “warm floors” laid inside.
If you fill the finished floor correctly, the foundation will be quite reliable and durable.
Results
Filling a full-fledged monolithic foundation with your own hands will cost more than a strip or MZLF option. If the assembly technology is followed, the slab will last much longer than conventional tapes. At the same time, the reliability and stability of the slab base is much higher than that of the strip base.
Tell us about your experience in arranging slab foundations. What features of pouring the mixture, in your opinion, should be paid attention to first? Share the article on your social networks and bookmark it. This will help promote the site.