When discussing the question of how to solder stainless steel, we are not talking about welding. Specifically, we are interested in the issue of joining thin-sheet stainless steel with solder using a minimum set of equipment. Soldering is noticeably simpler and allows you to connect small stainless steel products with almost jeweler-like precision and seam quality.
The content of the article:
-
How to solder stainless steel with tin at home
- Features of stainless steel soldering
- Equipment used
- Tin soldering modes
- Solder for stainless steel and its types
- Food solders
- Soldering with a gas torch
- Differences between high-temperature soldering and low-temperature soldering
-
The most common mistakes
- Incorrect heating
- Attempts to use materials of unknown composition and quality
- Wrong choice of solder
- Poor preparation
- Results
How to solder stainless steel with tin at home
This connection is advantageous in that even at home, the process of soldering stainless steel can be mastered in literally half an hour. It will take several tens of man-hours to learn how to properly weld stainless steel.
Soldering stainless steel at home is not difficult if you have the appropriate equipment:
- a powerful electric soldering iron and an electric heater-stove if you plan to solder dishes made of thin stainless steel;
- gas injection torch, if you need to solder relatively simple parts with hard grades of solder with a melting point of up to 800OWITH;
- propane-oxygen torch if a high-strength connection using brass or nickel-silver solder is required.
In addition, you will need to buy the appropriate brand of solder and brand of flux. For each type of soldering, there is its own optimal version of the solder-flux pair. In addition, you need to make a soldering stand on which the parts to be connected will be heated. Usually a small block of aerated concrete or fireclay brick is used.
Important!It would seem that it makes no difference what you use to solder the stainless steel. In fact, the choice of substrate or stand for soldering parts affects the quality of the connection. If you try to solder on a sheet of metal, you will not be able to heat the stainless steel to the required temperature.
Another rule: You only need to solder stainless steel under the hood; you can use a garage, workshop or balcony, but not inside the apartment.
Features of stainless steel soldering
To properly solder stainless steel, you need to consider the following.
- The composition of stainless steel is much more complex than ordinary carbon steel. Stainless steel should not be overheated or heated for a long time. Soldering must be done quickly, and it is advisable to avoid prolonged exposure to a high-temperature flame on a small area of the surface.
- Stainless steel has a high coefficient of thermal expansion and relatively low thermal conductivity. If you solder metal with strong overheating, the soldering area will certainly become covered with microcracks. That is, you can successfully solder two stainless steel tubes, but then during testing or under load one of them will burst, and not at the soldered seam.
In order to obtain high quality soldering, you need to adhere to several basic rules:
- Stainless steel must be cleaned mechanically using sandpaper, a brush, or abrasive treatment (often sandblasting) to remove the layer of oxides on the surface. Moreover, this must be done immediately before soldering the metal.
- Stainless steel must be heated quickly and strongly to the melting point of the solder. Flux should be applied to a surface heated to 90% of operating temperature, or used in conjunction with solder. When applied together, the flux is carried out in the form of coating a solder rod or embedded inside it.
- For strong high-temperature solders, it is advisable to first treat the hot surface of the stainless steel with flux. So that the chemically active reagent has time to deeply etch the surface of the stainless steel, remove deposits from the gas flame, and only then solder the parts.
Typically, sequential processing is preferred for soldering stainless steel with a high content of chromium and nickel. It is difficult to make a connection with tin, but you can use brass and nickel-copper P-81. Although on sale you can buy ready-made rods coated with flux BRASS FLAME 18 XFG, which can be used to solder stainless steel at 870OWITH.
The soldering process itself comes down to correctly spreading the melt with solder over the hot surface so that it evenly fills the joint. At this time, you have to heat the stainless steel with a burner until the entire seam is filled with melt.
On long linear and circular seams, the soldering area is heated with periodic movements. As you know, the melt itself flows from a colder zone to a hotter one, so you can easily disperse the solder along the entire length of the seam, only by skillfully heating the joint line with a torch.
Equipment used
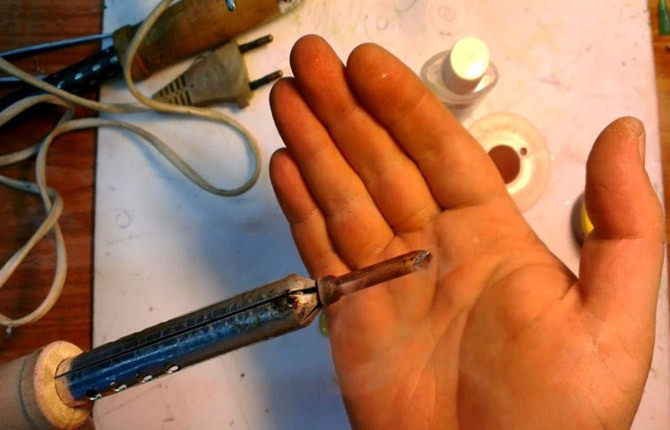
Stainless steel can be soldered with low-temperature tin-containing solders. For this, a 100 W electric soldering iron and a small electric stove are enough. The tile is used only to heat the part to the temperature of applying flux, and you can solder it with an electric soldering iron.
Often an electric stove comes in handy when you need to seal several cracks in stainless steel cookware. With its help, it is convenient to maintain the required soldering temperature without wrapping the dishes in aluminum foil.
The type of torch is selected depending on the brand of brazing solder and flux used. If you need to solder with high-strength copper-nickel or brass solders, then it is best to use a manual propane-oxygen torch like “MICRO DM 284” or similar models.
The microburner is connected to gearboxes (via a flame arrester) on propane and oxygen cylinders. This installation can be done with your own hands, even at home. It can be used to solder all high-temperature solders.
For copper-silver solders, a manual injection torch with a cartridge cylinder is sufficient.
It can be used to solder stainless steel with silver-containing hard solders with a melting point of up to 700OWITH.
Tin soldering modes
Tin based solders can be soldered using acid. The question is how to solder stainless steel with tin:
- Surface repair of cracks in thin sheet stainless steel. The metal surface is covered with tin over the entire length of the crack. Such a seam practically does not withstand mechanical load. Soldered to ensure tightness against water leakage.
- Filling joints and corner seams of box-shaped cases, trays and stainless steel boxes. Soldered to strengthen the rolling connection and ensure the tightness of the joint.
In both cases, the seam (crack) on the stainless steel is first degreased and cleaned. If the metal is thick, you can burn it with a torch. Next, the part is heated to 280OC and processed with flux.
For thin cracks on dishes, it is recommended to use an alcohol solution of rosin. If you need to solder non-food containers or boxes, you can use soldering acid. But, according to reviews, flux made from orthophosphoric acid gives higher quality on stainless steel.
Solder for stainless steel and its types
For low temperature soldering, traditional tin-containing materials can be used. There are many of them, the best quality is shown by special repair solders for sealing cracks and tinning copper.
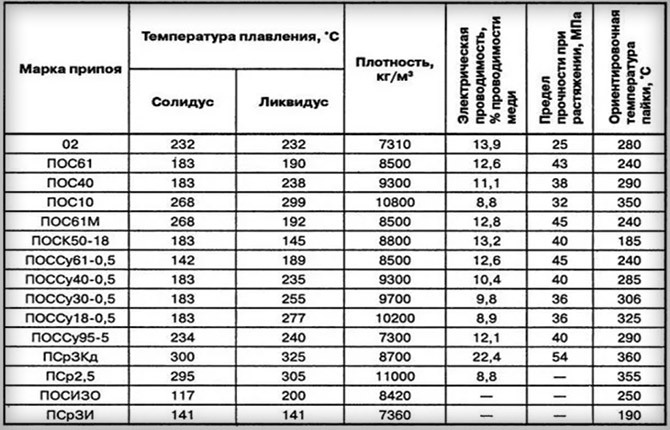
For brazing stainless steel with hard solders, the best weld is the Swiss Castolin ECO BRAZ 38230F. Silver content - up to 30%. The price can be up to $400. per pack. But the quality is very high even for beginners and soldering at home. You can solder at a temperature of 670-750OWITH.
In addition, the seam is plastic and viscous. In addition to stainless steel, they are often used to solder parts of bicycle frames and decorative cladding of vintage cars. Withstands vibrations best. As an alternative, silver-containing L-A9 can be used.
You can use brass material, Castolin 18XVG gives the strongest solder joint on stainless steel. But it is difficult to solder stainless steel with brass, even of Swiss quality. The seam requires heating up to 900OC, the soldered seam is strong, but too rigid and non-ductile. It does not hold up well against vibrations; it is used in the repair of automobiles and household appliances.
Copper-zinc-nickel solder P-81 is an order of magnitude cheaper than silver-containing grades. Soldering stainless steel is difficult; heating temperatures up to 950 are required.OWITH. The seam is very rigid, hard, and has increased corrosion resistance.
Universal PV-209 is used as a flux. You can solder with a mixture of borax and boric acid, but the quality is slightly worse.
Food solders
Among safe materials for low-temperature soldering of stainless steel utensils, we can recommend POS-1 or POSu95-5 solders. Despite the fact that bismuth is a heavy metal and has a certain toxicity, in general the weld turns out to be safe enough for boiling drinking water or cooking food in containers made from of stainless steel.
Silver-containing materials can be used for hard solders, provided that the copper content does not exceed 10%.
It is strictly forbidden to solder food-grade stainless steel with solders containing antimony and lead, regardless of their percentage in the soldering material.
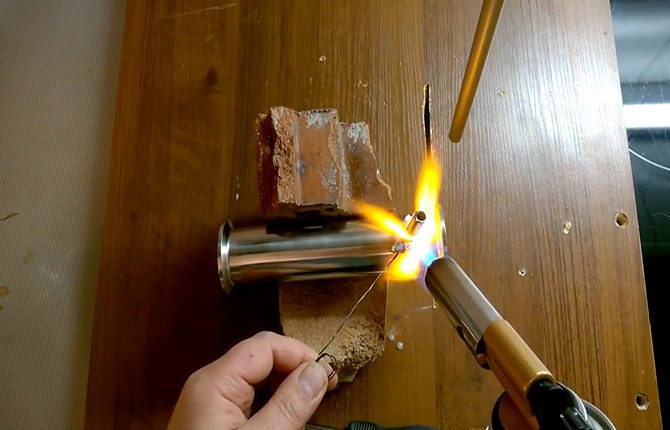
Soldering with a gas torch
There are several standard schemes for performing a soldered connection of two stainless steel parts:
- soldering two tubes;
- soldering a steel rod to a stainless steel sheet;
- soldering two sheets end to end.
The easiest option is to solder two tubes. This can be the connection of two parts of a stainless steel pipeline or the assembly by soldering of an additional pipe to the main cylindrical body.
In any case, you need to solder not at the joint, with one part settling inside the other. Therefore, the tubes are usually of different diameters; one is pressed inside the other by at least 10 mm.
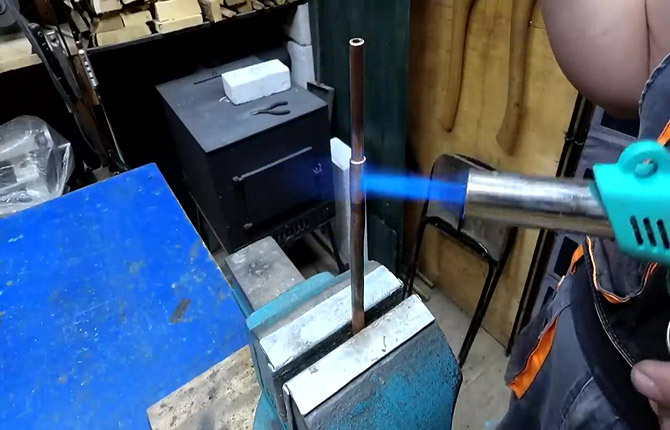
If you need to solder the side pipe to the main stainless steel body, you will first need to make a hole equal to the diameter of the outlet.
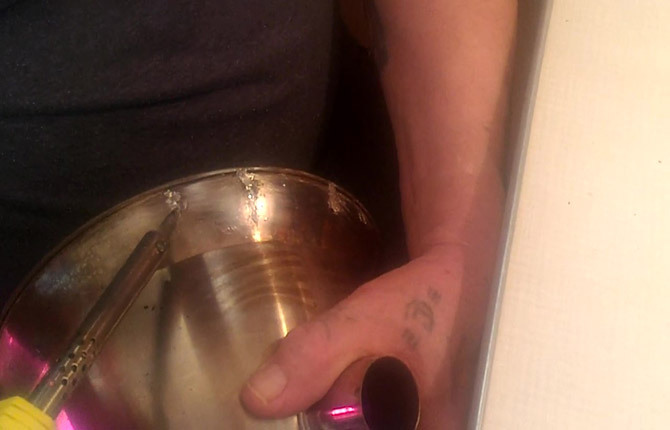
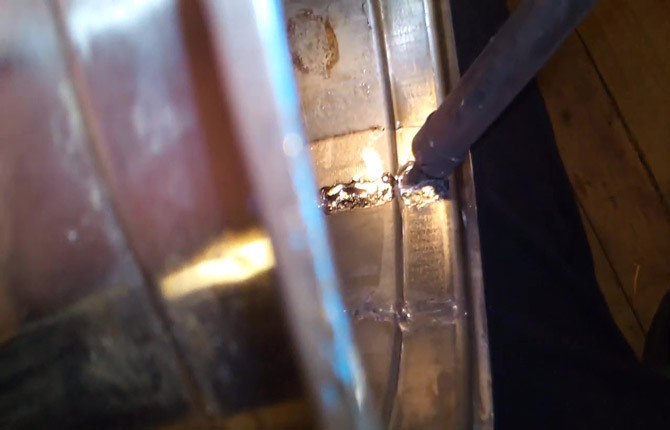
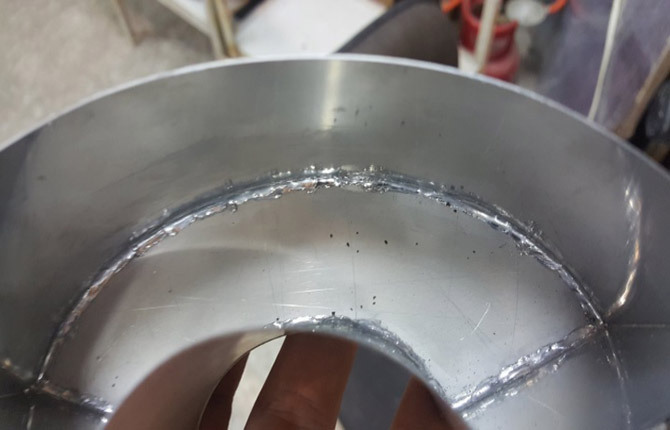
In both cases, after stripping, the stainless steel parts are assembled and heated with a gas burner flame. As soon as spots appear on the surface, treat the seam with flux and continue heating for a few more minutes. The last stage is to circle the joint with the end of a solder rod, without stopping the heating with the burner. As soon as the material completely fills the seam, the heat is removed.
Soldering two sheets of stainless steel is carried out according to the same scheme, always with preliminary firing and cleaning of the edges. Next, the sheets are laid overlapping and heated with a gas burner until tarnish appears. Now you can treat the edge with flux, heat it up and use a flux rod to stretch the melt along the entire length of the joint.
Important!High-quality solder and flux flow deep into the overlap. Inexpensive materials usually only stick to the outer joint due to poor fluidity.
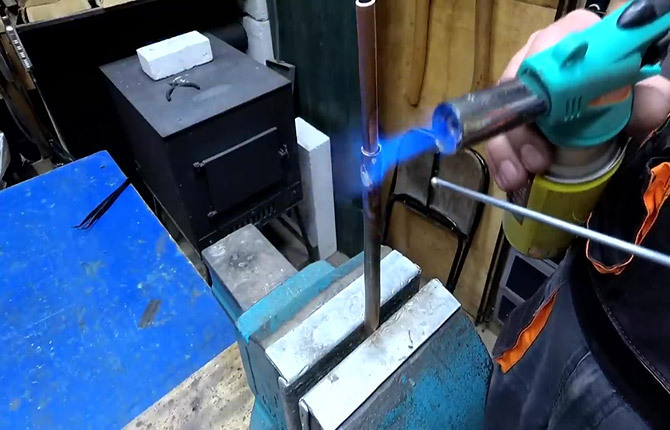
It is a little more difficult to solder a stainless steel rod perpendicular to a sheet of metal. First of all, you need to clean both parts along the mating surfaces.

Next, the rod is placed vertically on the sheet, immediately treated with a small amount of flux, after which both parts are heated with a burner to a high temperature. The melt should go end-to-end under the rod, but the solder is more viscous and may not get there.
Once the flux mass is completely melted, you can tin the base of the rod with solder. Moreover, you need to solder with an excess of solder material so that a melt pool is formed around it. Now you need to tear the rod off the stainless steel sheet for a second in order to tin the end and immediately return it to its place. The stainless steel parts are heated with a burner for a few more seconds and the heating is turned off.
After cooling, a very strong brass solder joint is formed.
The strength of the seam is obtained at the welding level.
Differences between high-temperature soldering and low-temperature soldering
Soldering stainless steel with a torch is quite expensive, since high-quality silver-based solders are several times more expensive than semiautomatic carbon dioxide or argon welding. Soldering with brass or copper-nickel P-81 at home is quite difficult, since it requires a special oxygen-propane torch and some experience in handling it.
But high-temperature soldering has two important advantages:
- you can solder very thin, almost jewelry parts, repair and restore equipment without loss of quality;
- the seam from solid silver or brass solder is continuous, sealed, without pores or cavities.
Therefore, when repairing equipment, craftsmen often prefer to solder stainless steel, especially thin-sheet steel, rather than use welding.
Low temperature soldering does not provide high joint strength. But usually the strength of the joint soldered with tin PIC is sufficient to ensure the tightness and rigidity of the part. In addition, soldering with tin is much easier; no special burners or expensive solders are required.
The most common mistakes
Most often, problems arise due to a violation of solder connection technology. There are quite a few reasons, and the most common are haste in work and an attempt to save on materials.
Incorrect heating
The most common mistake is trying to solder on still cold workpieces. The injection burner heats quickly and efficiently; the joint to be soldered can be heated in a few minutes.
But if work is carried out in an unheated room at low temperatures, then the workpiece, for example a stainless steel sheet, cools down very quickly. Therefore, you need to solder with an assistant or additionally heat the workpiece with a blowtorch or electric stove.
Attempts to use materials of unknown composition and quality
Silver-containing solder alloys are very expensive - from 30 thousand. rub. and higher. But sometimes there is simply no alternative if high quality solder seams are required.
Only craftsmen with extensive experience can successfully solder brass with borax or old solders of unknown composition. In addition, you will need a working oxygen burner. If there is already a need to make a soldered joint with brass, then it is advisable to at least rent a microtorch for a couple of days, and use PV-209 instead of borax.
Wrong choice of solder
Before soldering with a certain solder, you must make sure (read the instructions on the package) that this material is uniquely suitable for stainless steel due to its characteristics. Many people do not know, for example, that copper-phosphorus is not suitable for stainless steel.
A mistake is often made when silver solder is used to connect parts that are subject to large static loads and vibrations at the same time. Silver-containing alloys are very soft and ductile, so the joint “stretches” over time under load until it breaks.
In such a situation, it is recommended to perform double soldering. Initially with silver, then immediately with copper-nickel-zinc solder. Double soldering is more difficult, but if you master it, you can solder stainless steel 0.1 mm thick with a strength that is not inferior to a welded joint. In this case, the tightness of the joint will be an order of magnitude higher.
Poor preparation
Many problems are caused by poor surface cleaning. You need to clean it for a very long time and efficiently, perhaps pre-burning it. On stainless steel, oxides and surface carbides adhere very firmly, so the metal is cleaned with abrasive and metal brushes until shiny (do not polish).
Results
Choosing what to solder stainless steel with is not so difficult; there are quite a lot of all kinds of solders based on silver and brass on the market. The choice is large, but the strength of the connection depends 90% on the quality of the materials. Therefore, it is not worth saving.
Tell us about your soldering experience. What process features should you pay special attention to? Also bookmark the article and share it on social networks.