If you have no experience, choosing a way to solder an LED strip is quite difficult. It seems that one wrong move with a hot tip, and the lamp will go to the trash can. To master the technique of connecting LED strips, you only need one condition - do not be afraid to try and experiment.
The content of the article:
- Why is it necessary to connect LED strips?
- Connection methods: soldering and connector
-
Pros and cons of different connections
- Connection with connectors
- Solder connection
-
Instructions for connecting LED strip by soldering
- Connection with wires
- Connecting tape with a soldering iron without wires
- No suitable soldering iron or flux
- Connecting LED strips with plastic connectors
- Results
Why is it necessary to connect LED strips?
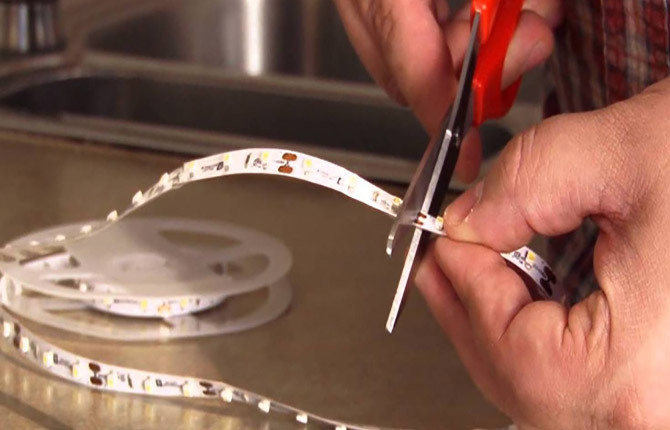
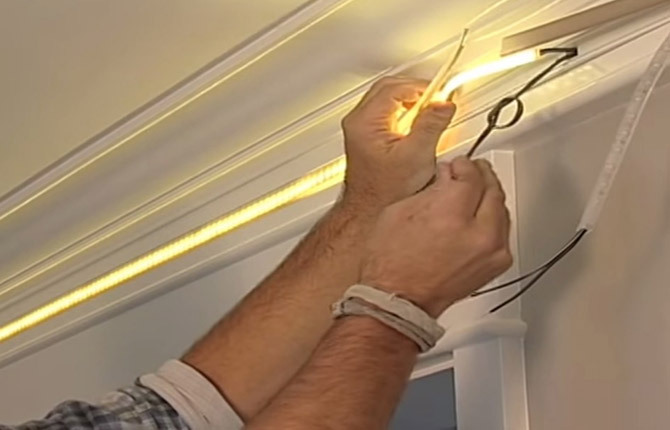
All reasons are related to the installation, connection or repair of strip lights. You have to solder when adjusting the length. For example, you need to cut the lamp to size and solder it to the board contacts or turn it at a right angle. In this case, the strip should be aligned, without curves or loops.
Sometimes the LED strip has to be repaired and small areas soldered. There is no point in throwing away the entire LED strip. The lamp can still work. It even happens that you have to solder contacts on an LED strip due to improper cutting. It is easier to repair a completely new LED lamp than an old one.
Connection methods: soldering and connector
There are several main types of splicing LED strip lights. It all depends on the equipment of your home workshop and soldering skills. If you have the opportunity to choose, then it is advisable to use the one that you are more used to or that works better.
For beginners, we recommend two soldering methods and one option for connecting the LED strip using special chips - connectors. If you need to do it quickly, it is better to splice with connectors. This is usually done when installing a large number of LED strips in several levels. A break, defect or incorrectly cut piece is not yet a reason to stop work.
Once the installation of the LED strips is completed, you can return to the connectors and, if desired, replace them with a solder connection.
At home they usually solder:
- when splicing tapes;
- when turning the LED strip light at an acute angle;
- When connecting to the regulator unit, you have to solder the wires to the contact strips of the lamp.
There is nothing difficult, but a little preliminary practice is still required. The main problem is to feel how solder and rosin behave, to understand within how long does it take for solder to harden, how to handle a soldering iron so that it is not cold, but also not overheated. You cannot solder with an underheated tip; there is a risk of melting the substrate if you keep it at the contact site for too long. It should not be overheated either - copper and solder may oxidize.
Pros and cons of different connections
Anyone who has even a little experience working with electronics or electrical engineering knows that soldering contacts is much more difficult than connecting mechanically. At the same time, the quality of contact, especially on a soft LED strip, will be high, which will more than compensate for the effort, financial costs and lost time. But both methods have pros and cons; it is better to find out about them in advance, before starting work.
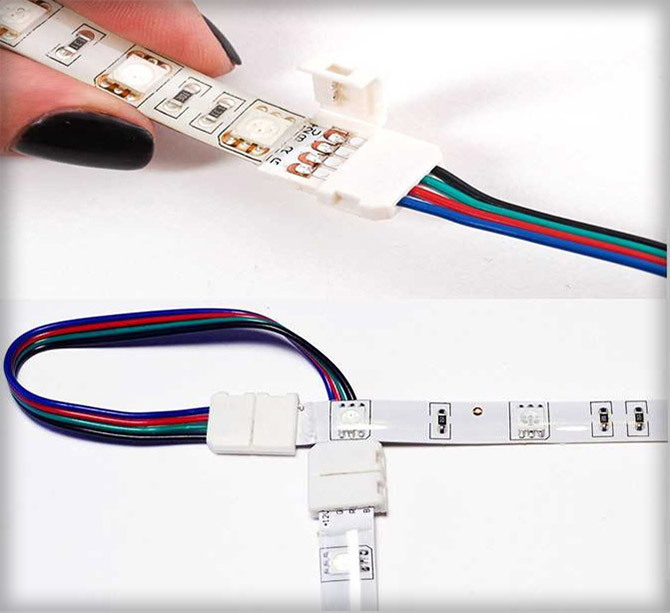
Connection with connectors
The main advantage is the simple docking technology, which does not require any additional equipment other than the connectors themselves. In addition, even a child can install the connector. You only need to show once how to install the connection correctly.
At first glance, this is not a very important advantage, but it is not so. If you need to solder not just one or two joints on an LED strip, but a couple of dozen.
For example, when assembling apartment ceiling lighting. Plus, you need to take into account that most of the strips have to be repaired or spliced on site, in a very uncomfortable position, doing the work with outstretched arms. The work is not easy. It is clear that soldering in such conditions, and with high quality, is quite difficult even for a professional installer.
Therefore, connectors were invented that significantly simplify the process of assembling LED lamps.
Another plus is that with the help of connectors it is quite easy to check individual sections of the LED strip when purchasing or before installation. No one will solder strips just to test the lamp. There are no traces left on the contacts from the installation of the connector.
There are two big disadvantages to using the connector this way:
- The connection turns out to be less reliable; if the LED strip is pulled strongly, the contact may disappear;
- The quality of splicing directly depends on the quality of the connectors. You can buy cheaper chips, but after assembly you often have to look for a place where the contact periodically disappears.
But this does not mean that connectors cannot be used at home. If you work carefully, the connection will be quite reliable.
Solder connection
Most hobbyists who know how to properly solder thin conductors always choose soldering. The skills acquired are like riding a bicycle. It's worth learning once, and you'll remember it for a very long time. But the main disadvantage of solder joints is that the quality greatly depends on the qualifications of the worker and his endurance. You can successfully solder one or two joints, but defects will appear on the twentieth.
Advantages of soldering:
- High quality contact. If soldered correctly, the connection point will remain that way for another 50 years, unlike connectors in which the contact often disappears due to crumbling plastic or deformation of the spring contacts.
- High connection strength. Soldering an LED strip with POS solder can withstand a load of 16-20 kg; the LED strip itself is not able to resist such a force. That is, you can install without any fear that the connection will come apart or be torn.
- Mastering the skill of soldering thin LED strips can be useful when repairing LED lamps. The soldering procedure is no different.
Oddly enough, but, according to reviews, most users prefer to solder tapes due to purely psychological factors. Soldering somehow looks more familiar and reliable.
Instructions for connecting LED strip by soldering
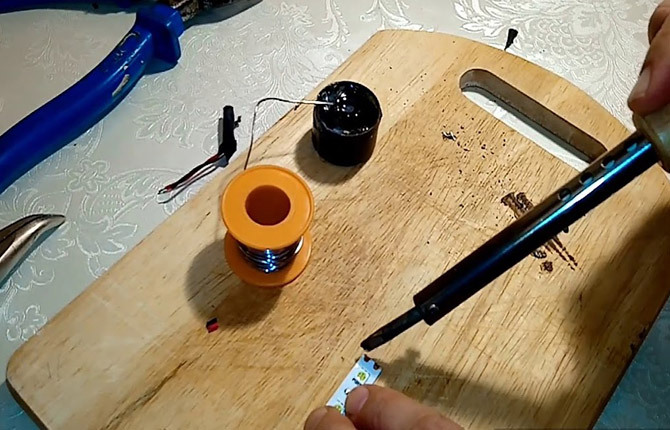
The most important part of the process is not even the soldering itself, but the preparation for it. You need to choose the right soldering iron. It is not necessary to have a soldering station; you can solder with a regular 40 W soldering iron. Moreover, the tool is universal, suitable for soldering wires and splicing LED strips.
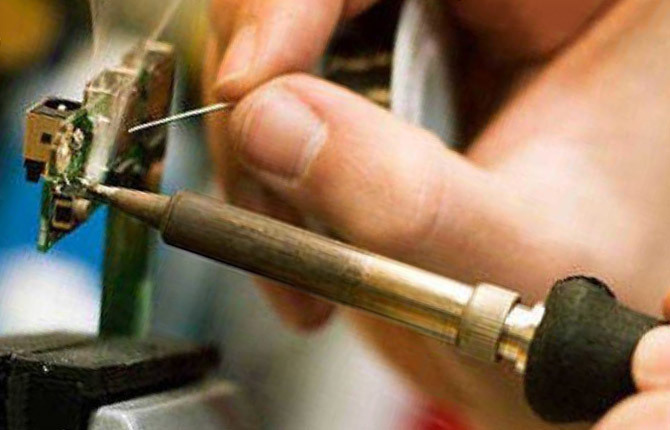
Now the solder, in theory, can be soldered with any PIC with a low melting point. Thin soldering wire for radio installation is best suited. It is sold in bundles of 80-120 cm. One skein is enough to solder all the electronics in the house for 5 years.
Some craftsmen use alcohol-rosin flux or pure rosin. Since you will have to solder quite large contacts on the LED strip, their surface will need to be cleaned. It is better not to use soldering acid based on hodgepodge and zinc. Ferrous metals are soldered with it.
For LED strip, you can use phosphoric acid. It is not so strong and non-toxic, it cleans oxides well on any metal.
Connection with wires
First you need to prepare the wires themselves, strip the insulation. You can solder a stranded copper wire to the LED strip. The thickness of the cores should be no more than 0.05 mm, otherwise the wire may simply break the copper layer of the contact track.
According to the instructions, the soldering process looks like this: first you need to heat up the soldering iron. Next, dip a stick (you can use a match with a rolled piece of cotton wool) into the acid and lightly touch the surface of the wires and two contacts on the LED strip.
Now you need to tin the end of one of the wires, immediately place it on the contact of the LED strip and lightly move the soldering iron tip. Do not press or heat. The solder will instantly transfer to the soldering area.
Using a similar technique, you need to solder the end of the second wire. Now you need to wash off the remaining flux with cotton wool and alcohol. This must be done, otherwise the acid will close the contacts.
It is clear that the solder droplets at the soldering site must be of a minimum size. Otherwise, there is a risk of simply accidentally shorting both contacts on the LED strip. In this case, it will be almost impossible to divide one tin blot into two. To avoid short circuits, you need to add a minimum amount of solder. It is enough just to touch the wire with solder with a hot tip, and that’s it, you can solder.
In addition, the movement itself when soldering is important. To avoid shorting the contacts on the LED strip, you need to solder in one motion. The tip is brought in from above, touches the contact and is immediately retracted to the side. With this soldering method, the risk of melting the plastic film of the lamp is minimal.
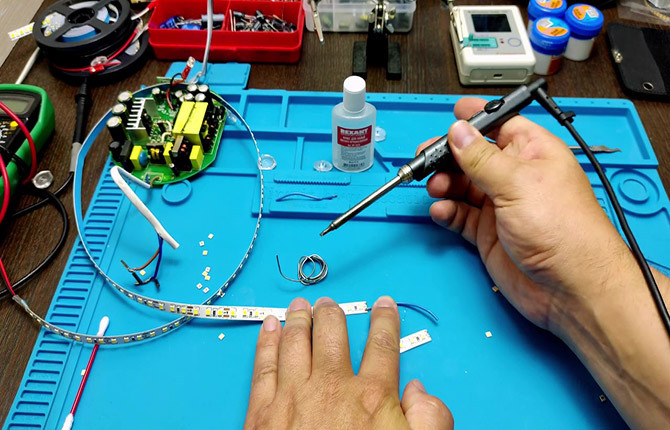
Connecting tape with a soldering iron without wires
The most common option for soldering an LED strip light. If you look closely at it, you can see that the strip consists of separate segments with 3 LEDs on each.
One of the problems with such lamps is the burnout of the spot LED. Because of this, a non-working area appears on the tape. It can be removed by simply cutting it out of the strip with wire cutters.
The remaining two parts can be connected into one, and soldering two pieces of tape is even easier than soldering wires. The brightness of the LED lamp will remain virtually unchanged.
First of all, you need to choose a way to fix the two parts of the LED strip on the work surface. If you need to add a small fragment 4-10 cm long to the main tape, then both parts can be pressed with the fingers of one hand, and the other hand can be used with a soldering iron. But such situations are extremely rare; usually you have to connect two full-size LED strips of 4-5 m each.
It is best to use a soldering holder or microscope stage. It is especially convenient to solder small parts on a special watch stand equipped with a removable magnifying glass.
But most hobbyists do not have such equipment in their home workshop. Therefore, one tape is laid on a flat base - a sheet of fiberboard or plywood and pressed down with a stack of books or any other heavy weight. You can take the second part of the LED strip with your fingers, attach it to the first and solder it.
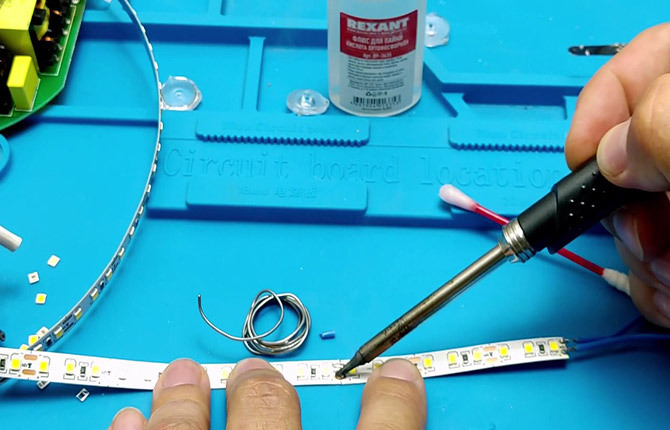
The sequence of actions is the same as when working with wires. It is necessary to strictly follow the movement pattern - briefly touch the contact and move the soldering iron tip away from the soldering site. Be sure to monitor the amount of molten solder on the tip. If there is too much of it, it is better to remove some of it from the sting with a sharp knife. It's quite easy to short-circuit an LED strip, so it's better not to take risks.
Important!During soldering, under no circumstances should you press or press for a long time with a hot tip onto the soldered contacts. There is a risk of burning through the substrate.
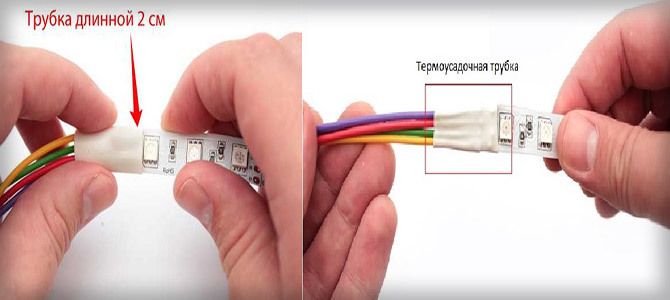
After joining, you need to remember to glue the joint on the back of the tape with a piece of tape, you can even use colored tape. The adhesive tape takes on the main mechanical tensile load, so the risk of breaking the soldering area is noticeably reduced.
No suitable soldering iron or flux
Often the house simply does not have a soldering iron suitable for its power. You can, of course, buy a new 30-40 W model, especially since there is always something to solder at home. But only the simplest option (not a soldering station). They are, as a rule, more reliable than branded ones, and it is more convenient to solder with them.
Almost everyone in their home workshop has an old, perhaps still Soviet, soldering iron with a power of 60-100 W. Soldering an LED strip directly with such a powerful tool would be a mistake. Therefore, it needs to be improved for soldering.
You will need a piece of thick copper wire with a diameter of 2.5-3 mm and a length of 10-12 cm. All you need is to wind the wire tightly around the tip of a 100-watt soldering iron (5-6 turns are enough), sharpen the end with a file and you can solder.
It’s unlikely for microcircuits, but you can solder two parts of an LED strip no worse than with a low-power soldering iron. Just don’t forget to preheat it, dip it in flux and tin it with solder. So that the copper surface does not oxidize before the repair begins, otherwise it will be impossible to solder.
If you don’t have orthophosphoric acid, you can try soldering with tubular POS radio solder, it has flux (of good quality) pressed inside the tube. You can also solder with an alcohol solution of rosin with the addition of aspirin.
Connecting LED strips with plastic connectors
This type of device was specially designed for connecting strip lights. By design, connectors are of three types:
- intermediate: for joining two LED strips of the same type;
- terminal: for connecting two wires to the lamp;
- splitter
The latter option is used only in specialized lighting equipment, so the chances of having to use it are extremely low. Most often you have to use connectors with wires to splice LED strips.
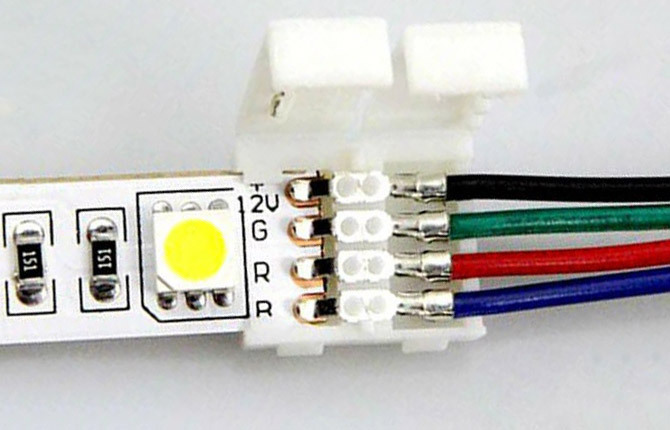
The intermediate type of connector is a small box with a folding side panel. Inside there are two copper (tinned or nickel plated) strips. There are a pair of contacts on each side. Their shape is made with a slight bend to provide spring force.
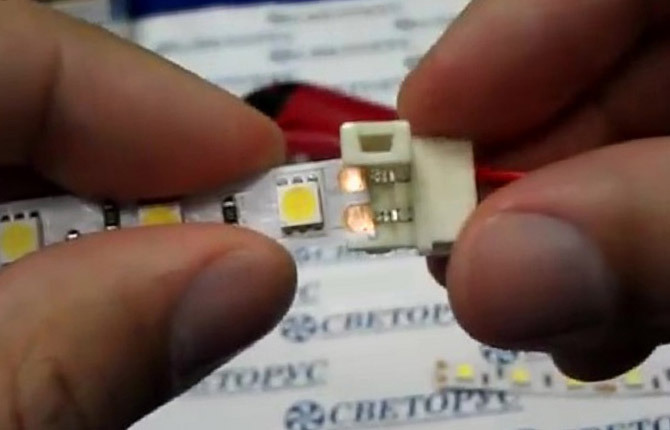
To connect two pieces of LED strips, you need to open the side of the connector, insert it tightly inside so that the spring-loaded contacts tightly touch the two copper pads on the edge of the strip. A similar procedure is carried out with the second tape. After this, you need to close the side of the connector until you hear a characteristic click. It was the lock on the body that worked.
The terminal connector is installed in the same way.
If the lamp is self-adhesive “on the back,” then some craftsmen remove part of the protective film at the end so that the edge is additionally fixed inside the connector due to the adhesive layer.
It is believed that such a connection is reusable. That is, there is no soldering inside the connector, therefore, if necessary, the joint can be disassembled and used an unlimited number of times. In fact, only the new connector holds more or less well. The plastic retainer and spring-loaded contacts lose their elasticity and often break when trying to use the connector for the third or fourth time.
When installing LED strips, connectors are used as consumables, so if this kind of lighting is planned in the house, it is better to have a couple of dozen in stock. Moreover, plastic parts easily break during installation, and in addition, a certain amount will be required for repairs.
Results
You can understand how to solder an LED strip in just a couple of workouts using a small piece of material. If you don’t want to bother with a soldering iron and solder, then you can use more practical connectors, but only of proven quality.
Tell us about your experience connecting LED strips. Which method do you think is more profitable: soldering or using connectors? Also share the article on social networks and save it to bookmarks.


