It takes ~ 4 minutes to read
Ventilation in the kitchen with an extractor fan is quite simple, but at the same time a necessary thing. This is the most effective way to “refresh” the air in a room. Without such a system, smells enter other living rooms, creating an uncomfortable atmosphere in the apartment. For a kitchen with a gas stove, an extractor fan is a must. It helps to collect fat on yourself, preventing its appearance on walls, furniture, appliances.

Why do you need ventilation in the kitchen
The main function is to maintain a normal air composition. Other devices cannot do it: humidifiers, air purifiers, etc. During operation, the air in the room undergoes changes:
- increasing the concentration of harmful substances that are released by decoration, furniture and any other items;
- as a result of gas exchange in the lungs of a person, carbon dioxide accumulates in the room, and the percentage of oxygen decreases (the same thing happens when the burners burn);
- heating devices also affect the quality of the air;
- microscopic pile from textile and wool products, particles of the epithelium of domestic animals constantly fly in the air, which is harmful to health;
- condensation.
These air changes do not mean that you should refuse to find pets, fabrics, etc. in the house. A negative effect is created only at a critical excess of the concentration of harmful substances. Therefore, it is important to create an outflow of dirty and an influx of clean air. This is the function of the duct in the kitchen.
Standards and requirements for kitchen exhaust systems and installation
For exhaust systems, as well as for any other equipment, installation requirements and technical specifications are presented:
- Matching the dimensions of the exhaust system and the gas stove underneath for maximum odor removal efficiency.
- Install the hood at least 50-60 cm from the stove. This is done for the convenience of work. In addition, if the hood is lowered too low, there is a high probability of ignition of fat accumulated on it.
- The hood performance should replace air at least 10 times per hour. To calculate how much the exhaust system should recycle, you need to consider the area and height of the ceilings in the kitchen. Calculated by the formula: V = S * h * 10 * 1.3, where S and h are the area and height of the room, respectively, 12 is the minimum air treatment rate in 60 minutes, 1.3 is the correction factor.
- If there is no vetanal in the kitchen, then it is better to mount the hood already with the ability to adjust performance, recirculation. If you connect a flow hood to natural ventilation, this will lead to disruption of the latter. Also, do not turn on such devices for a long time.
- Masters must clearly follow the instructions in the equipment passport.
- The hood is level.
- Turns at an obtuse angle are unacceptable, there should be as few turns as possible.
- If the length of the route exceeds 300 cm, then a second exhaust fan is required.
- No need to choose equipment with high power, there is a lot of noise from it, and it is not intended for residential premises.

How to make a hood in the kitchen
Make ventilation in the kitchen in the apartment is not difficult. The installation process is not complicated, but requires some knowledge. For example, in a kitchen, the size of the air vent differs from that in the bathroom. A huge role in the proper functioning of the system will play properly selected equipment.
Preparatory work for installing the hood in the kitchen
In order for the hood to work correctly and reliably, a tap is made outward. To do this, lay the smallest exhaust duct in the kitchen. Ideal option: round section and no more than two turns. To prevent leakage and freezing, check valves must be installed. Before mounting directly, you should obtain information about the dimensions and location of the exhaust system.
Location and dimensions of equipment
When placing a ventilation system in the kitchen, the position of the stove and the area of the room are taken into account. It is good if the room has high ceilings. Even very simple equipment will not harm the interior. Depending on the configuration, the following types of hoods are distinguished:
- Corner When choosing this type of hood, a person has the opportunity to save space and make the cooking surface more accessible, which is important for small kitchens.
- Wall mounted. One side of the dome is adjacent to the wall, and the other is located above the hob.
- Island. Happy owners of spacious kitchens can afford to install an island-type structure. Then the hood will be placed in the middle of the room - where the entire working surface in the kitchen islands is located.
The forms of the hoods also differ (inclined, flat).
Ventilation with a gas stove in the kitchen should work together. Accordingly, the size must be selected for the existing plate. They either coincide, or the width and length of the hood increase by about 5 cm. Too wide hood should not be chosen. Although she will do an excellent job with her function, it will become inconvenient to work in the kitchen.
The outlet is usually hidden in a (under) hanging cabinet, sometimes in a casing that masks the duct. The distance from the floor is 1.9 m.

Selection of exhaust duct materials
At the stage of selecting a suitable exhaust channel that will pass through the wall, several points must be taken into account. The first is the wall thickness, the second is the material in the wall through which the wiring will be carried out.
The best option is round galvanization. It can be used both as a channel hidden in the wall, and as a hidden duct. Any insulation is suitable for such a pipe. The insulating material must be of good quality, not leak water. One of the following materials may be preferred:
- PVC
- polypropylene;
- polyethylene;
- polyurethane.
Plastic products are convenient to install, have an affordable cost. That is why it is most often chosen as the material for the exhaust duct to the kitchen.
Creating and preparing a ventilation hole in the wall
The first step is to make a diagram on the wall. Next, holes are made to fix the tool bed. The dowel is hammered into the hole, and a stud is screwed in for fixing. The bed is fixed on the wall, final measurements are made.
Next, a drain is constructed, so that the coolant of the drilling crown flows down it. The easiest way to make a drain of aluminum foil.
Wall drilling takes place in several stages:
- First, the inner layer is destroyed, the arbolite cylinder is pulled out of the crown, so as not to interfere with further installation.
- Then the inside of the facade slab is drilled, the cylinder is again taken out.
- At the final stage, the outer tiled layer is drilled. The tool with the bed is dismantled.
Next, a check valve system is assembled. They protect the channel from the penetration of cold air from the outside. After that, the hood can be mounted on the wall.
Mounting the hood
A flat-type hood is mounted to the bottom of the hinged furniture or to the wall.
If there is an angular strip, then the hood housing is built into the hanging cabinet. It happens that installation is difficult due to a gas pipe or protrusions. In this case, sanitary studs are used, studs screwed into the wall as dowels. The hood itself is mounted at a certain distance from the wall. With proper installation, the system retains optimal traction. Turns of the channel reduce the "strength" of the equipment by 10%.
After installing the check valve, it is necessary to seal it outside the wall. Next, the insulated pipe is inserted. On the inside of the wall it is sealed, fastened with a square element on four dowels.
Duct installation
Another task is to lay the air duct to the hole. It is necessary to prepare a plastic or drywall box (easy to process). The box must hold not only its own mass, but also the mass of the air duct. To fix the frame, you need to use a dowel. Silicone sealant helps to achieve maximum tightness at the junction of the duct.
Sequencing:
- Marking the location of the elements.
- Drilling holes, fixing metal suspensions with dowels.
- Phased installation of duct elements.
- Sealing compounds.
To make the hood in the kitchen correctly, like a real professional, one should not forget about the sound insulation of the duct. This will neutralize unnecessary noise.
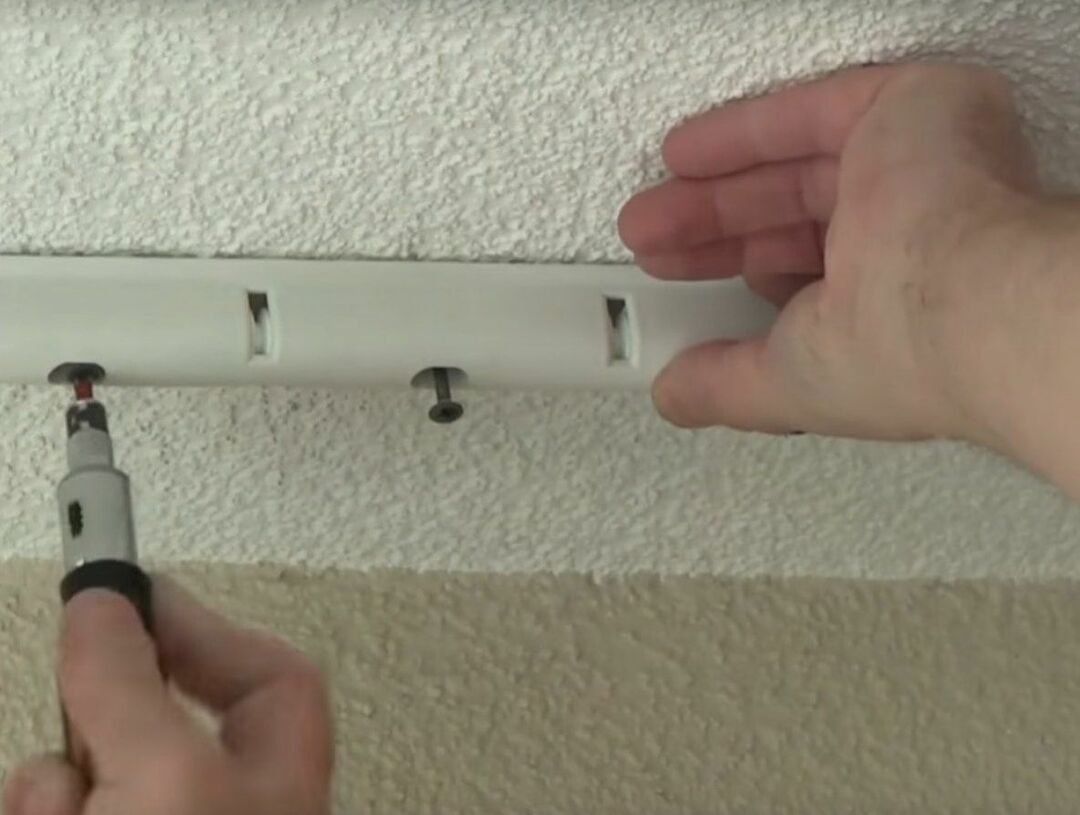
Creating a duct duct masking box
The air duct is a bulky design, so it is required close it with a box. There are several ways to do this:
- use a plastic box (characterized by rigidity and lightness, convenient installation) - place it under the ceiling or over hanging furniture;
- use a box made of drywall (it is possible to equip with lamps) - a metal-profile frame is required.
Before you disguise the duct, you need to make sure there are no leaks.
Sequencing:
- Markup execution. Mark the location of the third profile.
- Drilling holes for self-tapping screws (the easiest way is through the profile).
- Insert dowels.
- Fastening profiles to studs.
- Making a corner with perforation of metal corners of the hood.
- Joining profiles across.
- Fastening of gypsum plasterboard sheets to a metal profile frame. The outer corner of the sheet is blocked by a decorative corner.
It remains to finish the finish.
Supply valve installation
- If the apartment has ventilation in the kitchen for a long time, the supply of air masses is exhausted. Installation of a supply valve is required. It can supply air to the system in the amount of 40-60 cubic meters per hour. There are several varieties of this device: independent and additional. The first is installed on the wall, the second - on plastic window frames.
- First you need to mark the outline. Then drill a hole (with a downward slope). If it is an independent supply valve, then the diameter of the hole should be 4.5 cm. Then the sleeve is inserted.
- Valve pipe requires mandatory winding with insulating material. In this form, it is placed in a prepared hole (normally it protrudes slightly). The supply valve body is fixed on the dowels. At the final stage, filters are added to the system that protect the room from dust and other small debris.
- The force of the air inflow can be controlled using the damper.
Connecting the hood to ventilation and power
If the apartment has a ground loop and euro sockets, then the wire must be connected to the ground terminal (symbol: three strips of different lengths). In the absence of a grounded connector, you will have to do it yourself - screw the wire to the metal housing.
Also, there may be no euro sockets. In this case, the system is grounded when an electrical switchboard is connected to the blanked neutral. There is a bus with a ready-made pin, and a grounded yellow-green wire is thrown around. Additional grounding is added to this mount, the wire extends to the kitchen.
Cable cross-section (copper, stranded) - at least 2.5 mm square. A new wire is thrown on the old. The exhaust system is switched on through an automatic machine with a current of 6 A.
Tips and tricks for operating the hood in the kitchen
The system should be cleaned 2 times a year. Ventilation grills for the hood in the kitchen are removed, cleaned of burning. This helps to prevent ignition. But if there is no experience and knowledge on how to make an extract in the kitchen, it is better to invite an electrician to the apartment. Moreover, he can clearly show how to clean.
With great interest I always read your comments to my articles. If you have any questions, feel free to ask them, leave, you are welcome, Your feedback in the form below. Your opinion is very important to me. Thanks to your criticism and thanks, I can make this blog more useful and interesting.
I would be very grateful if you rate this post and share it with your friends. This is easy to do by clicking on the social media buttons above. Do not forget the article you like Add to bookmarks and subscribe to new blog posts on social networks.