It takes ~ 3 minutes to read
A relatively young trend that appears in many kitchens around the world is liquid wallpaper. An increasing number of people prefer this decoration material to the usual roll wallpaper. In this article we will talk about what liquid wallpaper is, how to apply it to a wall, as an example we’ll give photos and videos, after watching which even a beginner will cope with all the tasks.

Liquid wallpaper: what are they and what are the varieties
Liquid wallpaper is a special polygamous mixture, the filler of which can be the following shredded materials:
- cotton;
- natural silk;
- oak bark;
- mica;
- gelatin;
- dry algae.
In addition to this crumb, the mixture necessarily contains an adhesive base and various dyes. It should be remembered that liquid wallpaper can only be used for interior decoration.
Many mistakenly believe that liquid wallpaper is similar in structure and properties to decorative plaster. This opinion is fundamentally wrong, since the main ingredient of plaster is sand, which is not in liquid wallpaper, but there there may be a variety of fillers like sequins, mother of pearl, marble chips to give interesting effect. The similarity lies only in the method of applying the composition.

Liquid wallpaper is divided into several types depending on the materials used:
- Silk. The composition contains a large percentage of natural silk fiber. This finishing material can be applied to both concrete and plasterboard walls. Due to the quality of the material, such wallpapers last a long time, are not afraid of direct sunlight, but their price is rather high.
- Cotton For the manufacture of used 98% natural cotton and 2% mica. The material is very nice to the touch, looks attractive.
- Cellulose. As part of the composition, shredded wood occupies a large part, which in quality, of course, is inferior to natural silk and cotton. Hence the low cost of this type of wallpaper. However, they are perfect if the wall on which they need to be applied has microcracks. Cellulose will smooth them, damage and bumps will not be noticeable.
- Cellulose-silk. The composition is a mixture of two types of fibers, which can be understood from the name. This improved version plays the role of the golden mean, represents the optimal ratio of price and quality.
How to apply liquid wallpaper?
For work, a set of plastering masters is suitable. You will need the following tools:
- paint roller;
- plastic spatula;
- spray gun;
- trowel or grater.
Application is by roller or spray. The choice depends on the consistency of the resulting composition, as well as the surface area to be coated.
Knead Liquid Wallpaper
The main thing - do not act too quickly, do not make rash decisions. Before you quickly pour the dry mixture into water and start the kneading process, carefully read the instructions. It describes in detail the actions required from you, the necessary time, and so on. Here is a list of basic rules:
- The amount of water must strictly comply with the instructions.
- In the container for mixing, first pour water, and then dilute the dry mixture in it.
- At the first batch, only one packet of the mixture in one container can be used. The entire volume of material used should not be placed in containers immediately.
- In no case should you use for one batch part of one package. Do not even think that you can calculate the required amount of water to be poured. For you, everything has long been calculated and described in detail in the instructions.
The composition is best shrug. Do not be afraid, it is absolutely safe and will not be able to cause the slightest harm to your skin or health in general. Mixing with a mixer is acceptable, but undesirable, since it can cut long fibers in half, and this will change the properties of the mixture.
After the whole mass has been saturated with water, leave it for 6-12 hours (the exact time is indicated in the instructions) so that the wet glue reacts by bonding the fibers together.
The first stage - preparing the wall for applying the finishing material
Before applying liquid wallpaper at home, it is necessary to cover the wall with a layer of primer. This layer is required, as it is a guarantee that all the properties of liquid wallpaper will be preserved after a long time.
The methods of surface preparation depend on the material of which the wall is made:
- drywall - the entire surface should be primed in 2-3 layers, since the sealed joints can absorb more fluid;
- whitewashing - after removing whitewash, you need a high-quality primer layer;
- paint - if a layer of paint is applied professionally, then additional priming is not needed;
- Particleboard - 2-3 primers will prevent uneven water absorption;
- tree - even an expensive and high-quality tree species requires priming, since the structure of the wood massif is heterogeneous;
- concrete - primer is required in 1 layer;
- plywood - the greater the thickness of the plywood sheet, the better the liquid wallpaper will stay on it, but a primer of 2-3 layers is not excluded.
Choice of colors
According to the color scheme, the wallpaper is divided into two categories:
- Ready to use. All that needs to be done is to dilute the composition with water, stir, wait and apply the contents of the container to the wall. This method is suitable even for a beginner.
- For painting. They are made only in white, further decoration can only be done by a professional in their field. It is carried out by adding to the composition of dyes, sequins, pearl or marble chips.
An apartment can be designed even more interestingly if, with the help of liquid wallpaper and a bit of creativity, unique pictures are created on the wall. Obviously, this technology will take more time and effort than just placing the mixture, but the result will be worth it. To do this, you must first draw on the wall the landmarks of the desired pattern with a pencil. Next, you need to impose the composition in turn, moving from element to element, gently adjusting the mixture to the borders. It is important to be careful. In extreme cases, the wallpaper can be corrected within two weeks from the time the layer is applied.
Photowall-paper is no less interesting and non-standard option of registration of the room. This finishing material, however, is much more difficult to work when compared with how liquid wallpaper is applied to walls. The main condition is an absolutely flat gluing surface, in the opposite case, each crack and bend will be visible. In order to trellis as a professional, you need to plaster the wall, then coat with a primer, then apply putty. The final stage will be a special primer for the photo wallpaper, on which they already lie.
The technique of applying liquid wallpaper or how to glue a liquid wallpaper with your own hands
The technique of applying liquid wallpaper on the walls is not so complicated. Anyone can cope with this procedure if he makes the necessary efforts and patience. For greater certainty, you can arm yourself with video lessons, which are presented in large numbers on YouTube. A few important tips and tricks:
- Before applying directly to the wall, practice on any other surface. You must understand how to apply the layer evenly.
- In the process, keep the spatula at a slight angle (literally 5-10 degrees). Do not squeeze the liquid composition into the wall, on the contrary, apply it lightly, leave it airy.
- It doesn’t matter which side you start applying - at least from the very center of the wall. However, remember that with corners the hardest thing is that you need to get around them correctly.
- Do not make the layer too thin, otherwise the wall will shine through it.
- After finishing work, sprinkle a layer of water from the spray gun and once again go over it with a spatula.
- In case of a failed fragment, do not panic. Failure is easy to correct: just scrape off a piece and apply a fresh composition to its place.
Liquid Wallpaper Care
It’s easy to care for such a coating; liquid wallpaper can simply be vacuumed like a floor. Wipe the surface with a damp cloth only if you have applied a special protective varnish to the layer of the composition. This colorless varnish is made on a water basis, after spraying it creates a protective film. After its application, liquid wallpaper will no longer be afraid of liquids and dirt, but it will not become 100% water-repellent.
Conclusion
Another important detail: do not throw out the rest of the mixture after completion of work. You can leave them in a plastic bag and store for up to two weeks in a liquid state. In case of problems with the first layer, it will be easy to get the prepared paste and fix the damaged fragment. You can also dry the mixture and store it like that for an unlimited amount of time. To prepare a new composition from this powder, it remains only to add water and mix.
Summing up, we can confidently say that applying liquid wallpaper is not such a difficult technique. It is quite capable of overpowering a beginner without resorting to the help of professionals. Independent work will help you to feel even more love for your own apartment, give moments of happiness from translating a design idea into reality.
Liquid wallpaper is a non-standard solution for the design of the room, which can add coziness to the room, make it visually lighter, softer. Have a good repair!
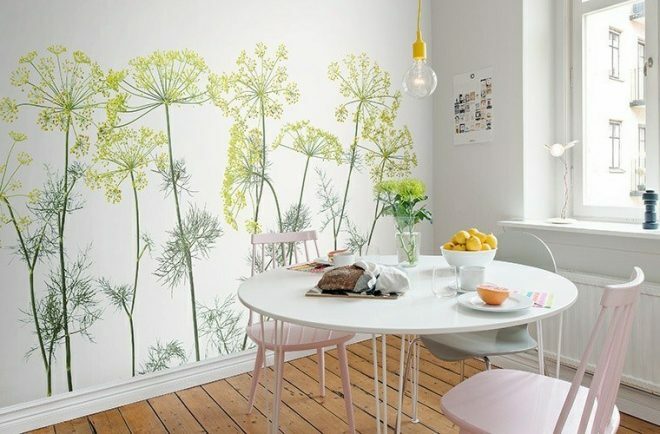
Photo: liquid wallpaper in the interior


Prev
Next
With great interest I always read your comments to my articles. If you have any questions, feel free to ask them, leave, you are welcome, Your feedback in the form below. Your opinion is very important to me. Thanks to your criticism and thanks, I can make this blog more useful and interesting.
I would be very grateful if you rate this post and share it with your friends. This is easy to do by clicking on the social media buttons above. Do not forget the article you like Add to bookmarks and subscribe to new blog posts on social networks.