 Computer - not a luxury but a vital necessity. This is not a subjective opinion and approval of the majority of inhabitants of our planet. Ease of placement of office equipment in the apartment, will allow to carry out tasks efficiently and student or student - to raise the level of knowledge. Buying a computer table impact on the family budget, and independent production will save means anyone who has the skills to work with plumbing tools and the desire to raise their product hands.
Variations and design features of computer desks
The content of the article
- Variations and design features of computer desks
- Preparation for the assembly table
- How to assemble a computer desk
Workplace for the installation of office equipment made of different materials:
- thick glass;
- veneer particleboard;
- plywood sheet;
- natural wood;
- plastic;
- laminated chipboard.

The latter type of raw materials is very popular, with respect to the other, due to the low cost, the choice of colors and the diversity of aesthetic perception.
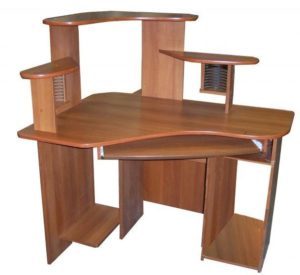
The versatility of the product is achieved by the design features of the computer desktop. They are:
- rectangular shape;
- angle;
- arbitrary shapes the working surface;
- the place under the system unit or without it;
- with floor cupboards and pull-out shelves;
- with a superstructure in the form of shelves for documents or printer.
Constituent elements of the workstation facilitate and simplify the use of office equipment. AT Depending on the user's individual requirements, are provided with additional devices and functions. These include a slide-out shelf for the keyboard, or a quick release module mounted shelves.
IMPORTANT! A distinctive feature of the workplace for the PC is the presence of a dedicated space for the monitor position, the system unit and additional office equipment!
table design can be different purpose:
- for an adult;
- for a child.
A method as location and mobility:
- stationary;
- modular;
- folding;
- portable.
Preparation for the assembly table
With self-manufacturing of frame parts in the first place makes the product outline, which shall include all design features resulting from these or other requirements. This drawing will be the basis for performing detailing if ordered miter sawing slabs in carpentry shop. The height of the products made at the level of 70-75 cm, and a shelf for the keyboard - 63-68 cm. Then determine the location of the workplace and prepare the necessary tools:
- measuring and marking tools;
- screwdriver;
- carpenter set.

ATTENTION! When choosing a location for the installation of the table take into account the availability of electricity liner to the workspace! The use of extension cords around the room is inappropriate and may lead to periodic shut down equipment during operation!
Preparation of scaffolds of chipboard accompanied by an unpleasant odor - is harmful to human, phenols without which it is impossible to manufacture laminated plates.
ATTENTION! In order to eliminate harmful smell, the end surfaces of skeletons covered with white glue in two layers! Formed after drying, the adhesive film will prevent the release of harmful substances!
When buying a serial product, unpack it, learn a complete set, then the installation manual of the product. With self-order individually or design, she is convinced of the accuracy and correctness of the executed sizes Facing details.
How to assemble a computer desk
Review the instructions of the purchase model, meeting the demands of the product manufacturer. And when the design and assembly of independent, adhere to the following order:
- Primarily, via corner fittings and clamps are collected lower supporting modules. If they are equipped with drawers, the runners bolted to the inner surface of the ducts prior to assembly.
- After assembling the floor pedestals, is attached to the tabletop slide-out shelf for keyboard and mouse.
- Then holes are drilled in longitudinal strips modules installed on the floor. If there are no such boxes or horizontal plane, then fasten the corners to fix the countertop on top of the pillars.
- Floor pedestals are aligned in azimuth, using a long level, the countertop is then moved to its original position and attached via screws.
- Collect shelves, designed to be mounted on top of the working surface. Then mounted and fixed.
- After that collect drawers slides and place them in regular places without facades.
- Completes the assembly of the table hanging on the facades open shelves.

ATTENTION! Fixing angles may be metal with open perforations for screws plastic or closed with cabinet, but the mounting frame must remain an iron, for the strength of the connection! If the upper mounting modules uncomfortable after fixing countertops, the first fixed shelves, and then, together with the working surface, to perform fasteners Cabinet base!
After completing all the work, set the monitor, system unit, additional equipment in the necessary places. Office equipment connecting to the network, are happy to use a computer desk, made with his own hands.