 Disassembling the joystick for the Xbox 360 is not difficult and can be done on its own. This procedure may be necessary if you need to carry out repairs, clean from dirt, dry spills, and also replace items that have become unusable.
What you need to disassemble the Xbox 360 controller
The content of the article
- What you need to disassemble the Xbox 360 controller
- How to disassemble the Xbox 360 joystick
To disassemble the joystick on the Xbox 360, you do not need a special tool, just a simple set of three elements:
- Phillips screwdriver
- flat screwdriver;
- Allen key or Torx 8.

REFERENCE! This set of tools is enough to complete the entire disassembly process. If suddenly there was no flat screwdriver at hand, a knife or other similar device is used instead.
How to disassemble the Xbox 360 joystick
Depending on the purpose, you can partially or completely disassemble the gamepad. Upon reaching the task, you can stop at any of the points below.
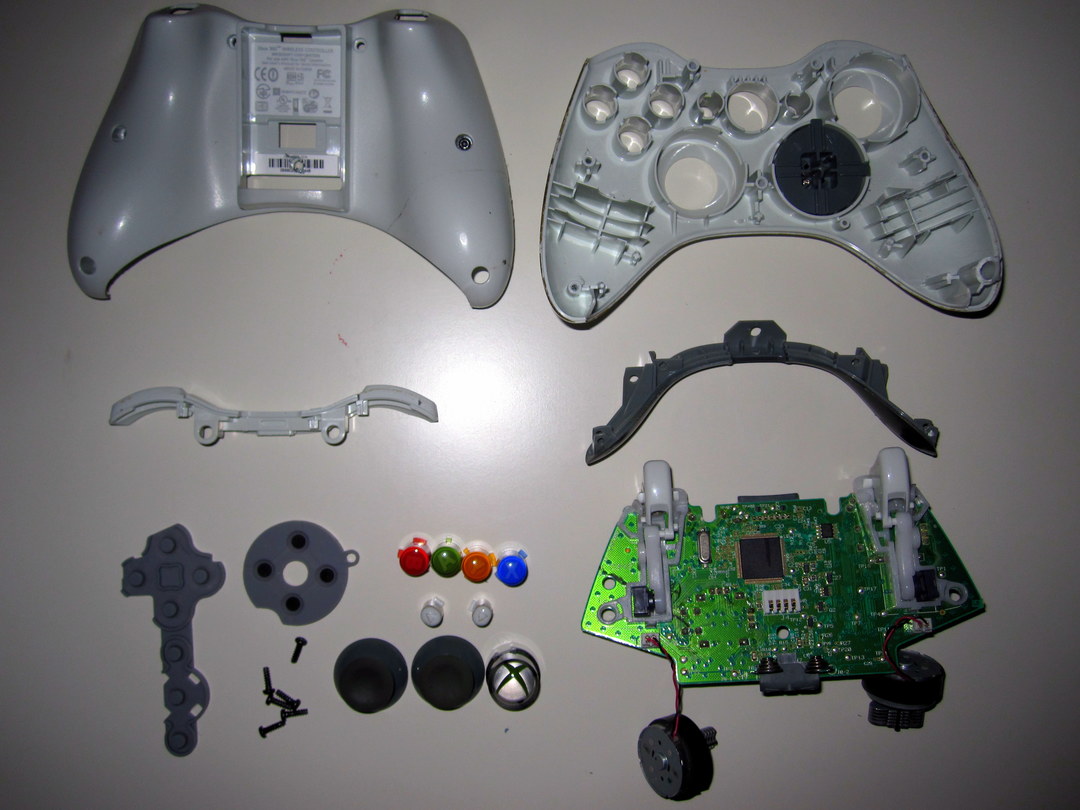
So, step-by-step disassembly of the Xbox 360 joystick is carried out as follows:
- It is necessary to remove the cover of the compartment of the power element (depending on the modification, the battery or the battery can serve as the battery element) and remove it.
- Using a hexagon wrench or Torx 8 screwdriver, unscrew the 7 screws. The last screw is hidden under the sticker. Some "craftsmen" are trying to unscrew these screws with a knife or a flat screwdriver. This cannot be done. The thread on the cap is easily damaged, and it will no longer be possible to unscrew a screw with a torn thread.

- Using a flat-blade screwdriver, lift and remove the back cover of the joystick. This procedure must be carried out extremely delicately, in order to avoid damage to the battery mounts.
- Now it's time to remove the board with the chip. To do this, carefully pick it up with a flat screwdriver on the side of the headphone jack.

ATTENTION! If the purpose of the disassembly was to clean up contaminants, you can stop at this stage. After cleaning, the joystick is assembled in the reverse order.
Now, from the mounting sockets, you can easily release the rubber bands and buttons. To remove the "cross" you need to unscrew the two screws with a Phillips screwdriver. After that, it is easily removed by hand.
In order to remove the sticks from the board, an additional tool is not required. They are removed if you just pull for them.
But to disconnect the triggers you will need an auxiliary device, namely a flat screwdriver. First you need to easily press it down from the bottom by pressing on a small recess located on the inside. Then, using the same screwdriver, carefully push apart the clamps that hold the key and remove the spring. Now the button is folded up and removed from the slot.
At this stage, the disassembly of the gamepad is completed. The assembly is carried out in the reverse order and if all the elements were disconnected carefully, there should not be any problems with it. Again, special care should be taken when installing the back cover so as not to damage the battery or battery contacts.


