Fully understand and even support the people who, if necessary, set the shell, choose the path of the economy and set to work with his hands. After all, let's be honest, the price is now called the master, to put it mildly, is not always adequate (well, if you be honest to the end, the quality of service is not always the case at the height).
You with this sink still live so live, so the reasons to do everything on the conscience of you will always have more. Fortunately, most of the washing plant - it is not so difficult as it seems, and does not require any special professional skills (with a few exceptions, which we will talk about later).
Types of shells and their attachment options
The content of the article
- Types of shells and their attachment options
- How to strengthen the sink mortise
- Fixing cleaning bill
- How do I attach underbench sink
First wash are separated by their form. She may be:
- square - the most popular of them, such as the shell is most conveniently built into the countertop, especially if they are with rounded corners, as they are easier to wash;
- circular - it is more compact and takes up little space, so it can be used angularly embodiment;
- rectangular - one more in demand among buyers form, on the countertop with a sink you can install additional wings;
- corner - more expensive car wash than the previous, which is compensated by its compact design, which is even higher than that of the circular.
Whatever form you choose, each of them can be invoice or mortise underbench. It is, as you already understood, installation options. Let us examine them in more detail.
Consignment note shall be to separate from the cabinet countertop. This is the easiest way of fixing, however, has the disadvantage of a gap between the pedestal and the desk at which water can flow.
Flush, as the name implies, it is built into the countertop. It looks more aesthetic of the previous version, and in general it is more convenient, but require more effort and installation time.
Underbench - the most difficult to install a sink, but the result is worth it: a huge saving of space and a modern look. It's great she looks in interior style "high tech."
Well, in general representation received, it is time to get down to business.
How to strengthen the sink mortise
Pre-cut hole in a table using jigsaw. To most modern mortise sinks attached template, on which is convenient to carry the dimensions on the table. If you are "lucky" to which the template is not inherited, it is necessary to arm with a pencil and trace the sink, putting it on the table. The dimensions of the holes made in the 12-14 mm smaller than the size of washing, because of its rear side, there are special "ears" to mount.
Attention! Installation of a mixer of supply water hose and a siphon done before installing the sink, not after!
It is attached with special clips or adhesive-sealant. I recommend to pay attention to a silicone polyurethane, silicone and acrylic flexible silicone. Especially good if it is designed specifically for sanitary ware: this means that there will be special additives against bacteria in its composition.
Glue easy: clean and wipe the surface of the table and apply sealant. Top goal at the sink, presses, dry cloth take away glue residue and all. The most difficult stage in the assembly - Cut a hole in the table.
If you do not trust the chemistry or love working with tools - complete with sink usually go here such clamps with locking screw:
It is very convenient, because when it is screwed into the grooves of the screw or screws is left gaps. Here's what each of its elements:
- 1 - for attachment to the "ear" shell;
- 2 - screw fastening;
- 3 - to be fixed on the table top.
So, to set the position, each mounting on all sides countertops and mark these locations with a pencil. After set each of them to the edge of the sink and countertops end, and then tighten the screws and screw.
Important! To avoid skewing the power of tightening should be the same on all sides!
With all the fasteners. For reliability, you can handle the ends of tables sealant, and a hole on the edge of the countertop - seal.
Fixing cleaning bill
On the inner side it has the form of rack profile. And this is how it looks to mount.
First, make a layout for each of the fasteners on all sides of the sink.
Maximum tightly screw the screws so that the fastener joined to the wall cabinets. Push the Power sink up until it locks steadily.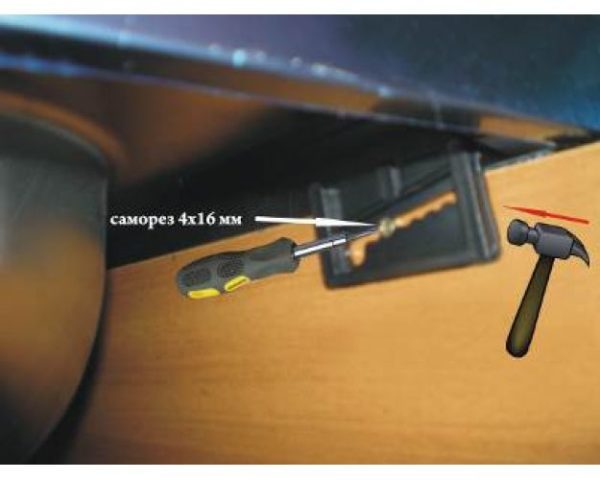
The maximum tighten the screw. That's all!
How do I attach underbench sink
Remember, at the beginning mentioned exception to the rule: "The shell is easy to install?" That's it. Underbench version still requires experience and appropriate skills, since installation must joint to joint, but it is not so easy. This is the only case in which I recommend to apply to a professional. If you are confident in their abilities, you can try at your own risk.
This sink is installed beneath the table through the seal. On the one hand fastening element grips the tabletop, on the other - the edge cleaning. That's how it looks:
The whole construction is fixed with screws.
Attention! For wooden worktops used screw. If it is a stone, then sealed with a sink using screws and dowels.
There is also a second method, when underbench sink installed in the rear side drank countertops and filled polymer resin. It not only attaches to a sink hole, but also reliably seals the seam, which is then overwritten. When dry resin is completely hidden ledge thus giving the impression of a single continuous with top surface.
When self-installing shell, whatever form it may be, and whatever way you choose, the main thing - to observe the instructions and do not let to chance. Be sure to check that you have all the necessary tools and fixtures. If you did everything correctly, you will be able to rightly praise themselves for having saved the budget and provided the kitchen or the bathroom one of the most important subjects.


