The selection and installation of lighting fixtures is one of the most enjoyable stages of home interior decoration. A beautiful chandelier of a spectacular design can become the "heart" of the entire design of an apartment or house. Well-chosen lighting can highlight all the advantages of a room and hide possible flaws.
However, the assembly and installation of a chandelier is often fraught with certain difficulties. Especially often, problems arise when connecting models with an abundance of shades to a switch with several keys.
But often homeowners can still do without the services of a specialist and install the chandelier on their own. In this material, we will consider the main stages of assembly and installation, talk about the intricacies of electrical connection lighting device and provide step-by-step installation instructions with visual photos and useful video materials.
The content of the article:
-
Stages of assembly and connection of the chandelier
- Stage # 1 - mechanical assembly of the structure
- Stage # 2 - dividing wires into groups
- Stage # 3 - fixing the chandelier to the ceiling
- Stage # 4 - phase search and connection
- Conclusions and useful video on the topic
Stages of assembly and connection of the chandelier
In fact, the installation of any chandelier goes through two main stages: mechanical and electrical. In the first case, all parts are connected into a single structure. During electrical assembly, the master needs to correctly connect all the wires, dividing them into separate groups in order to correctly connect the device to switch.
Let's take a closer look at the main stages of installation and connection of the chandelier
Stage # 1 - mechanical assembly of the structure
Most lighting manufacturers supplement their products with detailed assembly diagrams, which greatly facilitate the process of connecting all parts. However, even if there are no instructions, it is possible to understand the structure of even the most complex structure.
Most often, suppliers pack the scattered parts of the chandelier, forming functional blocks. The lampshades are placed separately from the horns, like the body itself, terminals and other details.
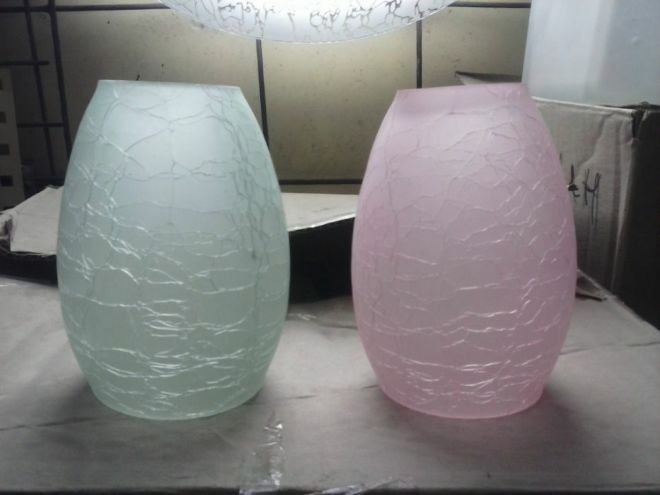
Plafonds and decorative elements of the product are fixed last, so it is better to postpone their unpacking. This will help to avoid accidental damage to fragile glass or deformation of the decor.
After you are convinced of the completeness of the chandelier and the integrity of the individual elements, you can proceed to the assembly of the device.
Assembly order:
- Assemble the top of the case. To do this, install the decorative plate on the chandelier rod, fixing the structure with a nut.
- Fasten the horns on which the shades will be located. To do this, unscrew the decorative nut above the protective housing cover. After removing the nut, place the horn in the special hole on the body and fix it with the same nut.
After mechanical assembly of the chandelier, it is worth checking the symmetry of the arrangement of the arms. If the design looks organic, carefully tighten the fasteners with a wrench. The decor and shades are installed after connecting the device to the electrical network and installing the chandelier on the ceiling.
Stage # 2 - dividing wires into groups
The way the wires are distributed depends on the type of switch with which the structure will be associated. Connection to a one-key product is the simplest, and the wiring device for two or more working keys require a more complex approach, since in this case the wires are distributed into several groups.
Each horn of the structure has its own wires, which are connected to the main cable of the chandelier. For convenience, their winding (insulation) is designed in different colors.
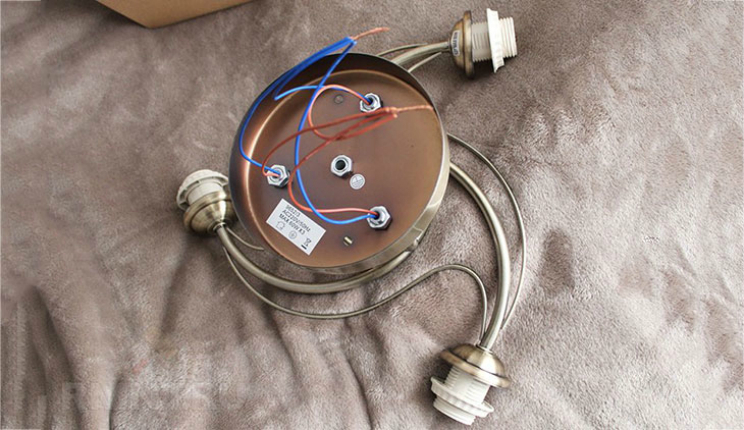
The wires in the arms of the chandelier must also be carefully routed out through special holes in the body of the lighting fixture. After that, they need to be grouped.
It is necessary to divide the cables into groups. For switches with one and two keys, this will be done according to different principles.
If a wiring product with one key will be responsible for turning the chandelier on and off, the wires are connected as follows:
- Using the twisting method, connect all the neutral wires from the horns together. The insulation of their cores is usually blue or light blue.
- Connect all phase wires in the same way. The sheath of this vein is colored brown, red, white, gray and other colors.
That's all - the wire groups are ready for further connection.
If the supply wire for connecting the chandelier has three working conductors (L1, L2 and N), the lighting fixture can be connected to a double switch.
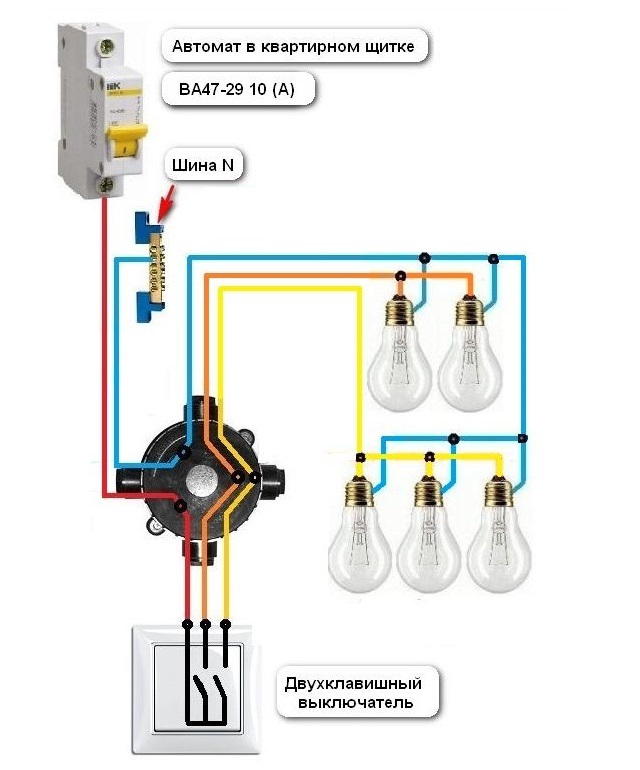
The figure above shows a diagram of connecting a chandelier to a two-key switch. For the convenience of users, the phases in the diagram are marked with different colors.
In this case, when disassembling the wires from the horns, the number of core groups increases to three. The first remains zero, and the phase wires must be evenly distributed into two groups - L1 and L2. Subsequently, when connected, they will be dispersed on both keys of the switch.
Stage # 3 - fixing the chandelier to the ceiling
Previously, it is worth attaching the structure of the lighting device using the most suitable method for this.
For mounting on concrete surfaces, a hook or anchoring strip is most often used.
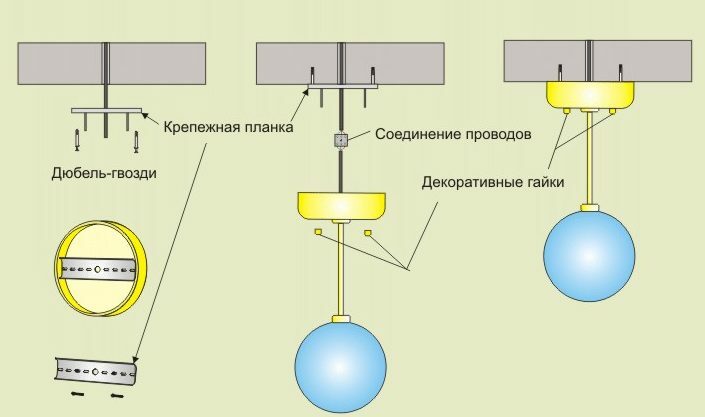
The method of fixing the chandelier depends both on the design features of the lighting device itself and on the type of ceiling in the room. The step-by-step fastening with the bar is shown in the picture above.
Stage # 4 - phase search and connection
Now it remains to connect the groups of wires to the supply conductors. But color coding home wiring conductors may not always be clear - sometimes all conductors can be painted white. Therefore, before connecting, it is advisable to ring the wires with an indicator screwdriver or a multimeter in order to determine the phase and zero in the cables.
Finding the phase with a screwdriver
The indicator screwdriver is convenient in cases where the electrical wiring cable consists of two cores. Phase and zero checks are extremely quick and easy.
To do this, it is necessary to de-energize the line by turning off the corresponding machine, after which strip the edge of the veins, freeing about 1-2 cm from insulation.
Then separate the veins to the sides to avoid accidental contact. After turning on the line power, take an indicator screwdriver. When the working part of the screwdriver touches the phase wire, the device will give a light signal. If, when interacting with a living room, the light bulb on the screwdriver does not light up, this means that we have a zero wire in front of us.
When ringing the wires with a screwdriver, it is important to remember the safety precautions and not to touch the working part of the device and bare cores.
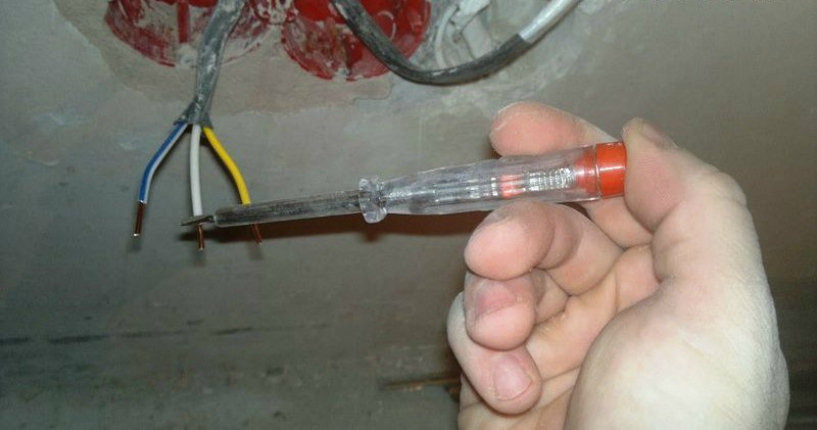
To correctly check the voltage in the conductor using an indicator screwdriver, it is imperative to hold your finger on the contact plate of the device
Phase determination with a multimeter
The multimeter will be needed in cases where the home power cable, in addition to the phase and zero conductors, also has a grounding line. Since the indicator screwdriver reacts only to the phase conductor, it is impossible to distinguish the neutral conductor from the ground conductor with its help.
In this case, you need to use a multimeter by following a few simple steps:
- After determining the phase using a special screwdriver, take a multimeter and turn it on in the voltage measurement mode from 220 V.
- Connect one probe of the device to the phase wire.
- After that, alternately connect the second probe to the two remaining wires and fix the values given by the device.
The data obtained should be interpreted as follows:
- if, with the simultaneous connection of the phase and unknown wires, the multimeter signals a voltage of 220 V, then the second wire is zero;
- if the values are significantly lower than the normal voltage indicator in the household electrical network (220 V), then the investigated conductor is protective (grounding).
After determining the purpose of all the conductors of the wire, you can de-energize the network and start connecting the chandelier cable.
Chandelier wire connection
Connecting the cables of the lighting fixture to the supply wire is the most critical step in connecting the chandelier.
To connect, it is necessary to connect the prepared groups of wires to the corresponding cores of the cable coming out of the ceiling, which will supply current to the entire structure. What are PPE caps used for or Vago terminals.
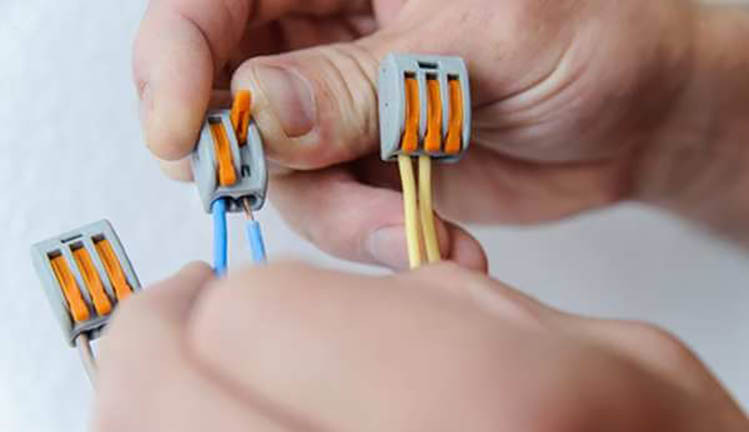
In addition to the caps, when connecting the cores, special Wago terminals can be used to protect the twist. A separate product is used for each group. A twist of the chandelier wires is placed in one of the holes in the terminal, in the second, a supply conductor is fixed, corresponding to the group of wires of the lighting device: phase or zero
Special caps-connectors, which should additionally protect the junction of the cores, are often supplied with the chandelier. To install this part, carefully screw the plastic cap over the twist.
If the manufacturer did not supplement the complete set with a PPE cap, it should be purchased separately, since when electrically connecting the lighting device, it is unacceptable to be limited only to twisting. We recommend that you familiarize yourself with connection methods electrical wires.
After these works, you should carefully place the wires at the base of the chandelier and you can put on the case cover.
After connecting the wires to the network, the complete installation of the chandelier is carried out: the final fixing of the decorative cover, the installation of shades and decorative elements.
Conclusions and useful video on the topic
The author of the following video talks about connecting different types of chandeliers and explains how to connect a chandelier from a single switch to a double one:
The creator of this video reveals the intricacies of installing a chandelier on a French stretch ceiling:
The lighting installation wizard tells about the features of connecting and setting up an LED chandelier with a remote control:
Basic knowledge in the field of electrical installation will make it possible to independently assemble and connect a chandelier, even with the most unusual design. But it is important to remember about safety precautions and be sure to turn off the power to the line when connecting the lighting fixture.
However, when buying a model with a very complex configuration or if you want to use a switch with three or more keys, it is still worth contacting a professional electrician. The master will be able to correctly distribute the wires and correctly connect the device to the network.
Do you still have questions about connecting a chandelier? You can ask them to our experts and other site visitors - the feedback form is located below. Also here you can leave recommendations and share editing secrets that will be useful to other users.


