Bad water heater performance interferes with normal life, right? The water barely flows or heats up for a long time, the burner smolders a little or soot pours in... You need to somehow fix it, look for a master, negotiate prices and terms. Why spend money if cleaning the heater is easy to do on your own?
We will tell you how to clean a Bosch gas water heater with your own hands without contacting gas workers. For complete disassembly and cleaning of the device, a “home” set of tools is sufficient. You will learn everything about dismantling the working blocks of the column, the rules for cleaning its burner, heat exchanger and chimney from our article.
The content of the article:
- What contaminates the Bosch gas water heater?
- Signs of a clogged gas water heater
- How to remove the cover of a Bosch water heater?
- How to remove and clean the igniter?
-
Cleaning the heat exchanger of the gas column "Bosch"
- Dismantling the water heater heat exchanger
- Cleaning the heat exchanger and main burner
- Descaling process
- Conclusions and useful video on the topic
What contaminates the Bosch gas water heater?
Contamination reasons instantaneous water heater related to its functions and principle of operation:
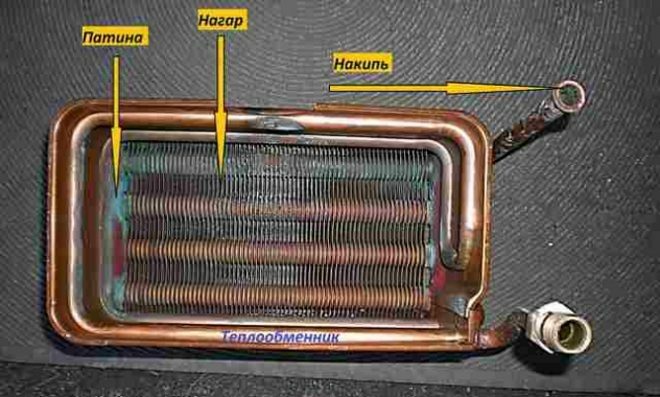
- Flowing water supply. The column heats the stream of water flowing through its heat exchanger, which brings with it mineral inclusions. As a result, clogging deposits settle on the walls of the heat exchanger and the pipes of the device and gradually increase.
- Burning gas burner. In case of defective gas combustion (see. reasons below) carbon deposits and soot are formed. The latter clogs the fins of the heat exchanger and the chimney, further impairing the combustion of gas fuel and slowing down the heating of the water.
- Poor tap water quality. Due to the hardness of tap water, during its heating, salts are released from the composition, which are deposited in the form of scale inside the pipes and the heat exchanger. The thicker the scale layer, the narrower the pipe lumen and the worse it allows water to pass through.
In addition to the salts of magnesium and calcium dissolved in water, it contains mechanical impurities from rusting pipes. They also participate in the gradual overgrowing of the pipe channel in the heat exchanger together with scale.
As for soot, its active formation is facilitated by increased pressure on the burner, weak chimney draft (low height, cracks, lack of thermal insulation, etc.), lack of supply air (PVC windows are sealed, and the supply valve No).
The use of a forced draft in a room with a running water heater also contributes to the deposition of soot (causes lack of oxygen), dustiness of the room (dust enters the burner, due to which the full combustion of gas does not happens).
Filters and magnetic traps, fine adjustment of the burner and air draft will slow down the process of column clogging, but will not completely eliminate it.
Since the formation of scale is more intense when the water is heated over 60OC, some owners of German water heaters set a low burner heating temperature. However, as a result of this, there is a gradual overgrowth of the working cavities of the heat exchanger with a greenish coating from condensate.
As a result, the flue gas discharge is impaired, which contributes to the accelerated formation of soot. A heat exchanger clogged with soot heats water very badly - soot is a good heat insulator.
Signs of a clogged gas water heater
The need for cleaning the Bosch gas flow heater is determined by the decrease in the performance of the device.
Cleaning is required if:
- the water heater simply does not start;
- it turns on, but does not work for long and turns off on its own, while there was no lack of water and gas;
- the column heats up regularly, but the water heats up noticeably worse than it was before;
- water pressure at the outlet of the heating device is weaker than at the inlet to the heat exchanger;
- frequent triggering of the overheating sensor, although the water heater is operating under medium load.
Clogged pilot jet. It is impossible to ignite the column or it is difficult if the pilot jet is clogged, due to which the device ignites the fuel with a delay - with a characteristic pop. A faint yellow wick flame, although it should be blue, is a sign of fouling in the pilot.
Chimney soot. If the burner ignites, but dies out almost immediately after ignition, the flue duct of the water heater is dirty. The chimney passability is significantly reduced due to deposits of soot and soot accumulated over the years of using the column. However, the chimney of columns in apartments is more often contaminated with volatile debris.
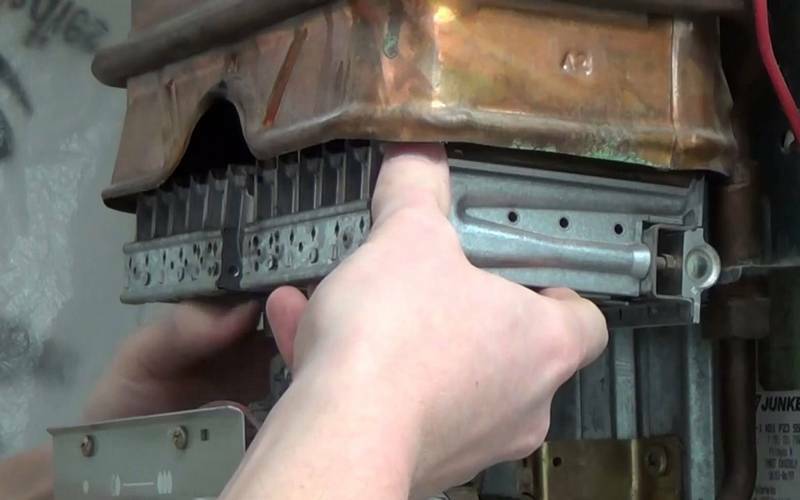
Preventive cleaning of a gas water heater must be carried out regularly, the recommended frequency is every two years. Otherwise, the column will work worse and worse, aimlessly consuming natural gas and water
Weak air flow. For natural draft, even a small gas water heater requires supply air. And modern dwellings are equipped with airtight window and interior door blocks.
The problem of insufficient draft will be solved by ventilation valves built into window frames, wall inlets, as well as ventilation grilles in interior doors.
Scale in the heat exchanger. Insufficient heating of water in a gas flow heater causes a reduced flow area of the heat exchanger tube, caused by a layer of scale. And the more scale builds up, the lower the water pressure after warming up in the column against the background of normal pressure at the inlet to the heating device.
Soot build-up of the heat exchanger. The greatest amount of soot accumulates in the central part of the finned heat exchanger, transferring heat to running water and contributing to overheating of the side sections of the heat exchanger block.
Uneven heating of the heat exchanger causes a quick response of the overheating sensor. Most often, contamination of the fins with soot develops together with the clogging of the chimney.
How to remove the cover of a Bosch water heater?
The decorative and protective casing of the column is easy to remove:
- you need to unfasten the round adjusting knobs by pulling them towards you;
- move the rectangular gas adjustment knob to the body cavity (“set on fire” position). Note that not every model of Bosch water heater has such a handle;
- use a Phillips screwdriver to unscrew the two self-tapping screws securing the casing to the speaker frame. They are located at the bottom, on the sides of the device.
It remains with both hands to gently push the lower part of the water heater casing towards you. Then lift up, remove completely and set aside. Now you can visually assess the contamination of the device, determine the scale cleaning works.
How to remove and clean the igniter?
Evidence of contamination of the ignition tube: the ignition flame extinguishes spontaneously; a weak flame tongue rises up without displacement to the burner due to insufficient gas pressure (if the pressure of the main or cylinder gas has weakened, then the igniter has nothing to do with it).
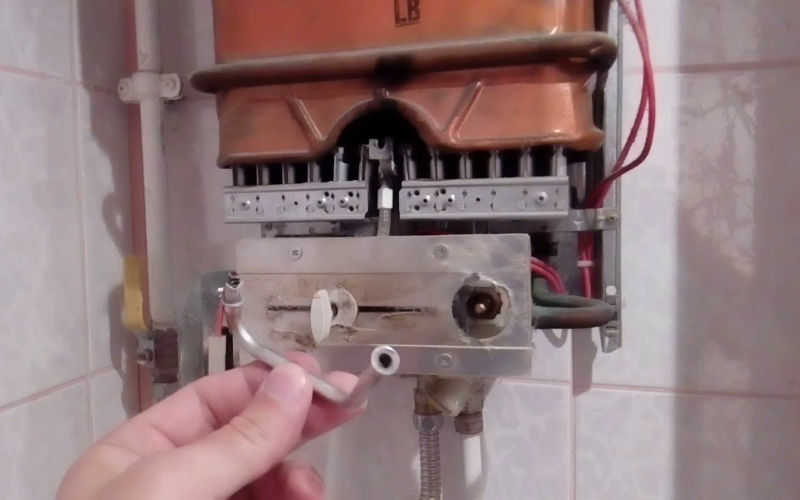
Cleaning the igniter will stabilize the ignition, prevent pops and the formation of soot on the heat exchanger grates
Please note: before you start cleaning the clogged igniter of the Bosch gas column, be sure to double-check - whether the gas valve of the device is closed!
Required tools: flat (minus) screwdriver or thin nose pliers (platypuses). Remove the ignition tube with sufficient care, without pushing through the heat exchanger jacket.
The procedure for dismantling the heater igniter:
- Top end. It is necessary to pull up the bracket that holds the flared edge of the ignition tube at the end of the burner. Slightly unclench the bracket, then move it up with pliers, or pry it with a screwdriver until it is completely removed;
- Bottom end. It is necessary to squeeze the edges of the bracket securing the igniter;
- Removing the igniter. Having freed the ends of the tube, it remains to lift it up and remove it by moving it towards you.
To clean the cavity of the ignition tube, you will need a piece of not too rigid wire, on which a piece of lint-free cloth (for example, a microfiber cloth) is clamped. We stretch the homemade "brush" inside the tube, then lightly tap it and blow it through.
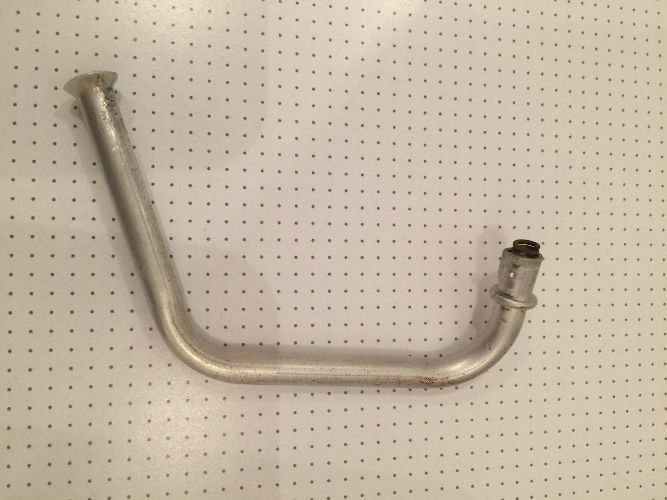
The igniter tube is made of aluminum, it is easy enough to crumple it. Therefore, cleaning, and especially tapping, must be done carefully, without undue stress.
It is also necessary to clean the tungsten spring on the underside of the tube. This will provide a quick ignition from the piezoelectric element. Finally, it is required to clean the nozzle at the lower connection point of the ignition tube and the electrode located in front of the upper outlet of the tube from carbon deposits. They should be wiped with a microfiber or other lint-free cloth.
Installation in the column of a cleaned igniter is performed in the reverse order of dismantling. If cleaning is done effectively, the flame from a lit ignition tube will hardly be visible.
Cleaning the heat exchanger of the gas column "Bosch"
If, after removing the casing of the water heater and inspecting the heat exchanger, soot contamination is found, it will need to be dismantled and completely flushed. It is necessary to clean the smoked heat exchanger precisely by removing it from the gas column.
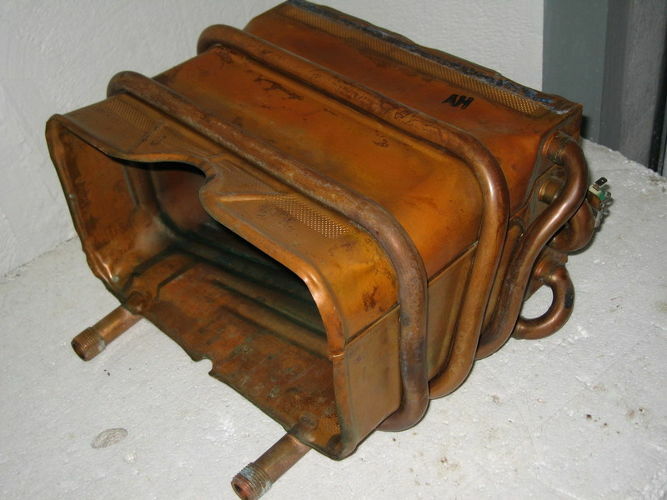
The heat exchanger will not look new after cleaning. The challenge here is to eliminate the maximum amount of contamination from the inner plane of the shell and, especially, from the radiator grille.
The first step is to close the shut-off taps for the water and gas supply of the heating column. If you intend to completely remove the device and dismantle the heat exchanger by placing the column on the table (this will be more convenient), disconnect the supply gas hose, input and output of the water supply system, then remove the device from the mountings.
However, there is no need to remove the entire water heater; you can also remove the radiator of the heat exchange module at the place of installation of the device. Let's consider this maintenance option in detail.
Dismantling the water heater heat exchanger
The required tools are flat (minus), Phillips (plus) screwdrivers and pliers.
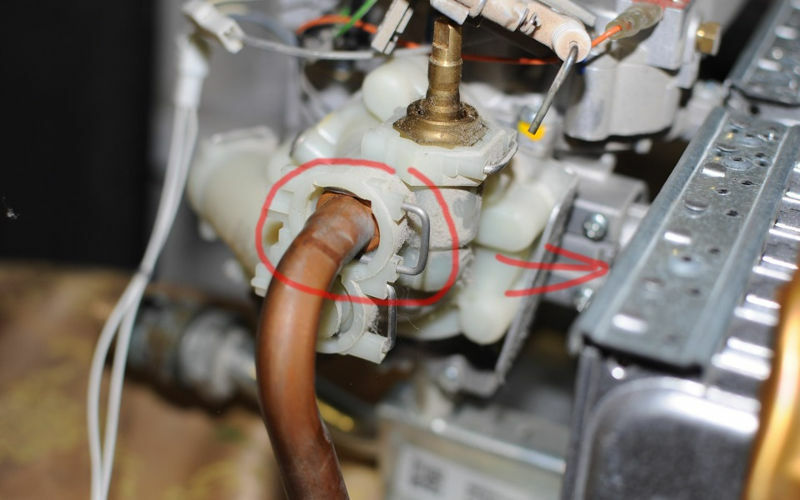
The pipes for supplying and removing water from the heat exchanger are fixed with brackets, which can be easily removed using a flat screwdriver and thin-lipped platypus pliers
Attention: with an outwardly large size, the heat exchanger is hollow inside and lightweight. When dismantling, handle it carefully, otherwise you will remember the shell!
The procedure for removing the heat exchanger using the example of Bosch WR13-2B:
- Closing the cold water cut-off valve on the supply to the water heater;
- Removing the column cover. Remove the adjusting knobs by pulling towards you, unscrew the two self-tapping screws on the sides at the bottom of the case, push the lower part of the casing towards you, lift and remove from the upper hooks;
- Pulling out the bracket securing the tube to the water distribution unit. Pry off the bracket with a screwdriver, remove with "platypuses", move the tube to the right. Before removing the retaining clip, place a wide container under the drain of about a liter of water from the heat exchanger;
- Removing the sensor terminals from the heat exchanger tank and housing. Located on the left side of the device, wires go to them;
- Pulling out the bracket that fixes the water supply pipe at the inlet to the heat exchanger (located on the right under it). The principle is the same - pry off with a screwdriver, gently pull out with pliers, then remove the tube completely;
- Removing the protective screen in front of the ignition group by unscrewing two self-tapping screws with a Phillips screwdriver. Then you need to remove the ignition group from the nest, remove it;
- Pulling out the clip from the connecting hose at the outlet from the heat exchange radiator (with a screwdriver and platypus), disconnecting the hose. Do not forget to drain the water first by opening the tap on the sink;
- Unscrewing the two screws securing the main burner on the sides;
- Unscrewing the two screws fixing the gas manifold under the burner (located under it, in the center);
- Removing the guide strip holding the heat exchanger from above. There are two side screws for a Phillips screwdriver. Unscrew and remove the bar.
It remains only to remove the heat exchanger together with the burner. Place the palms of your hands under the burner on its sides and firmly, not without extra effort, press the shell of the heat exchange radiator with your thumbs. Lift them up, then slide the top of the heat exchanger towards you and remove both modules out.
Cleaning the heat exchanger and main burner
For cleaning and flushing, the heat exchange radiator must be placed in a bath or other suitable container. In order not to scratch the bottom and walls of the bathroom bowl, you should first lay a cloth in it.
Using conventional detergents, hot water and a long-bristled brush, rinse off soot from the inside and outside of the unit. Dry it before re-installing it into the column.
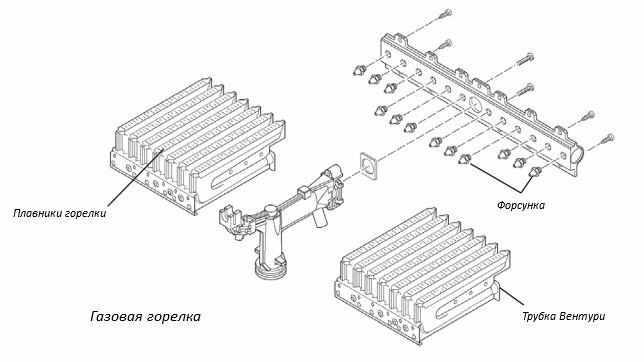
When reassembling, keep in mind that the slight inclination of the side fins should be oriented towards the center of the main burner.
If the burner is soiled with soot, it must be disassembled and cleaned. The fasteners of the burner sections (Venturi tubes) are bolted and can be easily unscrewed.
Professional cleaning of a dusty burner is carried out with compressed air, and at home - with a soft brush and a vacuum cleaner. For severe contamination, wash with soapy water and wipe with a lint-free cloth, then dry and reassemble the burner.
Descaling process
To eliminate deposits of magnesium and calcium salts (scale) in the heat-exchange radiator pipe, you will need to remove it and prepare it for flushing with an acid-containing solution. Note that soot cleaning must be performed before descaling.
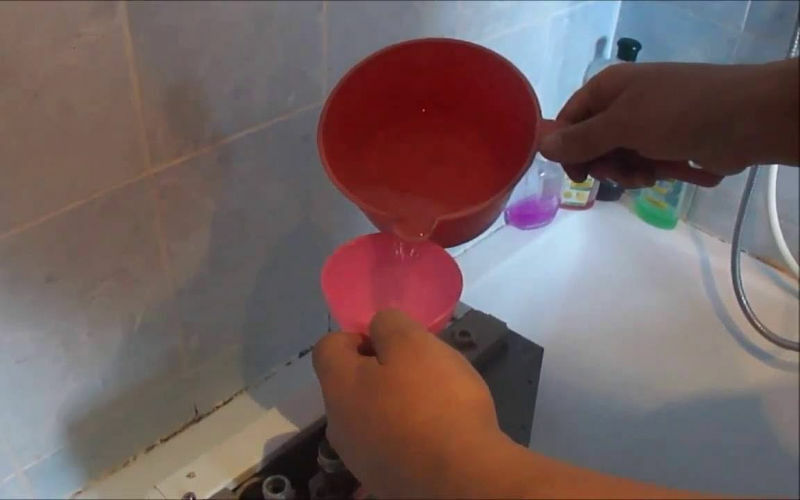
It is not profitable to spill prepared cleaning liquid based on citric acid aimlessly. Be sure to use a funnel to fill the heat exchanger tube completely
Do not try to peel off or scale down the inside of the copper tube of the heat exchanger! Firstly, it is practically useless exercise, because the bulk of the mineral deposits in the depth of the pipe will be inaccessible for cleaning. Secondly, scratching the thin walls of the tube will weaken its strength and cause deformation.
The following tools will help to remove scale in the column:
- Anti-scale preparationssold in hardware stores. The procedure for preparing each product for flushing is indicated in the manufacturer's instructions;
- Lemon acid. Since the volume of the tube in the design of the heat exchanger is about a liter (the exact volume is indicated in the instructions for device), you will need to prepare a hot solution in the proportion of 100 g of citric acid per 0.5 l of water in a volume of 700-800 ml;
- Nine percent vinegar. Vinegar diluted in three parts of warm water is able to remove scale in the heat exchange radiator of the column. The required volume of the solution is 700-800 ml.
No other products like Coca-Cola or homemade solutions based on active acids (hydrochloric, nitric, sulfuric and etc.) cannot be used for descaling - soda will not work in any way, and acid solutions can damage the tube.
It is necessary to turn the heat exchanger upside down with the radiator plates and upward, insert a funnel into the tube and pour the prepared cleaning solution. Chemical descaling will take several hours, so it is more convenient to fill the heat exchange radiator with a solution from evening to morning.
If a column that has been regularly operated for several years has not been descaled before, then the solution cleaner needs to be changed two or three times until it is completely cleaned. Otherwise, although the scale layer will be reduced, it will not be completely eliminated.
After waiting for the time required for the destruction of scale deposits (more than 4 hours), it is required to pour out the cleaning agent and rinse the tube with a large volume of clean water. During the flushing process, it is important to remove all sludge fragments that have separated from the pipe walls to the outside.
He will acquaint you with the causes of overheating of the water by the column and how to fix the problem. next article, which is worth reading for all independent home craftsmen.
Conclusions and useful video on the topic
Step-by-step dismantling of the Bosch water heater to clean the heat exchanger block and the main burner:
Video on cleaning the dusty main burner of a column from a home technician:
The gas water heater should be cleaned from soot and scale every two years of operation, otherwise the performance of the device will drastically weaken. If the warranty period specified by the manufacturer has expired, it is not necessary to contact the gas service with which the equipment service contract has been concluded.
It happens that there is no special need to attract gas workers to work on removing scale and carbon deposits. In this case, only man's hands, free time and a simple tool are needed. Follow the instructions above and you will succeed!
Would you like to talk about how to clean your own gas water heater yourself? It is possible that the subtleties of the cleaning process known to you will be useful to site visitors. Please leave comments in the block below, post a photo and ask questions on the topic of the article.
