Equipment for the heat treatment of metals is an expensive pleasure. Not every beginner master is ready to shell out a substantial amount for its purchase. But there are technologies according to which you can build a forge forge on gas with your own hands without much difficulty and expense.
In the article presented by us, you will find a detailed description of the assembly of the main attribute of blacksmithing. We will talk about how the forge works and its structural components. We will show you how to achieve the temperature required for melting and forging workpieces.
For independent home craftsmen, we suggest that you familiarize yourself with homemade products that have been proven by blacksmithing practice. You will find out what materials, finished devices and tools are required in the manufacture of a forge. Gain insight into the tricky process and provide valuable advice.
The content of the article:
-
Principle of operation and design specifics
- How does a forge forge work?
- Device and working components
- Choosing blue fuel for work
-
Forge forge construction technology
- Elementary design with gas burner
- Mobile version of the gosyatnitsa
- Stationary workshop equipment
- Based on the legacy of the cavalry
- Horn from a cylinder with a propane burner
- Conclusions and useful video on the topic
Principle of operation and design specifics
A forge is required for a number of operations to prepare metal for subsequent processing. The workpiece heated in it is given the projected shape. It is used to make forged jewelry, which are now popular in everyday life, parts, utensils, furnishings, etc.
The forge is used in all areas of heat treatment. It can be quite miniature, literally installed on the table, and stationary, reminiscent of a traditional brick stove. Regardless of the size, all models operate according to the same principle.
Image gallery
Photo from
A forge forge installed in a garage or similar utility room will achieve temperature background at 1100-1200 degrees for heating, smelting and forging metals, cementing, ebb glass products
Forges for blacksmithing work are stationary and portable. There are floor types for forging large blanks and table models for making original jewelry.
In a simplified version, a forge can be made from a metal container, into which you need to supply fuel and air to maintain combustion.
The forges offered by the industry cannot be called cheap equipment. But there is a way out. You can make it with your own hands
Equipment for a private smithy
Desktop version of a homemade blacksmith forge
Simplified version of the forge
Factory-made forging unit
How does a forge forge work?
To prepare the metal for subsequent forging, it must be heated and literally "softened" under temperature conditions up to 1100-1200 ° C. The conditions are achieved due to the specific design features that ensure the supply of fuel and oxygen to the combustion zone in the proportions required for the process.
Inside a gas or solid fuel forge, a characteristic chemical reaction occurs: hydrocarbons are processed. Carbon produced by the combustion of both gaseous and solid hydrocarbons catches and appropriates oxygen from the heated metal. The result is steel without oxidizing impurities.
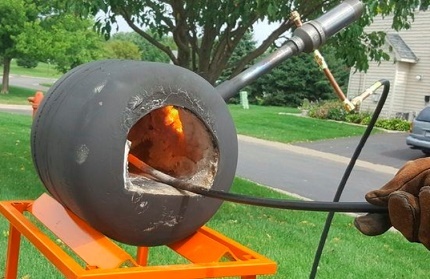
A forge-forge built with your own hands will not allow, of course, forging damask blades and openwork lattices for an exquisite balustrade, but for the manufacture of simple household items and original jewelry is quite fit
The features of the forge allow partial use of the reduction potential of carbon. All oxygen is not burned out from the preheated workpiece. Due to partial reduction, the metal is not completely burned out and does not become brittle, as is the case with cast iron.
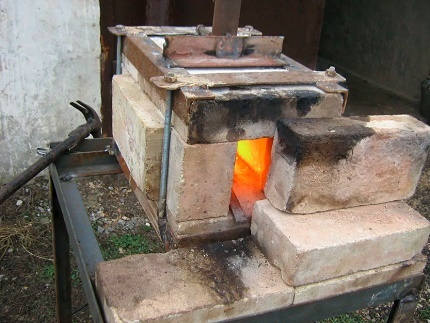
No special materials are needed to build a miniature home forge. Almost every owner has everything necessary. Surely he has bricks and scrap metal, steel pipes, anchors, clamps
By the way, cast iron products in the industry after heat treatment are saturated with oxygen in order to get rid of this deficiency or at least minimize it.
In an industrial furnace equipped with a control system, the air required for combustion is injected so that it is slightly lacking. It is difficult to equip a homemade product with such a device, unless, of course, install a ready-made gas burner with automation on it.
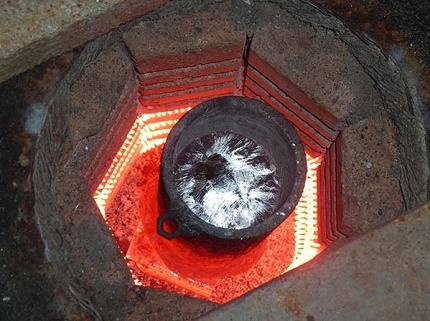
Regardless of the design and type of operation of the forge, carbon released from the hydrocarbon is processed in its working area. It attracts oxides to itself, eliminating the metal
Due to the impossibility of a regulated supply of air, or rather the oxygen contained in it, hand-made forged products are often burned out. This happens in the early stages. However, with experience comes the ability of the master to feel when it is necessary to stop heating, as well as the knowledge of what to do to avoid a complete loss of oxygen.
Device and working components
There are a lot of options for making homemade models, tested by blacksmiths in practice. We will present only a small part of them. Before deciding which gas forge is best to do with your own hands, let's figure out the typical features of the device.
Technically, any forge is a kind of furnace with characteristic accessories: a firebox, a grate, an air chamber, referred to in Russian heating units blower. Unlike a conventional stove, the air chamber is equipped with a drain for adjusting the air supply and a branch pipe with a valve.
The grate is reinforced so that it is able to resist considerable thermomechanical stress. A regular grill made of metal rods or corner pieces will not work. You need a reinforced device. Ideally, it is a thick metal panel mounted into the work table with evenly drilled holes.
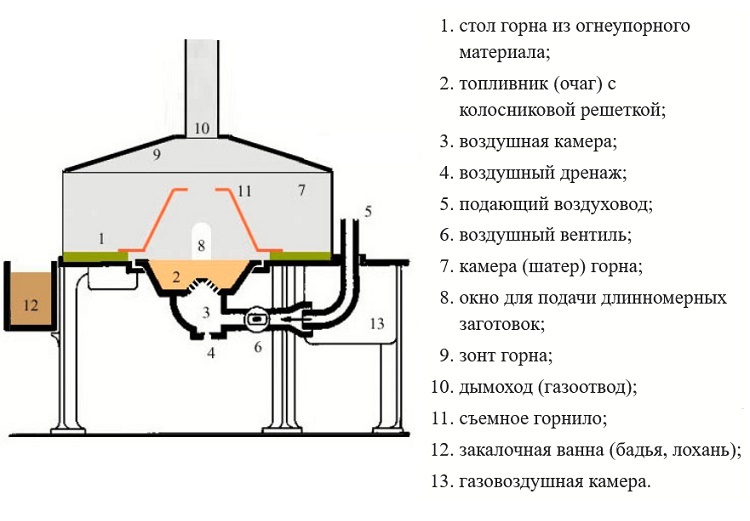
In the design of the forge, each structural part performs certain functions, due to which the release of metal from impurities and heating for forging is performed in an optimal mode.
The combination of these components is called a tuyere. There are several of them in the complete set of industrial furnaces, so that they can be changed depending on the required conditions for performing a certain operation and on the size of the heated workpiece.
The lance is most often installed not in a closed case, but mounted on a table. It needs to be sufficiently stable and protected from thermal effects, for which a lining is used. In a number of structures, a grate is mounted in the table or a metal perforated panel is installed instead.
In the lining of the table for a stationary hearth, which is going to be actively exploited, refractory quartz bricks are used. Homemade products for one-time work are lined with fireclay bricks. It is easier to find it on sale, and the price is lower.
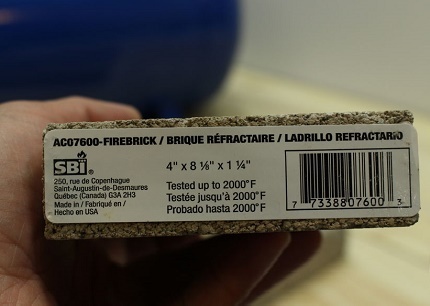
The combustion chamber of the forge is strengthened by lining, which is made with refractory or fireclay bricks that can withstand high temperatures
For a complete collection and removal of flue gases, a tent or umbrella is placed above the table with a perforated panel or above the lance. They are connected to a smoke channel, which is constructed according to the principle chimney for gas boiler. It should work flawlessly, because the gases emitted when the metal is heated are extremely toxic.
In addition to the main structural components, there are also additional devices. Usually, blacksmiths place a hardening bath next to the mine so that the finished product can be immediately immersed in a cooling and tempering medium. This is the case when thermal shock hardening is required.

When equipping your own forge, you need to think not only about the manufacture of equipment for heating metal, but and related equipment: anvil, quenching bath, gas-air chamber, chimney and exhaust umbrella
Artisans also use the gas-air chamber on an industrial scale. In it, the products are dried from condensate, added to the composition of additives, which can only be added in a gaseous state. The air is also dried there to obtain certain technological conditions.
To increase the area of extremely high temperature, a crucible is used - a bell expanding towards the base. It is needed mainly when working with non-ferrous and precious metals. Handicraftsmen often do not need any of the additions, except that a bathtub, under which any metal container of sufficient volume can be adapted.
Choosing blue fuel for work
It is believed that both mainline and bottled liquefied gas. Let's disappoint: it is inappropriate to use an unrefined natural option.
There are two good reasons for not using fossil fuels:
- From the pipe, blue fuel comes to us, which is a kind of mixture of gaseous hydrocarbons. Their calorific value and oxygen retention capacities differ. Therefore, it is virtually impossible to tune in to an optimal air supply.
- The gas mixture for domestic use always contains, albeit insignificant, but influencing the result, the content of impurities. The presence of phosphorus with silicon may not be noticed, but sulfur will definitely make the result of labor efforts unusable. Only melting can save.
In addition, household gas is odorized - giving it a characteristic odor so that a leak can be detected immediately. These substances will also negatively affect quality.
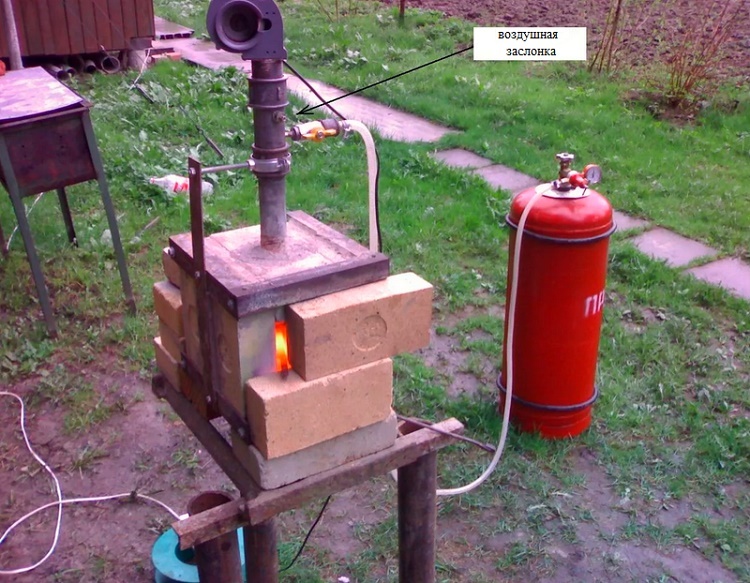
Household gas is not suitable for the operation of the forge, since it contains impurities that interfere with the processing of metals. Gaseous fuel must be cleaned before being fed into the combustion zone or cylinders with industrial monogas must be used
Industrial liquefied gases would be perfect: propane or butane supplied in cylinders. But only if these are monogases without accompanying impurities at all.
If it is not possible to buy refined blue fuel, you can clean it yourself. A container with naphthalene will help to get rid of sulfur-containing compounds, through which gas must be passed before it is fed to the burner.
By the way, if you use a factory-made burner, the forge construction process will be carried out much faster. And you don't have to worry about the result, everything will work flawlessly and safely. In addition, in the burner, air and gas can be mixed in advance in the proportions required for operation.
Forge forge construction technology
Let's make a reservation right away that the home-made gas forge, with the drawings and assembly methods of which we will introduce you, is not suitable for production purposes. However, it is very easy to make unique jewelry, interesting interior gizmos, original metal products with its help.
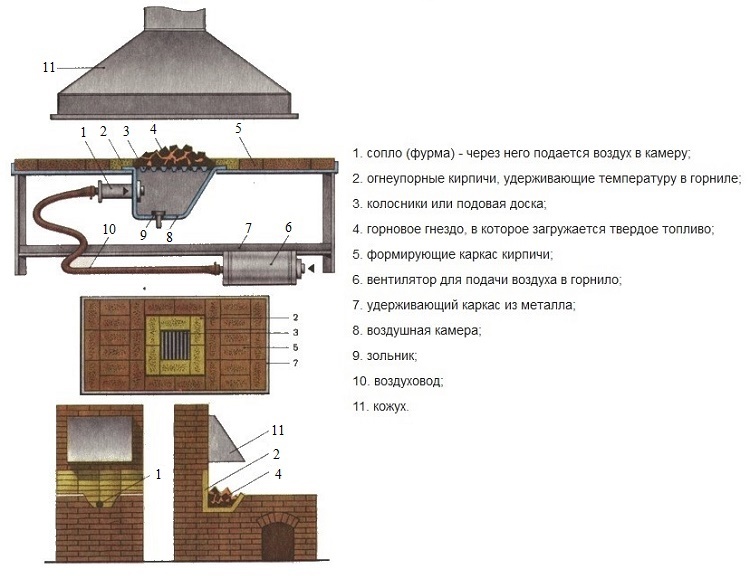
Many models of forge furnaces designed for operation on solid fuels can be adapted for operation on gas
Let's start with the simplest options that do not require skills in welding and other construction areas from the contractor.
Elementary design with gas burner
The simplest forge for the formation of beautiful tips on a metal bar, from which it is planned to weld a nice fence in the country, or for forging jewelry can be made from six fireclay bricks.
The grate in this model is cooked on the basis of two scraps of steel pipe VGP of arbitrary diameter, but not too large. They are welded across to them, twisted like a screw, trimming a profile pipe, angle or strip. This is necessary to capture the blast stream.
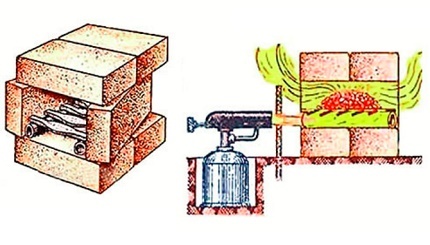
The simplest version of a forge can be assembled in half an hour from six bricks, several pieces of steel pipe and rolled metal
Fireclay bricks are used to make a "firebox", which has only a base, an upper ceiling, and two walls on the sides. This horn is installed only on the street, since a smoke exhaust system is not provided. On the side of the pressurization, a small hole is dug in the ground for the body of a gas burner or blowtorch.
In order to prevent an explosion from the gas burner during the operation of this furnace, it is better to put a partition made of asbestos cardboard before entering the firebox. After all, the heat emanating from the open firebox can return and heat the gas tank.
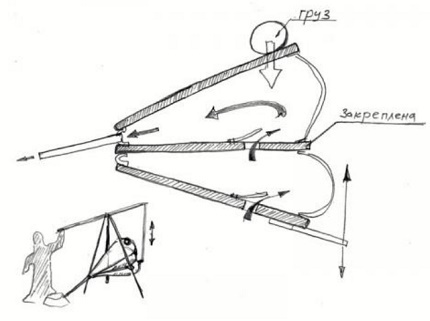
In the simplest forging installations, combustion air is supplied either naturally or by bellows. in both cases, it is impossible to control the oxygen supply
In general, in this device, heating is carried out on coals or coke (fine coke produced specifically for blacksmiths). A gas torch or blowtorch is used only to activate the process. They will ignite and create a blast stream.
Mobile version of the gosyatnitsa
For the device of this model, a used gosper is needed. Holes are cut at its ends to enter a home-made or purchased gas burner. Two recesses are cut above the holes. This model, like the previous type, can be operated exclusively outdoors.
The lining of a home-made furnace is made with a mixture of fireclay sand with brick fireclay fighting. You can buy a ready-made mixture for this. After application, you do not need to bake anything on purpose. Curing of the lining compound will occur during use of the fixture.
For blowing, a fan of a suitable type and power is installed, for example, from a manual siren. A blast gas burner is ideal, which can be removed from a used turbocharged boiler, if, of course, it is in working technical condition.
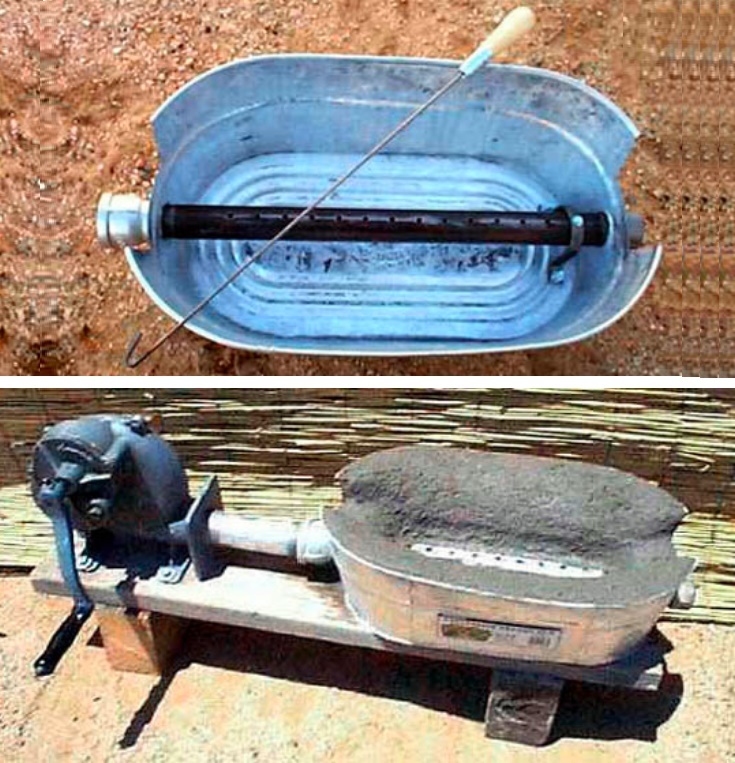
The construction made of old cast-iron cookware will not allow reaching temperatures of more than 900 ° С, which significantly narrows the scope of application
This solution has a significant drawback - you can work with it only on the street, and if you use a blower burner, you will need power supply. Those. you will have to stock up on either a good extension cord of sufficient power, or take risks by placing the device near your home.
There is another option - blacksmith furs, which have been used by blacksmiths for several centuries. Note, however, that it is not at all safe to pump air into the hearth's firebox manually. And with performance, everything will be problematic and ambiguous.
Stationary workshop equipment
Models installed in workshops for permanent work must not only be functional, but also ergonomic. It is important to consider both usability and safety, because a red-hot metal bar is a potential threat. And getting serious injuries is not included in the plans of any normal master.
In this case, the dimensions of the equipment should not be taken as standard, because we are all folded and arranged individually. The forge should be convenient for you and for those who will use your workshop, if it is rented together. The height of the desktop and its dimensions are of particular importance.
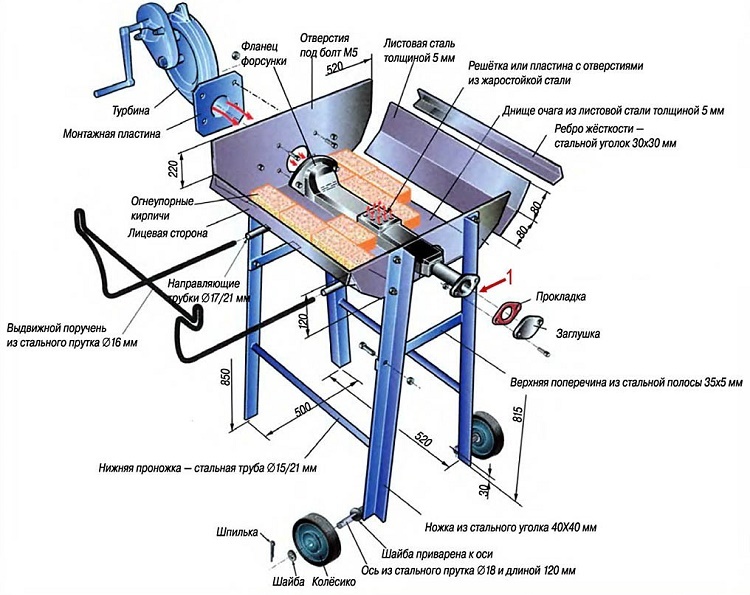
The mobile horn can be used in the winter in a workshop equipped with an exhaust system with a probe, and in the summer - on the street, moving it inside the building upon completion of work
To determine the size of the future forge, we will proceed as follows:
- We will choose a place in the workshop that allows all the main and additional equipment to be located in places convenient for carrying out the entire range of work on heating, forging and hardening.
- Let's define our place. Let's stand with our feet shoulder-width apart. Bend the working (right / left) arm at the elbow.
- We measure the distance from the elbow of the bent arm to the plane of the floor. It is more convenient for your partner to do this. Then we also get the second result, if you are not the only one to forge. We add 5-7 cm to the arithmetic mean of two distances - we get the height of the desktop.
- We take the largest ticks in order to measure the distance from the abdomen to their most extreme point. Add 10-12 cm to the measured distance - we get half the diagonal of the desktop.
- We calculate the length of the side of a square desktop, taking into account the previously obtained half of the diagonal.
The blacksmith's table is usually not made round, because it is inconvenient to work, especially if you have to work with an assistant.
Image gallery
Photo from
A homemade furnace for our own forge is made taking into account individual sizes and ease of use of the equipment
In the center of the working table of the forge for regular work, there is a one-piece grate with uniform perforation. This option accumulates less fumes, and if it collects, it distributes more evenly than a prefabricated grate from a bar, strip or corner.
In such designs, a vacuum cleaner is not used to pressurize the air mass while working on coals or coke. Better to connect the centrifugal snail fan from the car stove
The furnaces installed permanently for a private smithy must be equipped with a flue gas collection and removal system. In an enclosed space, it is also advisable to arrange mechanical exhaust ventilation.
Stationary forge work table
One-piece grate
Air duct for supplying oxygen to the combustion zone
Smoke exhaust system for a furnace in a private smithy
The stationary forge presented in the system is a versatile equipment that can be adapted for both solid and gaseous fuels. In the case of loading coal from burnt wood or coke into the firebox, the air is blown by a fan from the stove from the car, because the vacuum cleaner will blow out the coals.
In the center of the desktop there is a built-in grate. This option is needed so that when the holes are plugged with smoke, there is no uneven distribution of heat. When using gas, you need to equip the installation with an injection burner, which is better to buy, but you can also do it yourself.
Based on the legacy of the cavalry
Horsemen at all times needed horseshoes and nails to fasten them. Even the hussar and uhlan squadrons in their arsenal had portable horns that moved along with the military formations. At the heart of mobile forging machines was a crank mechanism.

At the heart of the action of the forge, which plied after the lancers and hussars to the combat positions, was the use of a crank mechanism
An analogue of the crank mechanism is now easier to find. It is enough to remember where grandmother's foot sewing machine was kept by the firm "Singer". With some alterations, Singer's followers of the Chaika brand will do.
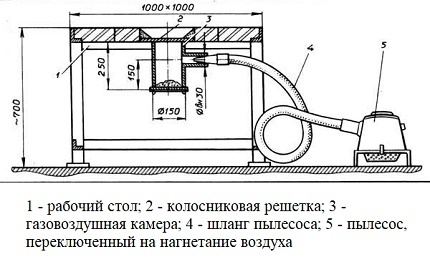
If gas is used as fuel in the work of a homemade forge, it is better to mix it in a gas-air chamber to which the vacuum cleaner is connected
It is advisable to give preference to the old versions with a cast iron bed. It will withstand any thermal and mechanical stress. The ideal solution will be a construction on wheels, which can be easily moved to a place convenient for work.
Horn from a cylinder with a propane burner
We warn you right away that this model of a forge is suitable only for those who have considerable experience working with propane. The gas chamber of this option is quite large, therefore, with the slightest violation of the rules, the explosion can be of destructive force. The consequences are unpredictable, but in most cases catastrophic.
A master who decides to make a forge from an oxygen cylinder will need exactly this empty container with a diameter of 25 cm or more. Refractory materials will be needed: plate, cement, paint, kaolin wool. You will need fasteners, ceramic coating, and a threaded steel barrel to equip the burner connection point.
You will also need fasteners and other materials, which we list in the text. To carry out the work, you need to stock up on a grinder, a set of 10-32 taps, a spatula, a coating brush, a drill and files. And you will also need protective equipment: an effective respirator, working cotton gloves, goggles.
The following photo selection will acquaint you with the assembly of a homemade furnace from an oxygen cylinder:
Image gallery
Photo from
Let's prepare a gas cylinder (in our case an oxygen one) for work: we will wash it with a suitable household product. In order to relieve the stress of the metal structure, mark on both sides two circles on a DVD disc and cut them out.
To cut a hole on the front side, mark a circle. We draw it according to the outline of a saucepan of a suitable size or other similar container.
From the front side, we cut the gas cylinder along the outlined circle. On the opposite side, cut off the end of the cylinder along the seam. Then we weld the part cut off from the back, but not with a continuous seam, but with an intermittent
We clean the sections on both sides with sandpaper or a grinder with an abrasive disc so that no burrs remain
Step 1: marking auxiliary holes
Step 2: mark the hole from the front
Step 3: cutting the cylinder with a grinder
Step 4: sanding the cut with sandpaper
If the cylinder initially did not have support legs and a handle at the top for carrying, they should be welded. By the way, if there is no experience in welding, work on joining parts can be done with bolts or by soldering.
Next, you need to arrange a branch pipe to enter the burner into our homemade forge:
Image gallery
Photo from
Having attached the threaded barrel to the wall of the cylinder, we outline it. It is better for right-handed people to place it on the upper right, approximately in the middle of the container, for left-handers - on the left
For owners of a drill with a core drill, drilling a hole is easy and simple. We will assume that we do not have such a tool at our disposal, therefore we drill holes around the circumference.
We install a disk nozzle on the engraver and connect the drilled holes so that it is fashionable to separate the circle from the body
If the nipple does not fit into the hole made, cut the "teeth"
Step 5: Marking the hole for screwing in the nipple
Step 6: Drill holes along the outline of the nozzle
Step 7: Cutting a hole with a disc engraver
Step 8: preparing the hole for screwing the keg
Now you need to fix the pipe and build a device for fixing the propane burner in the pipe:
Image gallery
Photo from
Having clamped the threaded barrel in a vice, we drill four holes in the walls of the barrel with a tap. We will wrap fastening screws in them.
We check how freely the screws move along the thread created for them. The move should not be too tight or too loose. After all, it is the screws that will hold the burner in the nozzle.
We unscrew the screws from the nipple and put it in the hole. We fix it in a convenient way for further work and weld it. If you find a flange of the appropriate size, you can screw it on
We fix the branch pipe in the body in two stages. First, we grab it with dots and an intermittent seam. Then we connect everything with a solid convex seam.
We treat the butt joint with a sealant. Check if the thread is damaged by a spark during welding
Having installed the working part of the propane burner in the branch pipe, we check how firmly the four screws hold it
If, after installing the working part of the burner, it turns out that its sting requires a build-up, you will have to upgrade the tool by lengthening the outlet
We are testing the operability and performance of a gas burner with an extended barrel. Checking the speed of ignition and reaching the operating temperature
Step 9: Drilling the screw holes in the nipple
Step 10: Checking the progress of the screws in the holes
Step 11: welding the threaded keg
Step 12: solid weld keg
Step 13: Sealing the joint
Step 14: Verifying that the burner is secured in the installed socket
Step 15: Extending the burner tip
Step 16: Testing the tightness of the extended barrel
Now is the time to start arranging the bottom of the homemade forge. To do this, we need fireclay bricks, from which we will build a kind of desktop. At the same time, we will separate the high-temperature zone from contact with the metal wall of the case.
Image gallery
Photo from
To prevent fireclay bricks from crumbling during cutting, we will soak them for 15 minutes in ordinary water. Then we mark it out for cutting. One brick must be divided into pieces 2.5 cm wide
We connect a hose with water to the angle grinder and start cutting, constantly wetting the cut with water from the hose
We dry cut brick blocks before joining without a hair dryer, in natural conditions. The workpieces must remain slightly damp in order to improve adhesion with the binder mortar
Putting the two remaining bricks together, mark the required length of the bottom part. It should be 5 cm less than the body length of our homemade horn
Let's try the support bars cut from bricks to the place of installation. Let's mark their location
We install solid and cut bricks on the support bars. We check if trimming is required after the fact
We extract the approximate details of the bottom of the hearth, modify them as necessary. We process all abutting sides of parts with refractory cement and connect
We leave the part of the hearth bottom connected with cement for hardening. We are waiting for as long as indicated in the manual by the manufacturer of the composition
Step 17: preparing fireclay bricks for work
Step 18: cut out the bricks with a sander
Step 19: drying the bars before assembling
Step 20: sampling solid bricks
Step 21: Trying brick blocks to the installation site
Step 22: Installing Bricks on Support Bars
Step 23: assembling the fireproof bottom of the forge
Step 24: technology break
The bottom, it is also the working refractory table of the forge, is ready. Now we start arranging the back wall:
Image gallery
Photo from
We will put on a respirator and protective polymer gloves to safely roll and cut the kaolin wool for ourselves. We put off the length of the cylinder and its circumference with a tape measure, from which you need to subtract the width of the brick stand
The kaolin wool insulation will be laid in two layers. First, place the first cut layer tightly along the walls. We still glue the cotton wool trims to the bottom part
After placing the outer layer of kaolin wool, we put a brick part inside. Then we cut out and put the second layer of insulation into the case.
Carefully with a construction knife through the welded pipe we pierce a hole in the two-layer insulation. We remove all unnecessary so that nothing interferes with the burner barrel
The opening of the back wall is too large, it needs to be reduced - we cover it with a refractory plate made of asbestos. To make a pattern, we attach polyethylene and circle
We transfer the film to a sheet of paper or cardboard, cut out a pattern. Then, according to the pattern from the refractory plate, we cut out a part that will cover the back wall
We install the part cut from the refractory plate, slightly squeezing the kaolin wool. Having straightened after that, the cotton wool will firmly fix the inserted element
All exposed parts of kaolin insulation are painted with ceramic paint. Apply as many layers as indicated by the manufacturer in the product instructions
Step 25: Cut the insulation with kaolin wool
Step 26: Installing the outer layer of insulation in the cylinder
Step 27: installing the inner layer of kaolin wool
Step 28: Punch a hole through the burner tube
Step 29: making a pattern for the back wall
Step 30: Cut out the back wall detail
Step 31: arranging the back wall
Step 32: staining with ceramic paint
With the back part sorted out, now the most difficult and time-consuming thing is the assembly of a removable cover for the front end. It is removed in order to periodically change the burnt-out insulation and brick stand. this often happens during active operation.
Image gallery
Photo from
To make the cover removable, we make a locking knot. To do this, in the trimming of the profile with a shelf of 25 mm, we cut two holes with a tap.
We weld to the body of a homemade forge a fixing knot from a profile trim
We make a lid holder from a strip 3-4 mm thick. Both bolts must hold it down during insertion.
Following the method described above for making patterns, we make them for cutting out a part of a removable wall from metal
We connect the metal components of the removable front wall by welding, it can be soldered or bolted. We take into account that ticks must freely enter the original "gate" of the forge
We apply a metal part of the front wall to the refractory panel. We circle, cut out a blank from it. Drill holes in the metal "horseshoe"
We connect the metal and asbestos horseshoe with screws. We check how much the hole has decreased, whether the blacksmith's tool will enter the forge
We cover all open areas of the insulation of the front wall of the homemade furnace with ceramic paint
Step 33: making the fastener
Step 34: Welding the Retainer Assembly to the Body
Step 35: Fitting the holder to the fixing unit
Step 36: making the part for the removable wall
Step 37: joining metal pieces
Step 38: Cut out the base of the removable wall
Step 39: joining the metal and asbestos parts
Step 40: painting the cotton wool insulation with ceramic paint
We can assume that we have successfully coped with the work, only the final stages remain:
Image gallery
Photo from
We remove and set aside the front wall of the furnace in order to apply a refractory coating and ceramic paint to the entire surface of the cotton wool and asbestos panel. Covering end parts are also painted completely
We paint all welded seams and joints with fire-resistant paint to protect them from rusting, oxidation and premature burnout.
The metal part of the front wall of the hearth, which secures the removable panel, is painted with refractory paint
We start the barrel of a propane burner through the nozzle, set it on fire through the hole in the front wall and test the work of our difficult homemade product
Step 41: painting the insulation completely
Step 42: painting the seams with fireproof paint
Step 43: paint the metal horseshoe
Step 44: testing the homemade forge
We want to warn home craftsmen: blacksmithing is a very interesting activity, but traumatic. You need to take care of your eyes, if possible, cover all parts of the body, despite the high temperature in the work area.
In order to protect against burns, you need to stock up on shoes with metal-reinforced socks. It is advisable to purchase a long canvas apron and gloves. It is categorically impossible to work with heated metal in synthetic clothing - it will instantly flare up from an accidental spark.
Conclusions and useful video on the topic
Original tips for DIY furnaces for a private smithy:
How to make a small tempering furnace for metal workpieces:
Detailed instruction on the manufacture of stationary equipment for heating metal with gas:
We have reviewed and disassembled only a small fraction of the designs and schemes for the construction of forges. In fact, there are much more of them. However, the information we offer will help you get an idea of the types of equipment so that you can choose the best one.
Would you like to share your own experience in assembling a homemade forge and setting up a forge? Please leave comments in the form below the block, ask questions, post a photo on the topic of the article. It is possible that your recommendations will be very useful to site visitors.
