Calling a professional gasman to repair the slightest malfunction of the stove can be inconvenient, don't you agree? He needs to be met at home during working hours, often - to wait for his turn, and even pay for his work and a house call. So isn't it better to learn how to repair gas stoves Hephaestus himself?
After reading our article, you can independently repair the stove and carry out preventive maintenance so that the kitchen assistant works like new. We will tell you how to independently disassemble a gas stove, we will name the most frequent breakdowns. For the same faults that you can fix yourself, we will give you detailed repair instructions.
The content of the article:
- How do I get to the internal equipment?
-
Repair of electric ignition of the Hephaestus plate
- The electric ignition of one cooking zone does not work
- Electric ignition does not click
- Gas control malfunctions
- The burners are poorly lit
-
Problems with the knobs of the burners
- The handle does not push and turn poorly
- Checkbox scrolls or bounces
- The handle turns tight
- How to fix the Hephaestus stove timer?
- Oven door
- Conclusions and useful video on the topic
How do I get to the internal equipment?
For self-repair and access to all the details, you will have to learn disassemble a gas stove Hephaestus, but in most cases it will be enough to remove or raise the table.
It is not difficult to figure out how to remove the top cover from the Hephaestus gas stove:
- Remove the hotplates. Fold them in the same way as they were located on the stove, so as not to confuse the two average in power and not to guess when assembling.
- Unscrew the screwswith which the table is fixed. Most often there are two of them - under the front burners, but on some models they are placed on the front side. There may also be 2 self-tapping screws under each burner.
- Lift the table top gentlyto avoid chipping the enamel. If it still does not give way, check for self-tapping screws on the side surfaces.
- Place a support under the raised table. If the table has been removed completely, place it horizontally side by side so as not to damage the enamel or glass from falling.
It often happens that one of the bolts is stuck and does not give in in any way. In this case, bend the washer and cut off the screw head with a hacksaw.
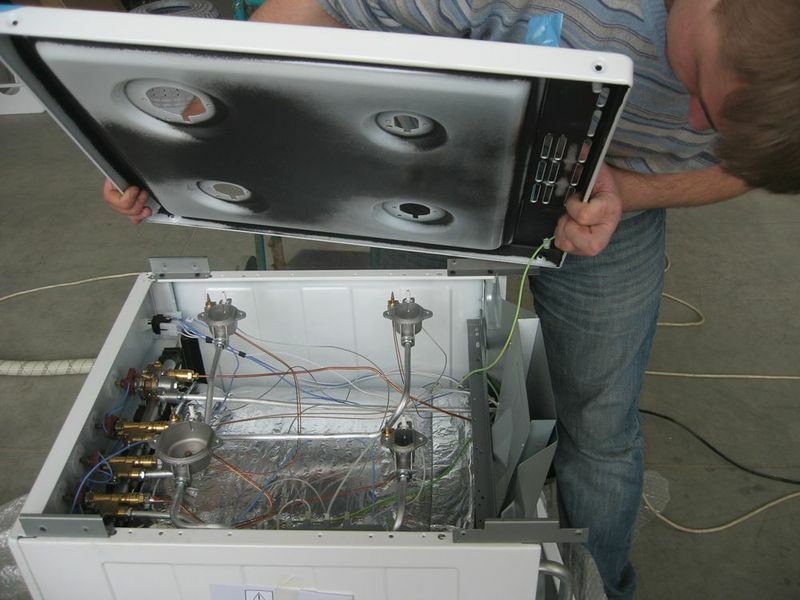
Under the table, you will have access to burner nozzles, gas control systems and electric ignition - almost everything that can be repaired
To repair handles and control buttons, access to gas taps, it may be necessary to remove the front panel. It is usually fixed with two bolts on the bottom or on the sides, but on some models it is fastened with latches. Note that the front panel is removed when the top cover is raised and the gas enable flags are removed.
The oven burner is covered with a tray. If you pull it out, you will have access to the burner itself, the gas control sensor and the piezo ignition plug.
Repair of electric ignition of the Hephaestus plate
If you turn the knob, you hear a characteristic hiss, press the button, but the gas does not light up - then there is a problem with the electric ignition of the Hephaestus gas stove, and you can try to fix it on one's own.
If you hear characteristic clicks, then somewhere the system is triggered, there is no spark only on the burner used. If there are no clicks, then the button or block-generator of electrical impulses is broken.
The electric ignition of one cooking zone does not work
It happens that the characteristic electric ignition clicks are audible, but one of the burners still lights up only from a match, then the problem is in the candle or the wire from it.
First of all, check the condition of the candle - it may be covered with a layer of dirt and grease.
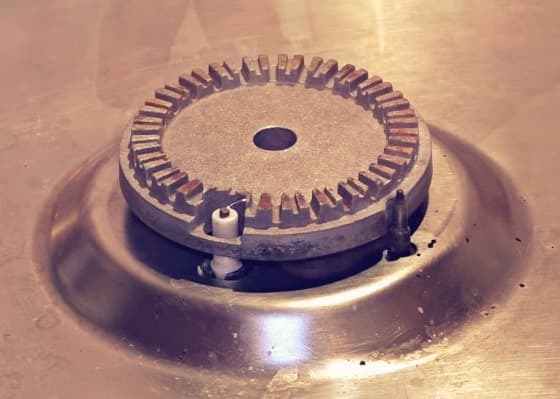
It is easy to distinguish the spark plug from the gas control sensor: it is thick, in white ceramic insulation, located closer to the middle of the burner, in the recess of the divider.
A layer of grease and dust on the candle can act as insulation that the spark cannot break through. Try to thoroughly wash the candle by removing the burner, and finally - degrease with alcohol or acetone. Pat dry with a paper towel or toilet paper, let it dry completely, replace the burner and check if it works.
If cleaning does not help, you should look for the problem further. Lift the stove table and inspect the wire that goes from the candle to the generator block, while trying to press the auto ignition button. Perhaps the wire touches the foil on the oven insulation, or the pipe, and a spark breaks through this place? It will be better seen in the dark or twilight - close the window, turn off the light.
If there is a spark somewhere other than a candle, wrap it with electrical tape and move the wire so that the spark is only on the candle, near the burner.
If it doesn't help, carefully examine the candle along its entire height: maybe the ceramic insulation has cracked on it, because of which the spark jumps lower than necessary? If so, this part will need to be replaced. Before doing this, be sure to unplug the stove from the outlet.
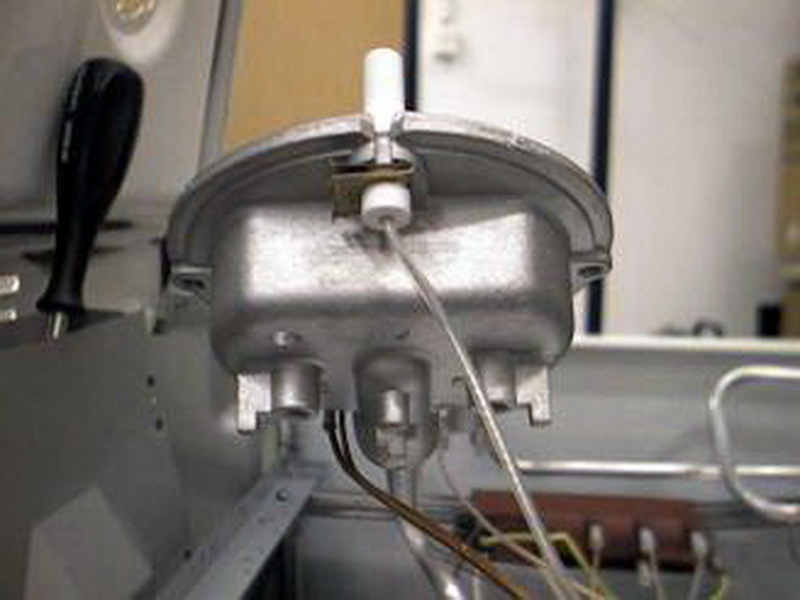
Going to the store for a new electric ignition plug, remember where you put the clip - a crocodile, it is necessary to install a new part
To remove the spark plug, remove the rubber gasket from it, squeeze and pull out the alligator clip under the spark plug, and then locate and pull the appropriate wire out of the generator block. After purchasing a new part, repeat the steps in reverse order.
Electric ignition does not click
If no burner lights up from the button, there are no characteristic clicks or the button is not pressed - it's not about candles. In the latter case, it is obvious that cleaning or replacing the button will be required, but if there is no such confidence, you need to check the unit's operability.
To do this, do this:
- Disconnect the stove from the outlet, lift the table and find the block to which the wiring from the candles and the auto ignition button goes.
- Remove all wires from its connectors, remove from the mount (bolts or latch).
- Insert a long piece of cable into two thick connectors on the edge, and into the remaining sockets - pieces of wire of the same length, stripped of insulation on both sides.
- Place the free ends of the short wires in a row or in a square, at an equal distance from each other.
- Plug the long end of the wire into a power outlet.
Sparks should appear between the risers and rhythmic discharge sounds. If everything is so - the unit is working, the problem is in the button or wiring. If not, take it for a sample and go to the store for a new one.
When connecting, the main thing is not to confuse the two power wires with the rest. Usually the plug on them is thicker, and the connectors for them are at the edge of the block. The wires from the burners can be swapped. If the unit is working, the problem is in the button or wiring.
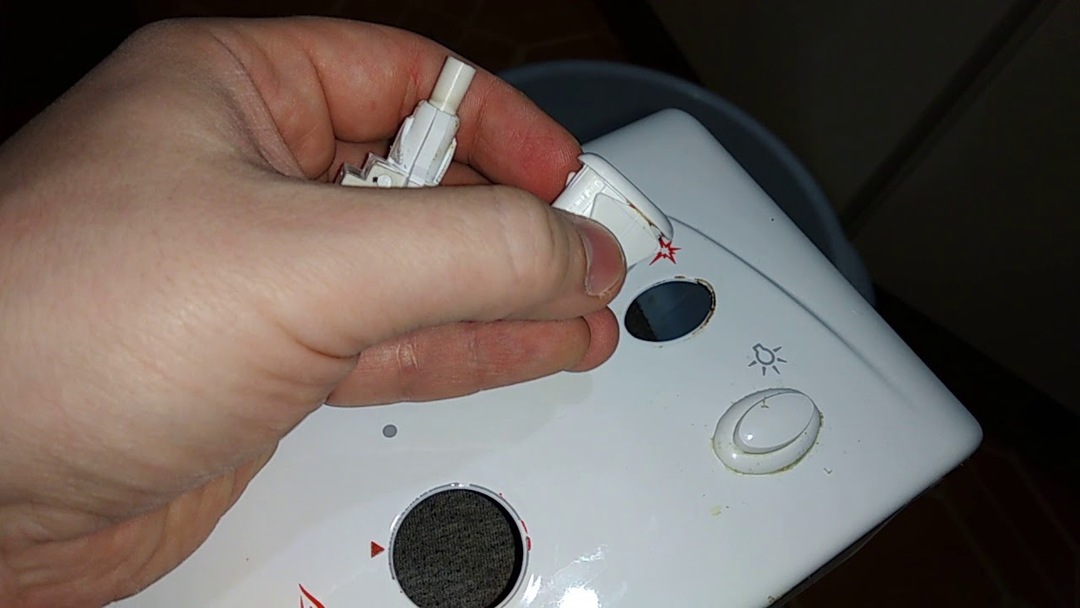
While removing the button from the latch, hold the parts on both sides so that the inside does not fall between the oven and the cabinet wall
First, wash the button well - it often sticks and stops working due to the accumulation of fat under the skirt. It is convenient to use a grease spray or remove the button from the panel.
Read more about why piezo ignition on a gas stove does not work read on.
Gas control malfunctions
Such a breakdown often enters the housewives into a stupor: the burner or oven ignites as usual by turning and pressing the knob, but it goes out as soon as the knob is released. The gas control system automatically shuts off the gas if the burner goes out or the knob is turned but not pressed - to protect against children.
Usually it is enough to keep the knob pressed for 3 - 5 seconds, the manufacturer recommends 10 - 60 seconds to be sure. If even after a minute of holding the knob, the hotplate goes out, then the leakage protection system is defective.
Gas control can only be installed in the oven or on all burners. The tip of the thermocouple is brought out near the burner, it is metal and rather thin, it quickly warms up from the burning gas. The heat from it is transferred through a copper tube to the gas control sensor installed in the tap behind the burner activation knob. As soon as heat ceases to flow, the magnetic valve of the sensor opens, shutting off the gas supply.
It happens that the gas control sensor does not work on the practically new Hephaestus stove. The reason is simple: the factory loosely tightened the nut that secures the thermocouple to the sensor in the gas supply valve to the burner.
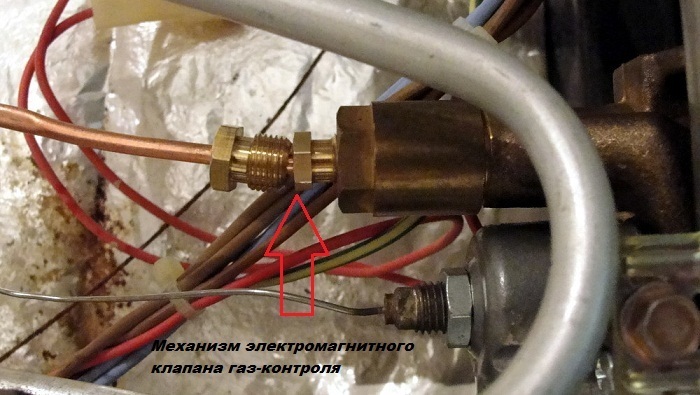
Just in case, check and tighten the thermocouple fastening nuts from all burners so that you do not disassemble the stove again later.
Open the stove table, find where the copper tube attaches to the tap (behind the burner start knob) and tighten this nut until it stops.
Over time, on the sensor thermocouplelocated near the burner, carbon deposits and scale may form. As a result, it heats up more slowly and does not work correctly. Fixing the problem is easy - clean the sensor with a thick cloth or zero-grade sandpaper. It is not recommended to use a coarser material: if the candle remains scratched, the next time it clogs up faster.
The reason why the oven in the Hephaestus gas stove immediately goes out, usually also lies in problems with the thermocouple, but another option is possible in the oven.
The burner of the oven is large, and the sensor is located at the very edge of it - at the first gas nozzles. It happens that the flame does not reach the sensor, or heats it up too weakly. Try to bend the sensor with a screwdriver, or unscrew the fastening screw and push the thermocouple forward slightly.
When none of the 3 suggested solutions helps, the thermocouple must be replaced. It is fastened with a nut on one side and a clamp on bolts on the other. Having removed the defective part, be sure to take it with you to the store - for a sample.
Usually a thermocouple is inexpensive, but if you are ready to give up gas control on this burner, there is also a free solution: connect directly, bypassing the sensor.
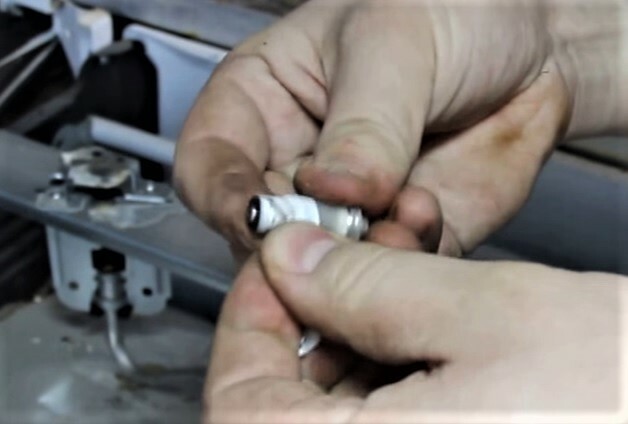
The solenoid valve, which cuts off the gas supply when the burner is out, can be fixed folded - just do not wind too much
To connect directly, do this:
- turn off the gas;
- unscrew the thermocouple - the copper tube from the gas valve with the sensor;
- with a 17 key, unscrew the sensor body from the back of the tap;
- the sensor looks like a plug with a spring stem. Fix it and insert it into place;
- screw the sensor body back on, tighten. Screw in the thermocouple;
- open the gas on the riser, check the tightness with soap foam.
Mistakes when assembling the valve threaten with gas leakage and the possibility of an explosion - be careful and be sure to check the gas valve for leaks after assembly.
The burners are poorly lit
It so happens that no matter how you turn the knob, the burner burns only at minimum power. If you do not take any measures, over time, it can stop burning completely. Most likely, the reason is that the gas nozzle is clogged.
Escaped food rarely gets into the nozzle, because during cooking it is protected by the top of the burner. Cleaning agents, especially those based on soda, are more common causes of blockages.
It is quite easy to clean the jet: first you need to remove the top of the burners and raise the table, in some cases it may be necessary replacement of jets on the stove. The burner burner is a small piece, the top of the gas pipe, with a thin hole in the middle.
This hole must be carefully cleaned. This is best done with a toothpick. It is not recommended to use metal objects for cleaning in order not to damage the hole.
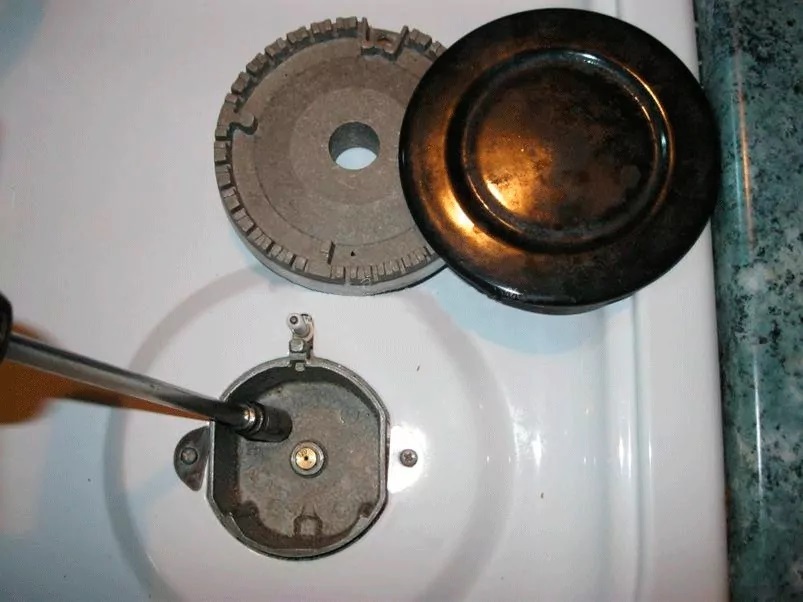
Escaped food rarely gets into the nozzle, because during cooking it is protected by the top of the burner. Cleaning agents are more likely to cause clogging, especially those based on soda.
In order for the cleaned dirt to fly out and not spill into the gas pipe, we recommend that you periodically open the gas supply to this burner - literally for half a second, but at full power. For safety, you need to open a window or turn on the hood.
Read more about how to increase the power of a gas burner. in this material.
Problems with the knobs of the burners
The knobs for supplying gas to the burner are one of the most necessary parts, without them it is impossible to use the stove. Behind the outer skirted flag that you turn, there is a gas cock, into which a gas control sensor can be built.
Electric ignition, built into the handle, is rare for Hephaestus stoves - usually it is carried out with a separate button.
Over time, the handles may stop turning, start to jam or start to spin. What to do with this, we will tell you further.
The handle does not push and turn poorly
Such a problem is not uncommon, if you start it, the handle may stop turning completely. This is usually caused by grease accumulated between the flag, skirt and the front of the stove.
Hot, it splashes during cooking and easily flows into all the cracks, and then cools, thickens and turns into a kind of glue.
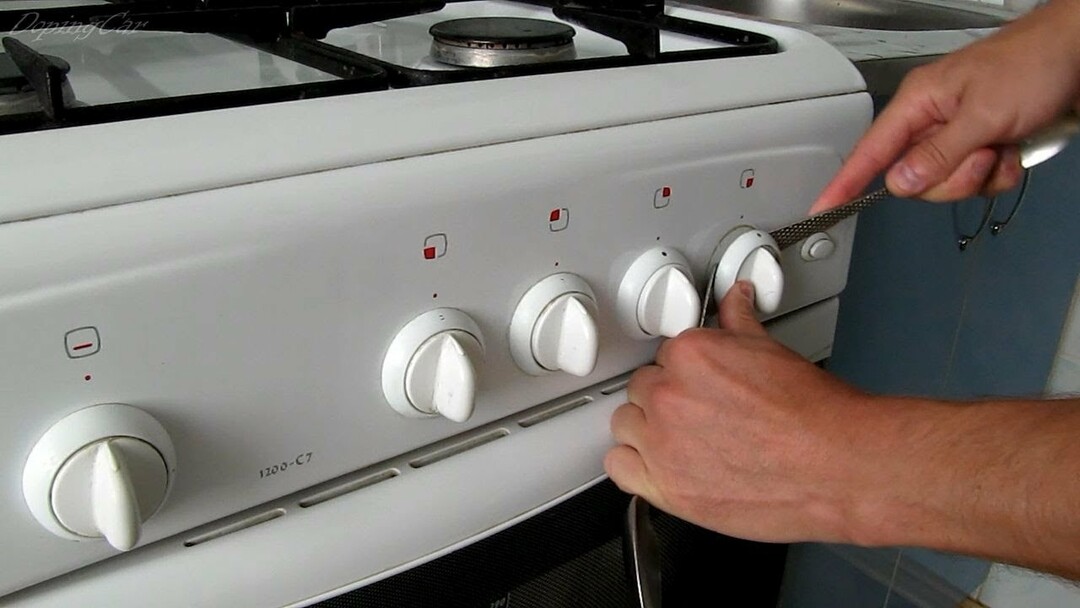
Gently pry off the skirt and handle with a knife, screwdriver, or other flat object. Do not use too much force - you can damage enamel or plastic
To get rid of the problem, the flag with the skirt must be removed from the stock and washed thoroughly. The handle needs to be pulled towards you - it is simply firmly planted on the stem, without latches or other latches. For convenience, you can grab it with pliers, preferably through a non-slip cloth, such as those sold for cleaning.
The skirt usually flies off itself after removing the handle, but if it does not rotate with a flag, then it can be secured with a latch. In any case, you can pick it out with a knife. Remember its position so that when assembling, the latches close to the panel or to the flag.
Many models have a reinforcing metal plate in the handle, don't lose it. After washing all the parts, as well as the front panel under the handle, reassemble everything. Remember to insert the spring if you had one.
Checkbox scrolls or bounces
This problem is rare in the Hephaestus plates, but it still happens. The reason usually becomes that a metal plate has fallen out of the flag and is lost, which clings to the recess on the stem.
You can cut such a plate out of a metal preservation cover and insert it into a special groove, or buy a new flag. If on your model the handle is completely plastic and its inner part is lapped, only buying a new one will help.
The handle turns tight
It happens that even after the flag with the skirt is perfectly washed, the handle still turns tight. The reason is that the grease on the gas taps has developed.
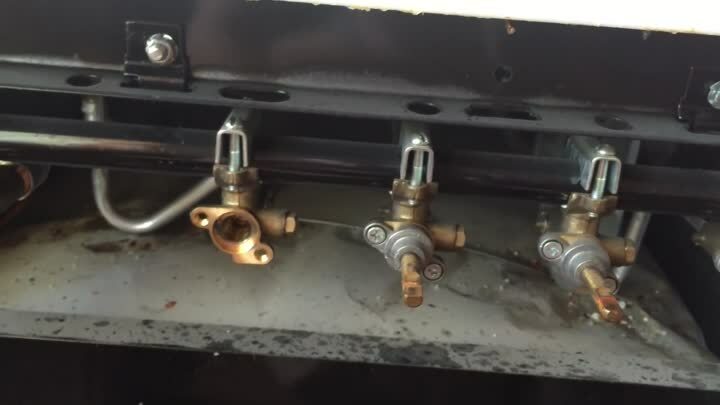
It is better to invite a specialist to carry out preventive maintenance, because errors in such repairs threaten with leakage or clogging of the gas supply pipes
If you decide to lubricate the gas taps yourself, buy a special graphite grease for this. Shut off the gas supply to the stove. Then remove the handles and the front panel - we described how to do this above.
In Hephaestus plates, the stem is fixed in the valve with a flange connection, in order to remove it, it is enough to unscrew the 2 bolts on the sides. Wash the stem immediately from grease and dust.
Then the spring and the valve plug are removed - the latter needs to be lubricated. This is a cylindrical part with a through hole and a saw cut on the side, through which gas is supplied to the burner. You need to lubricate the cork quite a bit, the layer should be invisible, but felt to the touch. It is more convenient to put some grease on your finger and rub the cork.
After assembling the crane, do not rush to replace the front panel. First, put the flag on the stem without it, turn on the gas and apply a soapy solution to the tap. If no bubbles appear anywhere, wipe dry and reassemble the stove.
How to fix the Hephaestus stove timer?
You can remove and repair only a mechanical timer yourself, with an electronic one it is better to contact a specialist. The alarm mechanism looks like a large metal pill.
To reach it, remove the handle, raise the plate table and unscrew the fasteners. Then open the timer case, blow through and brush off the dust, lubricate the pendulum and gears.
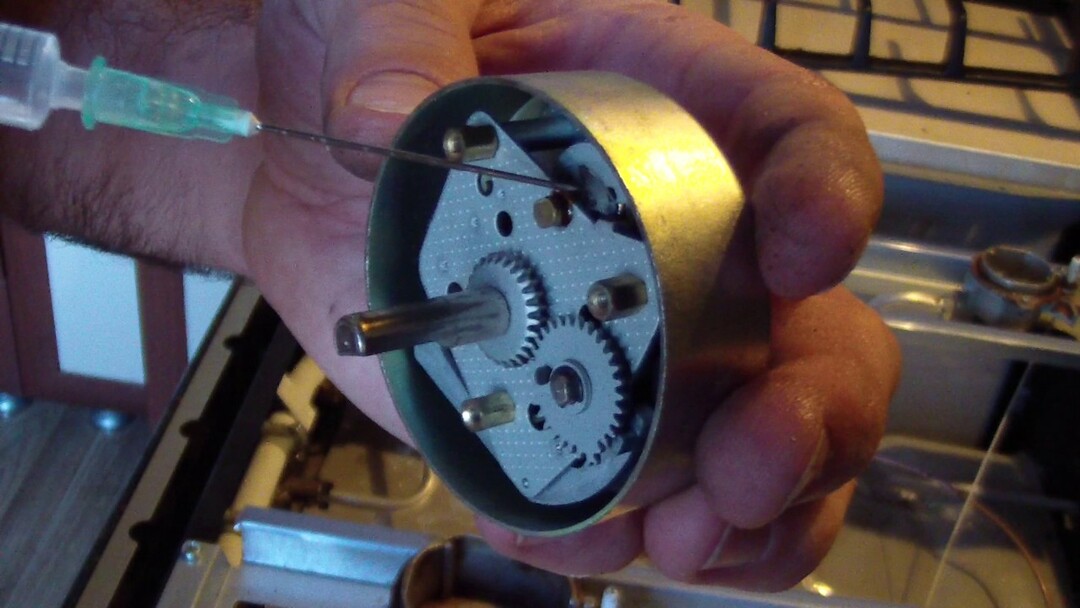
In order not to pour too much, use machine oil in a special oiler with a fine nose or an ordinary syringe.
Try turning the knob to start the timer. Started ticking? So it can be assembled and installed in place. No? Try taking it to a watch repair shop, or buy a new one.
Oven door
Most often, there is only one complaint about the oven door: it does not close well. A well-adjusted door should slam shut so that the sheet of paper is supported.
Otherwise, the gap is too large, which means that the heat loss will be higher, the dishes will cook unevenly, and the top panel and the plastic handle will turn yellow. Problems can be prevented by timely repairing the oven door of the Hephaestus gas stove and adjusting it.
The manufacturer uses 2 types of hinges for fastening the oven door - on a latch, collapsible, or solid, screwed on with screws.
The first ones are easy to remove: just lift both latches, close the door and pull up and slightly towards yourself. Then the door can be conveniently washed, or immediately returned to its place, already in the correct position. After inserting the door into the grooves, pull it up slightly, and then fully open and lower the latches.
To adjust the door on solid hinges, the screws for their fastening to the door must be loosened, but not completely unscrewed. Then loosen the door so the hinges are in place and tighten the screws.
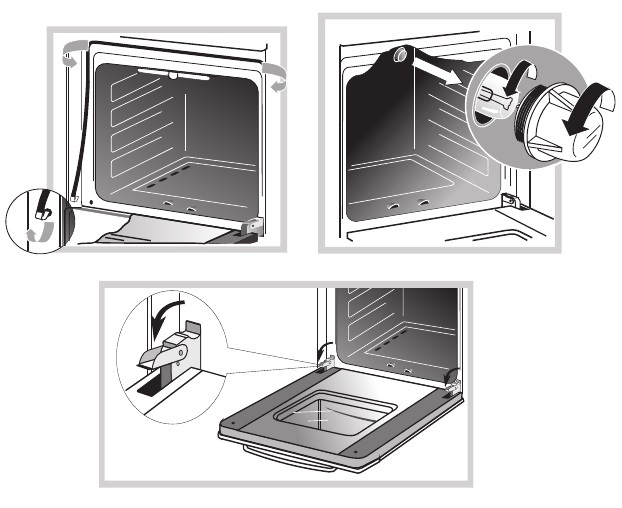
The device of most of the nodes of these budget plates is intuitively understandable, and the simple repair of your particular model is described in the instructions
In addition, over time, it may be necessary to replace the rubber seal - it dries out and cracks from the temperature. It is attached to hooks, kept under tension, so the only problem that can arise is finding a suitable new seal in stores.
In addition to repairing the door, it may be necessary to remove the glass in order to wash it from the inside or replace a broken one. The outer glass is inserted into a metal guide at the bottom, and is pressed against the top by the door handle. To remove it, it is enough to unscrew 2 or 3 screws holding the handle on the oven door - just hold the glass so that it does not break. Do not forget to wash and dry the handle itself, otherwise drips from it will stain the glass even during the assembly process.
The inner glass is attached in different ways, depending on the size. Small ones at the top and bottom are clamped by bolts with large washers. To remove the inner glass, which occupies almost the entire door, you need to unscrew the fasteners at the bottom of the door.
Conclusions and useful video on the topic
We offer you to watch the video on how to fix the most frequent malfunctions of the Hephaestus plate.
Cleaning the gas burner nozzle:
How to disassemble and clean the front panel handles:
Now you know more about your stove and its repair, and you will no longer call the gasman for every little thing. However, we would like to remind you that any repairs related to the disassembly of the gas pipeline - lubrication of taps, replacement of burners or nozzles, replacement of the gas control sensor in the tap - should be entrusted to a professional.
Did our article help solve your problem? Perhaps you have encountered other Hephaestus plate malfunctions or repair methods? Write your stories and questions in the comments.

