The type of heating in which heat is generated through the use of electrical energy is distinguished by a simple circuit to perform, and its installation takes minimum time. It is not necessary to be a professional to arrange an electric underfloor heating with your own hands, you just need to follow all the instructions exactly.
In the article presented by us, all types of electric underfloor heating systems are described in detail, their characteristics and advantages with minuses are given. For independent house craftsmen, we have provided step-by-step installation instructions. Taking into account our advice, you can build and connect the electric floor with your own hands.
The content of the article:
- Electric floors and their varieties
-
Cable heating system
- Features of work and device
- Electrical floor installation in the screed
-
Electric floor based thermomat
- Principle of operation and facilities
- Installation of thermal mats
-
The specifics of the film floor
- The process of laying the infrared system
- Some useful tips
-
Warm floor rod type
- Subtleties of work and organization
- The nuances of installation and connection
- Conclusions and useful video on the topic
Electric floors and their varieties
Depending on the heater used, the floors with electric heating are divided into 2 categories: with a heating element in the form of a cable and with an infrared one.
According to the method of production they are divided into 4 types:
- Heating cable It can be single-2-core, including self-regulating.
- Heating mats. It is a cable on the mounting grid.
- Film. Polymer flexible fabric with built-in infrared heating element.
- Rod. Consists of carbon fiber rods connected in series.
Calculate a warm electric floor, based on the size of the free part of the room environment. It is not recommended to lay heating elements under the furniture because of the excess load on the system in the specified areas. The power of the floor is chosen from the considerations of 0, 1 kW / m² on average. For different rooms, this figure is different.
Image Gallery
A photo of

Electric floors can not be called economical in operation. You will have to pay for electricity consumption, but in the device they are much simpler than water.

For the device of electric floors there is a wide range of systems on sale, which you just need to lay down and connect to the power supply and control devices

In contrast to water-heated floors, the construction of which is allowed only in private homes, electric floors can be arranged in high-rise apartments, offices and other public places.

The coupler above the electric floor heating is much smaller than above the water floor. Warming up the room is faster

An infrared floor device does not require a screed at all. Laminate, for example, can be put immediately after the organization of the floor system

The simplest version of the electric floor is the cable system, which is fixed on the base and poured cement mortar

Cable laying is much faster and more convenient if it is embedded in a reinforcing polymer substrate, with which it forms the so-called mat

An infrared floor device is simply and extremely quickly manufactured, the construction of which can be performed by a performer without experience.

Electric floor heating system

System prepared at installation

Laying electric floors in apartments and offices

The device electrical system under the tile

Laying laminate over infrared floor

Cable heating construction

Electric mats in the organization of warm floors

Film infrared heating
It is important before starting work to calculate the step with which the cable will then be laid out. To do this, find the quotient from dividing the area planned for laying the heating system in m², multiplied by 100 and divided by the section length in m taken from the passport.

If there is no alternative heat source besides the warm floor in the house, the area occupied by the system should be at least 70% of the room as a whole.
With arguments and criteria for choosing the best option for you a device for underfloor heating will introduce next articlewhich we recommend to read.
Cable heating system
Heat transfer cable heating floor is very high, virtually all electrical energy is converted into heat. It includes a heater cable, coupling, devices for adjustment and control. The cable is laid both in the screed and under the floor covering.

Electric underfloor heating can be heated to 60-70 degrees. Each type of it works on a special technology that has its own structural differences.
Features of work and device
There is no heating boiler in the system, the electrical cable itself gives off heat. Most often it is used as an auxiliary type of heating, but if the house is well insulated, the floor, heated with a cable, can serve as the main source of heat. The cable is laid in 3 ways: under the screed, inside and above it.
It is necessary to position it evenly, maintaining a distance from one to the other heating line of at least 80 mm and avoiding intersections, kinks and stress on turns. It is easy to damage the cable during installation, so experienced craftsmen recommend putting on soft shoes or covering already assembled areas with sheets of plywood.
Electrical floor installation in the screed
The installation process in the screed electric floor heating is labor intensive. The advantage of this method is that the heating element, being in the center of the screed, will heat up the surface more quickly and evenly. The technological process consists of several stages.
Image Gallery
A photo of

Before the construction of the floor heating system clean the base. If necessary, repair, then completely clean the dust and debris

The prepared base level polymer self-leveling mixture or sand-cement mortar

After the leveling layer has hardened, a substrate is laid on it that serves as a waterproofing and heat insulation.

A reinforcing mesh is laid on the substrate, which will protect the tie from cracking, provide it with rigidity and serve as a guide structure for the electrical cable

The electrical cable is attached to the reinforcement grid with flexible installation strips, mounting brackets or conventional wire

To control the electric heated floor on the wall have a thermostat, which is connected to the electrical cable and temperature sensors

After connecting devices to the thermostat, the system is checked for operability. If everything is in order, pour it with a cement screed

After waiting for hardening of the second layer of the screed, proceed to laying the floor covering, which is carried out in the usual way

Stage 1: Cleaning the base before installing the system

Stage 2: Leveling the base under a heated floor

Stage 3: Laying the thermal insulation substrate

Stage 4: Construction of reinforcing mesh

Step 5: Fasten the electrical cable to the reinforcement mesh

Step 6: Install the control unit on the wall

Step 7: Fill the screed over the electrical system

Stage 8: Laying the flooring
First pour the first layer - this will be the basis. The plates are pre-cleaned. With the aid of a perforator, they widen cracks over a millimeter wide and fill them, as well as chips and holes, with mortar.
The plate is aligned horizontally, if necessary, apply the composition of "self-leveling floors." After the base has dried, a liquid waterproofing is applied, and I leave it for 2 hours to dry.
A heat-insulating substrate with a foiled heat-reflecting layer is spread over the surface. If there is an unheated room at the bottom, then choose heat insulation with a height of 5 to 10 cm. Otherwise, a layer of 2-3 cm is sufficient. Sealed seams and joints with foil tape.
Perform the assembly of the heating circuit. In the perpendicular direction with respect to the wall chosen for the installation of the control unit, strip strips are mounted for fixing the cable. The edges of the polymer strips should end at a distance of 50-100 mm from the walls.
If mounting strips are taken instead of strips, they are removed from the walls by 200 mm. Before laying the warm floor check the cable resistance with a tester. The readings are compared with the passport, the allowable difference is 10% maximum.

Cable system "warm" floor is suitable for all types of rooms. It is easy to install and has an economical power consumption.
The starting point in the wiring diagram of the electric floor heating cable according to the classic version is the control unit. Make out the calculation in the form of "snake" and have parallel to the wall.
All transitions to the next turn should be outside the border rails. At the finish of the opposite wall should be an insulated end. The option when installation starts from the end is also possible.
After the line is fully laid, a temperature sensor is mounted in the metal corrugated pipe between the turns. The wires lead towards the plinth, and then to the control unit. You should not blast the sensors into concrete - their extraction, if necessary, becomes very difficult.
After checking the reliability of fixation of the laid elements, they are poured with a concrete tie, the capacity of which depends on the technical data of the object and the type of electric heating system. The solution must be well sealed. If voids remain, the thermal conductivity of the upper layer will decrease.
In the role of the control unit for the warm floor acts thermostat. He is responsible for processing information from the temperature sensor, and turning off or turning on the system in accordance with the settings. The thermostat can be either programmable or without software. Connect it to a 220 V outlet. Place for installation is chosen on the site with free access.

The connection starts by connecting the temperature sensor after this - the heating cable to the individual connectors. Further to the control unit down the line from the shield
Experts do not recommend connecting the control unit to a regular outlet. This can create an additional load on the wiring. You must create a separate branch to connect the system.
In some cases, the cable is laid in the grooves made in the concrete screed. The cable in the grooves is filled with tile glue. The advantage of this method is that the level of the final coating remains at the same level. After the installation of the cable is completed, the floor is turned on only after 2 weeks.
Electric floor based thermomat
For the production of thermomats use cable no thicker than 45 mm. It is fixed on a 0.5 m wide fiberglass mesh. The cable has a shielded and protected outer sheath. For residential premises, heating mats with a double core are used because of their significantly lower level of electromagnetic radiation.

If a tile is chosen as a finishing coating, instead of a concrete solution, glue for this type of material, specifically designed for underfloor heating, is poured over the cable instead of the concrete solution.
Principle of operation and facilities
The heating mat includes 2 elements: a thermomat with a cable and a corrugation. A sensor is inserted inside it, and it protects it from moisture and aggressive effects. If the glue layer is so thin that it cannot completely close the corrugation, you need to use a moisture-proof sensor.
Thermostat complete with a remote temperature sensor, wiring boxes, wires purchased separately. When choosing the first element take into account the maximum energy consumption. The cross section of the wires are selected, focusing on the power system and the material of manufacture.

If the cable needs to be wrapped, then cut the grid. The cable itself can not be cut and shortened. During installation, it should be at the top, the grid is attached to the floor using adhesive tape or staples
The installation process is extremely simple, since thermomat - product completely ready for installation. There is no need to fix the heating cable, and the uniformity of installation is provided by the design itself. Its cost is higher than that of the cable floor, but it has a lot of advantages, including a faster heating of the surface.
Installation of thermal mats
Before laying out the heat mat, the floor is covered with a layer of primer. This will increase the adhesion of the adhesive to the concrete surface. Usually, the glue is applied immediately to the mat, but if it is a wet room, then after applying and drying a thin layer of glue, it is covered with waterproofing and then again with glue.
In order not to violate the integrity of the cable and evenly apply the binder, it is necessary to distribute the adhesive composition using a plastic comb. Glue is laid on the tile and level it.
Tile plus glue should give a total of 20 mm, although some manufacturers recommend a minimum of 50 mm. This is explained by the fact that with such a thickness of the layer, the heat is distributed more evenly.

The photo shows the sequence of laying the warm floor of thermal mats under the tile, ranging from the choice of location (1) to tile laying (7). Installation is simplified if the room has a rectangular shape.
In accordance with the EMP, it is imperative to install a safety shutdown to ensure safety and a circuit breaker. If the system is installed in a bathroom, the thermostat should be moved to an adjacent dry room.
Image Gallery
A photo of

In the device of heat-insulated floors with use of electric mats of stages considerably less. However, the preparation of the base is carried out in the same manner: repair, level if necessary, remove dust and debris.

After waiting for the complete curing of the screed, place the mats. When using them, there is no need for a reinforcement mesh device and for attaching a cable to it.

According to the mats laid according to the scheme, a cement-sand or polymer screed is poured. It is laid not only on the heating system, but also on the unoccupied areas of the mats.

After a time, laid on the hardening of the cement-sand screed, laid flooring

Step 1: Tie down the base

Step 2: Laying the mats on the hardened screed

Step 3: Fill the screed on the electric mats

Step 4: Flooring Device
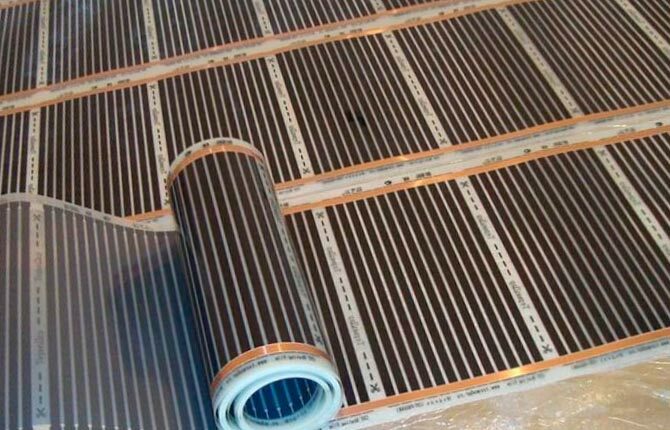
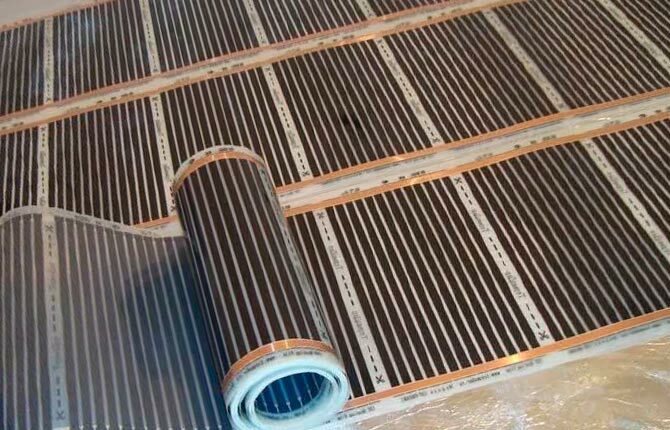
The specifics of the film floor
In the device system is warm film electric floor no special difficulties. Many stack it yourself. It is suitable for any flooring. The system, which is based on infrared radiation, is safe even for laminate and other wooden coatings.
There are 2 types of such films for the floor:
- Solid. Available in the form of a thin two-layer polyurethane film with continuous carbon coating inside.
- Striped. Including the same 2 layers of polyester film, polyester or polyurethane with carbon-fiber or ultra-thin aluminum stripes located between them.
Thermal elements in these systems have parallel and serial connections. At the edges they have bimetallic current-carrying tires of silver and copper strips stacked on top of each other. The infrared film floor is not made with the screed coating or in the layer of glue. Only “dry” styling is suitable.
Warm infrared floor has several advantages.
These include:
- easy and quick installation;
- small film thickness (0.3 cm) which does not significantly reduce the height of the room;
- the possibility of excluding such a working moment as pouring a screed;
- no effect on indoor humidity;
- antiallergic effect;
- relatively low energy consumption - 20% less than other types of electric heating systems;
- air ionization;
- easy disassembly if necessary;
- high reliability.
The standard set of materials includes a thermofilm, twisted into a roll, contact clips, insulation and electrical wiring. To this set it is necessary to add a thermostat equipped with a temperature sensor, as well as plastic film, tape, foil material. Before you buy all this, you need to calculate the required footage of the film.

It is not necessary to warm the floor with home appliances and furniture - these are unreasonable costs and excessive load on the system. Spread the film completely over the entire plane only when the owners are used to changing the situation frequently.
The easiest way to make a sketch of the premises on graph paper. Further, it should be noted the places where the sensors and connection points will be placed. Select the part of the room where you plan to install a warm infrared floor, then calculate how many heating elements will be required.
Compare device specifics film and cable floors will help the information contained in the article recommended by us.
The process of laying the infrared system
If the previous coating is in a normal condition, then it is allowed not to dismantle it by the technology of laying an electric infrared heat-insulated floor. Simply clean and eliminate the drops. A roll of film floor is cut using ordinary scissors.
It should be borne in mind that when forming the surface, the strips should not overlap or touch current-carrying tires. Manufacturers usually designate cutting points. This does not mean that the film can not be cut in other convenient places.
Image Gallery
A photo of

Infrared film is easily cut with ordinary scissors. But it is important to remember that you can only cut along a transparent strip, without intersecting carbon-coated elements.

To protect the free cut of the busbar, located on the non-connected side, it is sealed with bitumen tape

"Non-working" cut of the infrared sheet, to which the wiring will not be connected, after attaching the insulation to the tires, we glue them with ordinary tape

Under the connecting terminals choose grooves. Ideally, this is best done in a heat insulating substrate, but in the example they were formed in a leveling screed

Before laying the infrared strip base is covered with waterproofing. If the insulation material has a foil layer, then it will also work as a reflector.

On the laid waterproofing assembly of the floor heater is made. Connection terminals are located in previously selected recesses.

The assembled floor is connected to a thermostat located on the wall. Thermal sensors are brought to it and the system is checked for operability.

Convinced of the normal operation of the film floor and eliminating the shortcomings, if any, it is waterproofed and the finish is laid.

Stage 1: Cutting the carbon bands for laying

Stage 2: Isolation of the busbar

Stage 4: Sticking the edges of the infrared strip with tape

Stage 4: Forming recesses for the terminals

Stage 5: Laying foil waterproofing

Step 6: Assembling the Electric Film Floor

Stage 7: Checking the infrared film floor for operability

Step 8: Laying the flooring on top of the system
The main thing is that the cut must pass through the gap between the heating elements. In case the incision fell on the designated line, only collector bimetallic plates are insulated. In other cases, tapes glue the ends of the strips.
First lay a layer of waterproofing to protect the floor from moisture from the concrete floor. Next is the insulation, which prevents the loss of heat from the radiation reaching the base. Material can be used any, the main thing that the metallized party was directed outside.
Mark up the place where the wiring will take place. After assigning space for the installation of the sensor. The channel under the temperature sensor perform a width of about 20 mm. Wiring for the sensor is placed in a corrugated tube, then placed in the prepared channel.
Next stack the prepared strip according to the sketch. In order to reduce the length of the wire when laying the strip, it is turned with the face sides to the wall, where the thermostat will subsequently be located and stop, not reaching centimeters 15.
If there is a fireplace in the room, at least 1 m will retreat from it. The film is laid upside down, which is indicated by the manufacturer of the system in the instructions for the product. Connect the clips to the edge of the bimetallic strip, then connect the wires - the left clips are attached to the left clips and the right clips to the right clips.
The wiring for the thermal sensor should be hidden under the thermal film. To this end, narrow grooves with a width of 1 cm are cut out in the insulation, and an adhesive tape is pasted over the power cable laid in them and covered with a thermal film. We can not allow the wires to rise above the insulation.
The insulation on the edge of the wire is removed, rolled up, the wire itself is pushed through the clamp, fixed with pliers, then the junction point is insulated with bitumen tape. By connecting the entire circuit, measure the resistance of the resulting structure.

You can use as a reflective insulation, and not reflective in the form of cork web. Only the thickness of the layer is regulated - from 3 to 5 mm. Fasten strips of insulating material with mounting tape
The final stage is the installation of the finishing coating. The principle of connection of the thermostat is the same for all types of warm electric floor.
Some useful tips
Before completing the work by laying the finish coating the system is tested. If the thermofilm meets all requirements, there will be no sparking and overheating of areas anywhere. If, however, any defects are found, the floor is covered with another layer of polyethylene film with a minimum thickness of 80 microns. It is overlapped with an approach of about 20 cm.
There are a number of additional recommendations from installation professionals:
- The film warm system should be installed at moderate humidity (maximum 60%) and above zero temperature.
- The film in a minimized form can not be connected to the network.
- Before connecting the film floor, it is necessary to check the insulation of the contacts in the places where the cutting of the sheet took place.
- In case of damage to the thermofilm in the place where the graphite coating is located, apply two-sided insulation.
- If the floor is flooded, it is immediately disconnected from the mains and left to dry in natural conditions.
- Walking on the finished floor in the shoes can not be.
It is impossible to wall the thermal sensor. It is necessary to leave the opportunity for its control and replacement. Also, do not place carpets and other dense natural surfaces on the warm floor. To ensure ventilation and eliminate the possibility of deformation of the final coating due to temperature changes, it is recommended to leave a slight gap between the wall and the coating.
Warm floor rod type
Rod carbon floor - a core structure that heats the room with infrared rays of a far wave. There is no electromagnetic radiation in this range. Its peculiarity is that it is not the atmosphere that is heated, but the objects present in the room.

Carbon composite material is based on carbon nanostructure in combination with binding components. Carbon and carbon floor - one concept
Subtleties of work and organization
Its composition contains carbon rods connected in parallel into elastic mats 0.8 m wide and 25 m long using power wires. Inside the "carpet" placed heating elements. The interior of the rods consists of carbon, silver, copper, and the heat is emitted by the first of them.
In addition to the rods in the composition of the floor there is a temperature sensor and thermostat. This floor has the property of self-regulation. This means that the amount of heat is directly proportional to temperature. The disadvantage is that its installation is possible only with the use of screed, therefore, its dismantling is out of the question.

Rod infrared floor consists of carbon rods connected on both sides to the current-carrying cable
If any object is placed on the floor plane, the heat transfer in the place occupied by it decreases, and the rods begin to emit less heat, thus lowering the temperature. Therefore, the thermostat is only needed here for power control, the core field itself performs the function of preventing overheating.
The nuances of installation and connection
Although the core floor is considered an intellectual system, it can be laid by hand. The technology is simple, but it will work provided that all requirements are met.
Image Gallery
A photo of

Laying carbon rod floor is essentially similar to the floor heating device of cable mats. First, a heat-insulating substrate is laid on the prepared base, then, according to a previously developed scheme, heating strips are laid

During laying the strip of carbon floor is attached with adhesive tape to the substrate so that they do not move during the work.

All the electrical connections of the heating carbon system are duplicated by a protective heat shrinkable tube that is available in the rod floor configuration

The wire sensor that fixes the temperature of the floor heating, leads into a corrugated tube

In order that the temperature sensor does not create an unnecessary relief above the surface of the system, a longitudinal hole is cut out in the heat insulating substrate

A temperature sensor that reacts to a decrease / increase in the temperature of the system is located between the rods and is fixed with adhesive tape

Upon completion of the core system assembly, a check is carried out for the operability and quality of the connections. If defects are found, they are eliminated at this stage.

After checking the performance is filled with a tie, which is the basis for the device flooring

Stage 1: Laying the core floor on the substrate

Stage 2: Fixing the carbon system with scotch tape

Stage 3: Forming floor connections with wiring

Stage 4: Preparation of a rod floor temperature sensor

Stage 5: Cutting holes in the thermal insulation substrate

Step 6: Fix Sensor Position

Step 7: Verify the health of the assembled system

Step 8: Fill the screed over the carbon rod floor
The process consists of 8 consecutive steps:
- preparation of the base;
- laying heat reflector;
- mounting rods;
- connections between the bands;
- power cable connections;
- connecting the structure to the thermostat;
- connect the temperature sensor;
- Tile fills or installation of a tile-type topcoat.
Before performing these works, plan in which direction the heating mat will be laid and calculate the amount of material. The carbon floor comes on sale as a kit, but sometimes you have to buy some of the consumables.
The choice of power is influenced by 2 factors: the area and type of heating. According to their power, rod-shaped underfloor heating is divided into 2 types: up to 160 W / m² and up to 220 W / m².

The most rational option for the location of the heating mat is along a long wall with a focus on the thermostat, because in this case, when connecting to a temperature controller, you can take shorter wires and reduce the number cuts
The most rational option for the location of the heating mat is along a long wall with a focus on the thermostat, because in this case, when connecting to a temperature controller, you can take shorter wires and reduce the number cuts.
Most manufacturers produce a complete installation kit. At a minimum, it includes a rod mat, connecting kit and end, wires, installation instructions. Everything else: thermal insulation, tape, corrugated pipe with a plug, a thermostat, a sensor, bitumen insulation - is purchased separately.
It’s better to arrange the option of a heated floor: electric or water one for the subsequent laying of the laminate; in the articlededicated to this issue.
Conclusions and useful video on the topic
Video # 1. You will learn all about laying pivotal flooring in this video tutorial:
Video # 2. Choose the type of electric floor will be easier if you read this video:
Video # 3. How to not spend too much when buying a floor heating system will teach the author of this video:
Heating the house with the use of electric underfloor heating will allow you to maintain a comfortable temperature. The temperature difference between the top of the room and the floor will be minimal. If you choose the right system, just calculate everything and do the installation yourself, then in terms of finance you can win.
And what type of underfloor heating do you prefer for arranging your own summer house / apartment? Possible, you have a desire to share the subtleties of editing, known only to you? Please write comments in the block below, ask questions, post a photo on the subject of the article.