Sleeping places for children and adults take up too much space? Are the models presented in stores too monotonous, expensive, of dubious quality? The best solution to such problems is a do-it-yourself bunk bed made of wood or MDF. It will withstand active games of children and attacks of pets, will make your interior individual and stylish, and will cost much less.
In this article, we will give step-by-step instructions on how to make and assemble a bunk bed for children or adults ourselves, we will describe common and original solutions. For inspiration, photos of the best models are waiting for you, and for clarity, diagrams and videos.
The content of the article:
- When is a bunk bed indispensable?
-
Work preparation and planning
- What material to choose?
- Choosing fixtures and finishes
- Preparation of a working tool
-
Instructions for making a classic model
- Calculations and purchase of materials
- Step 1 - sawing and preparing parts
- Step 2 - assembling the side part of the drawer side
- Step 3 - assembly and finishing
- Alternative designs
- Ideas for creativity
- Conclusions and useful video on the topic
When is a bunk bed indispensable?
Until recently, it was believed that bunk beds are appropriate only in the nursery, in families with 2 or more children. The two-story lodge for adults was associated primarily with a hostel or a cheap hostel.
With the rise of studio apartments and small smart homes, this piece of furniture has been given a new lease of life. A modern bunk bed can become a sleeping place for the whole family, as well as combine the functions of a bed, a sofa, a children's sports and entertainment complex, closet and even an office. From 1 to 4 beds, from compact children's models to King Size beds.

To create a stylish and functional piece of furniture, it is not necessary to spend a lot of money. A little patience and accuracy - and an amazing result is guaranteed
If a decision is made to use MDF sheets as a material, then it is better to order cutting sheets and finishing the ends in the workshop, and only assemble them yourself.
In each of the store models, some solutions are strikingly beautiful and practical, while others I would like to correct. Do not look for compromises - embody all the best ideas, in your opinion, in a bed of your own making!
Work preparation and planning
So that in the process of work there are no annoying surprises and inconveniences, and the result does not become a disappointment, the first thing to do is to think through everything. Don't pick up a tool until you've decided exactly what the finished product will look like and how to complete each step from material preparation to assembly and decoration.
What material to choose?
From wood materials, board and timber, MDF, chipboard, plywood, solid wood and furniture board are popular.

Use a slab - a solid cut of a tree with bark - and peeled branches for an eco-style interior. Carefully polish and varnish all roughness and corners
Each of these materials can be used in the manufacture of a wooden bunk bed.
In popular models, they are used for this purpose:
- Board and timber - the most common solution, many models of bunk beds are completely made of them. If you choose the right thickness, it can withstand high loads in both children's and adult beds. Buy well-dried, planed, or at least edged, bark-free, selected grade lumber, free of knots and other defects.
- MDF - looks more modern than boards, costs a little more, you can easily cut out any original shape from it. It is better to order a cut in a specialized workshop to process the edges. For load-bearing parts (racks, drawers) it is used only in children's beds due to its lower strength.
- chipboard - inexpensive, but not strong enough plates. Used for decorative sheathing of a frame made of timber. To prevent harmful formaldehyde fumes, all edges must be sealed.
- Plywood 4, 8 or 12 mm - can be used as a base for a mattress (we will tell you more later), filing a bed of 2 tiers from the bottom, the bottom of drawers.
- Solid wood, slabs or furniture boards - an excellent solution for the headboard, footboard, visible part of the sideboard, if you have experience with them. They allow you to carve or ornament, they are absolutely environmentally friendly and look solid, but they are difficult to process and are quite expensive.
Bunk beds for adults are often made on a metal frame, but this is a topic for a separate article. MDF and chipboard are not strong enough, and solid or glued timber for load-bearing structures must have a large cross section.

The metal frame allows you to create transparent, but very durable structures of the original form. The main disadvantages are a lot of weight and cold if accidentally touched at night.
The choice of material is strongly related to the desired model. From timber and boards, you can assemble a strong, but “transparent” structure that will not visually clutter up the space, and from MDF - a wall or a “room in a room”.
Choosing fixtures and finishes
Having decided on the model and the main material, it is worth creating a drawing or taking a ready-made one on the Internet. It is necessary to calculate the necessary purchases and simplify the work.
Draw not only a general plan with the main dimensions, but also separately the headboard, footboard, bed and stairs. This way you can display all the details and imagine the assembly order.

If you are good with a computer, it is more convenient to develop a drawing in a special program: it will not make mistakes, automatically generate drawings of individual parts and calculate materials
In addition to the main material - beams, boards, MDF, plywood, fasteners and finishing elements will be needed.
The most reliable combination is wood glue and self-tapping screws. For a secret, invisible connection, dowels are used, the frame of the bed can be assembled on metal corners, and for a simple and reliable connection of the bearing parts - bolts. You can choose any type of fastener or combine all of them in different details.

For MDF and chipboard, small round dowels are used, because it is almost impossible to carefully knock out a hole in them for oval fasteners
In order for the bed to have a finished look, like a shop, and not a handicraft one, you need to process the ends, mask the screws and finish the coat.
All visible self-tapping screws are screwed “under the sweat”, slightly sinking the hat in the tree. To do this, pre-drill a shallow hole along the diameter of the cap. After assembly, this recess can be masked in various ways. For MDF and laminated chipboard, special plastic plugs are used to match the lamination.
On wood, you can also use plugs - wooden "pills", special putty, wood putty, or a mixture of wood glue and sawdust. In any case, such fasteners will be absolutely invisible only under opaque paint.
MDF and chipboard already have a finish coating, but they need to be finished with a special tape or film. Natural wood must be finally sanded, stained, varnished or painted.
Preparation of a working tool
Everything you need will surely be found at the home master; you can easily do without professional specialized equipment.

If you do not have the necessary tools and you do not know how to use them, it may be worth abandoning the idea of \u200b\u200bmaking the bed yourself.
You can order sawing parts according to your drawings in a workshop with professional machines. Then you will only have to assemble with a screwdriver, mallet and glue.
To do everything yourself, depending on the chosen material and model, you may need:
- Electric jigsaw, grinder, saw - hacksaw for the preparation of parts.
- Drill, screwdriver, better, cordless.
- Clamps for fixing glued elements or convenient assembly on self-tapping screws and bolts.
- Planer, grinder, emery, milling cutter to round the edges of the boards, remove fibers, sand finished furniture before painting
- Hammer, chisel, mallet - in addition to driving nails, you will need it when working with dowels.
- Roulette, pencil, level for marking.
- Brush and roller for varnish or paint.
- Iron - for pasting the ends of MDF or chipboard.
We have specifically indicated the purpose of each tool so that you can choose a replacement for what is missing. For example, it is quite possible to do without a milling cutter with a hand tool, a planer.
Instructions for making a classic model
It is easier to understand the basic principles of manufacturing and assembly on the classic model of timber and boards - we will consider it. By adding and adjusting individual elements, decorative overlays, complementing it with the desired accessories, you can create your own, unique and stylish design.
Calculations and purchase of materials
In order not to go to the warehouse for 1 - 2 missing bars and boards, you should draw the future bed in advance on a scale and calculate the necessary materials.

Some elements - for example, decorative overlays, railings and stairs - depend significantly on the model, others - drawers and lamellas - remain unchanged.
If the wooden frame is sheathed with MDF or chipboard, then the boards for the headboard and footboard slats, fencing and railings will not be needed.
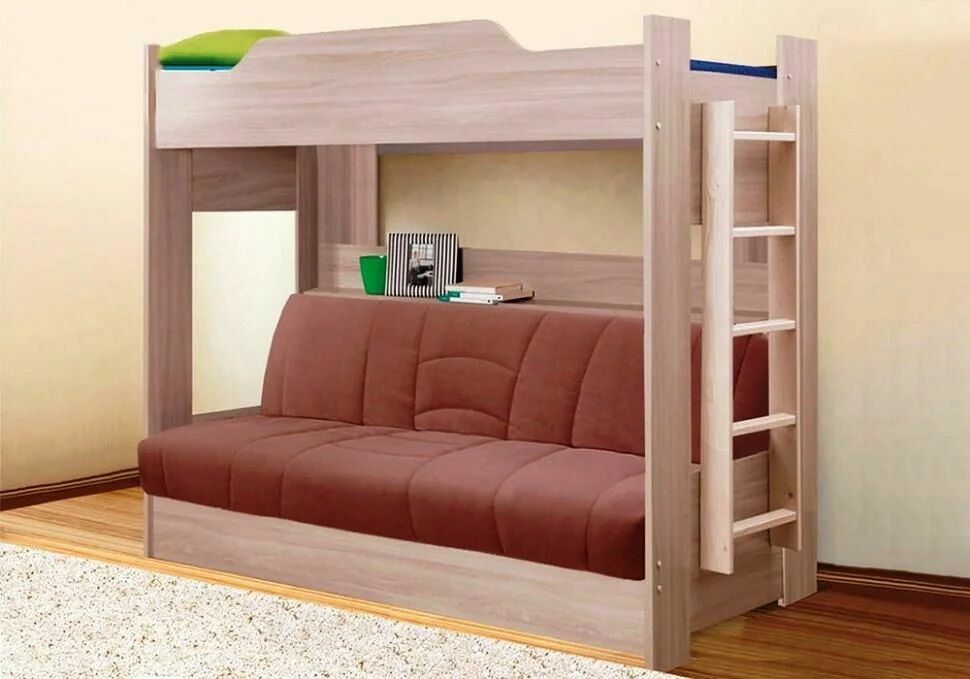
For the model shown above, you need:
- timber 38x76x1730 mm - 8 pcs, for vertical posts and decorative overlays;
- timber 38x38x1850 mm - 4 pcs, for longitudinal strips;
- boards 38x140 - 4 pieces of 2030mm each (side drawers) and 4 pieces of 914mm each (end drawers);
- boards 20x90 mm - 4 pieces of 914 mm central slats of the head and foot; 1 pcs 1510 mm stair railings, 2 pcs 1800 mm each and 4 pcs 2030 mm each for railing slats;
- boards 20x140x914 mm - 4 pieces, upper headboard and footboard strips;
- boards 20x64x482 mm - 3 pieces, stairs;
- boards 20x76x1000 mm - 24 pieces, on transverse slats.
Trimming timber and boards, and even shavings left during processing and sawing, will also come in handy. Take dowels, screws, emery and other little things with a margin. Do not forget about a new sharp file or wood disc for a jigsaw or grinder.
Step 1 - sawing and preparing parts
When all materials are purchased, they must be cut into pieces of the required length. with the help of a grinder or an electric jigsaw. It is undesirable to use a hand saw-hacksaw, as it will leave an uneven, sloppy edge.
In this model, you need to give shape only to the upper slats of the headboard and footboard. Before cutting the corners, mark up so that all 4 boards are the same.
If the lumber was edged, all harvested parts must be planed. Corners, long edges of the boards need to be rounded off with a milling cutter or hand planer, finished parts should be sanded.
Step 2 - assembling the side part of the drawer side

The fastening of the beam to the tsarga should be as reliable as possible: it is the first to take the load from those sitting, lying and jumping on the bed
On the board along the bottom edge from the inside, glue a beam - a longitudinal bar on which the lamellas will lie. Apply wood glue to both parts, press, fix with clamps until dry. Then additionally fix with self-tapping screws 6 cm long, screwing them from the side of the timber.
On top of the longitudinal strips, glue or nail spacer blocks from pieces of timber or boards 8 cm long. Only 13 pieces, with indents of 8 cm from each other. The slats-lamellas will be laid in the formed gaps.
In the same way, collect all 4 side, longitudinal drawers.
Prepare the boards for the slats: cut a step at both ends, half the thickness of the board and 4 cm deep. So it will lie more stably on the beam and take up less space in height.
Step 3 - assembly and finishing
When all the details are ready, it's time to drill or knock out holes for dowels in the slats with a chisel headboards, footboards, railings and end drawers, as well as in the uprights and railings of the stairs - under named details. Connections of load-bearing elements - side rails with uprights, as well as stairs - are more reliable to perform on glue and self-tapping screws.
The first assembly step is the sides of the future bed, headboard and footboard. Lay 2 beam-racks in parallel, lay out 6 planks between them - the upper and central headboard and footboard, end tsargs. Mark the connection points on each piece with a pencil. Drill holes for dowels.

The first time, assemble all the parts without glue and not completely tight to make sure the holes are accurately positioned and there are no distortions, and then disassemble
The headboard and footboard should be assembled evenly, without distortions, and be absolutely symmetrical to each other. Then they are completely disassembled and assembled again, but already smearing each mount with glue. For a tighter fit on the dowels, use a wooden or rubber mallet - a mallet.
The second step is the assembly of the side, longitudinal elements. First, long railings are inserted into the racks on the dowels, which separate the sleeper from the wall. Then attach the side drawers that were assembled earlier to the front side of the uprights.
For convenience and checking the level, they are pre-fixed with clamps. For each connection, 4 self-tapping screws are screwed under the sweat, slightly drowning the hats in the wood. To do this, small indentations are pre-drilled at the joints along the diameter of the hardware cap.
The third step is the installation of a handrail and a fence of the second tier. The handrail is attached with glue and self-tapping screws to the side rails, and the fence is attached to the dowels.

If using flat (oval) wood dowels, drill several holes side by side and then combine them with a chisel
The fourth, final stage of assembly is the installation of steps, decorative overlays and lamellas. Steps can be stuffed over the rack, inserted into pre-prepared recesses or secured with metal corners by turning horizontally. Decorative overlays sit on glue and fix with clamps. They must fill all the gaps between the horizontal elements, level the surface of the rack in front.
The slats are simply laid out between the spacers, without fixation. This way they will retain some elasticity. For the rigidity of the frame, one, the central transverse rail, is fixed with self-tapping screws. Clamps from all joints are not removed until the glue has completely dried.
To complete the bed, mask the self-tapping screws with wooden rounds, wood filler of a suitable color, or shavings mixed with glue.

Use pre-made carved railing posts for a sophisticated design. The high back of the first tier will turn it into a comfortable sofa
Sand the entire product, paying special attention to the joints of parts, corners and stairs. Remove dust, prime and dry the bed. Cover the wood with stain, varnish or paint, if desired - apply decor.
The bunk bed is ready! It remains to bring it into the room, fix it with a bracket to the wall, lay mattresses and bedding. Put a few large pillows under the wall on the first floor, and it will act as a sofa.
Drape the sides with fabric like a canopy - and get your little personal corner, hidden from prying eyes and drafts.
Alternative designs
In the version described above, the drawer is part of the overall frame, but often it is assembled separately. For example, the following construction is possible from the same materials.

On metal corners or glue and self-tapping screws, assemble two rectangular frame-sides, having previously fixed the support bars under the mattress on them
Just like in the previous version, you need to assemble the headboard and footboard separately. The flat bars of the rack in this embodiment are not glued into one, with a square section, but form an angle. Two corner racks are connected by planks.

The drawer is fixed on the racks first with clamps, and then with bolts or self-tapping screws. The latter can be screwed in from the inside for invisible fasteners

After installing both sides, all railings and stairs are attached, lamellas are laid and finishing is carried out
There is a variation of this option without lamellae. After assembling the drawers, with longitudinal slats-beams, another frame is made from a 60x30mm beam.
3–4 transverse struts from the same beam are fixed in it, and the resulting bed is upholstered with plywood from above and below.

Under the mattress, take a thickness of 8 or 12 mm, and at the bottom, 4 mm is enough. For beauty, one side of the upper bed, the "ceiling" of the first tier, can be upholstered with a cloth
Such a bed is laid in the tsarga when the bed is fully assembled.
Children's MDF bunk beds can be made as a classic option, but the end parts (headboard and footboard) are made from a single sheet of material, possibly with holes. Longitudinal, side drawers are also made of MDF, but the supporting beam under the mattress is attached on all 4 sides of the bed, strengthening the connection of parts.
In the manufacture of beds for adults, MDF, like chipboard, is used only for decorative sheathing of a frame assembled from beams. This load-bearing frame resembles the classic model described above, devoid of headboard, footboard and railings.
An absolutely alternative design is a bunk bed with hanging beds. It visually takes up much less space, but is too dangerous for small children.
In this design, the assembled drawer side is screwed to the wall at several points along its entire length, and the free edge is suspended from the wall on a chain, like the top shelf in a reserved seat train car. The floating bed with illumination of the lower tier looks especially impressive.
If you are not yet ripe for assembling a bunk bed, then we suggest that you familiarize yourself with a simpler option. pallet beds.
Ideas for creativity
The bed from the diagram is not at all what you want? Is it functional and beautiful enough? Use it as a skeleton and complete it with whatever you want.
And we offer ideas to draw from the following photos.

Natural wood looks too boring and archaic, but you don’t believe in the environmental friendliness of MDF and especially laminated chipboard? Mask all the fasteners and then cover the wood with a bright opaque paint

It is easy to give any shape to MDF parts with a jigsaw - build a castle, a yacht, an island or an entire house
To make complex, rounded parts symmetrical, make a paper template. Circle it with a dotted line, and draw a clean cut line under a flexible plastic bar - for example, a cable channel cover from a baseboard.
For two children, sleeping places can be placed perpendicularly, leaving a nook and storage space behind the stairs.

For a double seat on the first tier, strengthen the drawer side with a longitudinal strut from a bar, and place the 5th leg in the center
Bunk bed with sofa - ideal for a living room or studio apartment. Take the finished sofa, screw 4 beams or MDF sheets to its armrests or instead of them and build a 2nd tier on them.
You can not attach to the wall - a heavy bottom will give stability to the structure.
For a harmonious combination, remove all decorative elements from the sofa and replace them with sheathing made of the same material as the 2nd tier
You have 1 child, you are not going to sleep with him, but there is not enough space? Make a loft bed with a work or play area instead of a first tier. This option is especially convenient if there is no separate children's room - the youngest family member will have his own personal space.
Do you often have guests, relatives? Instead of boxes under the lower tier, you can hide another bed. In fact, it consists only of a drawer, to which the wheels are screwed.

The table and bedside tables can be used ready-made, factory-made, and for a harmonious look, the superstructure can be made in the same style and color

In some cases, it makes sense to “turn over” this structure by arranging a play area at the top. The kids will love it there! But do not forget about a reliable fence
In small-sized and one-room apartments, even without children, you often have to give up a full-fledged two-sleeping orthopedic mattress, because it inevitably turns the entire space into a bedroom. But there is a solution: a loft bed with sufficiently reliable supports can even fit two adults.
By raising the bed to the ceiling, you create a 2-story space, with a living area, a living room or study downstairs and a cozy bedroom upstairs.

Not enough space in your closet? Make more drawers under the bed and in the stairs. Put together a rectangle of 4 boards and a plywood bottom, make guides from a bar
Natural, unpainted wood is suitable not only for eco-style, but also for provence, minimalism, loft and even hi-tech.
To modernize the product, choose selected grade lumber, without the slightest flaw, with an unobtrusive texture, such as linden or alder.

Some corner designs will help to compactly and comfortably accommodate the whole family and free up space for daytime activities.

Add a rope, a rope ladder or even a slide to the classic model, because a children's bunk bed is not only a place to sleep
Fantasize and make dreams come true, just do not make other people's mistakes. Sleeping too high is not comfortable, stuffy - leave at least 80 cm to the ceiling.
Buy mattresses in advance and adjust the dimensions of the bed to fit them. The optimal width of the stairs is 40 cm, the height of the steps is 25 cm, the sides are at least 30 cm, depending on the height of the mattress and the age of the sleeper.
Conclusions and useful video on the topic
How to assemble a bed from parts ordered in the workshop is shown in this video:
A simple design of a loft bed with a working area from the purchase of material to testing the finished product:
Original bunk bed on chain suspensions:
You can build a strong bunk bed with your own hands, even without much experience in carpentry and specialized tools. If you want to turn a piece of furniture into a work of art and make it as functional as possible, you need to show imagination and spend much more time. But the result will exactly meet your wishes and amaze all guests.
Have you made your own furniture? Can you share useful tips for beginners? Join the discussion in the comments.


