Shelves are that part of furniture that not only organizes storage space, but is also an interior accessory. Therefore, the variety of their shapes and sizes is huge.
Most often they are made of wood and metal materials. Today, manufacturers offer plastic models, and you can make drywall shelves with your own hands. The latter option is becoming increasingly popular, due to the low cost and the ability to quickly change the interior of the room.

The content of the article:
- Pros and cons of drywall
- Shelf implementation options
- Where can I place plasterboard shelves
-
Step-by-step instruction
- Create a project
- Preparation of tools and materials
- We prepare the surface
- Frame assembly
- sheathing
- Finishing
Pros and cons of drywall
The advent of drywall in the construction market led to the beginning of a new era in the construction business. A cheap material appeared, which, in many technical and operational characteristics, was not inferior to identical building materials.
Builders used it with pleasure, sales grew. The reason for this is not only the low price. There are other factors that influenced the popularity of drywall:
- low specific gravity, which facilitates structures that are made of drywall;
- ease of processing - any configuration can be cut from the GKL, it can even be rolled up, knowing the conversion technology;
- it has a flat surface without drops, so it is an excellent leveling material that is used dry methods, hence its huge competitiveness in comparison with plaster and putty solutions;
- drywall can be finished by any means and materials, giving it an unusual or standard look;
- drywall construction does not deform over time;
- it is not necessary to use whole sheets for the manufacture and construction of some structures, shelves, for example, pieces will do.
Drywall also has disadvantages:
- the material is relatively brittle;
- afraid of shock loads, under the influence of which it breaks;
- bends under the influence of large loads;
- a frame is required for installation, which increases the cost of the structure.
There is one more minus, which today, as it were, should not be attributed to shortcomings - low moisture resistance. Drywall standard under the influence of high humidity is destroyed.
Therefore, manufacturers produce moisture-resistant GKL, which has a greenish cardboard. It easily tolerates high humidity, so shelves from it in wet rooms are common today. But even he is afraid of water, in contact with which he swells and loses his original appearance.
Shelf implementation options
There is a small classification of shelves, including drywall, which helps to make a choice. Because any interior accessory must first of all fit into it. Therefore, using the shelves of one of the categories, you can solve the tasks of decorating the room.
The first variety is by type. There are 2 positions - shelves open and closed. The former are mainly intended for displaying some items and designer accessories. For example, a demonstration of souvenirs, photographs, sports cups and other things. Closed shelves are more functional. Their job is storage space. Therefore, they are made larger in size. Especially the depth.
The next division is by type of accommodation. There are also 2 positions here:
- central shelves, they are also rectilinear;
- angular.
The former, as a single element, are rarely used. Usually these are several shelves connected in a common structure and forming a large storage space. Often this structure, for example, in the form of a bookcase. Such shelves are installed in living rooms or offices.
But no one forbids the construction of free-standing shelves from drywall, that is, there is space between them. This option is suitable for small spaces.
Corner designs are popular today. After all, with the help of them you can use zones that are practically non-functional. This is especially true in small apartments. They not only serve as storage places, but also become an unusual decoration of the room. Corner shelves are usually used for books.
The third type of separation is decorative and functional. The first are lightweight structures that are not designed for heavy loads. The latter, on the contrary, are ready to withstand even serious loads. For example, under books placed in several rows.
You can add to the classification the degree of decorativeness of drywall shelves. They can be decorated in different ways. But more often the models are simply painted. But decorativeness is achieved in a different way - with the help of backlighting. If earlier different types of light bulbs were used for this, today LED strips are used.

Where can I place plasterboard shelves
Since drywall shelves are universal designs, there are no restrictions on their installation location. Therefore, you can mount them in any room:
- In the nursery. Shelves here can perform 2 functions at once - storage places and a separating element with which you can carry out zoning. If the space is large, then they can separate the sleeping place from the playroom. If 2 children live in the same room, divider shelves can be used to separate one child's space from the other.
- Shelves for the living room are mounted on the walls. Optimally - along the room. They usually contain household appliances.
- In the kitchen, drywall shelves are also often present. You can place dishes on them, so a reinforced structure is used here. More often, open-type models are installed.
- In the bedroom, shelves will also be appropriate. But here you have to take into account the specifics of using the room. Large structures are not suitable here. Better small size, open type and backlit.
- In the corridor, it is better to collect mezzanines from drywall, which are also considered one of the varieties of closed shelves. But there are various options that will be convenient in this particular room. For example, several shelves located in the entire height of the wall.
- In the bathroom. There is never enough storage here. But a small area makes it possible to install only hinged structures. It is better if they are angular.
Step-by-step instruction
Before you make drywall shelves, you need to carry out a number of preliminary activities:
- Determine the location of their installation.
- Create a project.
- Prepare the installation site.
- Prepare the necessary materials and tools.
And already further the frame is assembled, which is sheathed with sheets of drywall.
Create a project
The easiest way is the old fashioned way. On a blank sheet of paper, draw a sketch of the shelf, indicating the exact dimensions. The latter are determined taking into account the installation location. For example, if this is the corner of a room, then you need to determine exactly how much space the structure will occupy. Will it be equilateral or will one side be larger than the other.
The distance between the shelves is determined, whether this distance will be the same or not. Before proceeding to the creation of the project, it is necessary to solve many problems.
The second way is to download a special program to your computer. And already on it to develop designs. Most of these programs are paid, but there are also free applications that can be used directly on the Internet.
It is recommended to take into account all the details in the development. Display not only the size and shape. For example, such a parameter as the thickness of the drywall used, or the location of the backlight will be important.
Preparation of tools and materials
The tools will be the same as for the construction of any drywall structure:
- perforator or drill;
- screwdriver;
- scissors for cutting metal;
- construction knife;
- building level;
- tape measure and pencil;
- staple;
- brush or roller;
- sandpaper.
From materials:
- drywall, the thickness of which is selected taking into account the loads acting on the shelf, but not less than 12.5 mm;
- metal profiles;
- self-tapping screws with dowels for attaching the frame;
- self-tapping bugs for connecting metal profiles to each other;
- self-tapping screws for attaching drywall to the frame structure;
- putty;
- primer.
We prepare the surface
Any design that will be hung on the wall will repeat all its irregularities. You need to get rid of them before installing the shelves. There is only one technology that is better to apply. Use plaster if the wall surface has large differences. And putty, if the irregularities are small. How it's done:
- an inspection is carried out to detect defects and flaws - these are cracks, chips and recesses;
- they are sealed with a repair compound or plaster mixture;
- a section of the wall is primed;
- leveling with plaster or putty;
- if the leveling process is carried out in several layers, then each should be primed.
The application of the next layer should be carried out after the previous one has completely dried.
Since the wall will be covered with shelves, there is no need to bring its surface to maximum smoothness. You do not need to use sandpaper at this stage.
Frame assembly
Do-it-yourself drywall shelves are made not as a separate piece of furniture. They are not collected separately from the wall. The whole process is carried out on the wall surface. Therefore, the first thing to do is to transfer the dimensions of the future structure to the wall surface strictly according to the created project.
Since the installation site has already been determined, it remains only to draw on it the lines along which the metal profiles for the shelves will be mounted. To set the horizontal, you need to use the building level:
- A horizontal line is applied to the wall, defining the upper edge of future shelves. A segment is laid on it, which determines the width of the structure.
- Down vertically from the edges of the segment, lines are laid that determine the height of the shelves. Here you can use a building corner or a plumb line. But with the help of modern building levels, vertical lines can also be applied.
- The last line is the bottom edge of the structure.
- A rectangle is drawn on the wall. On it, metal profiles are mounted on the wall, which are pre-cut to the required dimensions.
- Their installation is carried out as follows: they attached a section of the profile to the wall exactly along the line, drilled it with a perforator and in the wall at the same time a hole for the dowel, inserted the latter there and screwed the profile to the wall self-tapping screw.
- Likewise with all other segments.
- Now, 4 segments of the same profile are installed perpendicular to the wall at the corners of the rectangle from steel profiles. Fastening - bugs.
- At the ends of the protruding profiles, exactly the same rectangle is made as the one attached to the wall surface.
- If it is necessary to strengthen the structure, or it is large, then additional elements must be installed between the protruding profiles. If the depth of the structure is large, then they additionally need to install crossbars. The larger the shelf, the greater the load acting on it, the more elements will be required for its manufacture.
And some moments that should not be forgotten. They make it possible to correctly form a shelf structure, taking into account the shape and size:
- Guide profiles are mounted on the wall. The remaining elements are made either from a wall profile or from a rack profile.
- Guides make it possible to create any configuration on the wall. You just need to trim correctly, especially along the entire length, taking into account the curvature of the structure. This is done by cutting notches. And the more of the latter, the greater the curvature of the frame will turn out. Profiles are cut with scissors for metal.
- Accurate markings on the wall are a guarantee of accurate assembly of the frame. But there is always room for change at this stage.
Assembling the shelf on the wall, its complexity, largely depends on the dimensions of the structure. For example, if it occupies the entire wall, then you have to build a frame, the elements of which are attached not only to the wall, but also to the floor with the ceiling. In fact, this is already a full-fledged wardrobe. Although if this is an open type structure, then these are just shelves.
If the structure is assembled from wall to wall, then the fastening of the profiles is carried out mainly on these opposite walls. If a corner shelf is erected to the entire height of the room, then the frame will also be attached to the walls and to the ceiling with the floor.
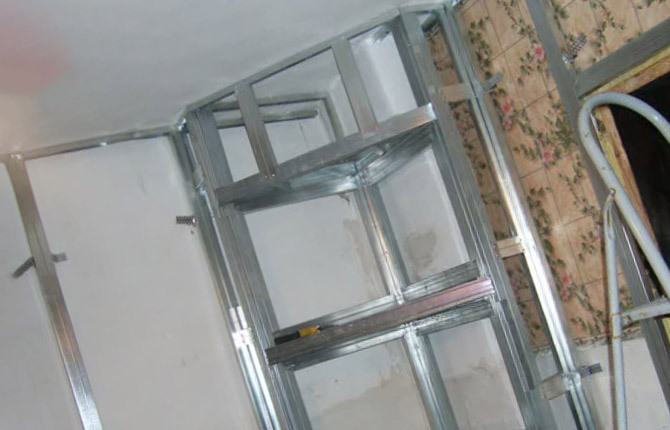
For example, the photo below shows a corner frame, consisting of a large number of elements. There are 3 vertical profiles that are attached to adjacent walls, 2 vertical rack-mounted profiles to the ceiling and floor at the same time. And also to those that are attached to the walls. And they are connected by jumpers, which form the strength and rigidity of the entire structure.
And already between them are going shelves. In this case, the upper part is prepared as a decorative element, where the backlight will be mounted. It is located high under the ceiling, so its functionality is low.
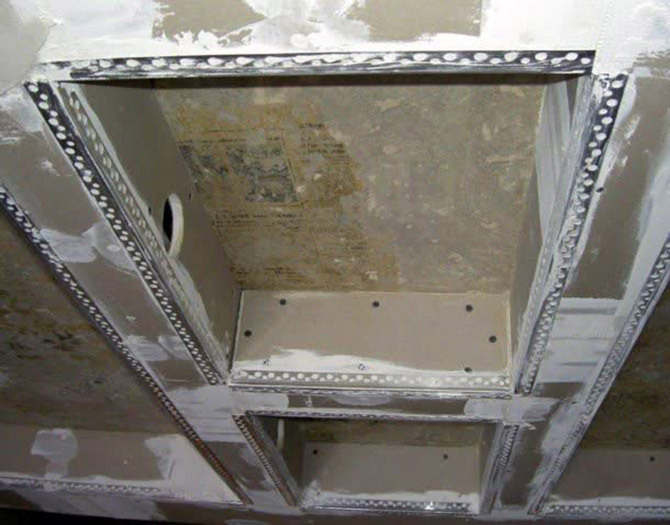
Sometimes drywall shelves are a built-in model, under which a niche is allocated in the house. It is believed that this is a more rational option that increases the functionality of the room. In this case, drywall profiles are installed along the edges of this niche. And the shelves are already attached to the frame, as well as to the back and side walls. The savings are clear.
If drywall shelves are planned to be heavily loaded, for example, they are built for a TV, then the frame profiles must be fastened with self-tapping screws often. The more, the better, but without too much zeal. Here the distance between the fasteners should be within 20 cm.
sheathing
Calculating how much material you need is easy. This is what the project is for. But a small margin within 5-10% is welcome. This is just in case if any changes are made during the construction process. Yes, and in the process of trimming there will be waste. And this must be taken into account.
The first is to apply markings on drywall sheets. To transfer the dimensions of the shelves, which are taken from the project, you can measure the frame. The second option is better, because these are more accurate actual parameters, taking into account mounting errors.
According to the marked marking, a cut of the skin parts is made. Cutting drywall is easy, here are the instructions:
- according to the marking, cardboard and part of the gypsum layer are cut with a knife;
- a wooden block is placed under the sheet at the place of the cut, but drywall can be laid on the table so that the part to be cut hangs;
- you need to put pressure on this part, it will break along the cut line;
- cut off the bottom layer of cardboard.
You can cut all parts of the skin. You can some of them, and after installation the rest.
Now the lining itself. In fact, this is a simple application of the cut pieces of drywall to the frame with the exact location of their installation and fastening to metal profiles with self-tapping screws. A few recommendations:
- the distance between the screws is 10-12 cm;
- the distance from the edge of the drywall to the place where the fastener is screwed in is 1.5-2 cm;
- the fastener head should be recessed into drywall to a depth of 0.5 cm;
- adjacent parts of drywall should be joined in the middle of one profile;
- if a large drywall sheet is used for sheathing, then several frame profiles must be laid under it so that sagging or indentation does not occur;
- if a shelf with illumination is being constructed, then the laying of wires must be carried out before sheathing;
- at the same time, holes for wiring and lamps are made in the right places in the drywall.
Finishing
The frame is sheathed with drywall, it remains to do a few construction operations:
- seal the joints between the sheets of drywall laid on the frame;
- level the surface of the drywall construction with putty;
- carry out the finishing of the entire structure;
- carry out the installation of lamps.
The first one is simple. Here you need to fill the joints between the parts of the drywall with putty, put a sickle tape on top and once again cover everything with putty. After complete drying, the primer of all planes of the shelf is carried out. After drying, leveling is carried out to the maximum. The thing is that when attaching drywall to the frame at the installation sites of the fasteners, the flat gypsum material is bent. This curvature must be removed.
Now about finishing. Any structure in the room should be in harmony with other objects and accessories. This is what is called design. Therefore, the color of the shelf is chosen taking into account the color shades of other elements. They can be in the same color palette, or they can be very different.
The only thing that can be definitely said about the finish is the finishing material. It should be paint and better water-based. It is easy to use, cheap, with a large selection in terms of color palette. At the same time, the water emulsion must be applied in several layers, without waiting for the previous layer to dry before applying the next one. This technology is called wet painting.
Tools - brush and paint roller. It is necessary to apply paint so that the layers are located in cross planes. One along, the other across.
Painting drywall requires a smooth surface. It should not have the slightest flaw. Therefore, before painting, the plasterboard planes of the structure are treated with sandpaper, and always fine-grained. It will remove the smallest particles of undissolved putty and traces of a spatula. It is also recommended to cover the drywall plane with another layer of primer after sanding.
There are other finishing options. For example, covering with decorative plaster. Drawing drawings, for this you can even use stencils. All kinds of stickers - especially this method will be appropriate in the children's room. But painting is used more often.
The step-by-step instructions for assembling drywall shelves are actually not that simple. It is easier to assemble a partition than a shelf.
Too many small details and various elements. Of course, standard ordinary ordinary shelves in the form of rectangular structures are not taken into account. But even from them you can create something original and functional on the wall.
If any of the readers have experience building drywall shelves with their own hands, write in the comments about your experience. Maybe someone will share some useful tips. Bookmark this article so you don't lose our helpful tips.

