A country house for today can be considered the best option for recreation. Adding a terrace to the house will help you to be more in the fresh air, while maintaining access to all the benefits of civilization available in the country.
A covered terrace is more comfortable than classic gazebos or a table with benches under the nearest tree. But an extension to the house will require careful preparation and the right choice of design from a huge number of existing projects.
The content of the article:
- Preparatory stage
- Choosing a foundation
- Choosing a frame
- Choosing a gender
- Choosing a roof
- Which ladder to choose
- Finishing and decor of the terrace
-
Step-by-step instructions for building a veranda
- Marking and building the foundation
- Installation of lag beams, stripe of the terrace floor
- Installation of vertical supports with strapping
- Terrace roof assembly
- building stairs
- Terrace railing
- Roofing, decorative trim
Preparatory stage
The most difficult thing in building a terrace with your own hands is choosing a scheme for future construction. It does not matter whether it is a summer terrace or an open porch for a summer residence, in any case, the design of the future building must be tied to an existing house.
In addition to having to make a drawing of the veranda or several sketches, it will be necessary to correctly connect the two structures, otherwise one may overturn or deform the other.
Therefore, at the preparation stage, you need to collect information about:
- The ground on which the construction of the terrace is planned.
- Foundation and condition of the basement of the house from the side of the extension.
- The location of the gutters, the possibility of installing rafters in the case of the construction of a covered terrace.
In addition, you need to choose the material for the frame, railing, floor, stairs and foundation. It is best if the same scheme is used for the veranda or terrace that was used during the construction of the house.
Some details of the terrace can be made with your own hands, but the decorative elements of the fence, porch, railing, roofing are best ordered from the craftsmen.
You also need to choose the location of the veranda for giving. It is customary to build directly on the facade of the house, combining the entrance to the building, the porch with the stairs leading to the terrace. But this is optional. Rest area can be:
- put on the facade.
- Take it to the back of the house, away from prying eyes.
- Move to the sunny or shaded side of the building.
But this is in the case of an open terrace. If it is planned to build a veranda under a roof or a canopy, then you will have to take into account the location of the trees, as well as the “gander”, through which wires from the electricity pole are connected to the private house.
Useful: Arbors with their own hands made of wood
Choosing a foundation
The traditional option for a veranda is partially buried pillars made of brick, cinder block, cast into concrete formwork, clogged asbestos-cement pipes.
Pillar foundations are used for timber terraces attached to the building on pillars. Usually these are wooden houses raised above the ground to a height of 40-50 cm.
If the terrace needs to be raised higher, then the frame is placed on pile supports. On dry soils with a low level of heaving, terrace piles are made of logs or oak beams sewn together with a package.
If the veranda is planned to be attached to a brick house, or the groundwater level is too high, it is best to install the frame on screw piles with the support strapped with a metal corner. The remaining parts of the frame of the covered terrace can be made of timber.
The height of the supports is usually chosen according to the level of the basement of the walls of the house. This is important in order to make it possible to ventilate and dry the blind area, the basement and part of the foundation of the veranda.
Choosing a frame
The basis for the veranda-terrace is made of pine or spruce. If funds allow, then the bottom filing is best made from oak or larch. The frame of the veranda will consist of a box resting on a columnar foundation.
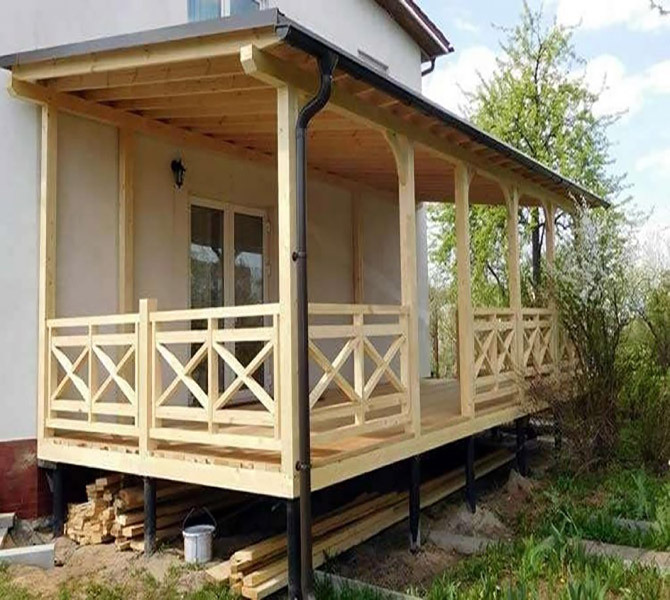
Along the perimeter of the terrace, vertical supports are installed, the roof rests on them. The fence will be made with horizontal railings.
Metal frames are usually used for glazing or in areas with a humid climate. For example, if the house is near a river or other body of water, then it is better not to install a wooden terrace.
Choosing a gender
The construction of the site can be made according to the traditional scheme - log beams, sewn up with a tongue-and-groove board. The veranda will be built on the east side of the house, so the morning heat will be enough to fight the moisture.
The fence is made according to an open scheme, no balusters or battens. Sunlight before lunch will quickly warm up the boards of the site, and in the heat of the day, the terrace falls into the darkened area of the house. The floor will remain warm for a long time, in the summer almost until late at night.
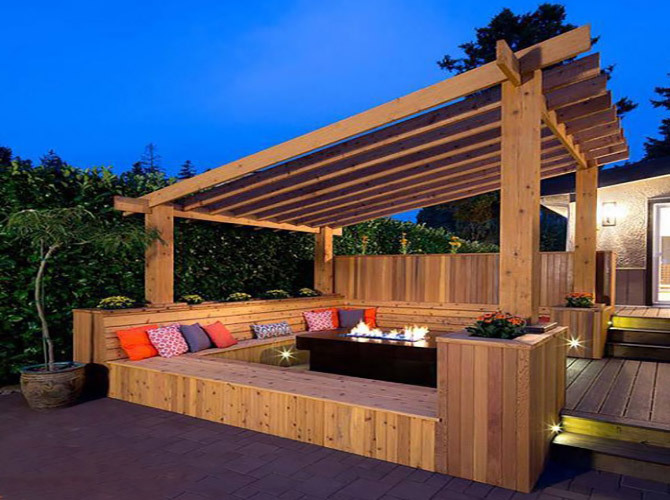
Choosing a roof
The easiest option to make a covered terrace is to install a canopy over the site. Usually it is a light cantilever-fixed frame made of a metal bar (pipe). Attaches directly to the wall of the house. The method is suitable only for light types of roofing, for example, a fabric awning, film, shading net.
At the same time, the width of the terrace area near the house cannot be more than 150 cm, in some cases 180 cm. Such roofs are massively used for open terraces of street cafes in the countries of Southern Europe, where, due to the humid climate, awnings are periodically removed to dry the wooden floorboards of the veranda.
The most accessible for do-it-yourself construction is a shed roof supported by an inner and outer row of pillars. The roof frame of the veranda, rafters, roof beams should not rest directly on the wall of the house, even if the building is built of brick or cinder block.
Instead, vertical posts with horizontal crossbars are installed along the walls. This part of the veranda frame is fixed to the wall with a sliding mount. In winter, due to heaving of the soil, different weights of the terrace and the house, both structures rise - fall to different heights. Therefore, the link between them is made sliding.
The slopes and overhangs of the roof rest on an outer row of pillars rigidly tied to the foundation of the veranda.
As a roofing, you can use a metal tile or corrugated board. But only if the roof of the terrace is not next to the windows of the bedroom or nursery in the house. The problem is that this is the loudest type of roofing. Even a small rain always strongly rattles on a metal tile.
Another disadvantage of metal tiles for the veranda is that it cannot be used in areas where strong winds constantly blow. Even small but regular gusts of wind easily tear off the fastening with self-tapping screws.
For a wooden terrace or veranda, ondulin, shingles or polycarbonate are suitable. Such a roof is a little more complicated, more expensive to install, but is guaranteed not to create discomfort for the owners of the terrace and the house.
Useful: Shed roof do-it-yourself step-by-step instruction on arrangement + features of a shed roof
Which ladder to choose
Stair climbing is done on wooden stringers. This is the simplest solution for a timber terrace. It is used on almost all wooden buildings, provided that the lifting height does not exceed 80-90 cm.
Reading: How to make a staircase to the second floor with your own hands
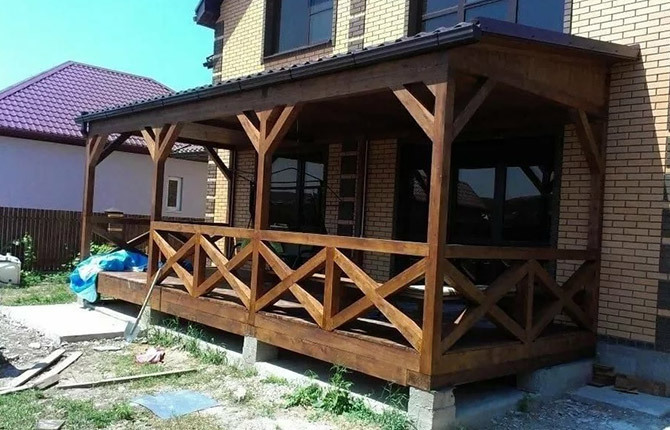
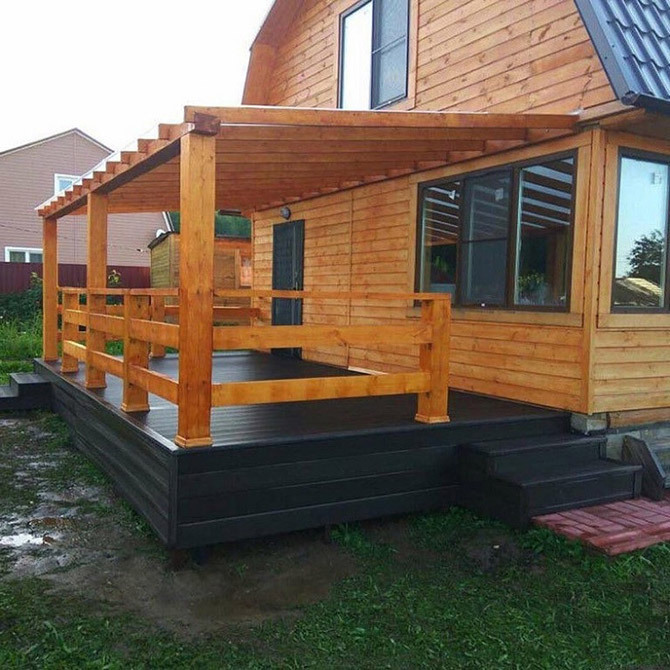
Finishing and decor of the terrace
For the decorative design of the veranda, a contrasting scheme was chosen - a combination of white and dark red, almost brown. The back wall of the house, to which the veranda is attached, is lined with white foam boards. The frame, floor, railing and roof of the veranda are treated with a dark polyester lacquer that is resistant to solar ultraviolet radiation.
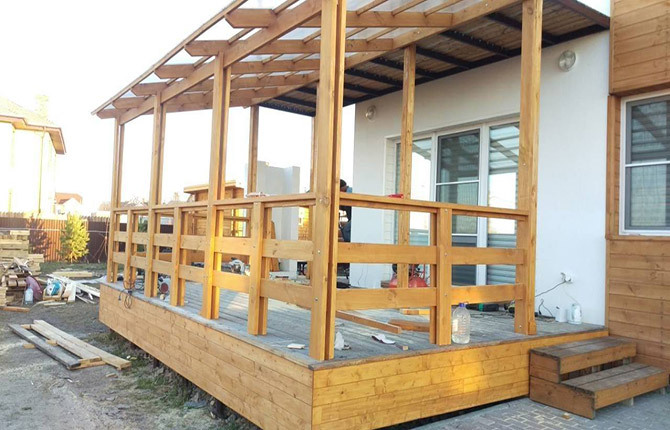
Step-by-step instructions for building a veranda
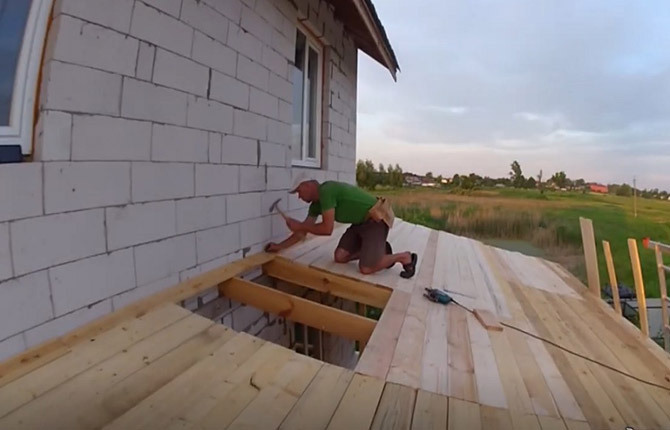
First of all, you need to prepare the site. Terrace - the veranda will be built on the entire width of the "rear" of the country house. Therefore, in advance it will be necessary to rearrange the gutters and downpipe, as well as remove part of the soil with grass and vegetation. The blind area of the foundation of the house can not be touched. The terraced platform will be located at the height of the foundation tape of the house.
For marking, it will be enough to drive two pegs into the corners of the rectangle and pull the cord.
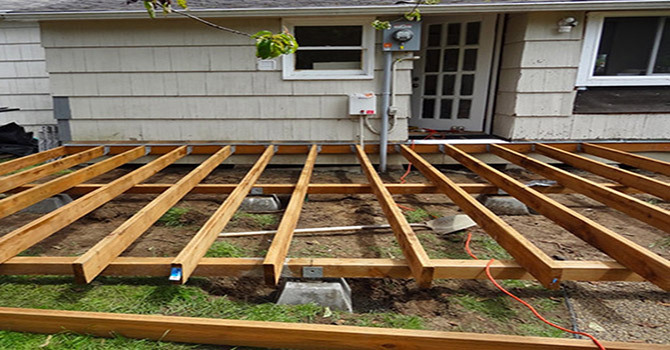
Marking and building the foundation
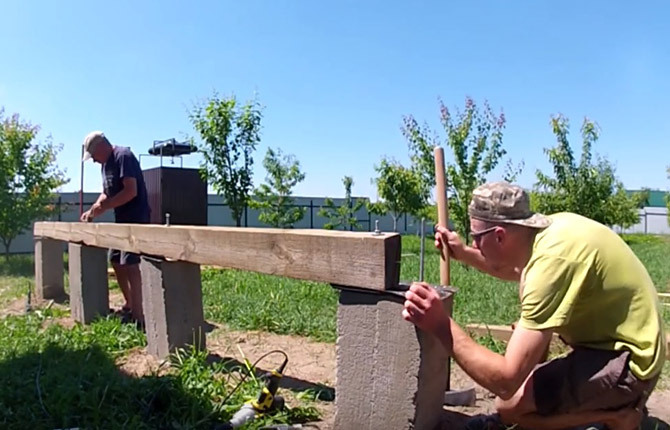
From the outside, the terrace will be based on concrete pillars, from the inside - on a strip, shallow foundation of the house. After marking, it will be necessary to dig holes for the installation of formwork from the boards. Therefore, square-section pits, depth 0.7 m, dimensions 35x35 cm.
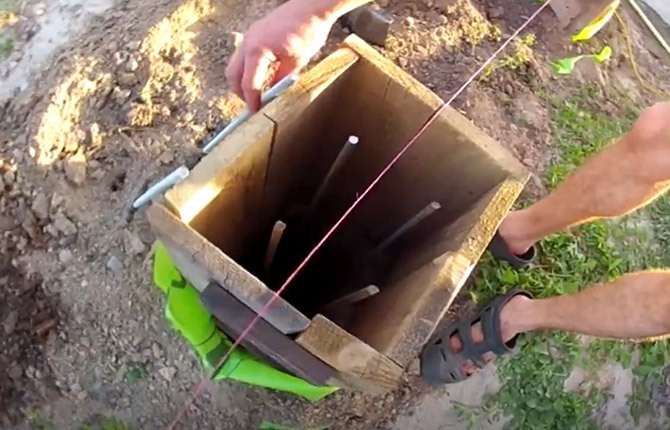
In total, 7 holes are required, the distance between them is 130 cm. Crushed stone with sand is poured to the bottom, waterproofing from roofing material is inserted. For each, you will need to knock down a box 60 cm high and firmly besiege it over the pit.
Four pieces of reinforcement 12 mm plus an M16 stud with a welded heel are laid in the formwork. With the help of studs, the strapping of the platform for the terrace will be fixed.
On the surface of a 200x70 mm beam, it will be necessary to pre-mark and drill holes for the studs. It remains only to lay the waterproofing from a pair of scraps of glass roofing material and put the beam on top. We tighten the nuts on the studs.
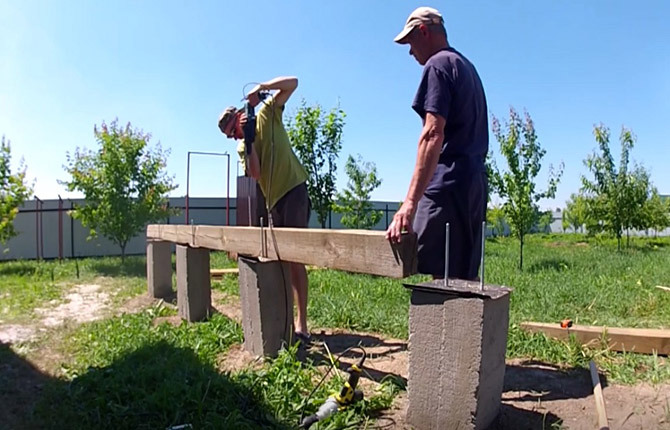
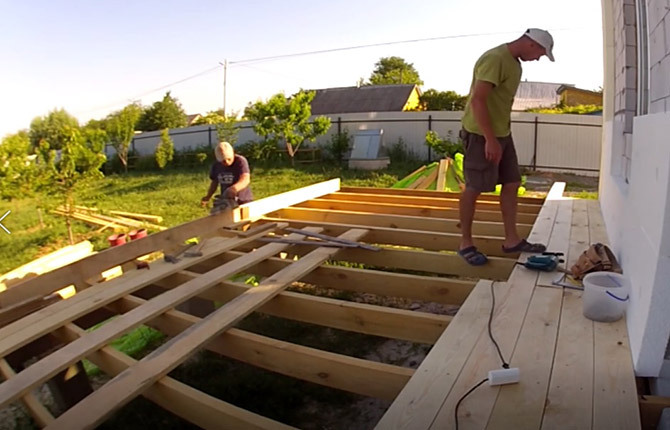
Installation of lag beams, stripe of the terrace floor
Since the weight of the terrace is relatively small, there is no special need to install the inner row of pillars for the installation of lag beams. Instead, in the first crown of the brickwork of the house, niches 50 mm deep are punched under each log. This will save energy, materials, and at the same time “tie the base of the terrace to the house. It will be possible not to be afraid that the veranda will "move away" from the wall of the cottage.
The grooves are punched so that the lag beams installed in them and on the outer beam are located strictly horizontally.
Next, under the niches, you need to fix a horizontal beam 100x60 mm, for the entire length of the wall. After that, you can lay the logs, align them and nail them to the outer and inner timber.
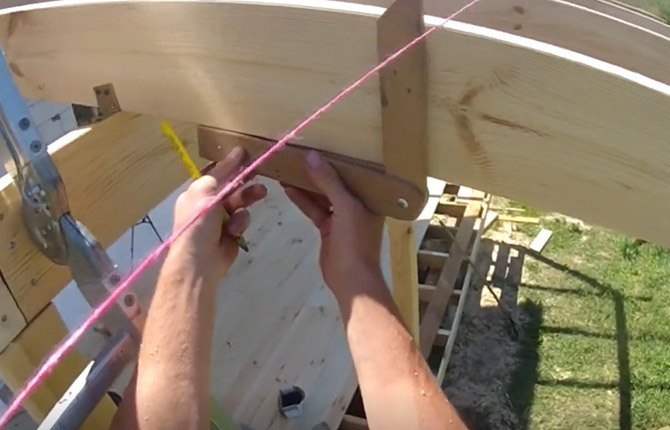
Now you can pull the marking cord, Mark the beams, cut off the protruding ends of the log with a circular saw. It is necessary to leave an overhang of 20-25 cm.
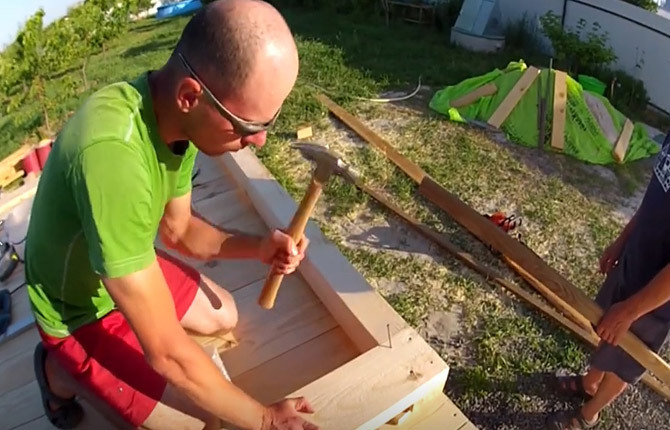
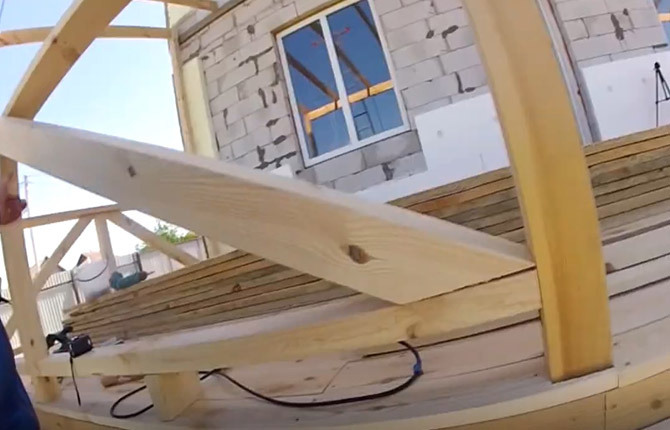
The next step is to sew the floorboards onto the log beams. Each board has to be sanded along the end surface and adjusted to size. The problem is that the terrace turned out to be quite large, 8x3 m. Therefore, one board is not enough for the entire length. You have to combine the boards so that the ends of the floorboards must rest on the logs.
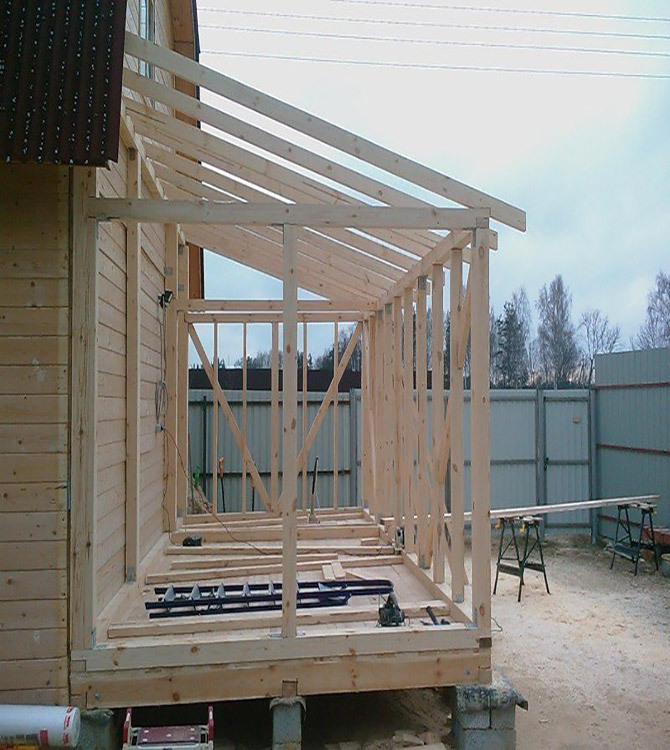
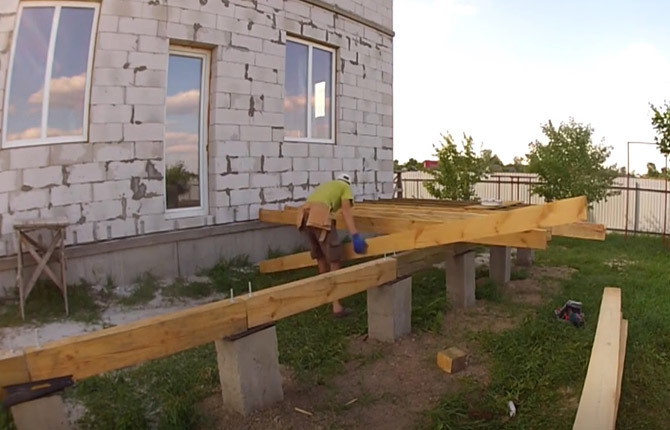
Installation of vertical supports with strapping
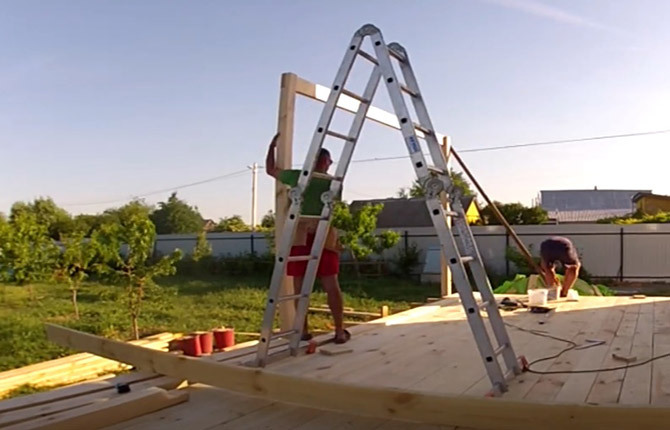
The height of the roof above the terrace is almost 3 m. Therefore, not separate vertical racks are installed, but a frame is assembled from two U-shaped structures. The “Gate” is first knocked down right there, on the terrace:
- For the vertical supports of the veranda, a beam of 100x100 mm is used, the upper ends are cut down in half the thickness to connect with the horizontal cross member.
- The horizontal part is cut out of a bar 150x50 mm.
- The rack and cross-beam of the veranda are adjusted in size so that the corner connection is tight, without gaps. Then check the angle 90O joiner's square.
You also need to measure the distance between the vertical posts, along the horizontal crossbar. It should be equal to the distance between the posts of the veranda at the bottom.
Only after that, the upper corners can be knocked down with nails.
It is better to knock down long beams and racks with nails, and not fasten them with self-tapping screws. As practice shows, self-tapping screws can split the wood of the veranda, but nails cannot.
The U-shaped structure is lifted and installed vertically on the log beams, temporarily fixed with slab struts.
The lower part of the vertical rack is sawn down to half the size for docking with a log beam.

After both parts of the U-shaped "gate" have been installed, they will need to be joined together by a horizontal cross member.
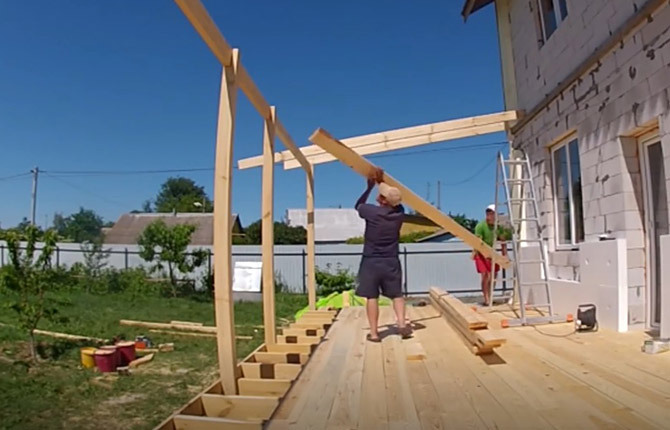
Terrace roof assembly
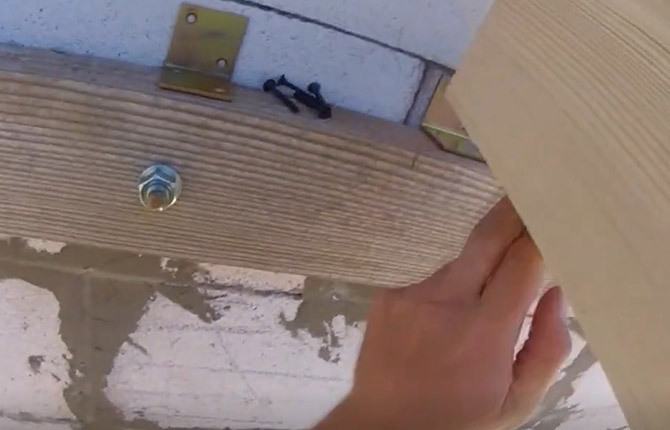
In order to be able to assemble the rafter frame of the terrace, it is necessary to make a second support for the rafters. A horizontal bar is sewn along the entire length of the wall of the house. The recommended dimensions are 60x90 mm, but smaller is possible. If possible, it is better to use larch or oak timber.
The crossbar is attached to the wall of the house with studs. Each rafter beam is attached to a horizontal support using two metal corners and self-tapping screws.
In a similar way, the rafter is attached to the cross member on the outside of the terrace.

Now you will need to pull the masking cord between the extreme log beams and cut off the protruding part using a jigsaw. Now the roof of the terrace has an even overhang.
The ends of the rafters and lag beams are sewn up at the ends with a horizontal strapping.
building stairs
The terrace platform is almost ready, but it is inconvenient to climb it, the height is about a meter. Therefore, the next step is to make a ladder.
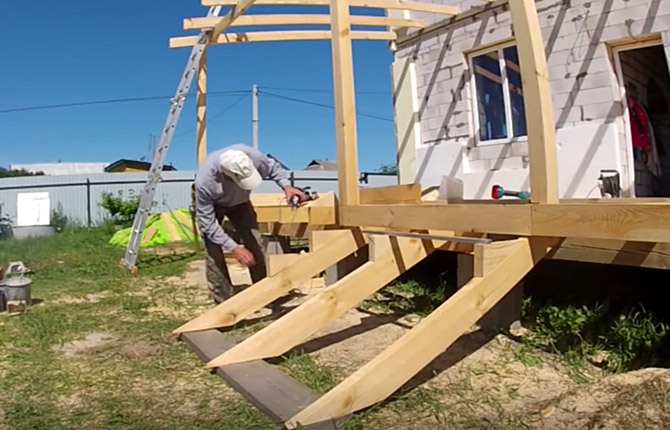
For stringers, three blanks of 200x50 mm are used, the lower ends are sawn down with an oblique wedge, and support grooves are cut out on the upper ones. The shape and size of the gash must be measured in advance.
Cut wedges can be used to form the supporting platforms of the veranda. After alignment, they are sewn to the stringers with self-tapping screws.
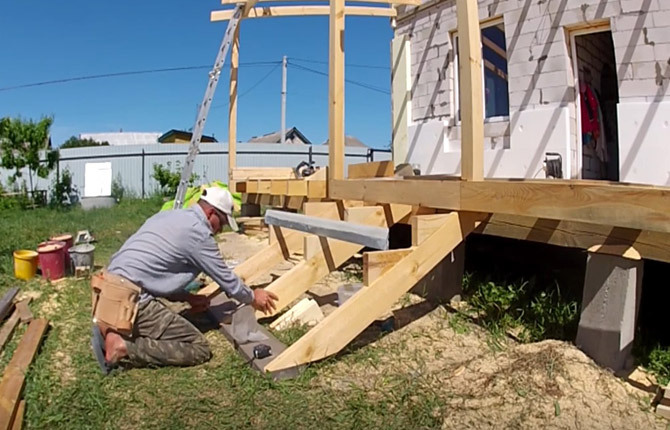
Steps (treads) for the veranda are made from two planks left after cutting the floorboards. They are also sawn to size and fastened with a screwdriver to the stringers.

Terrace railing
Before making the railing, it is necessary to sew two vertical beams onto the wall from opposite ends of the terrace. The horizontal crossbars of the railing are cut out of a 100x40 bar and sewn with self-tapping screws “on an oblique” to the vertical posts and the newly installed beams. The remaining parts of the veranda railing are attached in the same way.
To prevent the railing of the veranda from bending, vertical supports are installed in the middle. All parts of the railings, additional supports are interconnected using metal corners.

Due to the large size of the terrace, the railing turned out to be long, without railings. Therefore, diagonal braces must be sewn inside between the supports. This will give the terrace a more finished look and at the same time strengthen the frame of the building at the bottom.
The diagonals are not sewn to the floor of the terrace, but to an additional horizontal cross member stuffed at a height of 50 mm from the surface of the site.
Roofing, decorative trim
The crate of the veranda is made continuous over the entire surface of the rafters. First of all, the overhangs and the lower part are sewn up.
After that, a vapor barrier and a control lattice are laid. Metal tiles are used as roofing for the terrace. Separate sheets with a length equal to the width of the terrace rise to the roof and are fixed with self-tapping screws with rubber gaskets.

In addition, brackets for gutters are attached to the end plate of the eaves. On one of the vertical racks of the veranda, a pair of clamps cuts in and a drainpipe is installed.

To complete the construction of a covered veranda, you need to open the surface of the tree with varnish in several layers. If desired, the sidewalls from the side of the house can be tightened with soft "glass" or film.
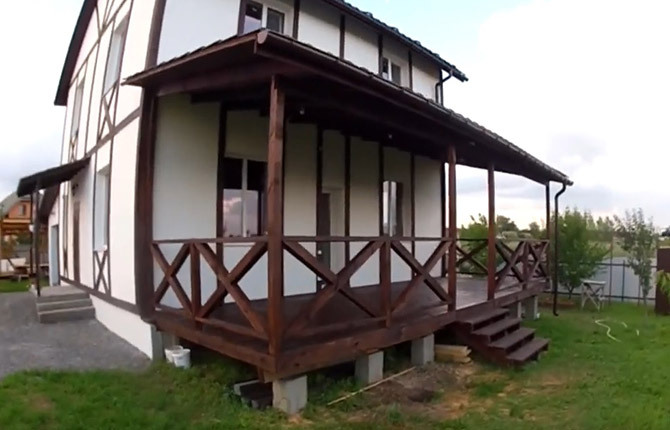
It will not be difficult to build a covered terrace in the house if you know the step-by-step instructions, the procedure for arranging the frame. All other details, including decorative trim and fencing, you can think of yourself. The only element that a specialist should do is the roof. Here you need the experience and skill of the master.
Tell us about your experience in building covered terraces for a country house. What are the points to pay special attention to? What scheme of a terrace-veranda for a house is considered the most successful?