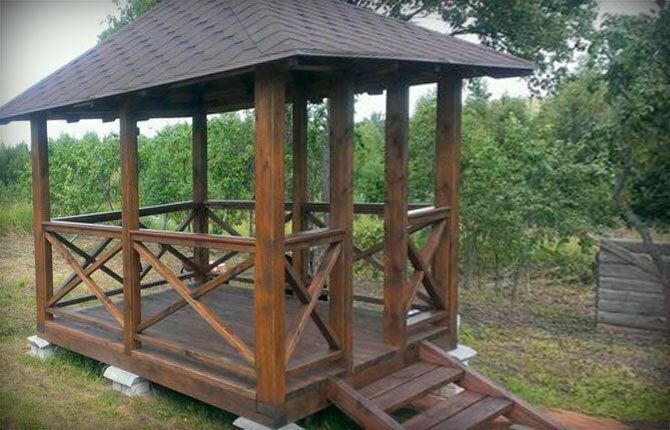
It is difficult to imagine a suburban area or household without a cozy gazebo. A home craftsman who has certain skills, a tool and a desire is able to create a wonderful relaxation area, a place to communicate with family and friends. For a small family, a 3 by 3 gazebo, created by yourself, is suitable.
The content of the article:
-
Preparatory stage of construction
- Implementation Options
- Drawings and diagrams
- Tools and materials
-
Step-by-step instruction
- Foundation
- Bottom trim
- Frame and top rail
- Floor
- Roof
- Roof
- Painting impregnation
- Glazing
- Protective mesh
Preparatory stage of construction
The decision to build a 3 by 3 gazebo entails a series of sequential actions. First of all, this is the choice of a place for the construction. It should take into account the wind rose with prevailing directions, the position of the building relative to parts of the world.
The entrance to the gazebo 3 by 3 is more practical to orient to the south, southeast. It is best to place the building on a flat area. Or do it on a small hill to protect it from precipitation, excessive moisture.
The utilitarian component of the project is important:
- Placement directly at the house retains the possibility of summing up communications, increases the adjacent territory, which will certainly affect comfort.
- Removing into the depths of a garden or plot will contribute to solitude, tranquility, peace.
- The nature of the building is year-round closed, or simple, open summer, which will take a minimum of materials and cash costs.
- The selection of any relief for the arrangement of a 3 by 3 gazebo should take into account the panorama that opens from this place.
- The gazebo is obliged to please with an elegant and pleasant look.
The site planned for construction is cleared of debris and foreign objects. If necessary, interfering trees or branches are cut. Communication paths are being laid.
Implementation Options
The site has been selected and prepared. The next stage of construction preparation is coming - from which to build a 3 by 3 gazebo.
The simplest and most feasible option even for an inept home accomplice is a portable lightweight construction made of collapsible elements. Available, practical, inexpensive. The disadvantage is seasonality, the need for storage space. Operational weakness - mates and parts become loose over time, wear out, gradually fail.
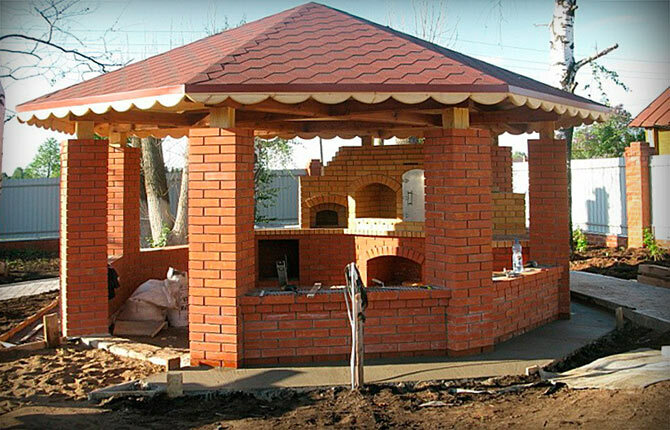
A 3 by 3 brick gazebo is a solid structure that is easy to use as a summer kitchen, install a barbecue or a fireplace. Of the shortcomings - the high cost, significant difficulties for the construction of their own hands.
Polycarbonate will successfully serve as an alternative to brick. Modern, lightweight, durable material. Effortlessly combined in any form with stone, wood, even improvised means. Spectacular art design combined with forged metal. The negative point is that during the rain there is a lot of noise inside the room. Polycarbonate is also widely used in indoor structures. Therefore, in the gazebo 3 by 3, a steam room and the effect of presence in the greenhouse are provided.
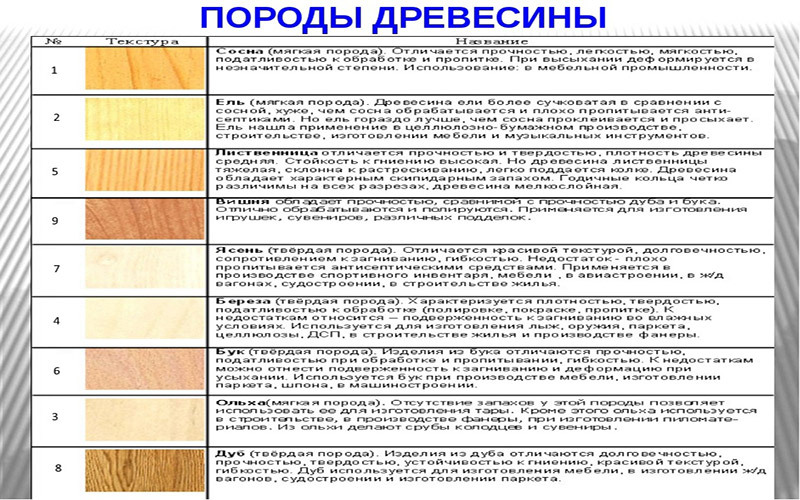
Wood is the most important raw material for construction. Low bulk weight with high strength, softness and ease of processing, outstanding decorative possibilities. The cottage, without exaggeration, will be decorated with a masterpiece created by oneself from this resource.
Drawings and diagrams
The place was prepared, the dimensions of the building were verified, the material for the structure was selected. The next step is drawing up a draft design. It reflects the configuration of the future gazebo 3 by 3, the location of the leading parts, design intent, design elements. Photos of completed projects, built pavilions, wooden arbors will serve as help.
Based on the sketch drawing, a detailed drawing is prepared. The nature of the foundation, the number of supports, the configuration of the parapets, the truss system are being worked out. The drawings are made in real scale with the most detailed drawing of the components, applying the final dimensions.
Schemes of complex mates and parts are displayed on separate sheets. It is most convenient to use A4 paper format, or graph paper. If you have the skills, computer programs will help, for example, ArCon Pro, AutoCAD.
Drawings and diagrams allow you to practically see the object under construction from all sides, calculate the dimensions, quantity of materials, and the total cost of the project.
Tools and materials
To build a 3 by 3 wooden gazebo, you need the following set of tools:
- laser or hydraulic level;
- tape measure, ruler, square, plumb line, carpenter's pencil;
- shovel, axe, hammer;
- electric drill, mixer nozzle, feather drills for wood;
- circular saw with adjustable angle;
- electric planer, sandpaper;
- fitting hacksaw, jigsaw, miter box;
- screwdriver, bit set;
- electric or garden drill.
As well as a container for the preparation of cement mortar, concrete. Need a ladder clamps, clamps. Need paint brushes and protective equipment - glasses, gloves, mittens.
Approximate list of materials for construction:
- Beam 150 by 150 mm (lower trim, corner posts).
- Beam 150 by 100 mm (pillars around the perimeter, entrance opening, upper trim).
- Beam 150 by 50 mm (logs, rafters).
- Boards 150 x 50 mm (flooring), boards 25 x 120 mm (roof sheathing).
- Roof covering.
- Fire retardant impregnation.
- Eurolining, glass, protective mesh.
- Self-tapping screws, perforated corners, anchors, plates, overlays, fittings.
- Brick, crushed stone, sand, cement.
The wood selected for construction must be dried, no more than 22% moisture is allowed, without cracks, damage, falling knots. Defective material gives out blue spots - the result of steaming during improper storage, black - indicate fungal mold. Such raw materials cannot be used.
Step-by-step instruction
Step-by-step instructions (in this case) are the order and sequence of work to achieve the ultimate goal - the construction and arrangement of a 3 by 3 wooden gazebo with your own hands. The instruction explains the tasks to be performed at a certain stage of construction, does not allow deviations from the design algorithm of actions.
Foundation
Only portable gazebos-tents from collapsible elements are operated without a capital foundation. All other pavilions require at least a simple but solid base.
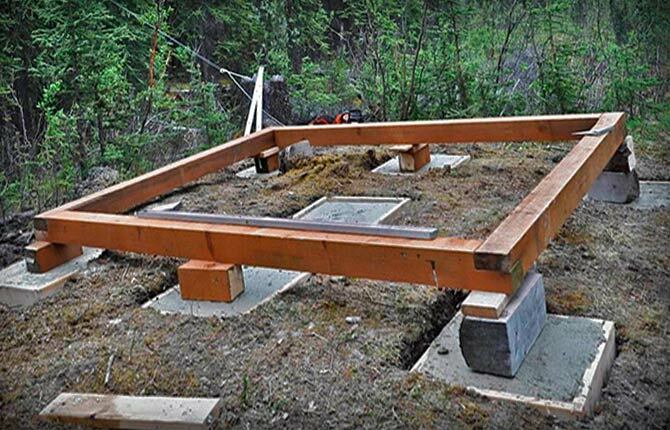
The weight of a 3 by 3 wooden gazebo is small, so it is not necessary and irrational to arrange tape, monolithic foundations. The optimal solution is columnar supports. This type of foundation is universal, suitable for arbors of any type, except for heavy brick ones.
Procedure:
- A scheme is taken, a plot for construction is marked. Wooden pegs indicate the central, corner and intermediate pillars.
- Holes are dug or drilled up to 0.8 m deep, depending on the density of the soil.
- A sand and gravel cushion is laid and compacted at the bottom of the hole.
- Formwork up to 25 cm high is arranged from boards or improvised materials to form parts of the supporting pillars protruding above the ground. The prepared cavities are reinforced, filled with concrete, anchors are installed for mounting the lower trim.
- The above-ground part can be made of red solid burnt bricks.
- In the course of work, the square perimeter and level marks are constantly monitored.
All further work is carried out after the concrete mortar has hardened. The necessary waterproofing in the form of bitumen or rubber-bitumen mastic is applied to the upper horizontal part of the support column, covered with one or two sheets of roofing material.
Bottom trim
This part is designed to evenly distribute the load, serves as the basis of the entire structure. Treated with a protective compound, prepared in accordance with the dimensions, the beam is laid on the foundation. Installation is carried out by sawing "in half a tree". Drill holes for anchors.
A protective, usually bituminous, composition is applied to the junctions. The assembly is tightened with nuts, with washers placed under them. Metal parts must be painted or galvanized. In addition to the beam around the perimeter, another one is installed - the central one. In this case, it is necessary to control right angles, diagonals.
Frame and top rail
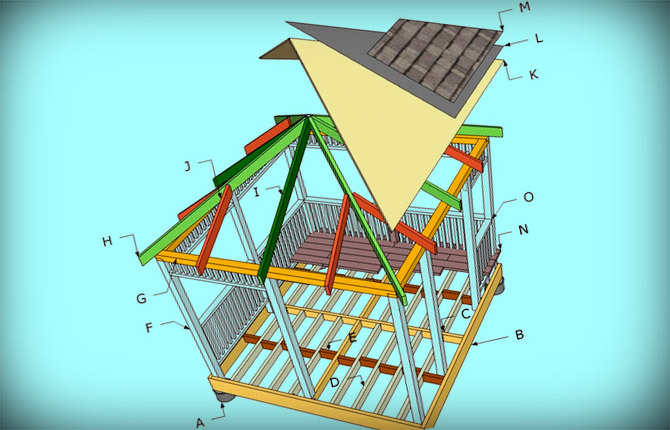
The frame is formed from corner and intermediate posts of the same height installed on the lower trim. For a shed roof, the minimum height of the front pillars is 230 cm, the rear pillars are 200 cm to maintain the slope. They are leveled and fixed with temporary jibs made of improvised material, wooden slats.
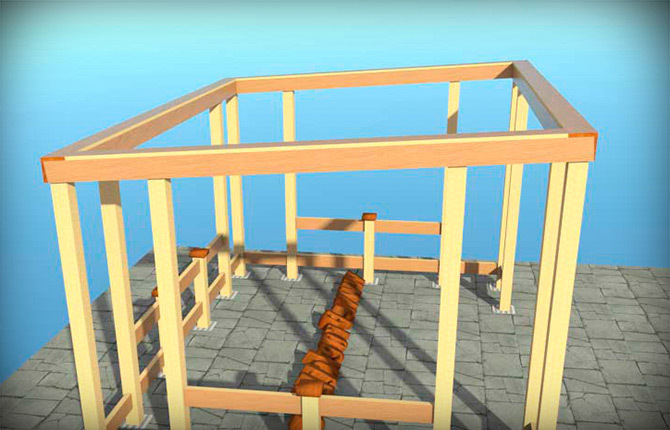
The final fastening is carried out with the help of dowels, screws, mounting angles. Delayed height, approximately 1 m around the perimeter. Corners are installed, a horizontal beam is attached to them. He will connect the frame, at the same time will act as a railing. For greater rigidity, the structure is complemented by diagonal braces. At the same time, wall cladding is performed. As a rule, this is the lower part - to the level of the railing. The upper space remains open.
The top harness is assembled in the same way as the bottom. It completes the connection of the frame bars, is a support for the roof. To reduce time and facilitate the process, the upper circuit is assembled together with the lower one, and at the right time it is lifted and mounted from above. In this case, the master will need assistants.
Floor
Immediately after the lower strapping, you can proceed to the flooring. Then it will not be necessary to bypass the vertical racks, the board will shrink more tightly with wedges. In addition, it is more convenient to assemble the frame on a boardwalk.
The device of the floor begins with fixing the lag. They are installed in the perimeter of the lower trim, without protruding beyond its level. The main laying trick is to correctly orient the initial board. If this succeeds, the progress of work will be rapid, without otherwise necessary dismantling.
Fitted-to-size boards are laid on the strapping and logs, assembled “in a tongue” or “in a quarter”, fixed with galvanized self-tapping screws. A grooved board is more expensive, but the tongue-and-groove connection is even and strong.
A board with a quarter is cheaper and easier to work with. It fits overlapping and even end-to-end. However, the lamellas do not fit tightly enough, which may affect the quality of the coating. An important factor is the aeration of the space under the floor. If necessary, provide drainage and ventilation openings.
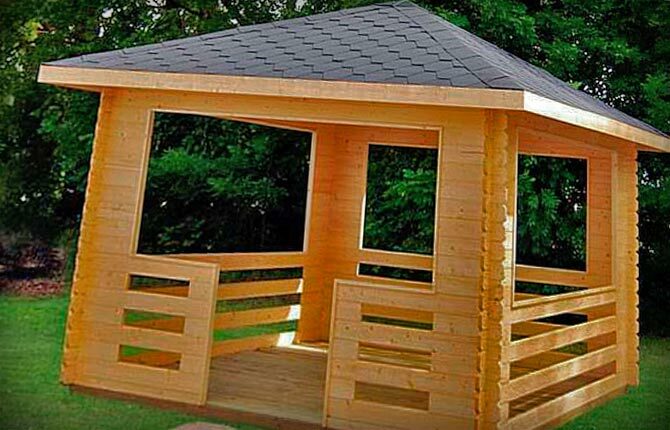
Roof
The simplest roof is a shed, easily erected with a minimum of material. But a 3 by 3 gazebo with such a roof looks unattractive, resembling an outbuilding. Among the minuses are instability in relation to snow loads, the need for high-quality waterproofing due to the small slope angle. The gable roof is used mainly for rectangular arbors.
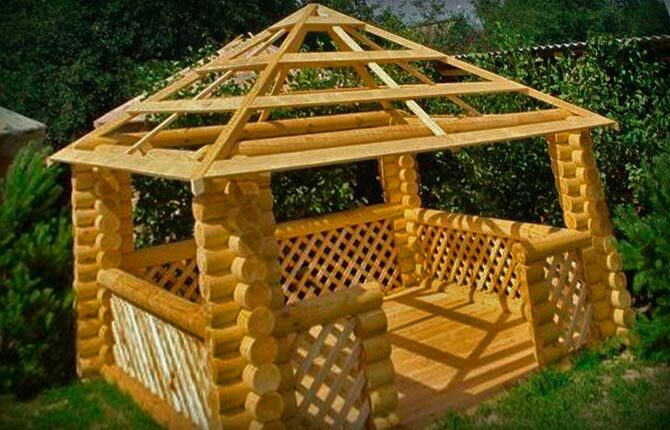
A square arbor 3 by 3 is more suitable for a hipped roof. Such a truss system consists of four triangles of the same shape and size. It is easier to fully assemble it at the bottom, and then lift it up, fastening it to the top trim. A securely fixed roof is sheathed with a crate, prepared under the roof.
Roof
There are no special subtleties in the arrangement of the roof. Roofing materials differ from each other in installation technologies, but the procedure for performing work remains common to all. First, a coating is laid on the roof, carefully fixed.
At the next stage, additional elements are installed - wind strips, chippers, skates, valleys. Their purpose is to localize weak points through which snow, wind, and rain can penetrate. Further, if the project provides, a drainage system is attached.
Painting impregnation
Wood, as a building material, is subject to decay, damage by fungi, insects, and fire. To protect against fire, flame retardants are used - aqueous solutions based on phosphates. They are applied with a paint roller, brush, spray gun. There are universal means with fire-retardant properties.
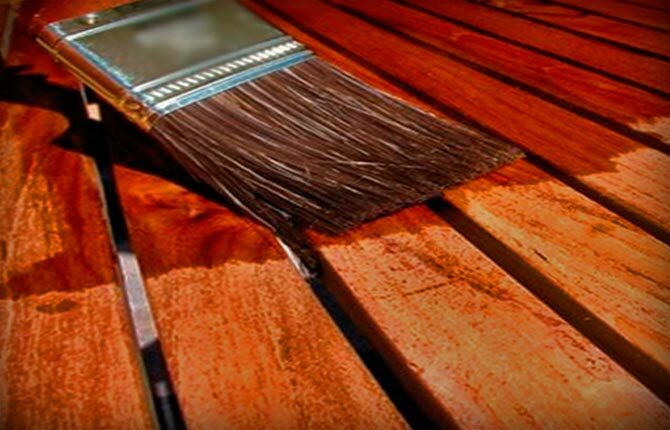
Traditionally, craftsmen combine protective impregnation with painting, using Pinotex Ultra, which has become extremely popular. Together with protection, the composition gives the treated wood a noble shade.
The entire set of wooden parts and materials must be carefully processed before the construction of the gazebo. This will increase the life of the building for many years.
Glazing
Glazing will help protect you from wind and precipitation, make your stay in the gazebo 3 by 3 more comfortable. It will be possible to use the space not only in the off-season, but also in the winter. The following options solve this problem:
- Simple glazing with conventional carpentry frames.
- Aluminum, traditional metal-plastic systems.
- All-glass, frameless glazing. The latest trend, visually perceived as a solid glass wall.
- Soft Window. The combination of a transparent PVC film with a dense color, reminiscent of a window frame and fittings for fastening.

The latter option allows you to open, close windows, use soft glass in the doorway. Material resistant to an ultraviolet, mechanical damages. A mosquito net is easily installed in any opening. Installation and removal does not require any special effort. The right choice for a small gazebo.
Protective mesh
An unexpected way - continuous drapery of a gazebo 3 by 3 with a protective mesh - demonstrates:
- Permanent shading effect.
- Total insect protection.
- The water-repellent properties of the mesh are ideal for bad weather.
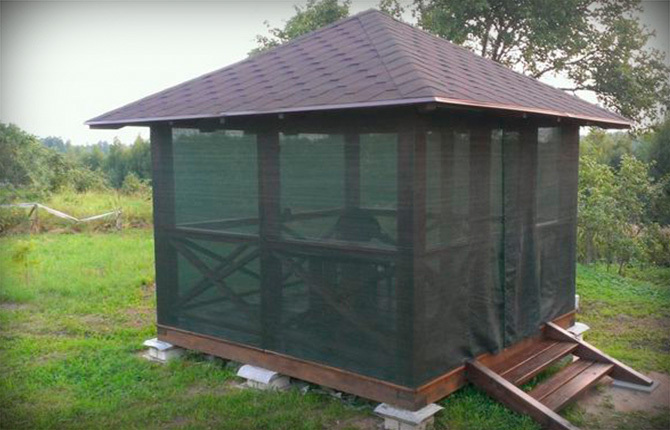
The negative point is that the design and beauty of the gazebo is hidden by a cheap mesh.
Clearly presenting the final result, a persistent master, even alone, is able to realize the project of a 3 by 3 gazebo with his own hands. If you have ever built a gazebo yourself, share your experience. Leave a comment, repost the article on social networks, bookmark it.
Selection for you:
- How to make a 3 by 4 gazebo with your own hands
- Arbors with their own hands made of wood
- Do-it-yourself brick gazebo
- How to build a comfortable metal gazebo with your own hands
- We build a gazebo from polycarbonate with our own hands
- How to make a gazebo from a profile pipe with your own hands
- We make a gazebo from improvised materials with our own hands
- We build a modern gazebo with a barbecue for a summer residence with our own hands
- How to make a beautiful gazebo from pallets
- Do-it-yourself gazebo with a pitched roof
- DIY hexagonal gazebo
How to close the gazebo from the neighbors?
PVC curtains for arbors are an inexpensive way to protect arbors, verandas or terraces, somewhat reminiscent of an awning, but have a more presentable appearance. The material is lightweight, able to protect from the sultry wind, insect attacks and snow.