Shingles is a wooden crate made of thin laths, which is used for interior wall decoration. Such material is lightweight, easy to install and completely safe for health. But in order to get a smooth surface, it is very important to properly plaster the shingles. To do it really with your own hands - the step-by-step process is described in the presented material.
The content of the article
- What is a shingle
- How to plaster on shingles
What is a shingle
Understanding what a shingle is is quite simple. In fact, this is a construction of wooden slats of small width (usually 15-20 mm) and a minimum thickness (3-5 mm), which is used to finish the wall. There is also a shingle for roofing. It is also made of wood, but it is not a lattice, but rectangular elements of certain sections.
Wall shingles have 2 layers:
- bottom row (prostration) - it is mounted at an angle of 45 degrees to the floor surface;
- top row (output shred) - mounted perpendicular to the bottom, also at an angle of 45 degrees to the floor surface.
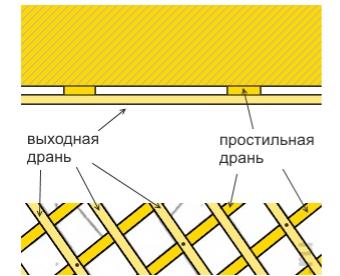
The result is a diagonal lattice consisting of numerous squares (rhombuses) of the same size.
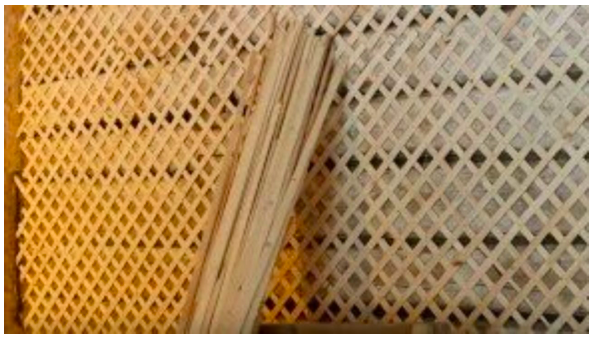
To put it simply, shingles can be said to be a finishing material that looks like a wall sheathing. It is always made of wood and has many advantages:
- environmentally friendly composition;
- resistant to sunlight;
- absorbs noise;
- well passes moisture, does not need vapor barrier;
- has a small weight due to low density;
- easy to install.
Although there are also disadvantages. First of all, they are associated with the fact that wood is prone to decay due to high humidity, high temperature. In terms of price, this is also not the most affordable material. In addition, it has to be pre-treated with an antiseptic composition. Nevertheless, this finish is often used in country houses. Therefore, it is important to figure out how to plaster a wooden surface.
How to plaster on shingles
Considering shingles, and what it is, we can recommend gypsum plaster as a finishing material. The fact is that cement or cement-lime mixtures should adhere well to the surface and go to depth. In the case of shingles, this is impossible, because the material is non-monolithic and loose in structure.
In addition, gypsum mixtures do not shrink, unlike cement. They evenly fill all the voids, dry out and stand up. Due to this, the plaster does not fall out, the surface becomes monolithic. This is especially important for homemade materials. It is not difficult to figure out how to make a shingle with your own hands, the main condition is to plaster it correctly.
To work along with the plaster itself, you will need the following tools and materials:
- primer;
- bucket;
- a set of spatulas;
- drill with a nozzle for mixing;
- lighthouses;
- self-tapping screws 70 mm;
- nails 25-40 mm;
- chisels;
- roulette;
- hammer;
- the brush is wide;
- roulette;
- rule;
- metal mesh for reinforcement.
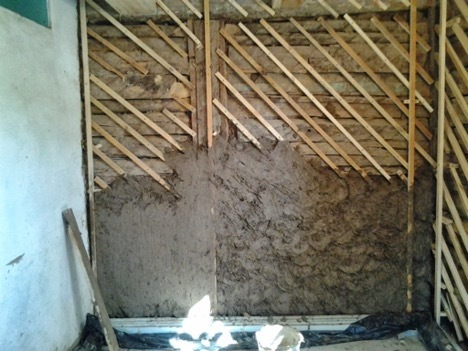
Instructions on how to plaster shingles on the wall are as follows:
- First, the surface is prepared - all the dilapidated pieces that fall out are removed, as a result, cavities are formed, which will then be filled with a new composition. Remove dust with a vacuum cleaner.
- Preparation of wooden surfaces for plastering includes mandatory priming. But they do not use an ordinary solution, but diluted with water in a ratio of 1: 1.
- If there are large damages, they are repaired with a special wood putty.
- A new shingle is stuffed over the old coating. To make the surface durable, it is desirable to put a metal mesh.
- Only after that they put beacons and knead the solution. First, the deepest places are trimmed, after which they proceed to the main area. The work is quite simple, and you need to do it quickly - preferably within an hour, because the solution will soon harden.
- Immediately after applying the plaster, the surface is leveled using the rule.
After hardening, you can proceed to finishing. To do this, use standard methods, for example, for painting or wallpapering. Thus, the dismantling of the old shingles and the installation of a new one can be done independently. Thanks to gypsum plaster, the surface will turn out to be even and harden in a matter of hours.

