For repair, replacement of individual parts, it is required to disassemble the washing machine into its component parts. You need to act sequentially, removing the panels, disconnecting the wiring and other elements. Instructions on how to disassemble the Indesit washing machine with a photo are presented in this material.
The content of the article
- What you need to work
- Dismantling of panels
- Shutdown of communications
- Dismantling the heating element
- Dismantling the tank
- How to remove the tank
What you need to work
The preliminary stage begins with the preparation of tools and materials that will be needed for work:
- a set of screwdrivers of different types, including bits in the form of hexagons and asterisks;
- keys of different types;
- disassembling the Indesit washing machine also involves the use of a hammer (if you plan to change the bearing);
- a small wooden block;
- pliers;
- multimeter for measuring resistance and other parameters;
- pliers;
- WD-40 (universal corrosion protection grease).
The instructions on how to disassemble the Indesit washing machine also refer to the preparation of the device itself. It must be de-energized, then pull out the filter and put a basin to collect the remaining water. Then you can start the process itself.
Dismantling of panels
First of all, the question arises of how to remove the front panel of the Indesit washing machine, as well as the back. You may have to remove only one cover - it all depends on which element needs to be repaired. For example, to replace the heating element, only the front part is removed. If you need to replace the bearing, you will need to completely disassemble the Indesit washing machine with your own hands.
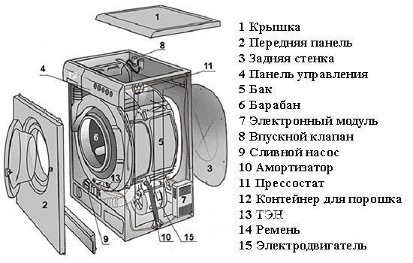
The step by step instructions are:
- First, the cover is removed (panel on top), which is fixed with 2 bolts (they can be found at the back).
- Next, the panel is pulled towards itself and the cover is manually removed, lifting it slightly.
- The next step, how to disassemble the Indesit machine, is associated with the removal of the rear panel. It is large, so it is fixed with 6 bolts, each of which must be removed.
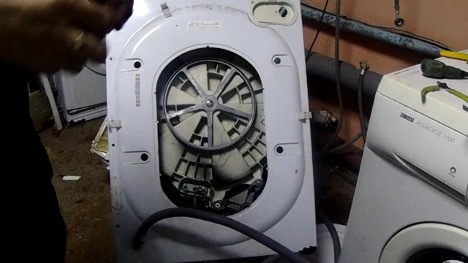
- Now it's the turn of the front part. This is very easy to do, since the part is fixed with only 2 screws. Moreover, it can not be removed if it is not planned to repair the heating element or other elements located in front.
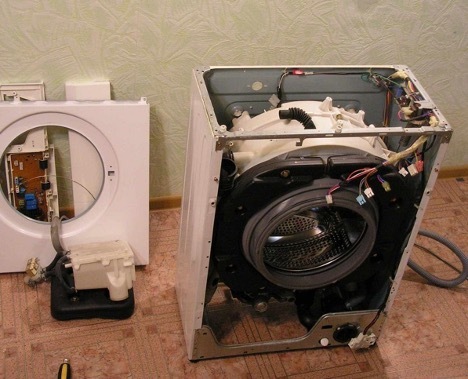
- It is clear how to remove the bottom cover of the Indesit washing machine. It is easy to remove as it is held by 6 bolts. After that, the tray is removed, into which the powder agent is poured. It is slightly lifted and pulled towards itself, simultaneously loosening in both directions. In this case, you can see 3 screws, which should also be unscrewed.
Shutdown of communications
Further, disassembling the Indesit washing machine with your own hands involves disconnecting all the wires inside the case, as well as removing screws and other elements. The algorithm is this:
- Disconnect the wire that goes from the panel in front to the control module (board with processor).
- Dismantling the wires that fit the powder receiver. Here are the blue and white wires. In order for the disassembly of the Indesit washing machine to proceed correctly, you need to take a picture or remember exactly where a particular wire fits.
- Next, you need to find the screw in the water supply area and unscrew it. A tube comes from the powder receiver, which is attached through a rubber lug. It is also removed by prying this ear.
- Disconnect the electrical cord. To properly disassemble the Indesit washing machine, you should find a part in the form of a rectangle - it is to it that the cord is attached. The screw is unscrewed and then pulled up.
- It is also necessary to remove the rubber band, which is fixed with a spring between the hatch and the tank. For dismantling, press on it and pull it up.
Dismantling the heating element
The next step in the instructions on how to disassemble the Indesit automatic machine is related to the dismantling of the heating element. It is easy to find behind the back cover. At the same time, the removal itself may seem difficult, but in fact the main thing is to carefully follow this sequence:
- Open a small panel below the loading hatch.
- Find the filter plug and unscrew it, moving counterclockwise.
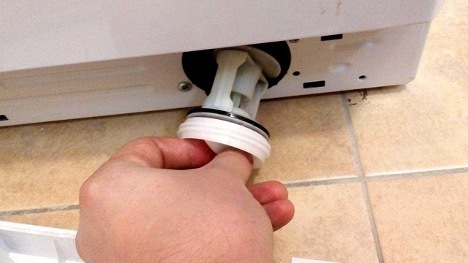
- If necessary, substitute a basin so that the remaining water gets into it.
- Remove the water supply hose.
- The drain hose is also dismantled.
- Now you need to understand how the Indesit washing machine is disassembled, namely, the heating element. First, it is photographed so that later it is possible to connect the wires correctly.
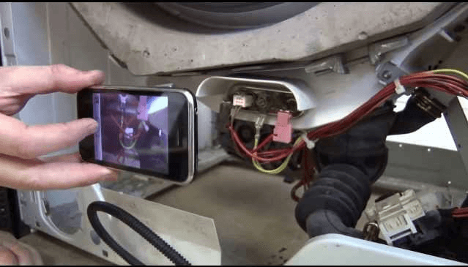
- Next, disconnect the wires from the connectors, bend the tongue and unfasten the wires from the temperature sensor.
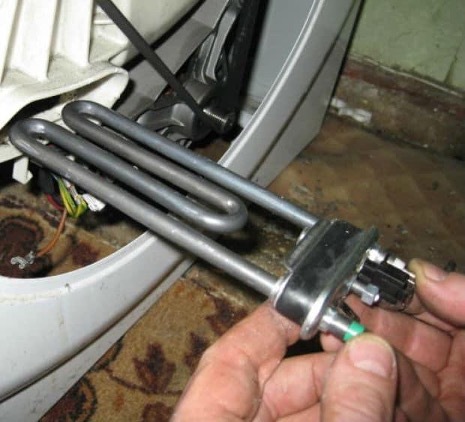
- To get the heating element, loosen the mount and remove the nut in the center (but not to the very end). The bolt is pressed inward and the heating element is carefully pry off with a flat screwdriver.
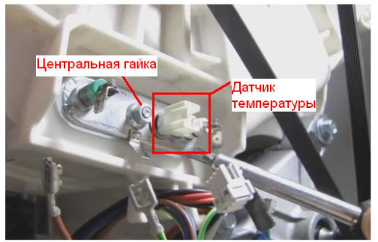
- Disassembling the Indesit washing machine at this stage can be difficult, because here you need to gently swing the heating element from side to side.

- If necessary, install a new heating element, after which the Indesit washing machine is assembled in the reverse order.
Dismantling the tank
The next step, how to disassemble the Indesit washing machine, comes down to dismantling the tank. The instruction looks like this:
- The unit is turned over and placed on the "head". Moreover, it is better not perpendicularly, but diagonally, that is, approximately at an angle of 45 °.
- In order to correctly disassemble the Indesit washing machine, the bolts to which the shock absorbers are fixed are removed on the left and right.
- Put the car back in its normal position, that is, on the bottom.
- Remove the plastic tank. Instructions on how to disassemble the Indesit washing machine recommend working together at this stage, since the springs must also be dismantled.
- Open the manhole cover and keep it open all the time.
- The shock absorbers are dismantled, which are attached to the tank with plastic pins.
- Remove the motor and pipe from the rubber.
- Finally, the load is removed from below.
How to remove the tank
You need to understand that the disassembly of the Indesit WITL 867 and other models actually ends here, because the tank itself is non-separable, therefore, in the event of a breakdown, it is not repaired, but replaced with a new one. To extract it, proceed as follows:
- They take a thin drill and make holes in the end of the seam, moving along the entire circumference (it is recommended to retreat 15 cm).
- They take a larger drill and again go through the holes already made to expand them.
- Further disassembly of the Indesit machine comes down to the fact that the tank is placed vertically on a flat surface and the factory seam is sawn. To do this, you need a hacksaw for metal work. Sawing is very slow, at least 3 hours, because the work must be done very carefully. Otherwise, due to incorrect movements, it will no longer be possible to glue the tank.
Thus, disassembling the Indesit washing machine requires certain skills, especially in cases where the process needs to be brought to the very end and the tank removed. It is preliminary recommended to understand the scheme of a particular model in order to correctly outline the sequence of actions. Disassembled parts are tested for performance and clogging, if necessary, they are replaced with new spare parts.


