Understanding how to disassemble a Hansa dishwasher is easy. This requires only improvised tools and minimal skills. First, the unit itself is prepared, put on a thick plastic film, then the panels are removed and the parts are removed in stages. Step by step instructions with photos can be found in this article.
The content of the article
- Preparatory work
- Step-by-step instruction
Preparatory work
Hans dishwasher malfunctions can be associated with various parts that need to be inspected and checked for performance. To do this, you need to remove each panel, and then get to a specific element.
But first you need to choose a place where the work will be carried out. It should be spacious enough so that the unit can be approached from any direction. If the kitchen does not allow, it is better to move it to the room and work there.
Also, before you repair the Hans dishwasher with your own hands, you need to do the preparatory work:
- Switch off the power supply and turn off the valve.
- Remove all baskets and other containers so that nothing remains in the chamber.
- If the machine is built-in, unscrew the screws and pull it out.
- Prepare a basin, unscrew the water supply hose and drain the remaining liquid.
- Spread thick polyethylene and put the unit on it.
As for tools, it is quite enough to take a set of screwdrivers (regular and curly), an awl and pliers. You may also need a soldering iron and a multimeter. The tool is used to measure resistance, which can be used to judge whether a particular part is working or not.
It is important not only to understand how to disassemble the Hans dishwasher, but also not to forget in what order everything is connected. In order not to get confused, it is better to take a picture of each step in advance with a high-resolution mobile phone camera. To get clear pictures, you will need to use a flashlight.
Step-by-step instruction
Hans dishwasher malfunctions can be associated with a variety of parts. Ideally, you need to check each of them; for this, the unit is disassembled, proceeding as follows:
- Using a flathead screwdriver, pry up and remove the bottom panel.
- Open the door as much as possible and unscrew each screw.
- Then carefully close, holding from the front. Press down and remove the door.

- We disassemble the Hansa dishwasher correctly. Next, you need to open the door again, remove all the screws from the end on top. The electronic module is dismantled and placed in a dry place - it is important to make sure that even a drop of moisture does not get on it.
- Remove the metal plate that lines the device door from the inside.
- They remove the material for soundproofing (it is also located on the inside of the door). Unscrew each screw that connects the case to the base.
- Further disassembly of the Hansa dishwasher consists of disconnecting the sprinkler.
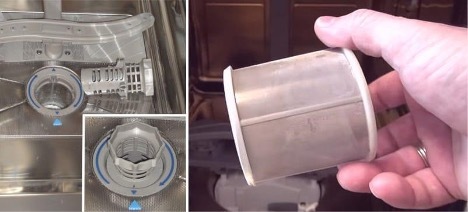
- At the bottom you can see the debris filter. It is twisted counterclockwise and removed. Also dismantle the filter that performs fine cleaning. In appearance, it resembles a metal mesh.
- Unscrew the fasteners that hold the sprinkler from below. It is necessary to prepare a basin to collect the remnants of the waste fluid.
- Remove the thermal insulation, dismantle the side panels.
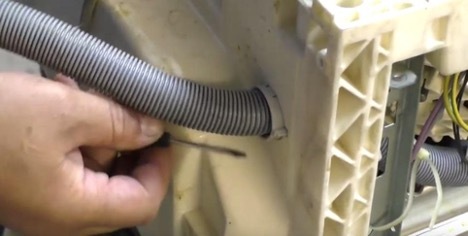
- Now the unit must be put upside down and, having disconnected the filler pipe, remove it.

- Disconnect each wire and remove the pump, which is located in the very center of the pan. The wire is also disconnected from it, and the pump itself in a plastic case is moved counterclockwise.
- After removing the pump, the pump is also removed. First loosen the fasteners at the bottom, then remove the drain hose.
Further, if necessary, you can inspect a specific part and “ring out” it with a multimeter. If there are signs of a malfunction, it is not advisable to carry out repairs - it is easier to install a new spare part. Then all the elements are installed in place, moving in reverse order. Photos taken at each stage will help to understand this.