The warm floor in the bath is done using a heating circuit, to which a sensor and a thermostat are connected to control the temperature. The work can be done literally in one day, but after that you must wait at least a month for the screed to fully mature, after which you can start using the system. The article provides instructions on how to make a heated floor in an electric bathroom, as well as recommendations for preparing the necessary materials and arranging waterproofing.
The content of the article
- What do you need to work
- Step by step installation instructions
What do you need to work
First of all, you need to prepare materials and tools for work:
- the base of the floor is a heating cable, which can be single-core or multi-core;
- temperature sensor;
- pipes for the floor - usually choose plastic, because it is convenient to work with them (length up to 1.5 m);
- mounting tape;
- temperature sensor;
- thermal insulation;
- waterproofing;
- perforator;
- hammer;
- chisel.
A separate important topic is waterproofing and underfloor heating in the bathroom. Covering with a film is required without fail, because water strongly destroys concrete over time. Even if the apartment is located on the ground floor, and there is no risk of flooding the neighbors, moisture protection will still be needed.
Most often, modern materials are used for this:
- thick polyethylene film;
- fiberglass;
- ruberoid;
- PVC film;
- cement-polymer mixture;
- mastic (water base).
Thus, there is no doubt whether waterproofing is needed under a warm floor. Despite the fact that the contour area is very small, the effect of moisture is felt more and more over time. The liquid penetrates into the cracks, directly into the screed and destroys it from the inside. If you do not provide for the laying of the film, after a few years the floor will begin to deform.
Step by step installation instructions
Installation work is carried out in several stages:
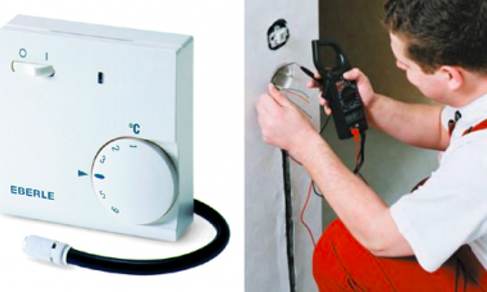
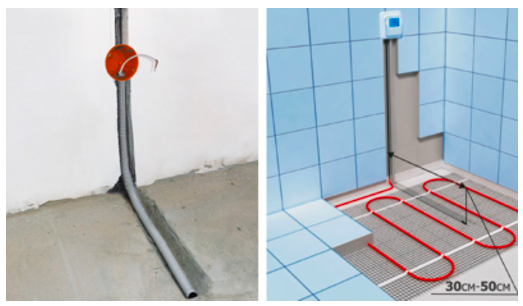
- A thermostat is installed to control the temperature and automatically maintain it within a certain range. It is mounted in a pre-made recess in the wall surface at a height of not more than 1 m.
- From this recess, 2 strobes are made vertically and the sensor wires are placed in one of them, and the power wire is placed in the other.
- The base of the floor is cleaned of dust and a self-leveling mixture is placed (a cement screed can also be used instead). When the floor is leveled, it is treated with a primer.
- Waterproofing is placed on the prepared surface. If the material is in a roll, it is straightened and heated with a hairdryer. Stick on the subfloor and do the processing of the seams. If it is, for example, liquid mastic, it is applied with a brush or a spray bottle. And it is better to do 2 layers.
- Next, lay the insulation. The stage is optional, but desirable, because in the absence of insulation, quite a lot of energy is lost. This is especially true if the apartment is located on the first floor. As a material, cork, foil polyethylene foam or foam plastic is usually used.
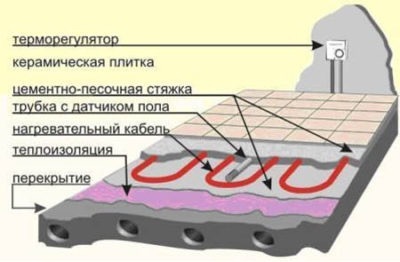
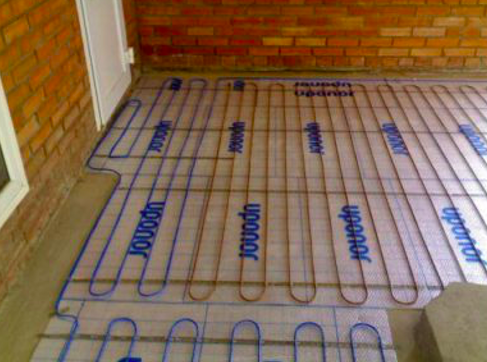
- The heating cable is laid, moving from the junction of the power wire with the thermostat. A steel mounting tape is fixed to the thermal insulation material with an interval of 40-50 cm. The cable itself is placed in a zigzag and fixed to the floor with a mounting tape.
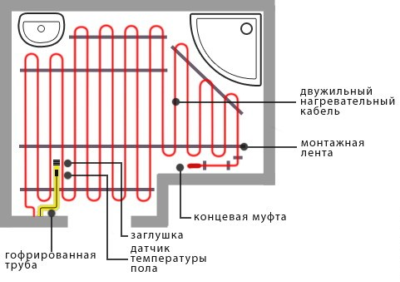
- During the installation of the cable, a minimum of 6 cm is left between its turns, and the interval to the wall is from 10 cm. Make several turns with a minimum radius equal to 5 diameters of this cable. Also observe the gap from the pipe and the heater from 20-25 cm.
- Now it's time to install the temperature sensor - it is placed in the pipe itself and placed in the space between any 2 turns of the cable. A plug is placed on one side of this pipe to prevent the ingress of cement mortar. The sensor leads are fixed to both contacts of the thermostat. After that, you can close up the vertical strobes using plaster.
- Then you need to turn on the devices for a while to check its performance. If everything is in order, you can fill in the screed, the thickness of which can be from 3 to 10 cm. It is optimal to purchase a special mixture for a warm water floor.
The installation process itself is not very complicated, but it takes quite a lot of time in the sense that the finishing is performed only 3-4 days after pouring the mixture. Then you have to wait another 4 weeks for the screed to fully mature. Only after that you can turn on the warm floor and start using it.