Replacing cast iron batteries with bimetallic ones is carried out independently. First you need to substitute the stop under the old radiator, turn off the taps and carefully disconnect it from the system, using a pipe cutter if necessary. Installation of a new radiator is carried out taking into account the requirements for distance and dimensions. Step by step instructions are provided in this article.
The content of the article
- Dismantling cast iron batteries
- Installation of new radiators
Dismantling cast iron batteries
Now you need to understand how to disassemble the cast-iron battery in sections. For dismantling, you will need the following equipment:
- wrench;
- grinder equipped with a disc for working with metal;
- puncher equipped with a drill on a concrete wall;
- level;
- radiator connection kit (thermostatic).

The main steps are:
- First of all, both taps are shut off and several rags with a basin are prepared. If there are no taps, you will have to contact the management company for a permit. On the appointed day, specialists must shut off the water supply through the pipes throughout the riser, where repairs are being carried out.
- Place an emphasis under the radiator and completely drain the water.
- Take a toggle wrench and remove the flanges as well as each locknut. It is often difficult to remove them due to "sticking" - in such cases, a pipe cutter is used. It is necessary to cut off the end of the pipe, after which there is a nut.
- Carefully remove the radiator from each bracket, after placing the stop down to prevent a sharp fall.
Installation of new radiators
Next comes the main stage - the replacement of cast-iron radiators with bimetallic ones. The procedure is as follows:
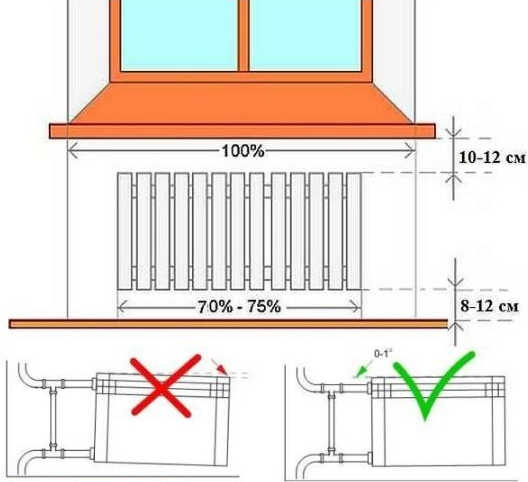
- Determine the exact location under the window, focusing on the norms shown in the figure.
- They take the battery in the film (it is not removed until the installation is completed) and placed strictly in the center of the window.
- Apply to the surface of the wall and make markings for the installation of brackets (if you plan to install new fasteners).
- The brackets are fixed with dowels and reinforced with a cement mixture (if the wall is made of reinforced concrete or brick). If the surface is drywall, double-sided fastening is required, i.e. with a through hole.
- The radiator is hung on the installed brackets and attached to the pipes.
- Check the tightness by blowing air from a car pump with a pressure of 1 atm. If the pressure remains at the same level, then you can open the taps and test the battery.

Thus, at home, you can replace the cast-iron battery with a bimetallic one with your own hands. The work is not difficult, but accuracy is required both during dismantling and when installing a new radiator. You should especially carefully check the tightness - if in doubt, it is better not to take risks and not open the taps, especially during the heating season. In such cases, it is recommended to call a specialist for additional testing.