Working with tools requires not only certain skills, but also knowledge about their structure and repair principles. One of these tools is a screwdriver, which can fail at the most inopportune moment. Repairing a screwdriver is a task that every craftsman can face, regardless of his level of experience. When repairing a screwdriver, special attention should be paid to its chuck, since it is the key element that ensures reliable fastening of the attachments.
In this article we will look at the main points that need to be taken into account before starting work on repairing the cartridge screwdriver, and also give recommendations on safety and selection of spare parts to restore working condition tool. Having acquired basic knowledge, you can significantly simplify the repair process and minimize the risks associated with possible damage to the screwdriver.
The content of the article
-
How to disassemble a screwdriver
- How to disassemble a Makita screwdriver
- The screwdriver rotates under load - what to do?
- Screwdriver spindle lock - what is it?
- Screwdriver button repair
- Screwdriver chuck jammed
- Screwdriver sparks
- conclusions
How to disassemble a screwdriver
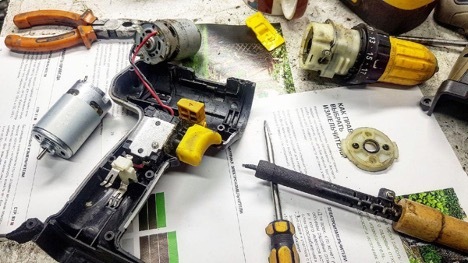
The process of disassembling a screwdriver begins with its chuck, which is one of the key parts of the tool. Correct disassembly of the cartridge is important for subsequent repairs or replacement of individual elements. Before starting work, make sure that the tool is unplugged or the battery is completely removed.
- How to disassemble a screwdriver chuck:
- First, open the chuck to its maximum diameter to gain access to the inner screw.
- The internal screw is usually reverse threaded, so you will need to turn it clockwise to remove it.
- After unscrewing the inner screw, close the cartridge and unscrew it by turning it to the left.
- If the cartridge fits very tightly, you may need a specialized wrench to unscrew it.
- Disassembling the screwdriver continues further:
- After removing the chuck, unscrew the screws that secure the screwdriver body.
- Separate the body into two parts, carefully exposing the internal components of the instrument.
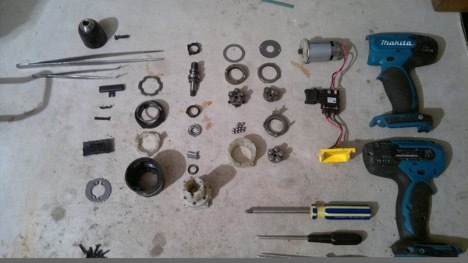
- Assess the condition of gears, wires, motor and other components to determine which components require repair or replacement.
The stages of disassembling the chuck and the screwdriver itself are important for further diagnostics and repair of the tool. If all precautions are followed and all actions are carried out carefully, the disassembly process will not cause difficulties even for an inexperienced user.
How to disassemble a Makita screwdriver
To disassemble a Makita screwdriver, you should perform a number of sequential steps:
- First of all, it is important to ensure safe operation by disconnecting the battery from the screwdriver.
- Remove the device case where the battery is located.
- Remove the screws connecting the two halves of the case using a Phillips screwdriver.
- Disable the reverse button, remove the speed switch.
- Disconnect the engine and transmission.
These are the basic steps to disassemble a Makita screwdriver. Additionally, during the disassembly process it may be necessary to disassemble the gearbox, as indicated in some sources. If difficulties arise during the disassembly process, it is recommended to contact professional craftsmen or study specialized manuals and video instructions for disassembling a specific model.
The screwdriver rotates under load - what to do?
A situation where a screwdriver spins under load can arise for a number of reasons, and the solution to the problem depends on the specific cause. Possible causes include wear or damage to the gearbox, chuck, or other internal components of the tool.
Repair of screwdriver gearbox:
- Disassemble the screwdriver and check the condition of the gear teeth for wear or damage.
- If necessary, replace the gearbox or its individual elements.
- Check the gearbox lubrication. Insufficient lubrication can cause wear and reduce gearbox efficiency.
If necessary, add or replace lubricant.
Screwdriver chuck repair:
- Check the cartridge for visible damage.
- Make sure it closes and opens properly.
- If the cartridge is damaged, you can try to repair it or replace it with a new one.
- Disassemble the cartridge and check its internal components for wear.
It is also worth checking the condition of other internal components of the screwdriver, such as the motor and electronic components, for possible damage that could affect its operation under load. If self-repair does not lead to the desired result, it is recommended to contact professional power tool repair technicians.
Screwdriver spindle lock - what is it?
The spindle lock in a screwdriver is a mechanism that allows you to temporarily lock the rotation of the spindle to facilitate the process of replacing or installing attachments. This mechanism is especially useful when you need to change a drill, drill or other attachment while keeping the spindle stationary. This makes the replacement process quick and safe.
To understand how the spindle lock works and check its condition, you may need to disassemble the screwdriver. During the disassembly process, it is important to be careful not to damage the internal components of the instrument and to properly restore it after inspection or repair.
- Disconnect the battery or unplug the screwdriver to ensure safety.
- Following the disassembly instructions for your specific screwdriver model, access the spindle lock mechanism and inspect it for visible damage or wear.
- If the locking mechanism is damaged, depending on the extent of the damage, you can try to repair it or replace it.
Spindle lock is an important feature that makes using a screwdriver convenient and safe. If you have problems with the spindle locking, it is recommended to contact qualified specialists or a service center for diagnostics and repairs.
Screwdriver button repair
This action may be required if the button stops responding to pressure or is unstable. First, you need to turn off the power to the tool by disconnecting the battery or turning off the screwdriver from the mains. You should carefully disassemble the screwdriver body, getting to the button mechanism.
After this, you need to carefully inspect the contacts and wires for damage, and also check whether the button is clogged with debris or dust. Depending on the problem identified, it may be necessary to clean the contacts, restore the wiring, or replace the button itself. If you do not have enough experience in repairing power tools, it is better to seek help from professional technicians.
Screwdriver chuck jammed
This is a common problem that can occur due to contamination, wear, or mechanical damage. Initially, ensure safety by unplugging the screwdriver or removing the battery. Apply penetrating oil to the chuck clamping area, give it some time to penetrate the gaps and try to gently turn the chuck in both directions by hand.
If this does not help, you may need to completely disassemble the cartridge to clean and examine the condition of the internal components. If damaged parts are found, they should be replaced. If the problem remains unresolved, it is recommended that you contact a power tool repair specialist for professional diagnosis and repair.
Screwdriver sparks
This may be due to wear of the brushes, damage to the windings of the armature or commutator. It is important to immediately stop using the tool and disconnect it from the power supply by unplugging it or removing the battery. It is recommended to inspect the brushes and, if necessary, replace them with new ones. If the problem persists, you should check the condition of the windings and the commutator. If there is serious damage or problems, professional repairs may be required. Contacting qualified specialists will help return the tool to working condition and avoid possible consequences from further use of a damaged screwdriver.
conclusions
Screwdriver repair and maintenance is an important process that helps extend the life of the tool and ensure its safe use. Problems can occur in various parts of the screwdriver, including the chuck, gearbox, control button and electrical part. Correct diagnostics and timely repairs will help avoid serious damage and maintain the functionality of the tool. However, if you do not have sufficient experience or specialized tools, it is recommended to contact professional service centers for repairs. Careful attitude and proper maintenance of the screwdriver will ensure its long and efficient operation.