Energy saving is a pressing task for many households. A do-it-yourself vacuum solar collector is a great way to reduce heating and hot water costs. To implement the project, you will need the ability to work with tools and basic knowledge of physics.
The content of the article
- Theoretical basis
- Manifold assembly
- Working with tubes
- Errors when creating a vacuum manifold
- conclusions
Theoretical basis
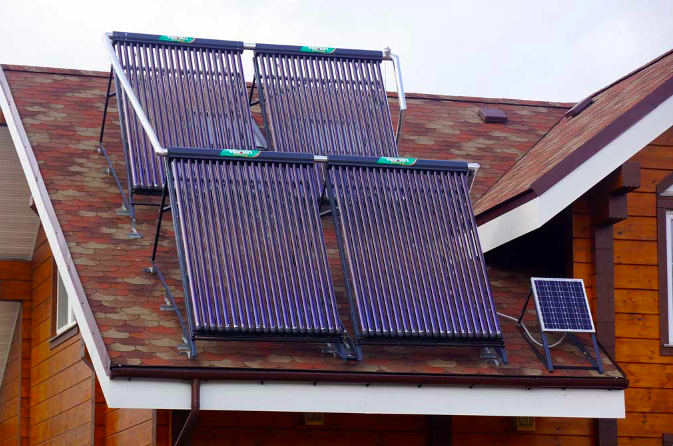
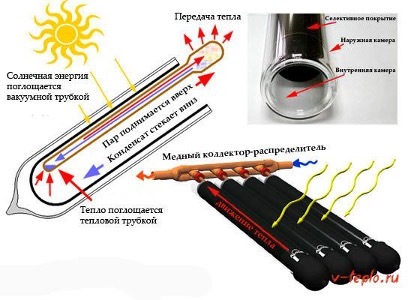
The operating principle of a vacuum solar collector is based on the use of vacuum pipes in which a vacuum is created to minimize heat loss. Vacuum solar collectors operate based on the principle of heat exchange and solar energy. The sun's rays passing through vacuum tubes are converted into heat, which is then transferred to the working fluid.
The peculiarity of vacuum tubes is that they provide minimal heat loss due to the vacuum space between two glass shells. This creates effective insulation and allows the system to operate even on cold or cloudy days.
The design of a vacuum solar collector includes several key elements: vacuum tubes, a heat exchanger and a circulation system. The correct interaction of these elements ensures the effective functioning of the system and the possibility of using solar energy to heat water and maintain a comfortable temperature in indoors.
Manifold assembly
Creating a solar collector begins with the selection and acquisition of materials and components. The main elements are vacuum tubes, frame and heat exchanger.
Assembly of the vacuum solar collector:
- Create or purchase a frame suitable for mounting vacuum pipes. The frame must be weather-resistant and provide the correct angle to the sun.
- Install the vacuum tubes into the frame, ensuring they are securely fastened.
- Install the heat exchanger so that it is in contact with the vacuum tubes for efficient heat exchange.
- Ensure reliable connections between the pipes and the heat exchanger, and also connect the system to the water supply.
- Insulate all connections and heat exchanger to minimize heat loss.
- Test the system for leaks and operating efficiency and adjust as necessary.
Assembling a vacuum solar collector requires care and certain skills, but the result is worth the effort.
Working with tubes
Particular attention should be paid to the process of creating vacuum pipes. Do-it-yourself vacuum tubes for a solar collector is a complex process that requires precision and care:
- high-quality glass is suitable for creating vacuum pipes;
- To create a vacuum inside the pipe, specialized equipment will be required;
- Vacuum tubes are installed in the frame to capture sunlight as efficiently as possible.
Errors when creating a vacuum manifold
The use of poor quality or inappropriate materials may result in loss of efficiency and longevity of the system. And insufficient insulation of connections and heat exchanger can lead to significant heat loss.
In addition, the installation angle affects the efficiency of the solar collector; it must be selected taking into account the geographical location.
Loose connections between the pipes and the heat exchanger reduce the efficiency of the system. And skipping the testing step can lead to water leakage and damage to the system.
conclusions
Creating a vacuum solar collector with your own hands is a complex, but very interesting and useful project. With its help, you can significantly reduce energy costs and make your home more environmentally friendly.