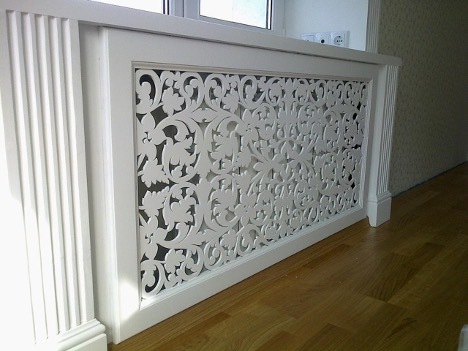
Heating batteries do not always harmonize with the interior, but there is a simple and effective solution - a DIY screen for the battery. This article will help you understand how to make and install such a screen, providing not only an aesthetic appearance, but also without compromising heating efficiency.
The content of the article
- How to make a screen for a battery
- Stages of screen manufacturing
- Installing the screen on the battery
- Errors when creating a screen for a heating radiator
- Conclusion
How to make a screen for a battery
Before you start manufacturing, it is important to decide on the material. Wood is a popular choice for its visual appeal and ease of processing. A wooden screen for a heating radiator is not only a functional element, but also an elegant addition to the interior.
The choice of material depends on your preferences and operating conditions. Wood is good for dry areas, while metal or plastic is better for wet areas.

Stages of screen manufacturing
Screen production begins with measurements. The battery screen must have precise dimensions to ensure a perfect fit and not interfere with air circulation. It is important to leave a small gap between the screen and the heatsink to ensure efficient heat transfer.
Before starting work, prepare the following materials and tools:
- wooden planks or MDF sheets;
- saw or jigsaw;
- screws and screwdriver;
- sandblasting paper;
- paint or varnish.
Manufacturing:
- Creating a battery screen with your own hands begins with cutting the material according to measurements.
- The next step is finishing the edges and sanding the surface.
- The materials are then connected to each other using screws or glue.
- After assembly, the screen is coated with paint or varnish for protection and aesthetics.
Installing the screen on the battery
This is an important stage that requires care and precision. Before installation, make sure the screen is completely dry after painting or varnishing. It is important that the screen not only looks aesthetically pleasing, but also does not interfere with the normal operation of the heating system.
First of all, check how well the screen fits your radiator. It should fit freely into the space around the battery, providing sufficient clearance for air circulation. If the screen is too close to the radiator, it may have a negative impact on heating efficiency. Ideally, leave approximately 2-3 cm of clearance on all sides of the radiator.
After fitting the screen into place, it's time to secure it. If your design involves mounting to a wall, use reliable fasteners that can support the weight of the screen. In some cases, simply placing the screen in front of the radiator is sufficient, especially if it is made of lightweight materials and has a stable base. In any case, make sure that the radiator control valves remain freely accessible so that you can operate your heating system without any problems.

Errors when creating a screen for a heating radiator
Creating a screen for a heating radiator with your own hands is a process that may seem simple, but it is easy to make mistakes. Below are the most common mistakes to avoid to ensure that your screen is not only beautiful, but functional as well.
One of the main mistakes is the wrong choice of material. Not all materials are equally good for making a screen. For example, the use of flammable materials or materials that do not withstand high temperatures may create a fire hazard. Preference should be given to wood, MDF or metal treated with fire-resistant compounds.
Another common mistake is insufficient clearance between the screen and the radiator, which prevents normal air circulation. This can lead to reduced heating efficiency and even overheating of individual screen elements. It is important to provide sufficient space for heat exchange.
Sometimes, when making a screen for a battery with your own hands, the dimensions of the radiator are incorrectly measured, which leads to the creation of a screen that is too large or small. It is also important to consider the shape of the radiator. An improperly selected size or shape can not only spoil the appearance, but also interfere with access to control valves or ventilation holes.
When making a screen, it is important to consider the overall style and design of the room. Ignoring this aspect may result in the screen looking out of place and spoiling the overall impression of the interior. The choice of color, texture and design should be in harmony with the surrounding environment.
Conclusion
Creating a screen for a radiator with your own hands is not only a practical, but also a creative activity. You get the opportunity to add a unique element to the design of your home, improving the aesthetics and functionality of your heating system. Follow safety precautions and have fun!


