 Sink is an integral element of any kitchen. There are many variations of this attribute. The best option is a model built into the cabinet. Anyone can install it with their own hands, the main thing is to adhere to the installation features and have the necessary tool.
What you need to install a sink
The content of the article
- What you need to install a sink
- Ways to install a sink on the cabinet
- Preparation of furniture for washing installation
- Stainless steel sink installation
 Stainless steel sinks are very popular due to their light weight, durability and ease of installation. Before starting the installation of the sink, you need to assemble the furniture. Depending on the type of cabinet, fasteners and assembly methods differ. The kit usually comes with accessories and the necessary instructions.
IMPORTANT! Headsets should be selected from separate modules to reduce installation time. For kitchens with a common countertop, sink holes and communications should be prepared in advance.
To attach the sink correctly, you must assemble a minimum set of tools. To seal the joints, you need a silicone sealant that protects the furniture surface from moisture.
Accessories for installation:
- electric drill or screwdriver;
- a set of drills with a dimeter for fastening;
- self-tapping screws and other products for fasteners;
- screwdrivers in a set with different sections;
- masking tape to protect furniture;
- ruler and device for level measurement;
- sealant for sealing joints.
Before installation, it is recommended to clean the space and remove excess. For convenience, all communications should be fixed on the pedestal in advance. After fixing the sink, this step will be problematic. The installation location will depend on the location of the water pipes and sewage. If space permits, then it is not recommended to place a curbstone near a refrigerator and heating devices.
Ways to install a sink on the cabinet
Corrosion-proof sinks of standard sizes can be fixed in two ways. Depending on the type of product and the features of the cabinet, different options are chosen.
Mounting Methods:
- with sealant;
- fixing on self-tapping screws.
ATTENTION! In the case where the sink is lightweight, two options can be used. If the product is non-standard, then the sealant cannot cope with the load, the use of metal fasteners is required.
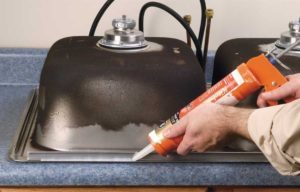
 When choosing a sealant, factors such as reliability and safe composition should be considered. For fixing the sink, a volume of up to 150 ml is suitable. The product should be with the current shelf life. For ease of application, you may need a special gun. Excess should be removed until the product has completely dried.
REFERENCE! The advantage of fastening on self-tapping screws is durability in use. Such a sink can withstand heavy loads.
You can apply an integrated approach. In this case, the sink is fixed to the pedestal using fasteners, and the holes of the joints are coated with silicone sealant. Depending on the model of washing, you can install on the cabinet in different ways. Standard mounts must be present.
The sink with curved sides can be lifted using wooden blocks. The dimensions of the product should allow a change in design. In the case when standard brackets are not suitable for installation, you can independently cut corners from wood or plastic. The stand can be mounted on legs or fixed to the wall. There are no fundamental features - it all depends on personal preferences.
Preparation of furniture for washing installation
The curbstone from the manufacturer is usually delivered unassembled, so before installation it is necessary to assemble it according to the instructions. The standard kit usually includes: base, side walls, doors and countertops. To bring convenience to the supply of communications, the back wall in the headset is usually absent. The kit usually contains the necessary fasteners and a hexagon. If items are missing, they must be prepared separately. Depending on the model, the assembly procedure may vary.
Basic assembly steps:
- Initially, you need to prepare the base and screw the legs to it. It should adjust the cabinet level.

- Next, the side walls and stiffeners between them are fixed. The more reliable the fastenings are fixed, the more durable the product will be.
- If there are drawers and shelves, you need to collect these elements separately and fix the fittings.
- The last step is to attach the doors to the hinges. If necessary, you need to drill holes for screws. If door closers and door stops are present, they must be fixed separately.
The countertop may not be in the cabinet. In this case, the installation will take less time. If the installation of the sink is carried out in the finished headset, then in advance you need to cut a hole for the sink. In order not to spoil the furniture, it is necessary to carry out all actions carefully.
Primary requirements:
- Initially, it is necessary to remove the necessary dimensions and prepare a sketch of the future hole.
- Then it is transferred to the surface of the countertop. It is important that there is equal distance from all sides. The more accurately the hole is cut, the more reliable the wash will be.
- Depending on the material of the countertop, a hole is cut in different ways. For wooden surfaces, you need a jigsaw or milling machine. Stone surfaces cannot be cut at home.
- The countertop can be treated with water repellent. In this case, chipboard and wooden furniture can last longer.
- To make the slices neat, you must remove burrs and bumps. To avoid gaps, the joints are coated with sealant for reliability.
When carrying out work, safety precautions should be observed. Cutting and assembly must be carried out with protective gloves. If a grinder is used, then the respiratory tract must be protected with a mask. Work with the pedestal is best done outdoors.
Stainless steel sink installation
Depending on the design of the cabinet, the stainless steel sink can be built-in and installed in an overhead way. The installation procedure in these cases is different.
Mounting the sink in the countertop:
- A suitable hole is first prepared. It is important to leave a distance of at least 5 cm on both sides. In the case when the sink is wooden, the cut is made along the edges of the cabinet.
- Along the edge of the saw, masking tape is required. This action will help protect the furniture surface from damage.

- Next, you need to screw the screws into the countertops or fix other fasteners. The stage is necessary to give reliability to the entire structure.
- Joints and cuts are treated with sealant to ensure the tightness of all joints. Apply the composition with gloves and very carefully.
- The next step is the connection of communications and fastening to the pedestal. If the furniture structure does not provide openings for pipes, they must be prepared.
- After fixing the sewer and water pipes, install the sink in the hole. Next, fix and connect the mixer.
- The final step is to connect the siphon to the sink. All joints need to be greased. To improve sealing, you can use plumbing tape.
After installation, it is necessary to wait until the sealant dries. The product cannot be used for several hours. Next, you should remove the remnants of the composition, and check the performance. If necessary, remove garbage and wash the sink. In case of leak detection, sealing is carried out repeatedly at the required sites.
Installation of a laid on sink:
- To correctly install the false sink with your own hands, you need to assemble furniture and prepare a place for future installation.
- The sink will be held securely in the cabinet with fasteners. The kit may come with the necessary items. If there are no fasteners, then improvised tools will do. The sink can be installed on wooden blocks or plastic corners.
- Temporarily the product can be fixed with self-tapping screws for reliability. After final installation, these items can be deleted.
- The mixer must be fixed immediately with a nut and washer. Connecting to the pipes is the next step using flexible hoses. Depending on the quality of the elements, the reliability of the entire structure will depend.
- The siphon is collected using plastic nuts and rubberized gaskets. Typically, the siphon configuration provides for these elements. Lubricate all joints with silicone sealant.
- Further, if necessary, additional elements and conclusions for the filter are attached.
- The final step is the removal of sealant residues and debris removal. Reliability of fastenings is tested at the first inclusion.
Surface mounted sinks can be produced in different sizes. There are standard forms, but if necessary, you can integrate the sink into the cabinets made to order. Corrosion-proof sinks are affordable, therefore, are popular among buyers.
The sink should be chosen according to personal preferences and the size of the furniture. Preference should be given to simple models without drawers and shelves. In this case, nothing will interfere with communications. The installation process of the sink will not cause difficulties when observing the basic rules of installation. Work is carried out with a tool. Correct and tight mount will ensure safety during use, as well as increase the life of the product. In the case when you can’t install it yourself, you can contact the specialists.


