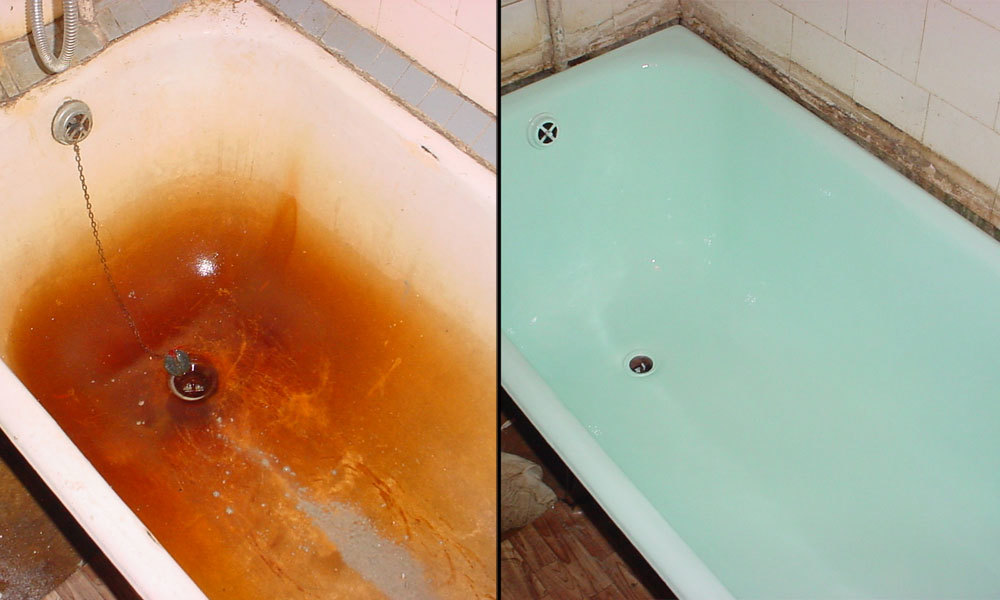
Bath can last for a long time, but over time they lose their coating quality. If there is a need to upgrade the plumbing, not necessarily to buy a new model. To learn how to deal with their own hands acrylic layer in the home, the main stages and features of the works, read on.
Is it possible to cover the bath acrylic self?
The content of the article
-
Is it possible to cover the bath acrylic self?
- What does that require?
-
stages step by step
- the treated surface
- How to prepare a composition?
- Coating
- important points
Such an operation, each able to hold the house on its own, without the involvement of professionals. The process does not require special skills or specific equipment.
What does that require?
We will prepare the necessary tools and materials:
- Bulgarian;
- pliers;
- emery paper (coarse and fine grits);
- Whisk;
- Drill (with a special nozzle providing grinding surfaces);
- rubber spatula;
- a vacuum cleaner;
- Building a hairdryer;
- stationery knife;
- rag, sponge;
- acetone;
- soda;
- The sanitary cleaning agent;
- cans or plastic bottles;
- acrylic hardener.
For convenience and safety will need:
- flashlight;
- work gloves;
- respirator or cotton-gauze bandage and goggles;
- polyethylene, paper, cloth;
- an adhesive tape (or other embodiments of the adhesive tape).
stages step by step
It is important to consistently keep applying technology to result in a reliable and long-lasting result. Tell us more about all the nuances of work done.

the treated surface
- Apply the grinder or drill with a special nozzle to completely remove the old layers.
- Then sandpaper to rough use (large grains) carefully we clean the bath residues from the previous layer. A further option would be heating the erasable regions hairdryer construction and processing office knifeIf not previously inflicted enamel factory type.
- Cleanse and wash away debris particles, is applied to the area Accessories plumbing cleanser, we distribute it with a sponge and wipe everything, including the place where the overflow.
- Once again we wash the product and leave it for drying of.
- Then the whole area pour soda, thoroughly rub the coarse sandpaper. This manipulation is necessary degreasing. Wear gloves, a maximum of 3 times.
- Accumulated trash properly wash water jet.
- Disassemble drain, overflow and the siphon, their location area treat soda, and then washed off the particles. Mixer apparatus and soul film must be protected, secure with tape. Action is carried out in order to avoid penetration of liquid to the next layer.
- The wall above the bath and shelves free from dust rags, because acrylic on during solidification must be reliably protected against ingress of any particles.
- Thus prepared container must be dried hair dryer, special We pay attention to ledges between the product and the wall (It is better to be dismantled during repair), cement joints where possible fluid accumulation.
- Peruse structure for damage (cracks and t. D.), The detected defects can be quickly eliminated automobile fillers. The stirred mass is applied with a rubber spatula and give time to dry.
- The dried mixture is treated with a fine-grained sandpaper, vacuumed formed remove particles. In this area (and overflow areas, siphon) is applied acetone, it will provide degreasing.
- Cover the floor beneath the tile and fixtures at the junctions of paper or film, fix the adhesive tape. The procedure is carried out, the polymer did not cause damage to them.
- Under a plum destination place the jar (or plastic bottle with the top cut off). In her will come the excess flowing consistency.

Important! After all the action bath should be rough to the touch, it will provide a better grip on the new surface.
How to prepare a composition?
Before the procedure, we leave the components in the room for a few hours.
- The liquid substance stringent portions (100% of the base should account for 0.95% of the additive), Slowly pour the hardener. The mixture is thoroughly bring to homogeneity using a drill with paddle-whisk.
- Mixing time - 10 minutes. look, to fragments of the polymer does not remain at the bottom and in the corners. Mindfulness will help to avoid the uneven layer of the future.
- The prepared composition is left for 20 minutes. We need a plastic bottle (or glass) in order to pour the solution.
Coating
Rules of work:
- poured from the top down, by product perimeter;
- first handle portion adjacent to the wall, then the outer side;
- mass flows in a thin stream, coating thickness - up to 5 mm;
- desirable to use a spatulaWith the help of well-impregnated surface materials to be applied;
- when the layer is completely suffered, instrument manufacture zigzag movement on the bottom of the structure, then align area, smooth brush strokes by moving the wall to a drain;
- the product is left for a few minutes;
- Lighting and turn off the flashlight coating inspect for defects (defects smudges) eliminate them with a spatula;
- We are waiting for about 10 minutes and re-check the result.

important points
- Full processing will require a minimum 2 laps salt-glaze.
- Finished emulsion mixture may contain air bubbles. They are removed hairdryer (at minimum speed), you need to work quickly.
- Massa keeps the flow properties of a certain period (Indicated on the package) to the end of the restoration must be completed.
- It is not recommended to heat the raw materials, It loses its strength and just stechot down. Restoration takes place at room temperature.
- Allowed to add colourant paste solution, which will give the desired color layer. Allowable its content - within 3% of the total weight.
- All steps are carried out gloves and protective bandage (Or respirator).
- Finished products can be used within 1-2 days, but the drying time is determined by the characteristics of the particular composition. If you are using acrylic new brands, this period is only 16 hours.
- room Be sure to close for a period of drying.
- Plumbing recommended wash liquid soap, dishwashing agents (containing no aggressive substances) or specialized materials routinely after each use.

Having done all the steps consistently and accurately, you will get a coating with excellent performance, which is able to last up to 10 years. This will help save money and extend the life of the bath.