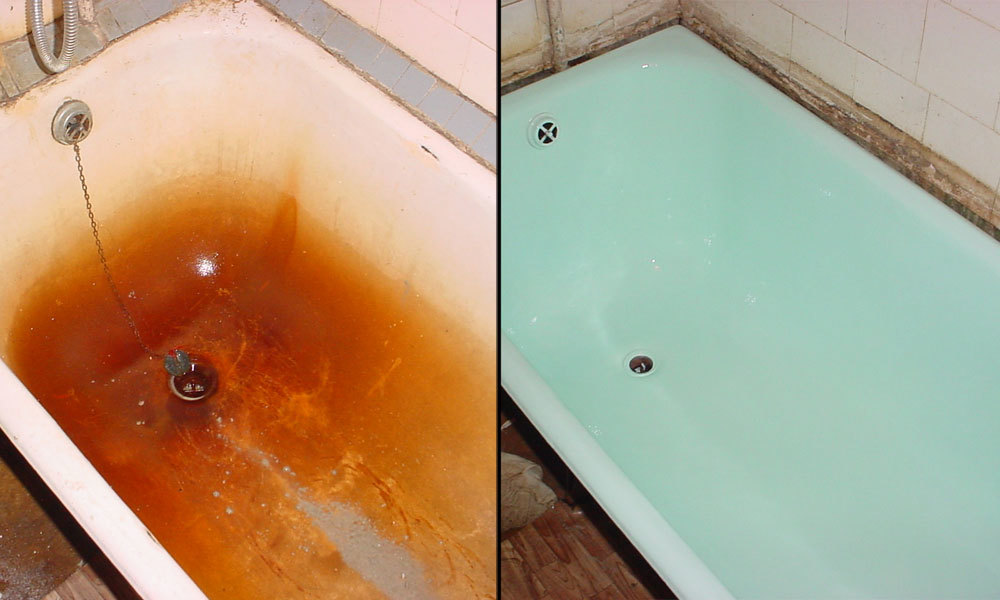
A bath, like any other product, loses its attractive appearance over time. Chips, scratches, cracks form on the surface of the bowl. At the same time, replacing the bathtub is a rather troublesome event, and the acquisition of new plumbing can create a perceptible gap in the family budget.
Several options for restoring the surface of a cast-iron bath can help in this situation. They are often resorted to by experts, but the restoration of the bowl can be done on its own.
All methods of cast iron bath restoration at home
The content of the article
- All methods of cast iron bath restoration at home
- How to update a cast iron bath with enamel yourself
- Acrylic recovery or bulk bath
There are several ways to restore the plumbing attractive appearance:
- Installation of a new liner. The main advantage of this option is the ease of installation
- *++. Even a person who does not have experience in working with plumbing can cope with work. Minus of installation - it is often difficult to choose a liner that is suitable in shape and size. If you have a bathtub of an irregular shape, this method will not suit you.
- Coloring with a special composition. To do this, use a spray or paint brush.
- "The filling bath." The method allows you to restore baths of various forms. You can do this yourself.
At the same time, an important step in each option is surface preparation:
- The surface must be well prepared, so the old coating should be completely removed. It is optimal if the layer is removed before the primer. To do this, you can use the "sandpaper" with a large grain size or a grinding machine.
- The entire surface of the tank must be thoroughly cleaned of the old coating.
- Dirt, dust, enamel fragments should be removed.
- If there are deep defects, they must be repaired using car putty.
- You also need to remove the crane, dismantle the drain.
- Cover the washing machine, sink and other interior items, and seal the surfaces adjacent to the tank with masking tape.

Only after this can you begin the restoration of plumbing.
How to update a cast iron bath with enamel yourself
The method is quite simple, so you can do it yourself. At the same time, you can enamel not only a bath, but also sinks, a shower tray and other plumbing.
It should be understood that enamel is not an ordinary paint, but a complex chemical composition of various polymers. You also need to know that such an enamel is not similar in quality to the factory enamel, and the application technology itself eliminates the baking step in the oven. Therefore, a new coating will last 2-3 years.
How to do:
- First you need to prepare the composition. To do this, the base and hardener must be poured into a deep container, mix thoroughly. Exact information is indicated on the packaging of the composition.
- Using a brush or velor roller, gently apply the product on the entire surface of the tank. Make horizontal strokes first, then vertical ones. This must be done carefully so that there are no unpainted places.
- Before the first coat is dry, apply the second one using a similar technique. Brush the resulting smudges of enamel with a brush.
- The bottom of the bowl must be covered with an additional layer of solution.
- The last step is drying. It should pass only in a natural way. Therefore, you do not need to speed up the process with a hairdryer - so the coating will dry unevenly. The composition completely dries out within a week.
Important! If you decide to use a brush, soak it in water for 24 hours. So, stubble will not come out of it. The enamel has a pungent smell of chemicals, so the restoration of the bath should be carried out using a respirator.
Acrylic recovery or bulk bath
The "bathtub" is a modern way to restore the surface. Despite the novelty, the technology quickly gained popularity, because it is easily performed on its own, and the new coating will last for 10-15 years.
To carry out restoration work, follow these recommendations:
- For convenience, pour acrylic into a suitable container and place it on the bottom of the tank - this way you will not stain the surfaces adjacent to the bowl.
- Starting from the corners of the bowl, pour acrylic onto the surface of the tank with a thin stream. The composition has a thick consistency, so it flows evenly on the sides and bottom of the product.
- Apply several coats of acrylic.
- Take a spatula and carefully level the composition. This must be done starting from the middle of the tank and to its bottom. You must completely cover up all the spaces formed. To do this, lift the acrylic from the bottom of the bowl and evenly distribute it with a spatula.
- The final stage is drying. The coating should dry completely, so plumbing can not be used for three days.

Reference! The density of the acrylic composition allows not only to restore the original appearance of the plumbing, but also to eliminate bumps on its surface.
You can restore the surface of the bathtub and restore its original appearance without resorting to the services of a master. In addition, this will save the family budget, because replacing plumbing is an expensive event.