By installing the shower, we often seek the services of professionals. In fact, the installation procedure is carried out by the masters, not always in accordance with all the requirements and state standards, t. To. Some companies or individuals seeking to complete their work faster. When you have all the knowledge about how to install the shower enclosure it can be mounted on their own or take great care, as do professionals. In this article we will explain all the nuances of the installation, as well as acquaint you with all phases of the work.
Positioning the shower in the apartment or cottage
The content of the article
- Positioning the shower in the apartment or cottage
-
Shower Cabin: assembly, installation and connection with their hands
- Pallet
- Panels and fences
- Sash window
- roof assembly
- Door installation
- The supply and connection of communications
- completion
The main thing when installing the cabin - the right choice of location. It must necessarily be located near the exhaust. If the model has an additional function, the connection to the electrical network must necessarily be grounded. Install sump must be with the building level, t. To. He is to be mounted horizontally.
When installing pipeline using special water-resistant sealants, otherwise it is possible to flow the water that will force you to redo all the steps. Please also note that by connecting the cab to the pipeline, it is necessary to use at least one filter. Be sure all pipes should be along the wall and hide in a special box or wall.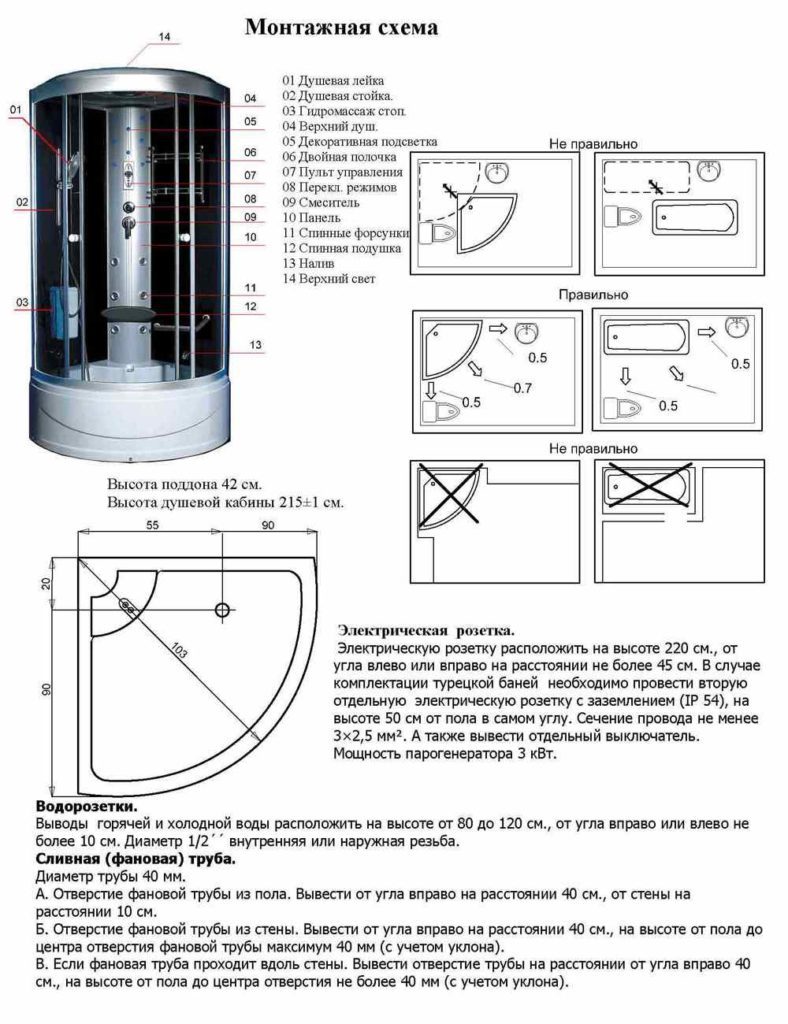
Shower Cabin: assembly, installation and connection with their hands
Installation of booths of several stages, the sequence of which must be followed carefully and do not change:
- Setting the pan.
- Installation of panels and enclosures.
- Installing and fixing the flaps.
- Installing the roof.
- supply of communications.
We explain each step in detail.
Pallet
If you want to build a walk-in shower with his hands, then start from the pallet.
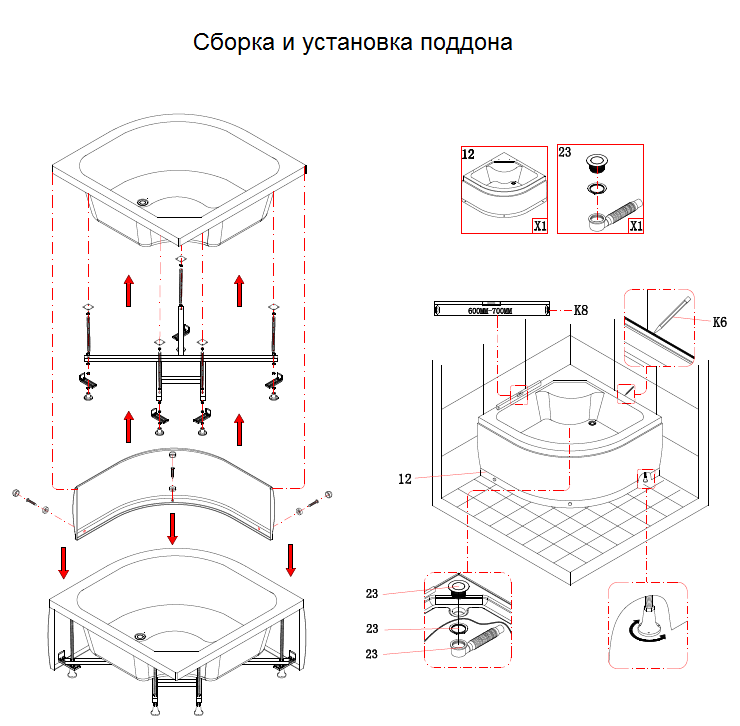
Beforehand, you must connect the drainage system. For this purpose, use flexible hoses. Access to the general sewerage system should be placed under the hole for drainage. You can then proceed directly to the installation:
- The pallet is lifted and placed on the legs.
- Long hairpin twist in special planting hole until it stops.
- On studs twist nut, washer and put on top of the metal support base for the support. This will help speed up the process and facilitate the installation.
- The site should be smooth, flat and clean.
- On the support is welded nut. It is placed on the central leg (dense screwing, clamping and nuts).
- By means of screws fixed to the wooden pallet rails and fastened tightly all mounting parts. The bars are located in the composite material of the pallet.
- Followed by a tight set of legs, which are held under the screen mounting hardware.
- At the end of the installation it is necessary to check pan drain work. Make sure that the structure is tight and the hoses are the correct length for the inlet to the sewer.

Panels and fences
This step is very important, so go to work as carefully and with due care:
- Inspect all of the panels and their location. Be sure to read the instructions.
- Lens mounted in guides pretreated sealant.
- Racks and guides are connected, the sealing elements are installed on the windows.
- The lower track is processed and inserted glass sealant.
- The side panels are joined with screws to the pan. Stock deepening should not touch.
- On the joints should be good to go with silicone. The better the seal, the higher the operational period.
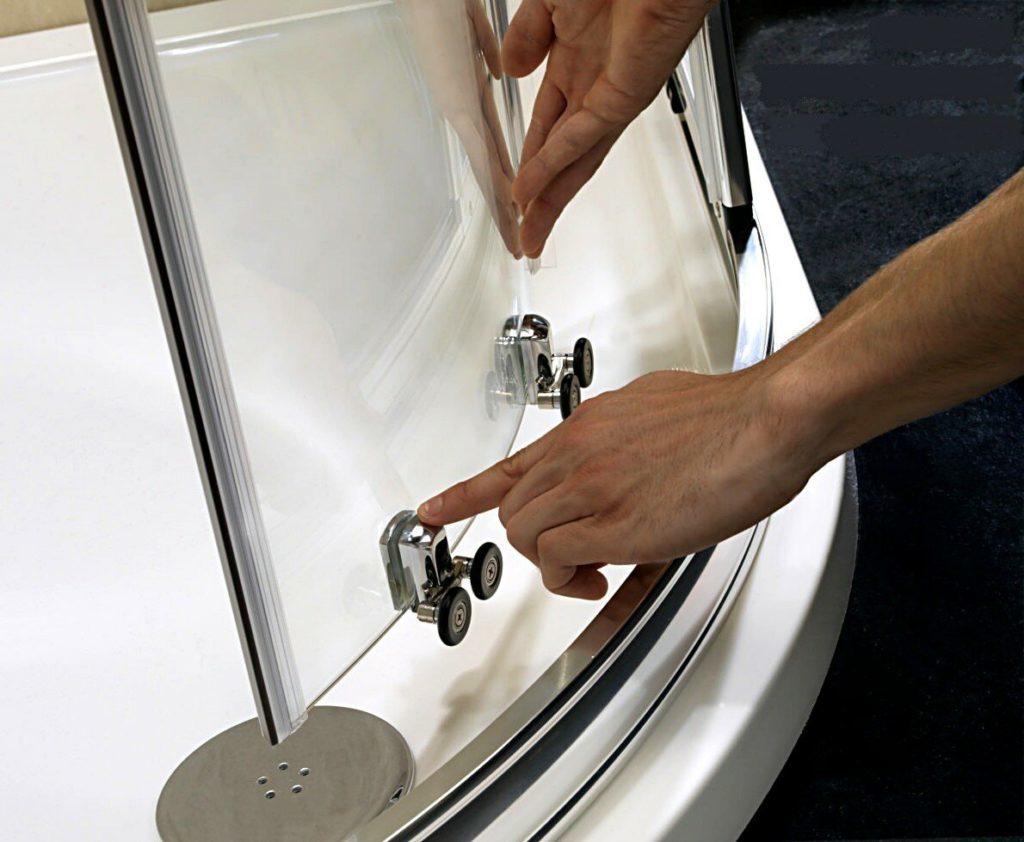
Sash window
Installing the shower is far from over. The next step will be the installation of glass leaves:
- Lock the door rollers and install the special seals.
- Put yourself flaps properly carry out the adjustment of the upper rollers. Remember, it is necessary to put them as close.
- Secure the screw plastic caps.
roof assembly
At this stage, as there are some features:
- It is necessary to release the meshing for ventilation and to remove the protective film.
- Immediately perform a sealant on watering until it is firmly joined to the point of attachment.
- Place the roof on the four self-tapping screws. Do not use silicone.
- Clips will serve as a connection to the rails.
- With the help of a color scheme, connect all the wires.
- Perimeter racks thoroughly treated silicone.
Door installation
Once you have installed the roof and shutters, it is necessary to put the shower door. In general, there is no difficulty here. The sequence of actions is as follows:
- Rubber stoppers fastened with screws inside.
- Mounted knob.
- This is followed by supply rollers and magnetic moldings inner part outwards wheels.
- Sami doors are placed on the rollers at the top and secured.
- At the end be sure to check the smooth open / close doors and density of contiguity.
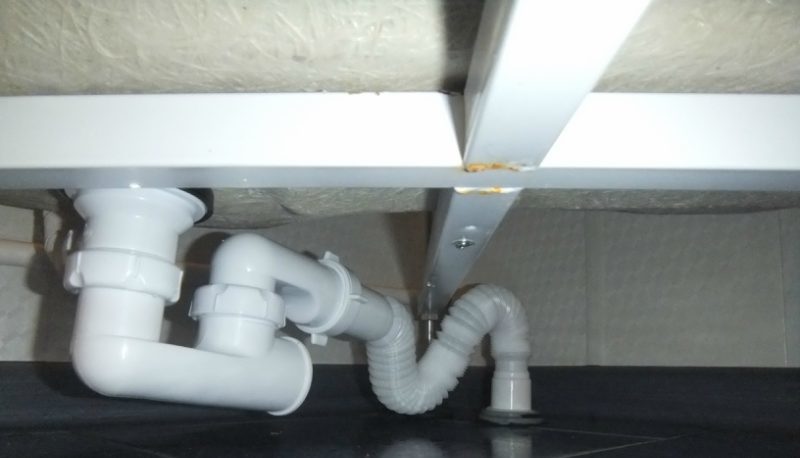
The supply and connection of communications
This is an important part, so follow the instructions precisely. To properly plumbed shower, follow these steps:
- Remove the protective film near the drain.
- Pad of rubber to replace the silicone sealant.
- Install the siphon.
- All connections are at the bottom of the thread and silicone-treated.
- Connect to the sewer.
When choosing the location of the shower stall pay special attention to the fact that more will be installed in the bathroom. Mains necessarily insulated and waterproofing in a small room should be maximum quality.
completion
After completing all the steps described above, it is required to make more number manipulation:
- Connect all the additional items and accessories.
- Check whether the hose fixing and watering shower.
- Check the sealing quality. Repeat if necessary.
- Install additional accessories: shelves, mirrors, etc..
Now you're ready to test your cabin. Before installing the device, it is desirable to check and, if necessary, replace the water pipes. Otherwise, it can lead to tragic consequences, it is not excluded that in case of an emergency will have to completely change the shower.
Installation of shower requires you to maximum concentration and responsibility. In compliance with our instructions you will install the equipment with their own hands, without calling the wizard.
Subscribe to our Social Networks


