An air conditioner is a complex unit, consisting of a large number of elements. Even the most advanced equipment, to which the Daikin air conditioner belongs, is not insured against the failure of any of them. In order to quickly identify the causes of problems, manufacturers equip their models with self-diagnostic systems.
Through a combination of letters with numbers and light signals, “smart equipment” informs about all violations in its own work. The display system displays the error codes of the Daikin air conditioner on the control panel display. In the event of any malfunction, the corresponding signal starts flashing.
This article introduces the alphanumeric designations of breakdowns, their decoding, the reasons for their occurrence and how to eliminate them.
The content of the article:
- Air conditioner self-diagnosis system
- Fault code classification
-
Common problems with Daikin air conditioners
- Indoor unit errors
- Outdoor unit errors
- Conclusions and useful video on the topic
Air conditioner self-diagnosis system
All models of Daikin air conditioners are equipped with a self-diagnosis system. With its help, they themselves diagnose their condition, and then inform about the problems they find. You can run this function in a special mode, but it also works automatically.
Almost all failures can be learned by observing the indicators, and the mechanism of this process is very simple. In the normal state, LEDs emit an even light. But as soon as a violation has occurred, they begin to pulsate, followed by a repetition of flashes. An alphanumeric or alphabetic combination appears on the display of the remote control.
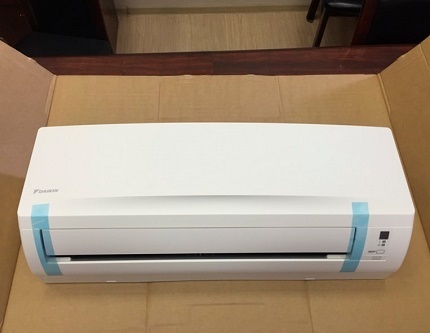
Daikin's latest air conditioners are built with the latest technology. They have a stylish design, low noise level, and undeniable quality. Models are economical and productive
Having practiced in decoding the coded information about breakdowns, you can understand that a home craftsman is quite capable of fixing some malfunctions on his own. If the failures are complex, then by informing the master of the code, the user will speed up the repair process.
Fault code classification
The letter at the beginning of the code indicates the structural part in which the malfunction occurred:
- failure in the indoor unit - "A", "C";
- refusal in the power unit - "E";
- malfunctions of temperature sensors - "F";
- nutritional problems - "N";
- malfunctions in the external unit - "L";
- the fan motors are blocked, the drainage pumps or the electronic board of the indoor unit are faulty - "P";
- system failures - "U", "M".
Errors that are not critical and that appear rarely are encrypted with a combination of numbers.
Common problems with Daikin air conditioners
Most of the faults of the Daikin air conditioner, especially its indoor unit, are not complex. The errors shown on the display consist of a classification code (letter) and an error number (number), a number and a letter, of two letters.
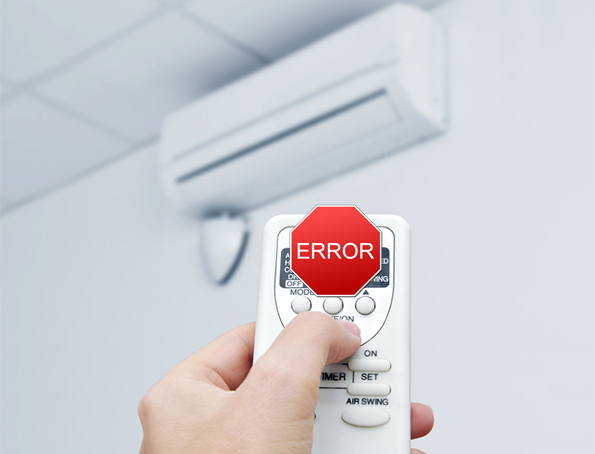
The control panel is designed to simplify and facilitate the operation of the air conditioner. There are such types of remote controls as wireless infrared, wall-mounted wired
Not only for different brands, but also for different lines, the codes are somewhat different. For this reason, you need to read the instructions. It contains decryptions of coded violations and methods for their elimination.
Indoor unit errors
When the general safety device is triggered, the code starts flashing JSC. There are many reasons for this:
- overheat compressor;
- failure of fans;
- insufficient amount of refrigerant in the system;
- debris in the capillary tube, other.
Among all the reasons, the most difficult is the malfunction of the electronic part. Elimination requires not only a professional tool, but also experience.
A defective printed circuit board signals a malfunction code A1. As practice shows, the control board is often misdiagnosed. Therefore, before changing it, you need to check the components that most often fail - relays, capacitors.
Among the common reasons for the failure of the control board are only five:
- instability of voltage in the network;
- improper installation of interconnect cables;
- natural wear and tear of individual elements of the board;
- ingress of moisture, destructive mechanical effects;
- non-observance of operating rules.
Often the air conditioner fails due to improper preparation for winter. When the device is de-energized, only the phase is turned off and zero is forgotten. In this case, the electronic board, provided that it is grounded to a common line, can damage the welding work carried out in the neighborhood.

If the air conditioner does not turn on, and all LEDs are blinking on the indoor unit, then most likely this is a sign of a failure in the software settings of the board. There is only one way out - reprogramming by codes, which can only be performed in a service center.
A2 code signals about blocking of the fan motor. When the self-diagnosis system generates a Daikin A / C DTC indicating a fan motor failure, you should try to rotate the blades by hand. If there is no free rotation, the cause is wear on the motor bearings and will have to be replaced.
The fan motor activates the rotary switch. The contacts inside it corrode over time and stop passing electric current. Use a multimeter to make sure the rotary switch is non-conductive. If the continuity of the switch is confirmed, it must be replaced.
An abnormal level in the drainage system is indicated by code A3. Excess moisture due to improperly arranged condensate drain may cause damage due to short circuits. In this case, you will need to disassemble the indoor unit and thoroughly clean the drainage system.
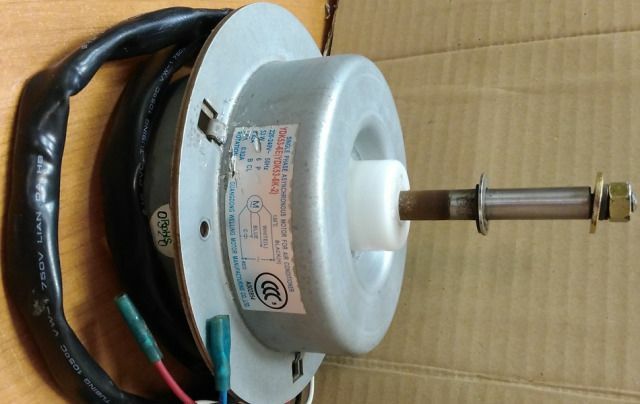
If the fan blades turn freely when the fan blades are rotated, the input power to the motor must be checked. After making sure that everything is in order with this, and the engine remains inoperative, they come to the conclusion - you need to change the engine
Codes A4 and A5 indicate a malfunction of the heat exchanger and an abnormal temperature. This is caused by an error in the temperature sensor.
You can check if this is really the case as follows:
- The temperature sensor is disconnected from the board.
- Check the resistance on the sensor using special equipment.
- The measurement result is compared with the specified values. At a temperature of + 25⁰ on a working sensor, the resistance should be 10 kOhm. If the condition is violated, the sensor is definitely faulty and must be replaced.
- If the measurements showed that the resistance of the sensor meets the standards, it is installed in its place, connected to the board, and the unit itself to the network.
- Next, check the connector with a multimeter. If the voltage is greater than 4.9 V or less than 0.5 V, the board must be changed.
- If the voltage on the connector is correct, the microprocessor is faulty and must be replaced.
When the fan motor is overloaded, the self-diagnosis system issues error code A6. The cause may be a disconnected or broken wire, a defect in contact, or damage to the printed circuit board.
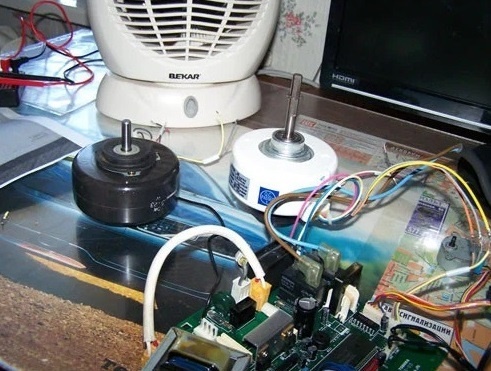
If the motor needs to be replaced, first de-energize the system and dismantle the protective grille. After this, the fan mounts are unscrewed, the electric motor is disconnected and replaced with a new one.
Display errors A7 indicates a malfunction of the blinds drive. The motor valve may be defective, the connections should be checked to make sure that there is nothing obstructing the movement of the louver.
The most common cause is a malfunction of the motor. In this case, simply replace it. There is also the possibility of microswitch failure, PCB malfunction, or defective connector connections.
An error such as general overcurrent has code A8. Since the starting current of the compressor motor is much higher than the operating current, the system issues a signal three seconds after the motor has started.
Overloading can lead to a fire hazard, so you need to start finding out the reasons immediately. This situation can be caused by a short circuit in the compressor itself.
In this case, the system decides that there is a short circuit, since the current rises to a significant value. A short circuit can also occur outside the compressor - in the control board, at the terminals, in the supply lines.
The cause of error A8 may be an excessive increase in pressure in the discharge system. An increase in this indicator can provoke errors made during the refrigerant charging.
Untimely cleaning of the heat exchanger gives the same result. Even a thin grease film on the surface of a visually clean heat exchanger can impede proper heat transfer.
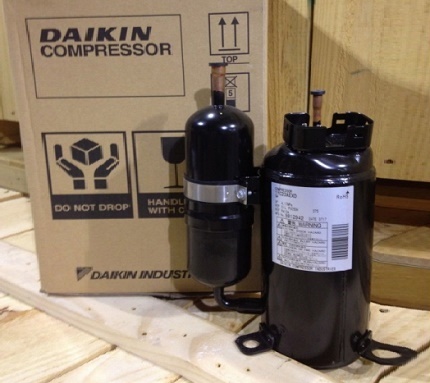
If a compressor current error occurs, it must be accessible. Then the air conditioner is started in the cooling mode. If the compressor fails to start the compressor and the connecting wires ring. Defective elements or the compressor itself is replaced
Code A9 indicates a malfunction of the electronic expansion valve. Failure can occur due to mechanical contamination. To test its operation, turn off the power and then turn it on again. Immediately after energizing, the expansion valve must be put into operation within 30 s.
In this interval, it is determined whether there is a 12 V voltage pulse in the middle of the expansion valve diode contacts. The absence of a pulse indicates a breakdown of the control board.

If there is no cold air, check the sensor for damage. You also need to ring the thermostat contacts with a multimeter at both the lowest and highest temperature limit
If, when the fan of the indoor unit is running, the condenser fan stops, the compressor is turned off, the expansion valve, take the following actions:
- on the control board, the contacts of the electronic valve are disconnected;
- check if there is a rated voltage on the board.
If the rated voltage is present, it indicates a malfunction of the electronic expansion valve. Lack of voltage indicates a malfunction of the control board.
The error codes of the indoor unit, indicated by the “C” symbol, are summarized in the table:
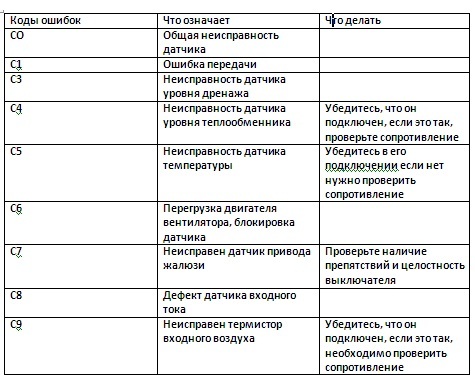
It cannot be ruled out that this or that failure occurred by accident or due to a mismatch of the current parameters in the network with the recommended values.
Deciphering the error code, consisting of spirit symbols:
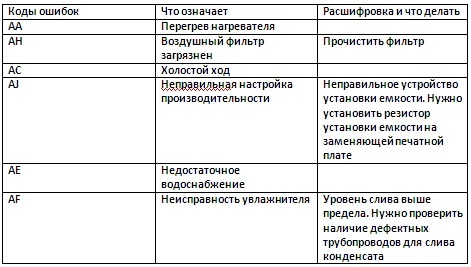
There are times when a bug spans multiple technical areas. Then the letter designation of the breakdown does not matter. The master must deal with it
One of the most unpleasant malfunctions is the breakage of the valves responsible for the liquid drainage. It entails a complete replacement of unusable parts.
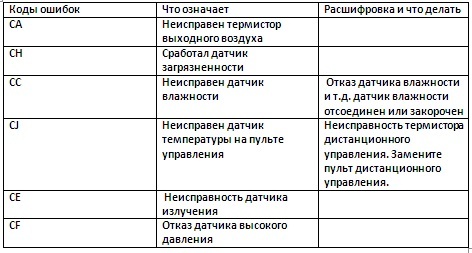
A table of error codes with double symbols will allow the user to compare the designations and quickly determine the source of the problem without much difficulty
Before contacting the service center, turn off the household air conditioner for a while, then turn it on again. After re-enabling, the error may not appear. If the code blinks again, you cannot do without a wizard.
Outdoor unit errors
The instructions supplied with the air conditioner describe how to eliminate some of the defects. They can be fully implemented in case of individual malfunctions of the indoor unit. Outside side errors and system malfunctions are more complicated, so it is better to contact a specialist.
Wink EO code indicates that the general protective device has tripped. This means that the self-diagnosis device has detected some kind of anomaly.
The work may be disrupted for several reasons:
- the inlet connection of the safety device is damaged;
- disconnected or broken seat belts;
- the shut-off valve is installed in the closed position;
- the refrigerant piping is clogged;
- the external control board is defective;
- there was an air short circuit.
Error under E1 code indicates that the split control circuit board is defective. With the power supply on E2PROM does not work correctly.
When the high pressure sensor (HPS) is triggered, a error E3. It occurs when the compressor is running when the high pressure switch is turned on.
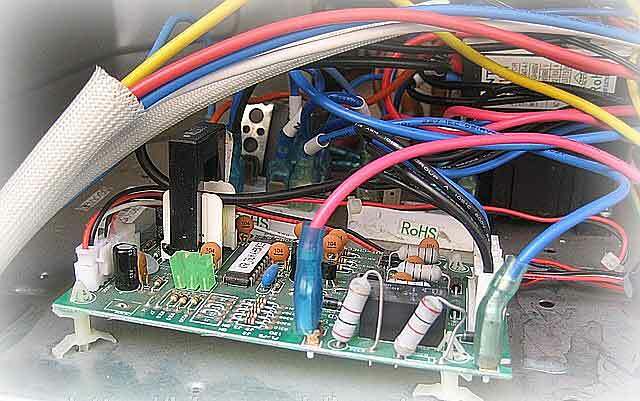
The control board processor contains the system operation algorithm. From here, the functioning of all its elements is controlled, the information coming from the console and sensors is processed, signals are given, the fan is started
Failure can be caused by an excessively high pressure level caused by a large volume of refrigerant or non-condensable gas.
Other reasons are likely:
- high pressure switch defect;
- disconnection or damage to the high pressure wire harness;
- loss of contact in the high pressure connector;
- damage to the printed circuit board;
- damage to the circuit through which the refrigerant circulates;
- clogged air filter of the indoor unit;
- clogging of the external heat exchanger;
- malfunction of the outdoor fan in cooling mode.
When the low pressure sensor (LPS) is triggered, the code E4. The compressor is running at this time, and the error appears when the low pressure switch is activated. The reasons may lie in a malfunction of the refrigerant circuit, the low pressure switch may also be faulty.
The low pressure wire connection may come loose or break. The likelihood of a defect in the connector, printed circuit board cannot be ruled out. The shutoff valve may remain closed.
If the compressor motor is overloaded, the system signals about error E5. It means that the compressor is activated for thermal protection or the discharge pipe is too hot.
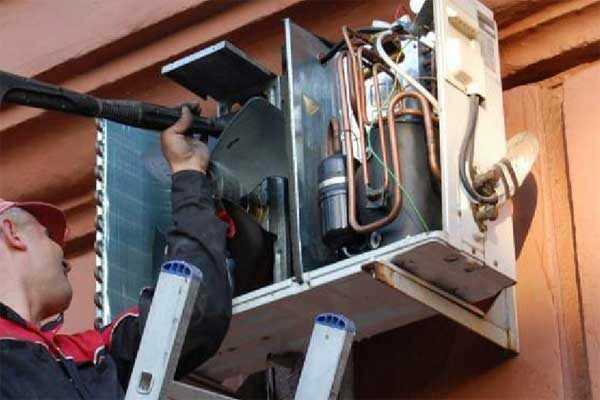
A sign of a refrigerant leak is a greasy film on the pipes at the points of entry into the fitting and on the threaded unions themselves. If such a phenomenon is detected, and short shutdowns occur with the compressor, then the cooler has left the system.
Failure can be caused by a check valve malfunction, lack of refrigerant, damaged outdoor unit, malfunctioning 4-way valve or electronic expansion valve.
Error E6 notifies about blocking of the compressor motor by increasing current.
At this time, overcurrent protection is triggered due to:
- the high pressure level is too high;
- voltage drop is observed;
- the shut-off valve does not open;
- compressor defective.
Error E7 - the fan motor is blocked by overcurrent. Damage can be caused by a defective fan, a harness or connector disconnected from the fan motor, or the printed circuit board. Perhaps it is simply a poor connection or foreign objects stuck in the fan.
With a general current overload, error E8. In this case, the input current of the inverter is greater than 28 A for 2.5 s. Among the reasons can be noted compressor failure, defect in the power transistor, printed circuit board of both outdoor and indoor units, short circuit.
Error E9 - signal about damage to the electronic expansion valve. It appears when the chain is broken.
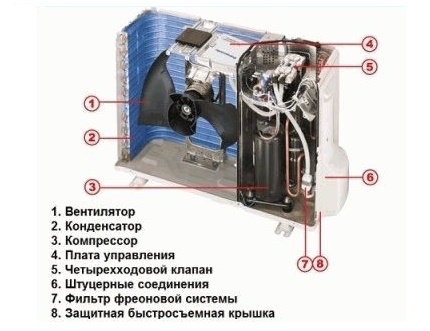
The source of the E9 error may be a malfunction of the expansion valve or its disconnection, damage to the printed circuit board. The reason may be external - electrical noise
Error under EA code indicates the occurrence of a 4-way valve abnormality. Origin of failure:
- poor contact in the connector;
- damaged thermistor;
- the outdoor unit is defective;
- 4-wire valve coil is defective;
- the 4-wire valve itself is faulty;
- a foreign substance has mixed with the refrigerant.
EU Code indicates an abnormal water temperature due to a malfunction of the outdoor unit or thermistor. On error EJ additional protection is triggered. HER - there is an abnormal moisture level in the drainage system. EF - the heat storage unit is damaged.
All errors related to power problems go under code "H". BUT - general sensor defect, indicates a failure of the compressor sensor system. This can be due to faulty connections or circuit board. H1 - failure of the air temperature sensor. This may be due to a faulty damper or limit switch.
H2 - the system power sensor is faulty. H3 - defect in the high pressure sensor. Error appears due to high pressure switch failure, wire harness disconnection, board malfunction, connector malfunction.
H4 - defect of the low pressure sensor. You need to make sure that it is connected. If so, the breaker must be checked for integrity. H5 - the compressor does not function, because overload sensor triggered. Here you need to look for a defect in the connector or in the compressor motor overload thermistor.
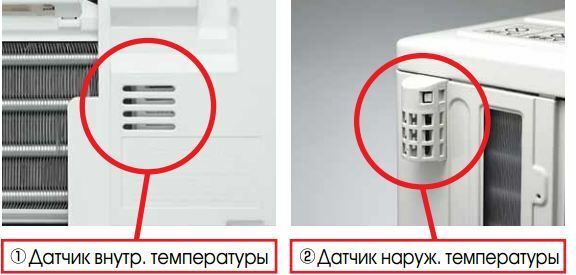
Sensors are devices that enable the unit to operate automatically. They are designed to measure specific technological parameters.
H6 - compressor overload. The compressor itself or the outdoor unit may be defective. An abnormal input voltage or a closed isolation valve can also cause a failure.
H7 - the fan is overloaded. Probable Causes: Circuit Failure, Out of Connector. When the input voltage sensor is triggered, it will signal an error under the code H8. Here, the power transistor, gearbox or outdoor unit are supposedly faulty. Internal wiring may be faulty.
H9 - not everything is in order with the outside air temperature sensor. Indicates that the thermostat resistance has exceeded the 60-600 kΩ range. The external thermistor, thermistor connector, printed circuit board may be defective. Thermistor resistance changes are inversely proportional to temperature changes. The malfunction of the thermistor is detected using a multimeter.
If codes appear F0, F1, F2, which means that the defenses have worked. In the first case, №1 and 2, in the second - №1, in the third - №3. F3 appears when the discharge pipe temperature is high.
It can be caused by:
- inappropriate amount of coolant;
- clogging pipeline;
- low temperature of discharge;
- exit from the thermistor holder;
- by disconnecting the expansion valve coil from its body.
Error F6 - exceeding the nominal value of the heat exchanger temperature. Such a failure is caused by clogging of the filter, heat exchanger, fan malfunction, excess refrigerant amount, inability to open the shut-off valve.
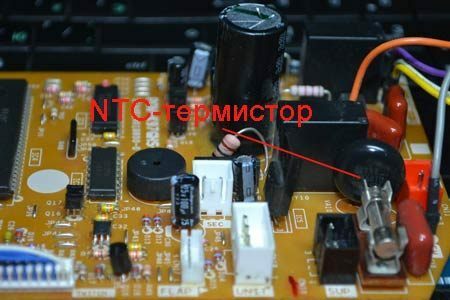
A thermistor is the same thermistor, but with a negative temperature coefficient of resistance (TCR). For manufacturing, metal oxides, ceramics, and sometimes even diamond crystals are used.
J0 code indicates a malfunction of the thermistor. J1, 2, 3 - pressure sensor, current, temperature, respectively. J4 - this is a signal about a sensor defect in the low pressure saturation zone. J5, 6, 7, 8, 9 - malfunctions of the suction pipe thermistor, heat exchanger 1 and 2, liquid pipe and gas pipe, respectively.
Errors with code "L" indicate problems in the inverter system. This can be either the activation of protective devices that shut down the inverter, or transmission errors between the outdoor board and the inverter board. The same effect is given by a defect in the printed circuit board, a malfunction of the power supply unit. You should try to reboot the system.
If there is a lack of cooler, an error will be displayed P0. Flashing code Р1 indicates an imbalance in the power supply caused by a voltage mismatch between the phases. This may also be the result of a defect in the capacitor of the main circuit, a malfunction of the magnetic relay, or incorrect wiring of the main circuit.
If the temperature inside the control unit rises, this will be indicated by the code P3. This is due to a defect in the thermistor or printed circuit board. You need to measure the resistance. P4, 5, 6 - errors indicating a breakdown of sensors - power transistor, direct current, output current sensor. P7 indicates a high output current.
Conclusions and useful video on the topic
The following video will clearly demonstrate the process of identifying and eliminating one of the common errors in the air conditioner:
The video will acquaint you with the steps for determining the failure of the control board:
The perfect self-diagnosis system of the Daikin unit allows you to identify any malfunction promptly. This contributes to the elimination of errors in operation until the moment when the equipment is completely out of order.
The user must not only decipher the codes, but also periodically clean the air conditioner. If malfunctions are identified, repairs, depending on the complexity, can be performed on site or under service conditions.
In the block below you can leave a comment with your own impressions of the Daikin air conditioner. Share useful information on the topic of the article, tell us about how the error was determined by the coded designation. Ask questions and post photos.

