In the interior of the premises, ceilings decide quite a lot, don't they? Ceiling tiles are often used to ensure their neat appearance and level surface. We will talk about the advantages of this facing material, as well as how to properly glue the ceiling tiles, in this article.
We will tell you how to transform a room with the help of ceiling tiles, we will give advice on its correct installation. And photographs and videos will help to cope with this seemingly difficult task.
The content of the article:
-
Advantages and disadvantages of the material
- Types of tile panels for the ceiling
- Subtleties of product selection
- Ceiling Panel Mounting Adhesive
- Calculation of materials for lining the ceiling
-
Step-by-step instructions for installing tiles
- Stage # 1 - surface preparation
- Stage # 2 - marking
- Stage # 3 - installation of tiles
- Stage # 3 - making a putty
- Methods for placing tiled panels
- Tips for installing tile panels
- Tiled ceiling care
- Conclusions and useful video on the topic
Advantages and disadvantages of the material
Ceiling tiles are a type of cladding material that is widespread on the market today.
Unlike similar products, it allows you not only to transform the room, but also to visually align the ceiling. The use of panels is possible both during the initial repair and during its renewal.

Even with perfect walls, but with an uneven or sloppy topcoat, the design will look ridiculous and unattractive. Therefore, when carrying out repairs to ceilings, it is also worth paying due attention.
The advantageous characteristics of the cladding material in the form of ceiling panels are:
- Versatility. Foam boards (the most common material for ceiling panels) can be glued to any type of surface: concrete, gypsum, wood, brick and more. Ceiling tiles can be used in kitchens, bedrooms and even children's rooms.
- Sound- and thermal insulation. Ceiling plates enhance these characteristics of the room. This function is especially relevant for apartments in multi-storey buildings. The tiles will help reduce the audibility of the neighbors upstairs.
- Easy to install. You can cope with the installation of ceiling panels yourself. This process does not require any special construction skills. In many cases it is simpler than usual sticking wallpaper. Moreover, even if for any reason one or more plates are damaged, they can be easily replaced.
- Affordable cost. Ceiling tiles are considered one of the most affordable materials for ceiling cladding. At the same time, in terms of its aesthetic and technical qualities, it is in no way inferior to expensive options for finishing panels, especially if you additionally paint the embossed parts.
- Elementary care. The tiled ceiling retains its attractive appearance over a long period of time. You can clean it with an ordinary dry cloth and even a vacuum cleaner. You will find detailed instructions for caring for this material at the end of the article.
Of the shortcomings of this material, only its susceptibility to burnout can be distinguished. Regular penetration of sunlight onto the surface of the slabs, which is typical for panels located above the window, leads to a change in their color. Therefore, in rooms located on the sunny side, it is not recommended to install bright panels.
Types of tile panels for the ceiling
Ceiling panels differ from each other not only in terms of external indicators - relief, color, dimensions, but also in the method of production.
In accordance with this characteristic, all materials are divided into three categories:
- injection. They are made from raw materials by the "sintering" method, differ in their original shape, deep pattern and thickness of 9-14 mm;
- pressed. Produced by stamping from polystyrene, standard thickness - 6-8 mm;
- extruded.They are also made of polystyrene, but by pressing, they can have a relief similar to wood, marble and other natural materials.
According to the type of their fastening, the panels are divided into seam and seamless. The first are classic slabs, with sticking between which a noticeable seam is formed. Seamless products do not imply the presence of a distance between individual plates, which allows you to create the effect of a monolithic coating.

Extruded tiles are considered the easiest in terms of maintenance and installation. The second place in terms of these characteristics is taken by injection-type coatings. The most "capricious" in work and maintenance are stamped panels
Cladding materials also differ in their shape. The standard slab is a square with a side of 50 cm. At the same time, rectangular products with different aspect ratios are presented on the market: 30x60, 40x70, 30x70 cm, etc.
The dimensions of the facing materials should be chosen taking into account the characteristics of the room where they are planned to be installed. A detailed system for calculating panels for any type of room is given below.
Subtleties of product selection
When choosing a facing material for a ceiling, it is necessary to take into account not only its aesthetic characteristics, but also other important characteristics:
- The edges of the products (especially for polystyrene panels) - they should not peel off, the grain size should be equal.
- Load distribution (applies to expanded polystyrene panels) - when holding the slab by the corner, there should be no creases or cracks.
Pay attention to the geometry of the products. It is important that each angle corresponds to the set value of 90 degrees. Any deviation from this norm is fraught with the appearance of uneven seams.

It is also important to pay attention to the physical condition of the materials themselves. There should be no flaws on the surface of the slabs - creases, dents, delamination. The drawing should be clear, even
Ceiling Panel Mounting Adhesive
In order for the facing material to lie flat on the ceiling and properly perform its functions over a long period, it is necessary to choose the right glue. The adhesive is the base that holds the tile blocks.
Due to the fact that the panels, due to the force of gravity, always tend downward, special requirements are put forward for the glue. The adhesion of such material should be maximum, the color should be white so that the seams are as invisible as possible, the viscosity should be tight to prevent displacement of the panel blocks during installation.
The building materials market today offers several types of adhesives for ceiling tiles.
| Glue type | Dignity | disadvantages |
| Eltitans (universal) | Universal Transparent Suitable for plaster, wood, concrete Forms a flexible seam |
Long drying process |
| Titanium | Viscous consistency Implemented in a ready-to-use form Resistant to high humidity, temperature drops |
The panel must be held for a long time to adhere to the surface |
| Silicone | Fast clutch Closes inter-tile space Economical consumption |
Incompatibility with metal. In contact with metal, it can provoke the appearance of corrosion on it. |
| Acrylic putty | High viscosity Reliable adhesion to any type of surface Can be used for smearing inter-tile seams |
Absent |
| Liquid Nails | Strong grip Long service life - as long as the material to be glued |
Impossible to dismantle tiles for reuse |
| PVA | Complete lack of smell Transparency of the layer after drying |
It has a low viscosity due to which consumption increases, as well as a long drying and setting process |
The glue should be purchased after purchasing the ceiling tiles themselves. At the same time, it is recommended to do this in one store.
In this case, the specialist will be able to help you make the right choice and recommend the most suitable adhesive for a particular facing material.

Remember that all adhesives are made on the basis of toxic toxic substances, since they have not yet learned how to produce organic glue. For this reason, it is recommended to work with liquid in a special respirator. For any symptoms of poisoning - dizziness, headache, nausea, you must stop the work process and go out into the fresh air
Calculation of materials for lining the ceiling
You can calculate the number of tile panels and glue that will be required in the process of pasting the ceiling on your own.
For slabs, the calculation is made according to the following algorithm:
- We calculate the area of one slab. For example, for panels with dimensions of 50x50 cm, it will be 0.25 square meters;
- We calculate the area of the ceiling. For an aspect ratio of 5x6 m, it will be 30 square meters;
- Determine the number of individual plates. To do this, we divide the ceiling area by the area of one slab: 30 / 0.25 = 60.
As a result of the calculations, you will receive the number of panels required for cladding the upper surface of the room. But it should be borne in mind that during the installation of the plates, difficulties may arise, due to which the material itself may be damaged.
Therefore, you should always buy a few more tiles (it is customary to purchase 10% more material). This will limit you from having to head to the building supplies store in the middle of your workflow.

As for the calculation of the glue, in this case it all depends on the type chosen. The average consumption of the adhesive is 0.5 liters per 10 sq. m. You can accurately calculate the amount of liquid for adhesion of the cladding to the ceiling directly in the building materials store.
Step-by-step instructions for installing tiles
You can install the ceiling tiles yourself. At the initial stage, it is important to determine the type of bonding of the facing material to the ceiling.
Fastening of panels is possible in two ways: with a square - the classic scheme of laying slabs parallel to the walls and with a rhombus - laying blocks diagonally.
It is recommended to start work from a chandelier. In this case, if necessary, it is much easier to enter the blocks, because the panels laid near the walls can be cut slightly without affecting the overall picture
However, you can start laying the material from the wall, usually opposite the entrance. This option is used if several chandeliers are installed on the ceiling in different places or there is ceiling rosettes.
Stage # 1 - surface preparation
The first stage of any installation work is the preparation of the surface for installation. In the case of laying tiled blocks on the ceiling, the preparatory process involves cleaning the upper covering of the room. It is necessary to completely clean the ceiling from traces of the previous finish.
If there are dents or slight irregularities on the surface, they should be removed with putty. This will contribute to better adhesion of materials to the surface, as well as ensure their long-term operation. We also recommend at this stage to equip noise insulation of the ceiling - this is especially true for residents of high-rise buildings.
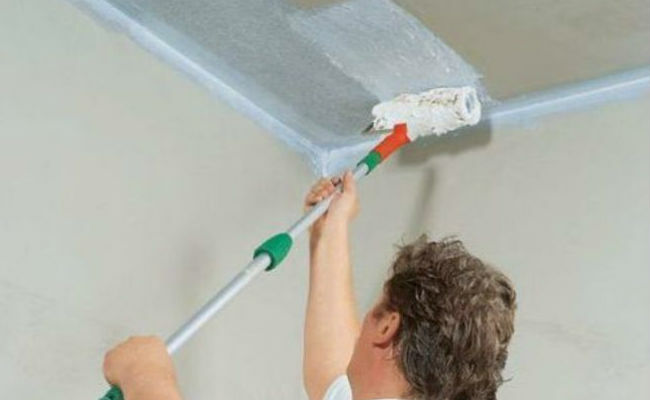
After finishing the ceiling with a putty and drying it, a primer should be applied, which will also help improve the adhesion of materials.
To perform installation work, you will need a stepladder, glue for pasting, a ruler or construction tape, a pencil, a stationery knife, adhesive brush, gloves, respirator, etc. all this can be purchased in a building supermarket in accordance with personal preferences.
Before starting work, all windows in the room should be tightly closed to prevent possible draft. It is also necessary to de-energize the room - in the event that the installation will be carried out at the location of the light device.
Stage # 2 - marking
The second most important step in laying tile panels on the ceiling is marking. Many novice craftsmen neglect it, relying on their perfect visual perception of the working area.
This often leads to uneven joints between tiles, the need to cut individual blocks and, in extreme cases, the dismantling of some products. Therefore, you should not neglect the marking of the ceiling surface. You can do it with a simple pencil. But in the beginning it is recommended to make a clear definition of the center of the room.
For this:
- Pull the paint thread from one corner of the room to another, pull it down and release it so that a straight line remains on the ceiling surface;
- Repeat the procedure with opposite corners.
This method will help you pinpoint the middle of the room. It is especially relevant in cases of diagonal sticking panels with the beginning in the center. But it should be borne in mind that if the central point does not coincide with the chandelier, then you will have to shift it towards it.

At a certain center, with an ordinary pencil, you need to draw a square / rectangle that exactly matches the shape of the tiles to be laid. From here it is worth starting the installation.
It is not necessary to mark each tile on the surface. The main thing is to correctly lay the first one. The subsequent ones will be folded like puzzles, leaning against each other with their side faces.
Stage # 3 - installation of tiles
The standard installation sequence for ceiling tiles, provided the ceiling is flat or pre-leveled with putty, is as follows:
- Lubrication of the facing material with adhesive around the entire perimeter, while the edges do not need to be lubricated.
- Applying the block to the ceiling surface, pressing it firmly.
- Fixing the tile - hold it for about 0.5-1 minutes for the glue to set.
- Repetition of similar operations with the rest of the ceiling materials.
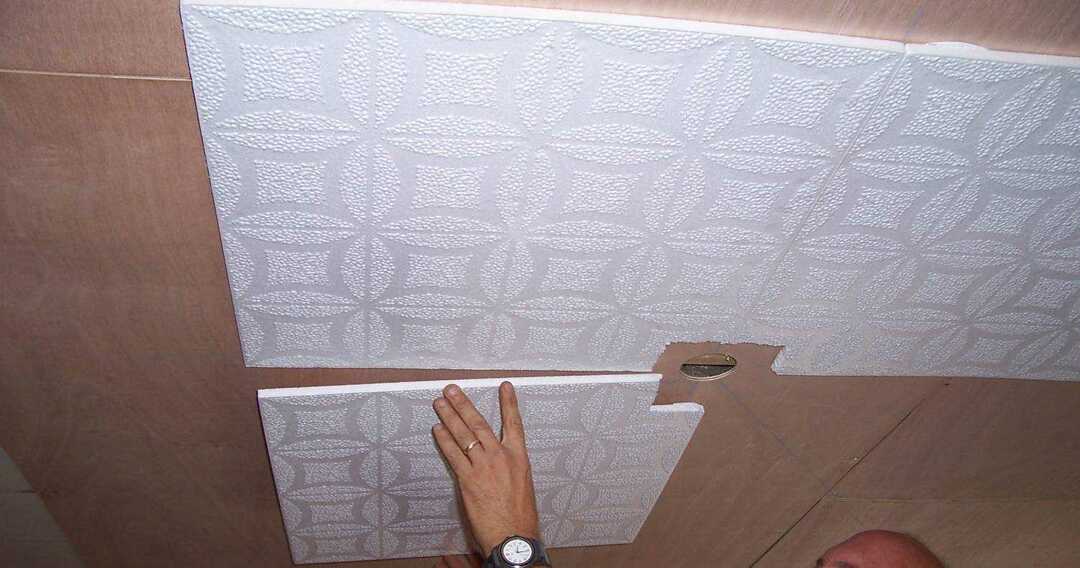
Each tile is applied exactly to the edge of the already glued tile. When performing installation, remember the plane drawing.
If necessary, trim the tiles, if you need to make a hole for the chandelier, attach the tiles tightly to the wall, etc.

If it turned out that you have already glued the tile panel and only then found the gaps between the elements, you should move the tile with the help of a wooden strip by attaching it to the free edge. Trying to perform such actions with your hands, putting pressure on the entire surface, is not worth it. This can break the polystyrene or foam.
Stage # 3 - making a putty
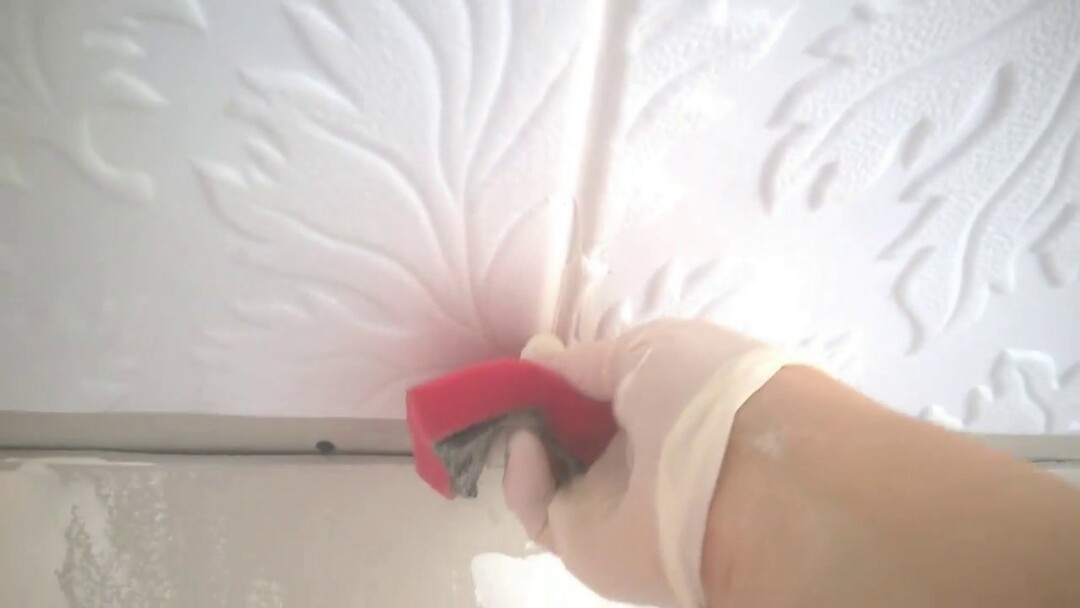
After completing the installation of tile blocks, it is necessary to fill the joints. This procedure is performed both with suture and seamless installation. To complete it, you must purchase an acrylic sealant.
Further work is carried out according to the following algorithm:
- Fixing the sealant in the gun.
- Cut the sealant tip at a 45 degree angle.
- Distribution of the composition along the seam by pressing the handle.
After the completion of this work, it remains only to wait for the sealant to dry completely. The average speed of this process is 4-6 hours.
Silicone sealant dries a little more - 24 hours. You will find detailed instructions on how to use the product you have chosen in its description.

After the laid ceiling is dry, you can paint it. Embossed protrusions on panels are usually painted. It is customary to use a contrasting paint in color. Such processing will be able to give the coating a certain nobility, make it more original
Methods for placing tiled panels
There are several ways to glue tile panels to the ceiling. The first, the most common, involves laying tiles parallel to the walls. Pasting can be done in any direction.
Work begins by fixing the central square. The method for determining the center is described above.
Pasting the ceiling diagonally is considered more original. In this case, the panels run at a 45 degree angle to the walls. Installation also begins from the center of the ceiling. But it is defined a little differently.
To find the center point, you can use one of the following methods:
- Draw two transverse stripes from the center already defined with the paint cord.
- Divide each corner from the intersection of the center lines in half.
The created lines will serve as guides for you when laying tile blocks.
A very common method of installation is considered to be stacking panels on the ceiling in a checkerboard pattern. The material is laid out from the center parallel to the walls. It is recommended to use this option in rooms with a large area.
Another interesting way to decorate the ceiling is to lay the panels with a snake. In this case, the installation scheme is similar to the classic diagonal gluing. The peculiarity lies in the alternation of colors.

Regardless of the method chosen, you must hold each panel for up to 1 minute. The elements should be laid tightly to each other.
If the surface of the tile is too soft, use a soft wallpaper trowel as its holder - it will help prevent fingerprints on the material. If these basic requirements are met, installation will be quick and easy.
Tips for installing tile panels
In order to install ceiling tiles as efficiently and quickly as possible, we recommend that you follow a few rules from professionals.
The first concerns the preparation of the panels: before gluing them, it is recommended to keep them in a dry and warm room for several days. This is necessary to eliminate excess moisture from the material, which can impair its adhesion to the ceiling surface.
If, during installation, small contaminants have formed on the tiles, then they should be removed during work with a cotton pad moistened with alcohol, or with a regular stationery eraser.
After gluing each tile, remove the remaining adhesive from its surface. If this is not done, then with further attempts to eliminate the already dried adhesive, it is possible to damage the material itself, impairing its aesthetically pleasing appearance.
Tiled ceiling care
To preserve the original appearance of the facing material, it is necessary to properly care for it. To do this, it is enough to regularly wipe the surface with a rag.
But do not use damp material - moisture can negatively affect the condition of the plates. This applies only to foam products (for others, wet cleaning is permissible).

As a tool for removing dust, you can use a regular vacuum cleaner with a soft brush or a mop with a fluffy attachment.
Greasy stains on the ceiling panels can be removed with rubbing alcohol. You can also use dish detergent or washing gel.
Only aggressive chemicals, for example, whiteness, are prohibited. Stubborn stains can be removed from the ceiling using regular vinegar.
Conclusions and useful video on the topic
Installation instructions for ceiling tiles:
Installation of ceiling tiles is one of the simplest installation jobs. Even a novice master or a person who has nothing to do with construction activities can do it. The main thing is to follow the recommendations presented above, do not forget about the importance of marking and carefully lay the material.


