Having started repairs in the kitchen, we often think about how to sheathe the gas stove so that the coating lasts for many years and does not lose its appearance after the very first cleaning.
Agree, finishing the working wall in the kitchen is not an easy task and requires compliance with a number of conditions. After all, cooking is a process that has a strong effect on the exterior of the kitchen: splashes of fat, water and steam. Over time, all this may not have the best effect on the external cladding.
Next, we will tell you what materials can be used for wall cladding behind a gas stove. And we will understand the intricacies of their installation. Here are step-by-step instructions provided with visual photos and useful videos.
The content of the article:
- Materials for the design of the apron
-
Wall decoration instruction
- Option number 1 - installation of ceramic tiles
- Option number 2 - decorating the wall with a glass screen
- Safety rules when choosing a material
- Conclusions and useful video on the topic
Materials for the design of the apron
Quite high requirements are put forward before materials for cladding kitchen walls. After all, housewives spend a lot of time in the kitchen preparing food. Therefore, it is very important that the environment is not only pleasing to the eye, but also practical.
So, materials for protecting walls from a gas stove must have the following characteristics:
- Moisture resistance. Everyone knows that the humidity in the kitchen is always at a high level - steam during cooking, splashes of hot and cold water. All this can negatively affect finishing materials with low moisture resistance.
- Heat resistance. Walls near the gas stove always get hot, and quite strongly. Therefore, constant exposure to high temperatures can adversely affect the wall covering.
- Hygiene. In humid conditions, bacteria multiply at an incredible rate. Therefore, for the cooking area, you need to choose a coating that will not absorb anything into itself.
- Mechanical strength. This is one of the main requirements for finishing materials for the kitchen. The work area (apron) will be cleaned regularly. And it is very important to choose a material that will allow you to remove dirt without much effort.
- Aesthetics. In addition to all the above requirements, the material for kitchen walls should look organically in the interior, because the kitchen is a place where every housewife spends a lot of time. You should also immediately take care of camouflaging gas pipes.
Having dealt with the requirements that are put forward in front of the materials for finishing the working area of the kitchen, we will talk about the materials themselves that are used for this purpose.

It will not be difficult to choose a material suitable for the interior for decorating the walls in the kitchen. There is a huge variety of finishing materials on the market. In addition, you can order the finish according to your own taste, although it will cost a little more.
Thinking about how to close the wall behind a gas stove, most often people opt for ceramic tiles. This material is renowned for its aesthetic qualities and affordable price.
The tile does not absorb grease and other impurities, therefore it will not be difficult to clean it. In addition, the material is highly resistant to temperature extremes and is not afraid of household chemicals. And the variety of shades and textures allows you to create the perfect design of your dreams.
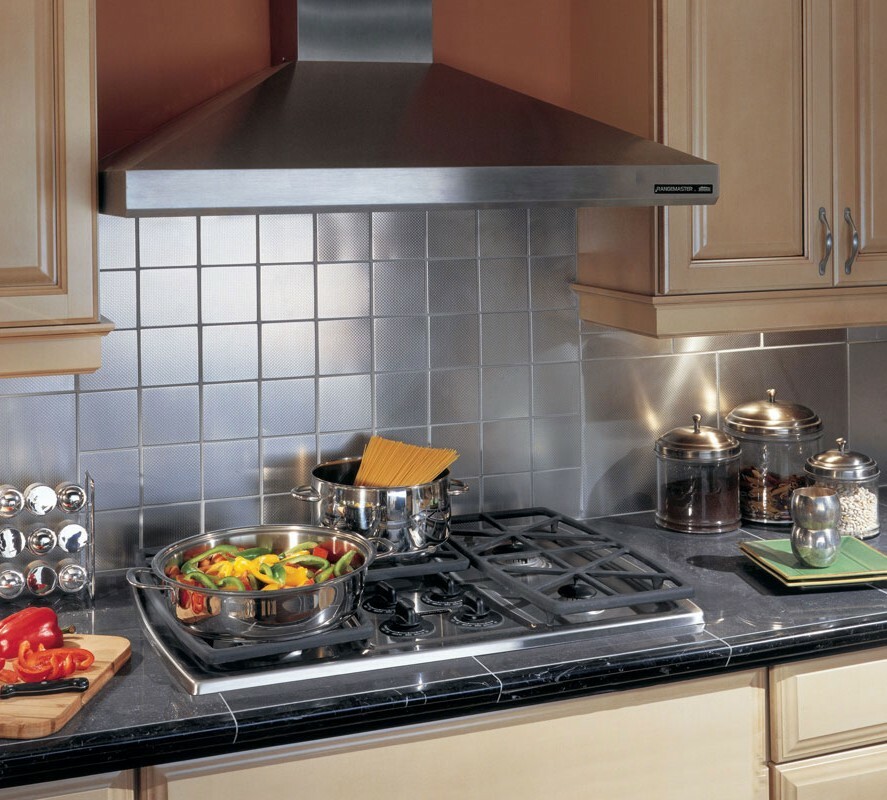
Ceramic tiles are perhaps the most common material for wall decoration near a gas stove. She is not whimsical to care for, and a large color palette allows you to choose a material suitable for any interior
The only drawback of ceramic tiles is the complexity of their installation, but we will talk about this a little below.
PVC foil. It can also be used for wall cladding behind a gas stove. This is a fairly cheap type of PVC coating. The film can be textured and glossy, with or without a pattern. And you can buy it at almost any hardware store.
But, in essence, this is a one-time coverage option. After all, this material has extremely low wear resistance. It is more suitable for a temporary solution. For example, when you need to close a more expensive finish.
We looked at the best ideas for wall decoration in this photo collection.
Image gallery
Photo from
A variety of colors, textures, ease of maintenance - all this makes ceramic tiles the most popular option for wall cladding behind a gas stove.
The mosaic can be made of various materials: glass, mirror, metal. But the best option would be a ceramic tile mosaic. She is not as demanding in caring as other brews.
Plastic panels are often used to decorate the walls in the kitchen, including behind the gas stove. But, choosing this option for your kitchen, do not forget that plastic is very sensitive to temperature changes, so it will quickly become unusable behind a gas stove.
Recently, tempered glass aprons have gained wide popularity. A wide variety of images can be applied to this material, which allows glass to be used in any kitchen interior.
Using natural or artificial stone for wall cladding behind a gas stove is not a very popular option. Of course, such a solution looks very expensive and stylish, but in terms of practicality, the stone is very much inferior to other materials.
You can use stainless steel to decorate the apron behind the gas stove. This material is not afraid of exposure to high temperatures, it is resistant to a humid environment, easy to clean and does not lose its original appearance for a long time
Another popular type of wall cladding behind a gas stove. A mirror apron can be made either in one piece or from fragments. And if desired, the material can be tinted to match the color of the interior
Allows you to choose an option for every taste. But, film is the most impractical material of all of the above.
Ceramic tiles are an affordable and practical option
Mosaic - stylish finishing material
Plastic panels are stylish but impractical
Glass - bright and practical
Natural and artificial stone - expensive and stylish
Metal is the most durable material
Mirror - stylish and unusual
PVC film is beautiful, but not practical
Mirror behind a gas stove it looks bright and unusual. The mirror panel is easy to clean from dirt, it has good resistance to moisture and high temperatures. Such a solution will fit into the interior of almost any kitchen.
There are also disadvantages to the mirror finish. The main one is the complexity of installation. In addition, in order for the mirror coating to look stylish and aesthetically pleasing, you need to constantly keep its appearance clean. Therefore, be prepared for the fact that after each cooking, the mirror apron will have to be wiped from dirt.
Stainless steel, as a finishing material, is also popular. Its surface can be matte, glossy or patterned. Steel has strength, durability, resistance to moisture and temperature extremes.
Such material is quite expensive, therefore, in order not to spoil the coating during the first cleaning, it is worth considering that it needs to be cleaned only with the use of special, non-abrasive cleaning agents.
Wood behind a gas stove looks stylish and noble. This is perhaps one of the most sustainable materials for wall decoration. But, before stopping your choice on this option, it is worth considering that such a finish will be very expensive. In addition, for proper installation, you cannot do without the involvement of specialists, and this will also cost a tidy sum.
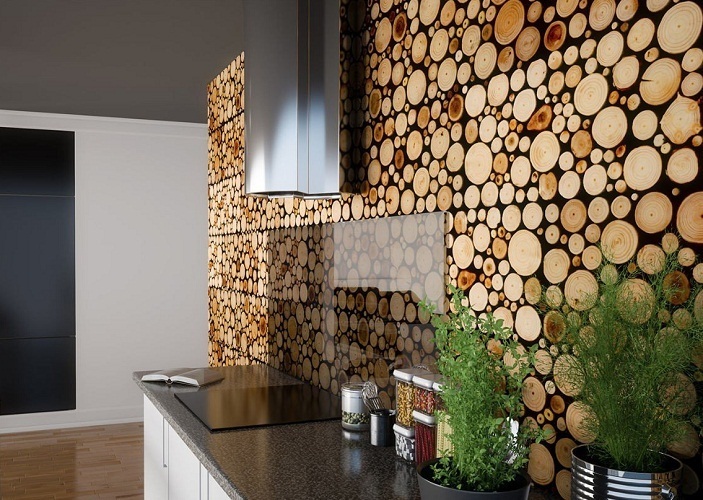
A wooden apron is a stylish and environmentally friendly solution, but in order for the coating to serve for many years, you need to take care of its correct installation and maintenance.
Natural and artificial stone - this group includes many materials and not all of them can be used to decorate the walls behind the kitchen stove. Among the materials suitable for this purpose, it is worth noting clinker tiles, granite, basalt and porcelain stoneware.
When choosing such materials for finishing a kitchen apron, it is worth considering the high cost of the coating itself and its installation, as well as the fact that if the lining is damaged, it will have to be completely changed, since it cannot be repaired is subject.
The above are the traditional methods for finishing the wall behind the slab, but in addition to them, there are alternative options that you can do yourself. More on this in the next photo gallery.
Image gallery
Photo from
Using wine corks to create a kitchen backsplash is a stylish and original idea. Plugs can be laid lengthwise, across, cut into pieces. But, this option is not durable, so you should take care of its additional protection, for example, by covering it with a layer of glass
Take your time to throw away old discs - they can make a great backsplash for your kitchen wall. You can create a panel, both from whole disks, and from their parts - it will look equally attractive
Using sea pebbles to decorate the working area, you get a stylish and environmentally friendly coating, which, moreover, is easy to clean from dirt and is not afraid of temperature extremes
If desired, you can create a practical and original apron for the kitchen area from fragments of ceramic dishes and tiles. But do not forget that such a non-standard solution is not suitable for every interior.
Wine cork apron
Old CDs for the work wall
Pebble for wall apron
Ceramic kitchen apron
As you can see, there are a lot of options for decorating walls behind gas stoves. You can choose a classic design, or you can create a masterpiece from scrap materials with your own hands. The decision should be made based on your preferences and financial capabilities.
Wall decoration instruction
Next, we will analyze several simple ways how you can sheathe a wall behind a gas stove yourself. What materials and tools are required for this.
Option number 1 - installation of ceramic tiles
Decorating the work wall in the kitchen with ceramic tiles is one of the most popular and widespread options. Of course, this work can be entrusted to professionals, or you can try to do everything yourself.
But, before proceeding with the decoration of the walls near the gas stove, we recommend that you familiarize yourself with the progress of the upcoming work.
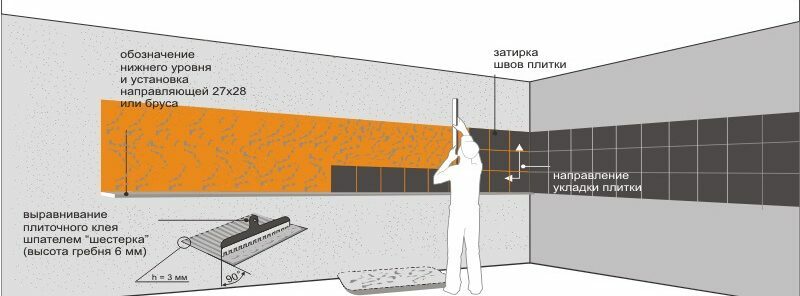
Usually the height of the apron above the table top is 50-75 cm. In this case, it should be borne in mind that the tile must necessarily go behind the countertop so that moisture and dirt do not accumulate at the joint.
First you need to calculate how many tiles are needed for the apron. To do this, you need to measure the height and width of the apron itself, not forgetting to take into account the dimensions and hood location over the gas stove.
The number of tiles will depend on their size and installation method. Taking into account possible errors in calculations and the possibility of spoiling the material, it is better to play it safe and take the tiles 10% more of the estimated amount.
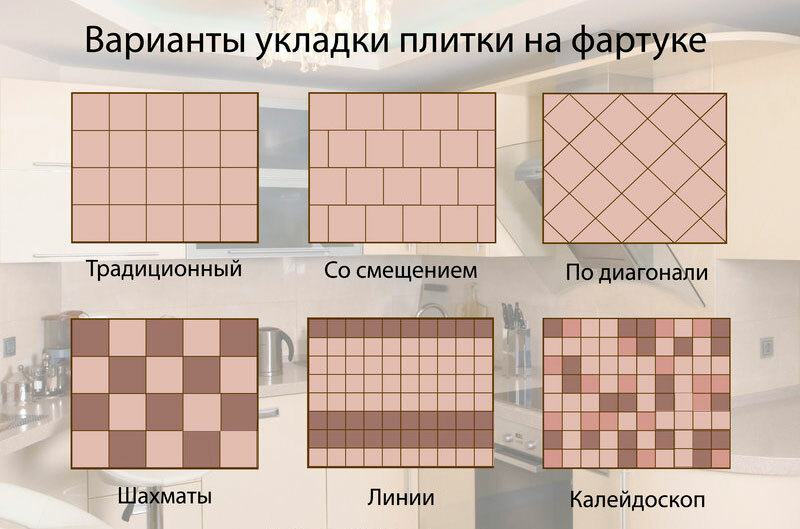
The most economical is the traditional method, in which the tiles are stacked on top of each other without displacement, but diagonal laying will require much more skill.
Having purchased the required number of tiles, you can start preparing the tools for work.
To prepare and clad the walls, you will need to use:
- Perforator. It may be needed if there is an old coating on the walls.
- Screwdriver. For mixing the adhesive. Only in advance you need to take care of a special nozzle.
- Bucket. It is better to take a capacious plastic bucket with a volume of at least 10 liters.
- Spatulas. For work, you need a narrow, jagged edge and rubber.
- Building level. With its help, the correct laying of the tiles will be controlled.
- Tile cutter. For trimming the edges of tiles if necessary.
In addition, the following may come in handy: a cord, a ruler and a pencil, a rubber hammer, crosses for mounting tiles, grout and, directly, the adhesive itself.
Having prepared all the necessary tools and materials, you can start finishing work.
Image gallery
Photo from
The first step is to free the tile laying area from the old coating and putty it
Next, we make an estimate and determine how many tiles will go for one row, where you need to cut or make holes for sockets
After stirring the adhesive composition in the proportions indicated on the package, proceed to its application. This should be done with a spatula with a notched edge.
Having previously cut off all unnecessary and made holes for sockets, you can start laying tiles on the wall. To obtain even seams on both sides of each tile, you need to install crosses
Step 1 - preparing the work wall
Step 2 - sketching the tiles
Step 3 - applying adhesive
Step 4 - laying tiles on the wall
After all the tiles are laid, it remains to wait until the adhesive dries, then remove the crosses and grout the joints with a rubber spatula.
As you can see, the process itself is not as complicated as it might seem at first glance.
Option number 2 - decorating the wall with a glass screen
A worthy alternative to the ceramic tile screen protector is the use of special tempered glass. This material will reliably protect the walls of the slab from dirt, it is not exposed to moisture and high temperatures, and also has good wear resistance.
That is why many housewives opt for a glass screen. And it looks very stylish.
Before starting work, it is necessary to measure the area of the wall on which the glass apron will be attached. It is better to double-check the measurement accuracy several times in order to avoid installation problems later if the product turns out to be slightly larger / smaller than necessary.
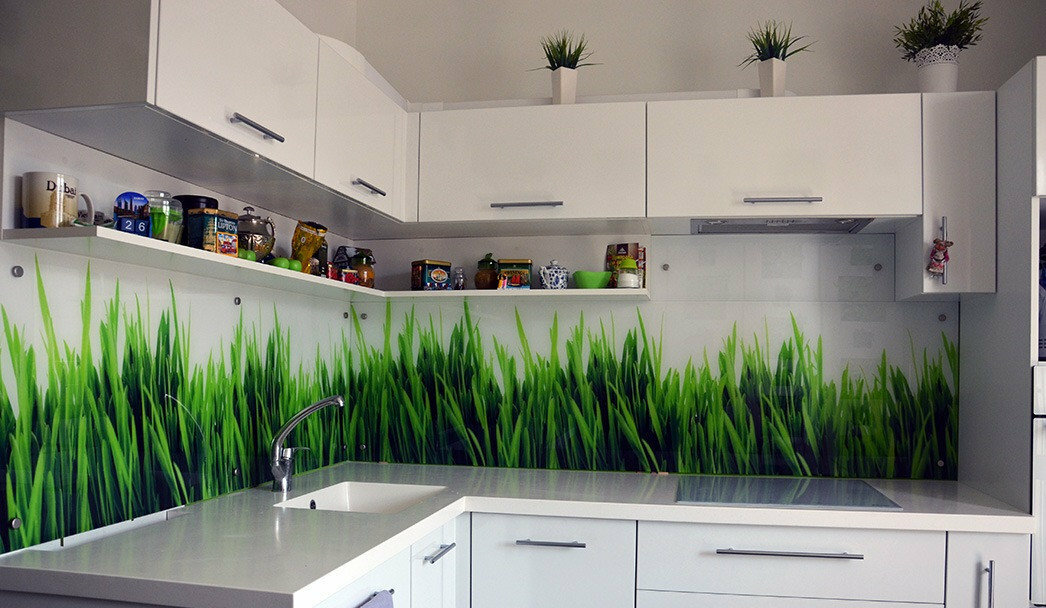
To save money, you can order an apron made of transparent glass, and stick your favorite wallpaper or film with a suitable image under it. Or you can order a product with a printed pattern, but it will cost a little more.
When ordering the manufacture of glass for an apron, you should immediately stipulate making holes for fasteners. They should be at least 5 cm from the corners of the product.
The panels are rather large, so the wall on which they will be attached must be perfectly flat so that the product fits snugly against it throughout the entire area.
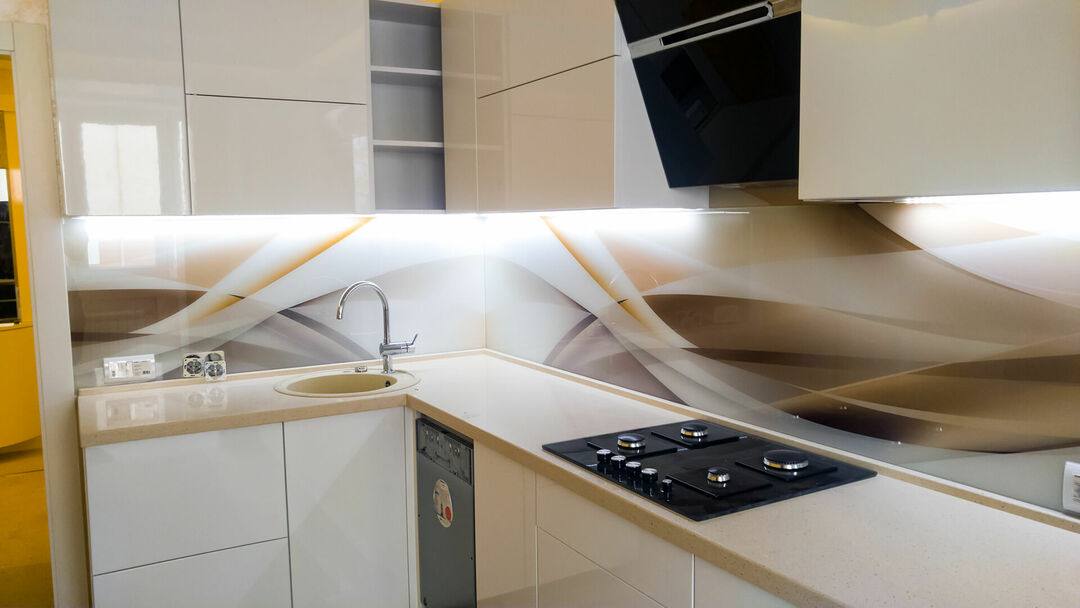
It is easy to choose a protective glass screen for a wide variety of kitchen interior solutions. And the ability to apply any images you like greatly simplifies the choice
Before starting the installation, you need to attach the finished apron to the wall and mark the location of the fasteners with a pencil. Further, using a perforator and with a nozzle of the appropriate size, make holes for fasteners, insert dowels and anchors into them.
The next thing to do is to position the glass panel on the anchors and fix it with the fixing caps.
As you can see, even a novice home craftsman can handle the installation of a glass apron. The main thing here is the accuracy of measurements and smooth walls.
Safety rules when choosing a material
The most important thing in the design of the kitchen space is the correct choice of material for finishing the wall behind the stove, especially if the kitchen has gas equipment. In addition to cooking spray, this wall will be exposed to high temperatures.
Therefore, it is important that there is a heat-resistant material behind the hob. In this regard, ceramic tiles, glass, and metal have proven themselves well.
If the choice fell, for example, on MDF or PVC panels, then you should know that flammable materials must not be installed in the immediate vicinity of gas burners, so that such a solution does not turned around by fire.
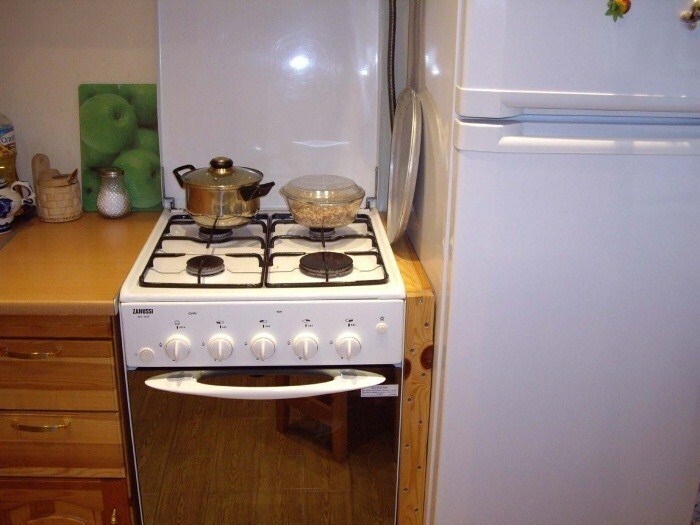
As a heat-insulating material, you can use foam, cork, chipboard, drywall and many others. The choice will depend on your financial capabilities
Also, do not forget that it is highly undesirable to place a refrigerator next to a gas stove. If such a neighborhood is unavoidable, then it is worth laying a heat-resistant partition between the devices.
The insulating material is placed between the refrigerator and the stove. Insulation can save refrigeration equipment from overheating, but it doesn’t provide any protection against grease.
Conclusions and useful video on the topic
How to independently install a protective glass screen will be discussed in the following video:
Installation of a ceramic tile apron:
When choosing a protective screen for a wall behind a gas stove, special attention should be paid to the choice of material. It must have good wear resistance as it will be regularly cleaned with detergents. It is also equally important to comply with the installation technology, because even the highest quality material will not last long if the installation technology is not followed.
On the market now you can find material for every taste and wallet, so there should be no difficulties with the choice.
Have you ever had to engage in self-installation of an apron behind a gas stove? Please share with our readers what material you chose, and whether you managed to cope with the task. Leave your comments, share your experience, add photos of your kitchens in the discussion block.


