Gas convectors are quite popular. They work on a commonly available type of fuel, which attracts with a low price, minimum volume of combustion products and high efficiency. Without any problems, you can install and even mount a gas convector with your own hands, if you know the specifics of performing these works.
We will tell you how to install a gas heater that provides convective heating. Let's get acquainted with the principle of its operation and design features.
In the article we have proposed, you will find a guide for the installation and manufacture of homemade products tested in practice. Our advice will undoubtedly be appreciated by independent home craftsmen.
The content of the article:
- The secrets of the popularity of the gas convector
- Standards for the location of gas convectors
- Wall mounting and fixing steps
- Rules for proper operation
-
Homemade gas convectors
- Option 1. Heater based on IR burner
- Option # 2. Using a decommissioned heater
- Option # 3. Upgrade with duct fan
- conclusions
The secrets of the popularity of the gas convector
Convectors that use gas are used to equip residential, industrial and commercial facilities. They are especially in demand in private houses, small workshops, cafes that are not connected to centralized heating systems.
Often, it is gas convectors that are used to heat large vehicles: campers, trucks, buses. They are more convenient to use than solid fuel stoves and diesel fuel heaters, more economical than electrical appliances.
Image gallery
Photo from
Convectors, in which the air is heated by a gas burner, are installed in city apartments, not connected to the centralized gas supply or located in the ground floors insufficiently insulated high-rise buildings
Almost all models of gas-fired convectors are capable of operating both on main fuel supplied by gas supplying organizations and on cylinder fuel
The connection of the gas convector, into the chamber of which gas is to be supplied for the combustion process, is made by a hose to the cylinder or to the pipe of the public gas supply network
Installation of the gas convector is carried out only on the main walls in order to shorten the path for the removal of combustion products to the street
Gas convectors are actively used in the arrangement of summer cottages and low-rise country houses. To organize gas heating, you do not need to lay pipelines, install a boiler, install shut-off and control valves
With the help of gas convectors, you can quickly and inexpensively improve conditions in the entrances of multi-storey residential buildings, shopping, sports complexes, public buildings, commercial establishments
Gas-fired convectors are the best solution for arranging objects remote from areas with a well-equipped infrastructure. They will perfectly heat the car service points located on the highway, tire fitting and other workshops
Gas convectors are actively used in heating various vehicles, as well as tents and campers.
Gas convector in the interior of the apartment
Connecting the device to the centralized gas supply
Convector with a cylinder for storage and consumption of gas
Installing the device on a solid wall
Gas convector in a country house
Improving conditions at the entrance
Heating of garages and filling stations
Convector chimney in a vehicle
Work convective type devices is based on the natural movement of heated air passing through a combustion chamber with a heat exchanger located inside. The heat exchanger heats up the gas burner, to which gas is supplied through a nozzle through a hose or pipe.
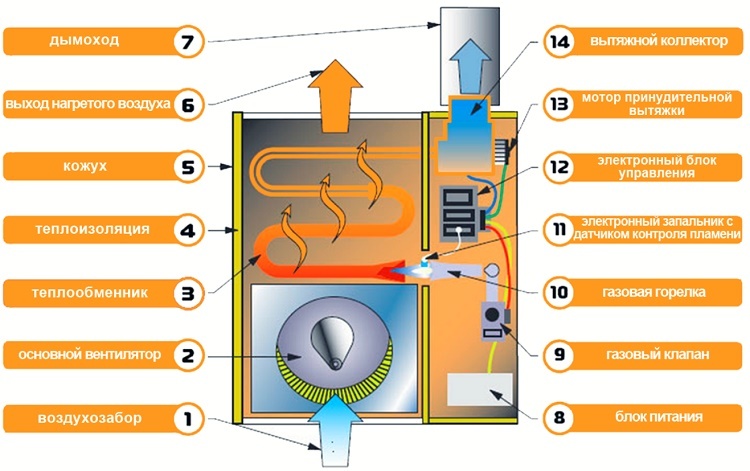
The air drawn into the gas convector is heated by a burner, into the nozzles of which gas is supplied either from a gas pipe or through a hose from a cylinder
Almost all models of gas convectors can operate both on main gas and on a liquefied combustible mixture of propane and butane. They can be connected both to the gas supply network and to a cylinder or gas holder. It all depends on the technical conditions of the facility being equipped.
Gas-fired convectors are available with open and closed combustion chambers. The former are cheaper both in price and in the next operating cost. The latter are more expensive, but much safer, and therefore buy them more willingly. Let's analyze the principle of operation of just such a device.
Image gallery
Photo from
Air drawn in naturally or with the help of a fan is heated by the heat exchanger of a gas convection heater
A combustion chamber with a burner installed inside is located directly under the heat exchanger. Chambers, by analogy with boilers, are open and closed.
Gas heater controls are usually located to the right of the heat exchanger. The handles located on the body control the ignitors and the electrode of the device
The design of the gas convector is extremely simple. There is practically nothing to break in the design. If necessary, any node can be easily changed by yourself
Gas convector heat exchanger
Gas appliance burner option
Gas heater control devices
Machine control unit
The air required for combustion enters the combustion chamber of the gas device through coaxial chimney. If we simplify the presentation of a coaxial structure, then these are two pipes of different cross-sections, one of which is installed inside the other. Due to the nature of the device, the coaxial system performs two important actions.
Through the gap between the pipes, air is drawn into the combustion chamber, which is required to stimulate and maintain the combustion process. Through the central pipe, a few, but extremely toxic products from the processing of blue fuel are discharged outside, i.e. outside the heated object.
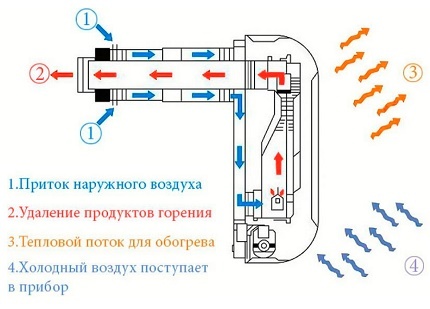
A gas convection device with a closed chamber is more expensive than an open one, but safer. All its components are insulated and do not come into contact with air in the heated space.
The convection gas heater has absolutely nothing to do with the air space in the room. A fresh portion of air is taken from the street, flue gases, soot and fumes accompanying gas combustion are sent there. During operation, the gas convector does not burn out oxygen in the treated object and does not threaten users with carbon monoxide poisoning at all.
The movement of air through gas convectors is natural and forced. In the first case, the cold flow spontaneously displaces the warm one from the heat exchanger into the room. In the second, the movement and change of the cooled and heated air mass is accelerated by the fan, which needs power supply.
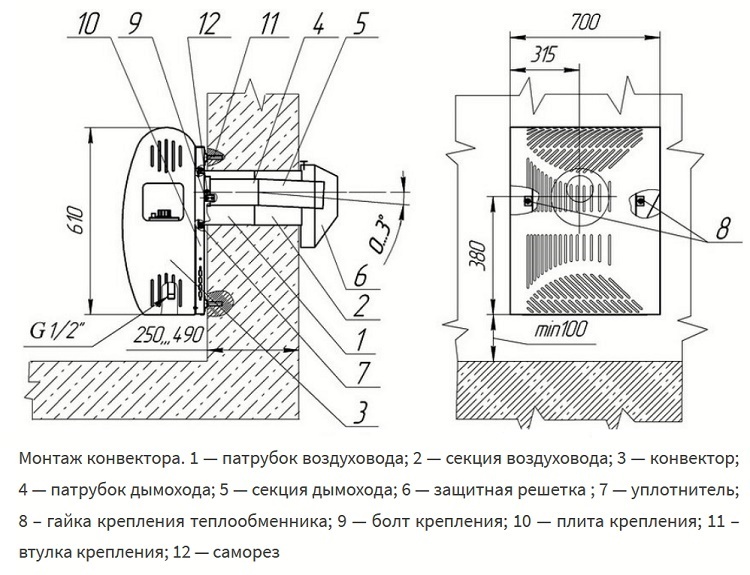
Convectors are equipped with chimneys to remove the products of blue fuel processing. Devices with a closed chamber are equipped with coaxial pipes
The blue fuel is supplied to the burner through the gas valve. It doses the supply and performs the function of a kind of climate system that maintains the temperature background required by the owners in the room. In addition, volatile devices are equipped with automation.
Automatic protection systems guarantee safe operation. They interrupt the supply of gas to the chamber in the event of pressure fluctuations in the gas network or flame damping in the burner. Deflectors are installed on the coaxial pipes of gas convectors, which exclude the blowing of the nozzles by gusty winds.
The author of the video will clearly introduce the principles of operation and features of the device of a gas convection heater:
Craftsmen design and assemble unique models gas heaters, taking into account the principle of their operation and the features of the device. In their homemade products, the basic rule is taken into account - you just need to ensure safe and efficient heating of the air passing through the device with a gas burner.
We will definitely consider the proven models of home-made gas convective heaters, but first, let's figure out the rules for installing and connecting the ready-to-use equipment proposed trade.
Standards for the location of gas convectors
Gas convectors are installed inside heated residential, utility and industrial premises. They are allowed to be operated in warehouses, garages and other explosive objects, subject to the rules of use.
The number of devices is calculated based on the volume of the room to be processed. It is believed that on average 1 kW generated by the device is capable of providing 20 m³ of heat. Of course, for an accurate selection of averaged values, besides, climatic conditions affect the calculations and the real heat loss of the building, but the approximate number of required convectors can be represented as follows receive.
Fastening that is homemade, that the factory gas convector is made on the main wall. It is recommended to place it directly under the window, but not in a niche that impedes the movement of the air flow. It is necessary to install the device so that nothing interferes with operation and maintenance.
Image gallery
Photo from
There must be a gap between the bottom edge of the gas convector and the floor plane. This distance is necessary to ensure a free path for cold air drawn into the heat exchanger and to eliminate contact between the burner and the building structure.
The optimal place for installing a gas convector is considered to be the part of the wall under the window opening. However, it is permissible to put devices on blank walls.
To the right / rear / left of the convector body, a minimum of 15 cm must be left. It must be blown freely by the flow of air to cool during operation
To operate the fans of a gas convector with a closed chamber, the device must be connected to a power source. there must be a distance of at least 50 cm between it and the outlet
Hanging the gas appliance on the wall
Hanging the gas appliance on the wall
Offsets from the gas convector on the sides
Distance from the convector to the outlet
Most manufacturers of gas convection appliances recommend maintaining the following distances from building structures:
- From the plane of the floor with a combustible coating not less than 150 mm.
- From the plane of the floor with a coating that is not prone to burning, 100 mm.
- From a window sill or other similar structure, towering over the convector, at least 100 mm.
- From structures and objects located to the left / right / behind, 150 mm each.
- From the front wall of the gas convector to the nearest obstacle from 500 mm.
The gas convector must be equipped with coaxial chimney, brought out to the street through the main wall or through the roofing system. The thickness of the wall crossed by the chimney can be 600... 800 mm.
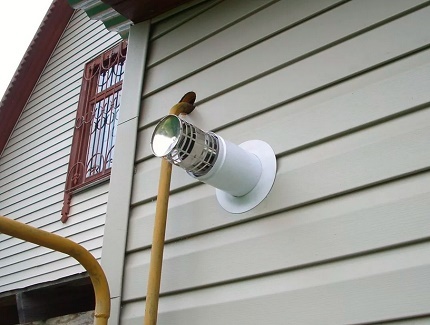
It is recommended to equip a coaxial pipe connected to a gas convector with a deflector outside. It will exclude the penetration of birds, foliage, branches into the device, prevent blowing by a gusty wind
When exiting through the wall between the coaxial pipe and the ground surface, there cannot be less than 300 mm. If it comes out at a height of more than 2000 mm from the surface of the earth, protection from atmospheric negativity and unauthorized entry should be provided.
Wall mounting and fixing steps
To bring the coaxial pipe through the wall, you need to drill a hole in it, the radius of which will allow you to bring the chimney out, insulate and seal the gap between the pipe and the wall. According to the position of the drilled hole, the fixing points of the convector are marked on the wall.
Consider the process of preparing a hole for the output of a coaxial pipe in the wall of a frame building:
Image gallery
Photo from
We mark the wall of the building through which the coaxial pipe will be output, postponing the required distance from the level of the finished floor
Let's drill holes in the corners of the marked opening to make it easier to work and cut out the opening
We equip the cut-out opening with thermal insulation plates of the Termoizol brand. Insulation boards thickness 6 cm
Glue the pieces cut from the heat-insulating plate with mastic to each other
From the inside, we protect the room from heat loss by installing a solid heat-insulating plate with a hole
To prevent precipitation from entering the hole with the coaxial pipe, we install a silicone flange from the inside and fasten it with self-tapping screws
To try on the position of the coaxial pipe, which needs a slight slope towards the street, we assemble the device by fastening the parts with tape
If the slope "to the street" required for condensate drainage is not provided, we slightly modify the hole with a construction knife
Step 1: Marking the "window" for the output of the coaxial pipe
Step 2: Forming the opening for the arrangement
Step 3: Arrangement of the opening with slab thermal insulation
Step 4: Bonding the cut slabs with mastic
Step 5: Installing the insulation board from the inside
Step 6: Bonding the insulating flange
Step 7: Assembling the coaxial pipe for fitting
Step 8: Correcting the Pipe Position if Necessary
Naturally, the first step is to fix the brackets on which the device will be hung. Upon completion of their fixation, proceed to the installation of the unit and its connection to the chimney and gas pipe. But first you need to prepare it for installation.
In summer cottages and cabins, the walls of which do not have a bearing capacity sufficient for the load a device with a cast-iron heat exchanger, it is better to put the heater on supports, for example, as in the following gallery:
Image gallery
Photo from
To equip a convector with a heavy cast-iron heat exchanger with legs capable of supporting its weight, we first screw two pieces of a metal U-profile to the body
We will use steel furniture corners as legs. To fix them, we slightly cut the body and put it into the slot of the device
Through the mounting holes available in the profile and in the furniture corners, we fasten the supports to the body with self-tapping screws
We check how evenly the case is installed on the support legs. If necessary, we correct its position
Step 1: Fastening the two profile pieces to the body
Step 2: trimming the chassis and installing the legs
Step 3: Attaching the Heater Support Feet
Step 4: Installing the appliance on homemade legs
The casing is removed from the convector, and an O-ring is put on the hole located on the back side. The appliance is then tipped against the wall, causing the coaxial pipe to be inserted into the sealed opening on the back of the unit. After that, the connection must be reinforced with a mounting sleeve.
Now you need to connect to the gas supplying pipe or hose. It is advisable that in case of connection to the main gas, the pipe has already been brought to the place where the convector is installed. Before entering the gas channel into the device, there must be a valve so that the supply can be shut off if repair, replacement or cleaning is planned.
Image gallery
Photo from
Before installation, we check the functionality of the device. After making sure that it is fully operational, we remove the casing for the convenience of installation work
We put the device in the prepared place. It is easier to disconnect the coaxial pipe before installation and start it from the street side. But if you are worried about the tightness of the connection, then it is better to mount together with the pipe
After hanging the device on brackets or installing it on homemade legs, we install and fix the casing back
We connect the convector to the gas cylinder using a hose. Before entering the device there must be a ball valve, at the outlet from the cylinder - a reducer
Step 1: Preparing the convector for installation
Step 2: Installing the Instrument in the Prepared Place
Step 3: Reinstalling the convector cover
Step 4: Connecting to a gas cylinder
Note that the connection to the pipe of the centralized gas system can only be made by representatives of the organization with which contract signed for the supply of gaseous fuel and maintenance of gas equipment. The master must have a certification from the manufacturer with the right to carry out installation work.
The duties of the gasman called to install the gas convector include connecting to the gas supply system and checking the connecting unit for leaks. After completion, the employee must issue an act to the owners, which lists all the actions he performed.
You can connect the convector to the gas cylinder with a hose yourself. But it should be remembered that the connection must be made using a reducer and a gas valve. You also need to know that the nozzles for supplying main gas and liquefied gas mixture differ in diameter.
It is desirable to equip the opening for the coaxial pipe using a flange that ensures the tightness of the external unit. But before installation, the usual version needs to be slightly modified depending on the mounting method. Consider an example of preparing and installing an external seal on a wooden wall:
Image gallery
Photo from
So that the flange can be attached to a wooden wall, we will make a mounting frame. We cut aluminum strips to size with a miter box and drill holes in them with a miter mark for fasteners
Let's try the cut strips and attach them to the metal flange mounting piece with tape and a couple of screws. Another one will be superimposed on top of it, so it is better to write down the dimensions somewhere or cut out the details in advance
We carefully fasten all the fasteners, connecting the metal part of the flange and our auxiliary frame
This is what the modified seal looks like from the back. It will need to be pressed tightly against the wall and all gaps should be sealed with bitumen mastic.
Flange and strips for fastening it
Flange mounting frame assembly
Fastening all frame parts to the flange
The back of the modified seal
After revising the flange installed on the coaxial pipe from the street side, proceed to its installation:
Image gallery
Photo from
To ensure tightness, we put on a flange on the outside of the coaxial pipes, then we process the external joints of the thermal insulation boards with bitumen sealant and paste over with masking tape
We cut out four parts to the size of the opening to form an edging that holds the flange and thermal insulation plates
Along the perimeter of the frame holding the flange from the street side, we process all joints with bitumen mastic
We attach a deflector to the edge of the coaxial pipe, which will prevent the burner from blowing out and keep birds away. We fix it with self-tapping screws
Step 1: Finishing the Outside Flange Opening
Step 2: Fixing with a metal bar
Step 3: Sealing the joint with bitumen mastic
Step 4: Installing the deflector on the coaxial pipe
If the device was sold with injectors designed for main gas, they should be changed to those of the size and model specified by the equipment manufacturer before installation. All nozzles in the device must be replaced.
Don't you forget that gas bottle any container should not be placed above the basement, placed in the basement and basement levels of the house. It is forbidden to install it directly next to the heater. It is necessary to maintain a distance of at least one meter between the device and the cylinder. It is better to have more, so that the heating of the cylinder by the heater is completely excluded.
Rules for proper operation
Only adult users who have carefully studied the manual and recommendations for use can turn on and off the gas convector, adjust the modes of its operation. It is unacceptable for the younger generation or disabled people to participate in these processes. If it is impossible to protect the gas convector from their interference, then it is better to refuse to install the device in advance.
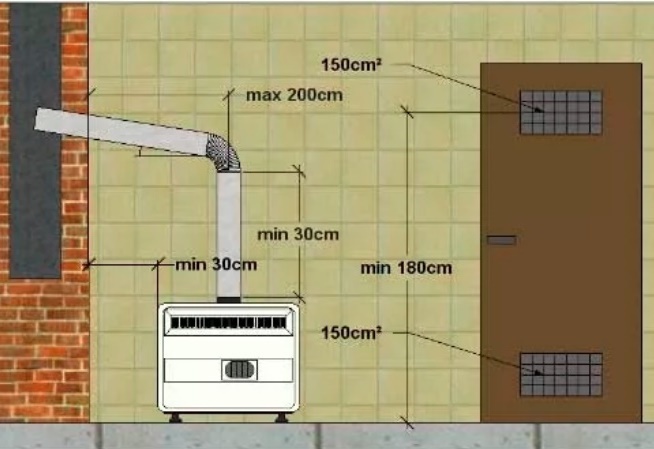
The room in which the operation of the gas convector is planned must be ventilated, for which it is necessary to have a window or at least a window. It is desirable that the door leaf has ventilation grilles.
Remember that in case of detecting a specific gas smell in the room, the tap at the convector inlet should be closed immediately. In no case should you "spark" in such a situation: strike with matches, turn on the lighting, use a lighter and etc. Failure to comply with these requirements, a small leak at first sensations can cause a destructive explosion.
The room in which the leak was detected must be immediately ventilated by opening the windows and door wide open. You should immediately call the employees of the gas organization that connected your device to the centralized line, or the emergency service. It will be possible to operate the gas heater only after the leak is completely eliminated or the device is repaired.
Homemade gas convectors
Among the developments of home-made convectors that convert gas into thermal energy, there are not too many different solutions. This is due to the danger of errors in the construction of devices operating on blue fuel. The slightest miscalculation can lead to an explosion, poisoning, fire.
However, there are some interesting constructs worth considering. They can be useful in heating summer cottages, country houses, trailers, tourist tents, garages.
Option 1. Heater based on IR burner
In fact, this is just a refinement of the usual infrared gas burner Solyrogaz brands. The device operates on bottled gas. The inventor and performer of the idea was the GII-2,3 model, the working panel of which can be installed horizontally.
The original heat exchanger was simply welded and installed on this working panel, which heats the space in the usual mode by flameless processing of gaseous fuel. It looks like a metal cube with metal tubes laid inside the body.
Image gallery
Photo from
This model of a portable gas convector is structurally a modification of an infrared burner, as a result of which the heat transfer of the device increased.
In the development, a mobile infrared gas burner of the Solyrogaz brand was used, on which a heat exchanger was simply installed
The heat exchanger is a metal cube with aluminum tubes welded into the structure. Air will circulate through them during heating from below with a gas burner
The movement of the air flow, the change of the heated air mass by the cooled portion is stimulated by twelve-volt fans from the computer
Homemade mobile gas convector
Application of gas infrared burner Salyarogaz
Homemade heater heat exchanger
12-volt computer fans
The heat exchanger has no bottom, it would prevent the passage of heat waves. At the top, there is a branch pipe for connecting a chimney. A pair of computer fans are installed at the back to accelerate the flow of air.
Structurally, this model resembles an air heater for air heating systems. By the principle of action - too. The air drawn into the tubes of the device is heated by a gas burner, then it is forced out of the tubes with a fresh portion of cold air.
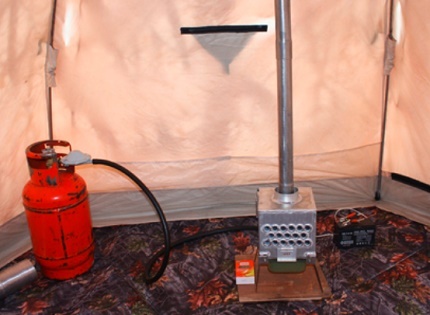
The mobile gas-fired convection heater is suitable for tourists, fishermen with hunters, and those who like to travel in a camper. It just needs to be connected to the cylinder, and the rigid or corrugated pipe installed on the branch pipe is taken out of the tent.
According to the owner of the invention, the modified burner heats up the tent much faster than it, but without a heat exchanger. All products of gaseous fuel processing are discharged through a pipe connected to a branch pipe. Oxygen does not burn, gas is consumed economically. For fishermen, hunting enthusiasts and tourists, this is a real find.
Option # 2. Using a decommissioned heater
This option is generally extremely simple, it was invented to save money on heating the garage. The whole revision consisted in the repair of the decommissioned convector and in the removal of the casing. The result allowed a significant increase in heat transfer and heating rate, but it has problems with safety.
Image gallery
Photo from
To improve the heat engineering quality of a decommissioned convector, it is enough to remove the casing from it. If the "native" brackets could not be saved, you can hang the device on anchors hammered into the wall
In five to ten minutes of operation, the gas convector heats up a garage with an area of up to 30 m²
In order not to accidentally damage the gas hose during operation, in the example it is fixed on the wall in a cable duct
The coaxial chimney is closed from the outside with two bent metal strips that act as a deflector and protect against bullies
Fixing the convector with anchor bolts
Heating the garage with a gas appliance
Fixing the gas cylinder hose
Installation of anti-vandal devices
First, the tightness is broken. In case of accidental attenuation, the gas valve of the heater will, of course, stop supplying.
However, with constant combustion, oxygen from the air mass in a confined space will be burned out, therefore it will be necessary to regularly ventilate the garage in one gulp or construct forced ventilation.
Secondly, an open heat exchanger can easily cause burns. But where children do not run, this can not be considered a minus. An adult is unlikely to forget that the casing has been removed from the heater and that if you move it carelessly near the device, you can get burned.
A similar solution, but used for heating the trailer, will be introduced by the following video clip:
A 30 m² garage is heated by a convector without a casing in about five minutes. Gas is consumed in the amount of no more than 500 rubles in the winter month. It works less often in autumn and spring, which means that costs are even reduced.
Option # 3. Upgrade with duct fan
The essence of the alteration is to install an air duct with an exhaust fan on the front grille. The heat generated by the convector is directed to the owner's working area. There are no special tricks, but there is a significant reduction in heating costs.
Features of the device and operation of the modernized gas convector are presented in the video:
Combustion products are discharged outside the facility as usual - through a coaxial pipe, through which fresh air is supplied to the burner to support the flame. This homemade product is significantly safer than the previous model, but you will still need to periodically ventilate the treated room. After all, without a doubt, she will "drive" clouds of dust.
conclusions
Undoubtedly, gas convectors are the most popular type of heating devices today for small residential, domestic facilities and even vehicles. The difficulty is that the most affordable and, if possible, purchase type of fuel can be dangerous if you violate the operating instructions.
If the rules of use are strictly observed, there will be no threats to life, health or property. Homemade products will not create any risks if the gas moves along sealed circuits. However, if there is any doubt that you will be able to ensure tightness, it is better to buy a factory-made device and not tempt fate.
Would you like to talk about how you installed and connected your own gas convector? Perhaps you have an interesting idea in your arsenal for assembling or modernizing a gas heater? Please leave comments in the block form below, ask questions and post photos on the topic of the article.


