Progress in materials has brought a gift - vinyl wallpaper. The well-known PVA glue has learned to foam and sinter on rolls of paper, while simulating the surfaces of various materials, including the silk of imperial palaces. Although vinyl wallpaper has nothing to do with silk, it is often called silk-screened for its specific appearance. In fact, the vinyl is applied by means of tinted dots printing. After heating, the substance swells, the points merge - the process is complete. Warm stripes are sometimes embossed, rolled under the paint rollers. The pattern can be applied before embossing. Manufacturing is not complicated, but the components used are expensive. It is difficult to call the palace collections of vinyl tapestries budgetary. However, vinyls properly glued to the wall will last almost forever.
Features and varieties of vinyl wallpaper
Depending on the substrate, wallpaper is distinguished on:
Attention! Earned on our website kitchen designer. You can familiarize yourself with it and design your dream kitchen for free! May also come in handy wardrobes designer.
- paper,
- non-woven fabric,
- fabrics.
The first ones are the cheapest, the acrylic is foamed on them, so the substance is easily destroyed even with a fingernail. Non-woven material is used as a substrate for denser samples. Vinyl on a fabric basis is similar to a sieve, coarse calico. Used where there is a complete imitation of a tapestry.
According to density, vinyl is divided into two categories:
- high relief,
- low relief.
High-relief canvases are produced in wide white canvases with the texture of matting, double-thread, linen canvas, as well as ribbons in the form of plaster decor. After gluing, such reliefs are painted with acrylics. For kitchens and hallways, decorative canvases are produced in the form of tiled, brickwork. Service life is limited: rearrangement of furniture, children, pets, inability to wash with abrasives - the reasons for the rapid destruction of the layer.
Low-relief washable, not afraid of shock, does not fade, no unpleasant smell. Their only drawback is the ability to condense steam on itself. That is, they do not “breathe”. Therefore, they are recommended for rooms and areas with good ventilation.
Vinyl of 4 standards is produced: 53 cm, 70 cm, 106 cm and tape friezes. All varieties, regardless of the height of the relief, series and manufacturer, are combined with each other. The main thing in the gluing process is to avoid gaps between the canvases. Vinyl overlaps are not glued.
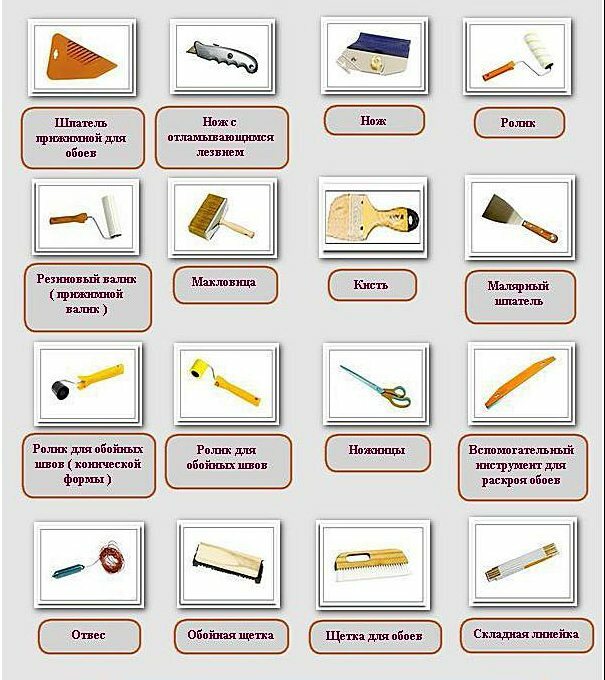
How to glue: the necessary tool
- Metal ruler;
- Stationery knife;
- Square;
- Roulette;
- Flat brushes - 0.5, 2.5 cm;
- A fleecy roller on a stick - L 200 mm;
- Roller on the handle - L 120 mm;
- Leveling scraper;
- Building level (better laser);
- Plain pencil T;
- Shoe brush;
- Scissors.
You will also need a board made of fiberboard, a table, a stepladder, rags, masking tape, weights to prevent the canvases from curling. As an adhesive - methylcellulose CMC or modified starch.
Adhesive selection
CMC stands for methylcellulose glue. All of its other names are a publicity stunt. CMC is poured in very small portions (dust) into a bucket of water, mixing thoroughly. Set aside for several hours, stir again. The liquid should be viscous, like jelly, envelop the stick without lumps. Kissel-like consistency is the same for all vinyls - heavy, light, high-relief. Dilute very thick glue with water, but carefully, in small portions, otherwise it may become a watery liquid.
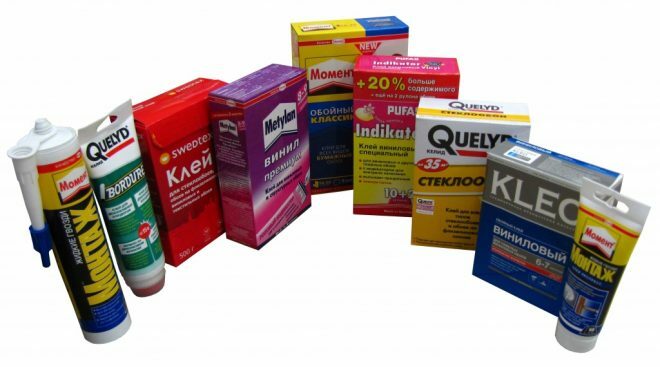
Another wallpaper glue is modified starch. It dries without leaving a trace, does not form whitish smudges. Its price is higher, but the preparation is the same as that of the CMC.
PVA glue is added - up to 10% of the total mass - before gluing itself to accelerate the setting of meter prints, but it is not required. Excess it is thoroughly blotted with rag tampons.
Preparatory work
Removing old wallpaper
The gloss of vinyl gives out all the unevenness of the wall, so the surface is prepared more carefully than for painting. The chalk is washed off the wall, the old wallpaper is scraped off with a spatula and knife, after soaking it.
Sometimes you need a lot of water. Oilcloth is placed on the floor on the bars, the flowing water will be collected in an oilcloth ditch. Each time the wetted roller is rolled over the old wallpaper, it will peel off faster. The washed wall is allowed to dry.
To remove old wallpaper in one large layer, they resort to the following: newspapers are glued onto a shabby paper print. Allow to dry, tear off.
Wall alignment technology
Scrape off the oil paint. Large shells are covered with plaster, impregnated with a primer. Further - the application of the plaster mix "Start". After the walls are sanded. It is recommended to glue the fiberglass canvas before the finishing coat. The fiberglass will serve as a scent while gluing. It also reinforces the finishing layer. All fiberglass glue is the same. The final layer is "Finish" putty.
Applying a light source to the wall, dry surfaces are checked for small cuts and protrusions. After straightening, the surfaces are primed again. The final stage is gluing. The glue prepared in advance is rolled with a roller.
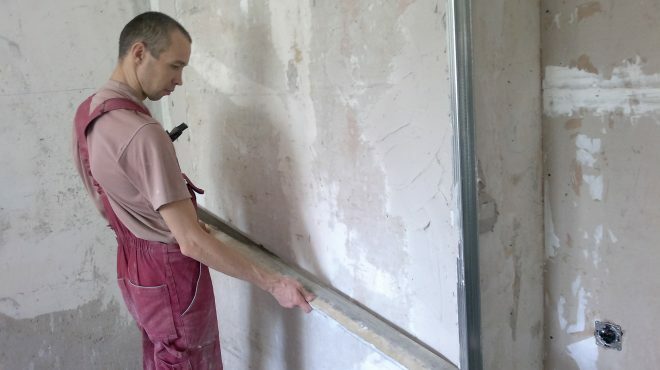
Very old walls are easier (and cheaper) to level with plasterboard. In this case, transverse and longitudinal guides are attached to the wall with a pitch of 1200 mm, plates are hung, the places of screw entries and seams are putty. The reinforcing mesh is not applied along the seam. It is not necessary to apply the finishing layer of putty mixtures on drywall, but the plates are primed and glued in the same way as in the previous case.
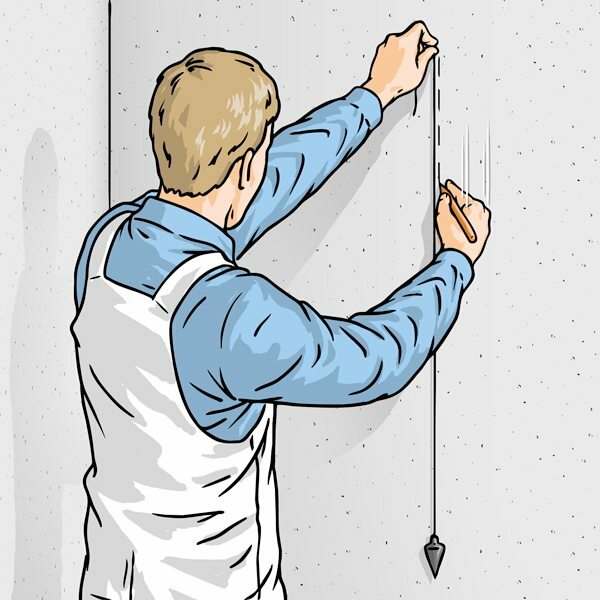
Markup
The surfaces are measured. With a level and a pencil, beat off the top edge. The highest canvas height in the whole room is set (it can vary). Usually it is 2m 65cm +. In the case when the design implies two tiers and a frieze, marking is done along the horizons.
Installation of the ceiling cornice is carried out either before or after gluing. In the first case, the joint between the cornice and the canvas is covered with acrylic between two masking tapes. From above, acrylic is tinted with a water emulsion (it turns yellow over time). In the second case, the wallpaper protrudes 5 mm above the lower edge of the plinth, and the top of the wallpaper is covered with polystyrene cornices, having previously protected it from penetration with a building protective "paint brushes"!
You need to mark up the entire composition in advance. Special attention is paid to verticals. With the help of a level, a vertical line is drawn for each canvas, otherwise the “slid” cut can initiate a skew for all subsequent ones.
Step-by-step instruction
To properly glue such wallpaper with your own hands, follow the instructions below.
Preparing the canvas
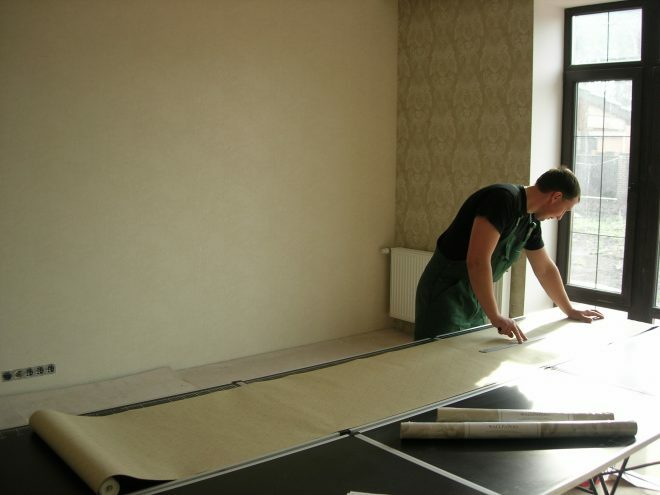
The roll is rolled out, inspected for defects, the length is cut in accordance with the marking rectangles. You need to cut in one step, using a backing board, a blade well fixed in the handle. The cross line for the cut must be strictly perpendicular.
How to apply glue
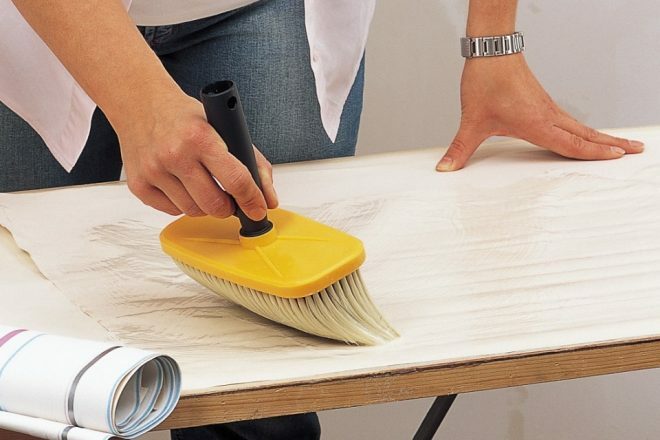
The cut is placed on the floor, pressing the corners with weights, preventing them from twisting. The glue is rolled with a roller without squeezing in a paint tray. The vinyl backing absorbs a lot, so after the first rolling it is immediately rolled again. It is advisable to lubricate the contours of the canvas with PVA in addition to the CMC. The top and bottom are brought to the center. The formed envelope is soaked for 3 - 5 minutes. Unfold by attaching to the wall. It is advisable to apply together - to avoid rupture.
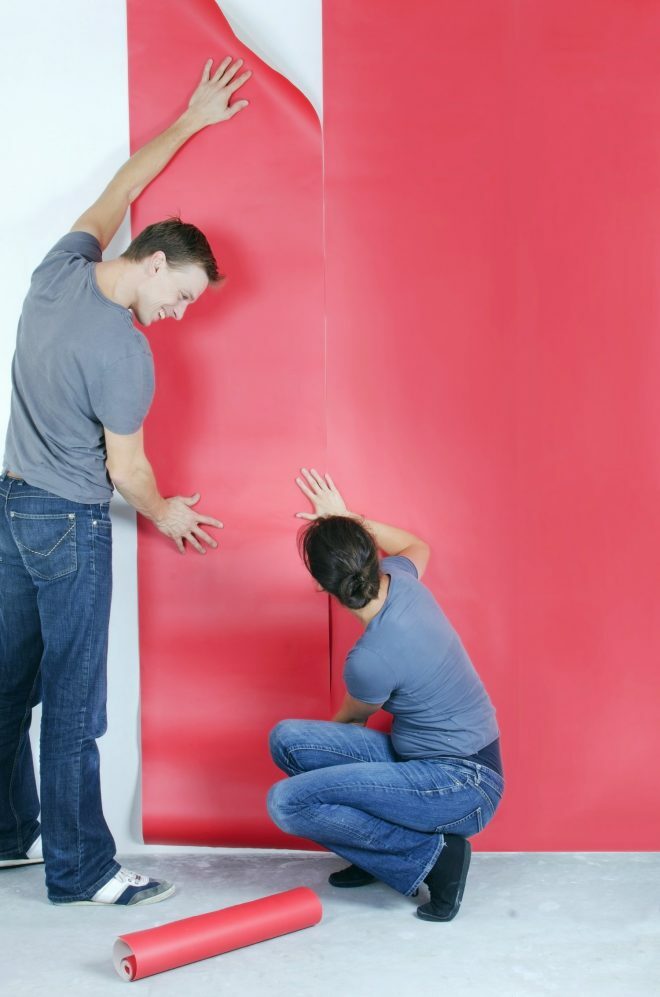
How to glue the finished canvas
Before sticking on the finished piece of canvas, you must pay the utmost attention to the top edge. Once it is fixed in accordance with the marking line, the canvas is finally unfold and its center is fixed by hand. Holding the upper edge, they pass over the canvas with a spatula-trowel. Subsequent movements - from the center to the edges. Excess glue is removed with a moistened cloth swab, the canvas is glued perfectly. A shoe brush is used. With it, the canvas is leveled in a circular motion, the side edge is checked against the horizontal, if necessary, the edge is removed, slightly tightened. The wet cut is elastic and stretches up to 1 cm at a meter thickness. Do not touch the damp wall with nails and sharp objects - it is very vulnerable.
From the center, the cut is rolled out with a small dry roller until the crackling of the air expelled from under the substrate disappears. Excess glue is removed again.
Trimming the edges
Vertical canvases on a wet wall cannot be trimmed. The groove from the knife will remain, moreover, it can provoke the destruction of the putty. But on a gypsum plasterboard, the canvas can be trimmed - in those places where there are no nests, under the screws, away from the seams. After drying, the strips are trimmed close to the floor.
Tape material - friezes - are stretched after stretching along the wall. It is difficult to foresee their final length. The tape is measured, trimmed with a margin, laid, marked with a pencil and carefully trimmed with scissors.
Sticking in problem areas
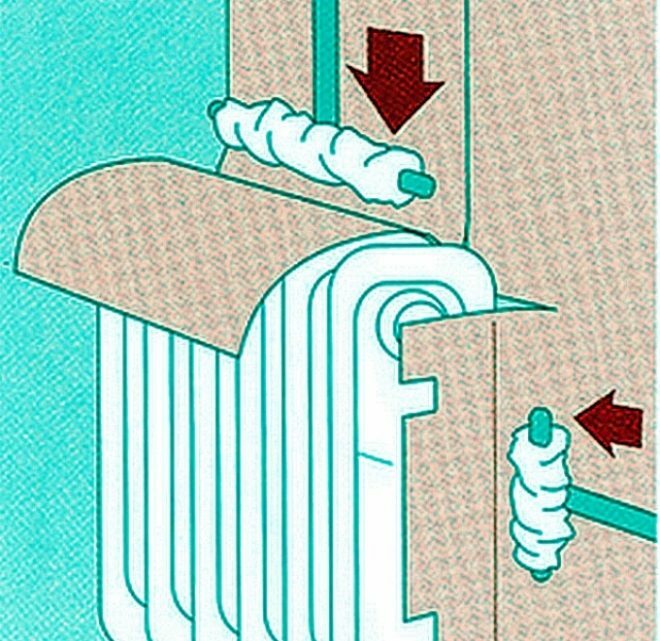
No water-based adhesive can withstand the temperature fluctuations behind batteries. You can't see behind them: the curtains are masking. But it is possible to pick up the color and paint over. Acrylic paint with glitter is suitable for mother-of-pearl wallpaper: silver, gold, bronze. These compounds are extremely stable. The edges of the vinyl near the batteries are painted over from the back with thick PVA glue, pressed. Hold, for example, with a mop. This work can only be carried out near cold radiators.
The preparation of corners for good materials is thorough. The corners are ruled with plaster mixes, rounded. The vinyl sheet will tear in a narrow place, leaving it to the side. Therefore, having aligned, rounded and glued, the corner is sealed with a canvas, folded along, dispersing the air left and right only after full adherence around the corner.
Housings of sockets and switches are removed before gluing. It goes without saying that the network must be turned off. Dried tapestries on rosettes will give themselves away with a relief, they are easy to find by touch. A cruciform hole is made in the center, the unnecessary is cut off.
Drying time of vinyl wallpaper
To establish whether the moisture has evaporated or not is simple: you need to touch the wall and ceiling with your palm. Normal drying of wall materials is 24 hours. In autumn, the drying period can be delayed - up to 2, 3 days.
After complete drying, check the joints. If the pasting has moved away, the edge is pasted over on both sides with masking tape, carefully pulled back, PVA glue drips from the stationery dispenser, pressed and dried with the warmth of the palm.
Video: how to properly glue vinyl wallpaper with your own hands
Good work requires care, strict adherence to technology. But working with vinyls cannot be classified as time-consuming processes. However, preparatory work is voluminous and costly.
average rating 5 / 5. Number of ratings: 1
No ratings yet. Be the first to rate.