 External and internal walls are plastered to protect against harmful environmental influences and level the surface. Modern plastering techniques allow you to apply finishing so that the layer will simultaneously serve as a decorative decoration for the interior or exterior. When a layer of plaster or starting putty is applied to the surface of the material, a certain texture is created, then staining is performed using a special technology. Other techniques allow you to apply the finishing layer in the form of artistic figures that stand out from the general background. So how do you do it yourself? We will tell you in this article (video at the end). And you can choose the right plaster here.
Decorative plaster device
To make the work done look perfect, you need to level the walls for applying a layer of starting putty. Experienced craftsmen align not only the surface of the wall, but the corners and joining lines of the walls with the floor and ceiling. To create a vertical angle of 90˚, use a building level and a corner. A line for aligning the wall-to-ceiling connection is applied using a bead (colored thread), which serves as a guideline for applying the layer thickness.
Attention! Earned on our website kitchen designer. You can familiarize yourself with it and design your dream kitchen for free! May also come in handy wardrobes designer.
Surface preparation
 Stages of preparatory work:
- tap the surface with a hard object (hammer) and reveal a weakly adhering coating, remove it;
- paint, whitewash or wallpaper is completely removed from the rest of the area, cracks are sewn separately;
- the wall is leveled with a starting solution, while plastering plastic mesh is glued in places of greatest thickness, if possible, then the entire area is glued. This will prevent cracking of the layer during operation;
- sometimes it is easier and faster to apply sheets of drywall, which can be placed on a frame or glued to the surface using pre-exposed beacons;
- primer the surface once with a weak solution (for deep absorption), the second time make a solution according to the technology from the primer label (to fix the surface).
Preparation of the composition
In the store, they buy ready-made dry mixes designed to level the unevenness of the walls, they are packaged in waterproof bags and require dilution with water to get started. There are also ready-made, already diluted mixtures on sale that can be applied to the surface immediately after opening the plastic bucket. To save money, they buy dry mixtures; after several times of training, the mass is easily mixed with water with a drill attachment like a whisk.
 For the first time, a small amount of dry matter is diluted, since the resulting solution can dry quickly, therefore, a large amount of the solution is not prepared. To calculate the required number of bags, a preliminary calculation is used, which looks like this:
- for plastering with coarse-grained (starter) compositions per 1 sq. m 1 mm thick leaves 1.8-2 kg of dry matter, if you want to apply a thick layer, then the rate is multiplied by the thickness of the layer in millimeters;
- under the same conditions, the consumption of medium-grained material will be 1.5–1.7 kg per square, while the calculated layer thickness is also taken as 1.0 mm;
- to make a layer with fine dry mixtures 1 mm thick, 0.9–1.1 kg of substance will be required per square of area.
Water is poured into a clean container, then the mixture is poured (not vice versa), water is used at room temperature. For correct mixing, pour the entire amount of dry matter at once, if the solution turns out to be thick, it is better to add a little water. It is worse to add a dry component to a liquid solution, since lumps that are difficult to break are obtained.
After mixing, wait about 1 minute and use the mixer again. Sometimes colored pigments are added directly to the finished solution or paint is applied to the finished layer.
Applying plaster to the wall
After careful preparation of the wall and preparation of the solution, do-it-yourself decorative plaster is made, the video of the process can be viewed below. The ready-made starting composition is taken on a spatula and applied to the wall. Experienced craftsmen work with a large tool (60–80 cm), it is more convenient for them to smooth the surface. For those who do the work with their own hands for the first time, it is recommended to start with a 45 cm long spatula and additionally use a cover spatula, which is 6–8 cm wide. They remove the excess solution from the handle of a large spatula and transfer the mass closer to the edge of the working surface.
The thickness of the mortar layer on the wall is adjusted during application, trying not to impose too much, but also not shaving off so that surface defects will be visible. The work consists in applying the entire mass at a time, since you need to have time to apply the drawing before the solution completely solidifies. During the plastering, a mesh is applied, if it is in pieces, then it is glued with overlaps.
The method of obtaining a decorative pattern by rubbing
 Take an ordinary trowel and rub the surface until the solution on the wall has completely seized.. There are certain technologies for drawing a picture:
- The rain is obtained after rubbing the area with a plastic trowel with vertical movements (up and down), sometimes the direction of the rain threads is made oblique, for this movement is changed to inclined. To keep the threads of the rain straight, markings are used using thin masking tape.
- The decorative pattern of the lamb is obtained after rubbing the base with short circular movements, which will lead to a pattern resembling curls of lamb hair.
- There is also a technology of movements, which will result in a carpet pattern. To do this, select a small area and move the trowel first with vertical movements, then they are replaced by a horizontal direction.
If you cannot make the entire wall at one time, then the drawing is not done until the very border of the material applied today. After the plaster is done, the edges are joined on the next area, only after that the selected pattern is applied.
Application of the coloring layer
Before painting, the surface is sanded to smooth out too sharp transitions and defects; this is done after the solution has dried - about a day later. Sometimes thick layers do not dry out and look like dark spots, you need to wait until it is completely dry. For acceleration, you can turn on the heat fans, directing the jet to the problem area. After sanding, before the paint, the walls are treated with a layer of soil.
Usually the first layer of paint is made darker, the second is applied lighter, but after the first has completely dried. They paint with a dark color, carefully filling in all the cavities and irregularities, using a brush for this. And the second is placed so that only convex elements fall into the work area, and the depressions are not affected.
Textured plaster device
Such dry mixes in bags or ready-made solutions in buckets are purchased in hardware stores. The mixtures dry more slowly, so you can prepare the mortar in a much larger container and treat the wall surface in one go.
Finishing
Aligning the walls is done with coarse-grained mixtures intended for large thicknesses, and the textured mixture is applied already on a flat surface with a layer of about 3 mm. The material is applied with a spatula. After applying the mass, without waiting for it to set, a textured layer is applied using various devices.
Variants
For this, the following tools and devices are used:
- rollers;
- stencils for stamping;
- spatulas and trowels;
- crumpled rags.
 Each method requires a bit of training, so it's best to try covering the surface somewhere in an inconspicuous place. It is convenient to work with a roller, since with the help of its textured sides, you can apply a small and large pattern. The difficulty lies in wait for the master, who decided to make such a texture with his own hands, in the fact that when the roller moves the structured putty is pulled together in a thin layer in the direction of travel - at the end of the work, an unexpected thick layer is obtained material.
To avoid such a nuisance, the wall, before applying the textured mass, is divided into stripes or squares using masking tape 3 to 5 centimeters wide. The plaster is applied in the space between the belts, then it is processed with a roller, while the excess mass ends up on the belt. The strips are removed, after the total area has dried, the depressions are filled and again passed with a roller. Sometimes even squares, rhombuses or stripes look advantageous even without filling, creating a kind of decorative composition.
It is more convenient to work with stamps: they are imprinted into the soft surface of the layer at a selected frequency, while the indentation depth is observed. Ready-made stamps can be bought in a store or made with your own hands, embodying a previously thought-up idea. After the material has dried with a spatula and trowel, remove unsuccessful and protruding elements, and then prime the surface before painting.
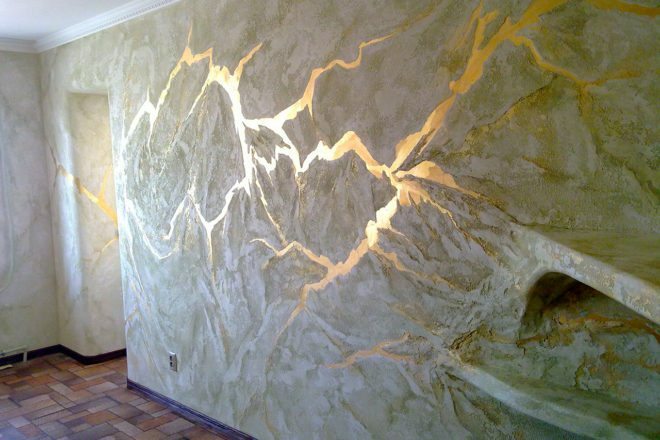
You can use various materials at hand for texture, for example, wind an old rag on a roller and make passes over the area. It turns out a kind of pattern that imitates the surface of marble veins, only convex. Do not forget to clean the roller from the accumulated putty after a short pass, change the rag.
Coloring of the surface with the applied textured pattern is done after the layer has dried, the correction of unsuccessful bulges, the obligatory primer. The entire surface is painted in one color, irregularities give a shadow, the texture is emphasized in a favorable color. Sometimes a two-tone color is used according to the principle of dark depressions and surface tinting of convex elements. Layers are applied at intervals necessary to dry the previous one.
How curly art plaster is made
To complete such a drawing, you need to evaluate the chosen design of the room and decide on the placement of the artistic drawing. Some types of interior design do not provide for the insertion of stucco molding (which, in fact, is artistic plastering). But artistic drawings on the walls will decorate any room in the classical style, baroque, rococo and other interiors.
The solution is applied to the surface of the wall or ceiling in several ways:
- through a stencil;
- construction tools;
- using your hands.
Stencil application
 If a performer of artistic plaster with his own hands cannot independently apply a drawing on the wall, then use stencils made of plywood, hardboard, chipboard, MDF, OSB and other remnants of building materials that have thickness. A pattern or repeating elements are cut out in the plane of the material, which will then be applied to the area of the wall.
The stencil is neatly attached to the surface. If the thickness of the sheet is small, then you can use scotch tape, but more often after applying the putty, the device begins to shift under the weight and spoil the picture. It is recommended to use a fixing adhesive. The putty is applied in an even layer inside the pattern, trying not to overlay excess material on the stencil body.
The thicker the stencil, the more the pattern will protrude above the wall surface. The device is removed carefully without damaging the edges of the pattern. If this happens, then using a soft putty, you can correct the drawing with a thin spatula, fingers or a brush. The painting is painted according to the intended palette, including the imagination of the master.
Application with construction tools
This option provides for massive application and shaping of the image using spatulas, trowels or trowels. The artistic image is made with your own hands and decorated in accordance with the chosen design solution of the entire interior.
How to cover with your hands
 Stucco molding requires an entry-level skill from the performer. The putty is applied to the wall using the hands, then any shape is formed from it right on the square. Often, corners in a room are decorated with decorative branches, curly leaves, and window and door slopes are also decorated. In the nursery, on the walls and ceiling, you can depict your favorite heroes of fairy tales and cartoons, make a flower wall.
Drawings are made on a smooth background or placed on plaster. Sometimes, to complete the composition, the drawing is framed with an artistic frame made of finished foam frieze, then a real picture on the wall, made by hand, is obtained.
Do-it-yourself home repairs are always the pride of the owner and his household, and the creative process itself sets a person up for good deeds and accomplishments. Decorative, textured and artistic plaster will unite loved ones even more and will become the basis of coziness and comfort in the house.
Video: how to make decorative plaster from putty with your bunches
average rating 0 / 5. Number of ratings: 0
No ratings yet. Be the first to rate.


