A garage is not just a building where you store your own car. It has several functions - a small workshop and a small warehouse. If you build a basement under the garage, then the functionality of the room increases several times.
But for all the functions to work, you need to deal with the arrangement of the premises. For example, install shelves in the garage that will be used as storage spaces. And the more shelves, the more you can fit on them.
The content of the article:
- What design should be
- Shelves and shelving options
-
Instructions for self-manufacturing shelves
- What you need
- Step-by-step instruction
- Useful tips for planning your garage space
- Photo layout options for shelves in the garage
What design should be
There are several requirements for shelves and racks for instrument, accessories and other things. They must be strictly observed:
- Shelves or racks should match the dimensions of the garage. Their presence should fulfill one task - to arrange the space so that tools and things do not interfere with the parking of the car, so that a person can find them at any time. The dimensions of the shelves for the garage should be such that they themselves do not interfere. If there are not so many tools, canisters, cans and others, then a few shelves solve the problem. If there are a lot of them, then you can’t do without a rack.
- Shelves must be reliable and stable. Therefore, it is necessary first of all to decide what will be stored on them. For example, if these are small tools, fasteners and other small things, then you can get by with wall shelves. If you need to store tires, filled canisters, overall and heavy objects in the garage, then you need to build a large rack in the garage (aka a floor shelf). The larger the design, the more it will cost.
- Safe operation. The garage is an object of increased fire hazard. Therefore, the best material for building shelves is metal. Wood is also suitable, but it will have to be treated with fire retardant compounds. Shelf surfaces must be non-slip. A collar on the outer edge will increase safety. The design should not have sharp protruding elements so as not to get injured about them.
- Ease of use. The number of shelves and racks, their dimensions, location must satisfy the owner of the garage. But for this, you first need to decide what materials, tools, etc. will be stored on the shelves. After that, you can draw up a diagram.
First of all, you need to decide on the size of the shelves and their locations. Therefore, it is recommended to draw up a drawing of the garage, where to try to find a convenient place for their installation, taking into account the area occupied by the car.

Shelves and shelving options
Today, industrial furniture manufacturers offer many different designs, shapes and sizes of racks and shelves for the garage.
Classification:
- Stationary floor shelves in the form of a bookcase. This design is called a rack. This is the most reliable option, because it is attached to the walls and the floor, sometimes even to the ceiling. Such a model cannot fall over, which ensures the safety of use. Often, a large number of attachment points are made on the racks of the structure, which allows you to rearrange the shelves, increase or decrease their number. The bearing capacity of such objects is high. You can store heavy items on them. Usually they are made of metal, but the shelf can be wooden.
- Collapsible shelves. This is a bookcase that you can assemble and disassemble with your own hands - the connection points of the elements are so simple. Typically, shelves of this type are small in size, their bearing capacity is low, and their strength is also not up to par. Used for small items. Made from metal profile.
- Mobile shelves. Wheels or rollers are attached to the lower ends of the support racks, making it easy to move the rack. On the one hand, it is convenient, for example, to bring a whole arsenal of tools to the place of car repair. On the other hand, the model has low stability.
- Rotating. Such shelves have recently appeared in Russian stores. Usually small things are stored in them. They are not designed for large and heavy items. Rotation provides accessibility to everything that lies on the shelves. If the garage is used as a workshop, then this option is very convenient. Manufacturers offer floor and desktop models.
- Island. This is a subtype of mobile shelving that can stand with or without wheels. It is small in size, lightweight, it has 2-4 shelves. The bearing capacity is weak, but for hardware, small tools, including electrical ones, a good option.
- Modular. The design consists of several modules that are joined to each other. You can build shelves indefinitely.
In addition to everything indicated, manufacturers offer hanging shelves and drawers, roof rails, gratings and other products in which you can store tools, inventory, fasteners and oversized items. They can be straight or angled, you can hang shelves on the walls or on the ceiling. Here is the maximum indicator of convenience.

Instructions for self-manufacturing shelves
The complexity of manufacturing depends on what material the self-made shelf in the garage will be built from. If this is a metal profile, then the work foreman must have the skills to work with an electric welding machine, power tools and other equipment. All of these units must be available.
If the shelf is made of wood, then the process is simplified, because welding and other complex technologies do not need to be used to connect the parts. Everything is fastened with screws. Therefore, further there will be a conversation about how to make shelves from lumber in the garage with your own hands.
This will be the cheapest design, which is inferior to metal counterparts in terms of operational safety. But in order to increase this criterion, it is necessary to treat wooden elements with antiseptics and fire retardants - in this sequence. After the rack is painted or varnished.
What you need
To build a floor shelf in the garage you will need:
- timber with a section of 50x50 mm;
- boards 20-35 mm thick, 100-200 mm wide;
- metal fastening corners;
- wood screws;
- sandpaper;
- protective impregnations;
- paint or varnish.
But in order to determine the amount of materials required, you need to know exactly the dimensions of the garage shelf. The height should be equal to the height of the garage. This makes it possible to place more shelves on the same area.
Depth requires balance. Because deep shelves take up a lot of space, but on the other hand they are more spacious. Therefore, everyone has their own thoughts in this regard, hence the wide size fork - 30-80 cm. But if the shelf is intended for overall items, then the maximum size is taken, and vice versa.
Given that a bar of 50x50 mm is chosen for the racks, the length of the shelf should not exceed 1 m. For example, if the length of the garage is 4 m, then 2 options can be used:
- Make 4 shelves 1 m long and connect them together.
- Use a beam of a larger section not only on the racks, but also on the frame of the shelves. This will increase the cost of construction.
The next dimensional parameter is the distance between horizontally laid shelves. There is no standard here, it can be any size. As a recommendation - 30-50 cm.
What you need from the tools:
- saw on wood;
- screwdriver;
- pencil and tape measure;
- metal ruler;
- building corner;
- paint brush;
- paint bath.
Step-by-step instruction
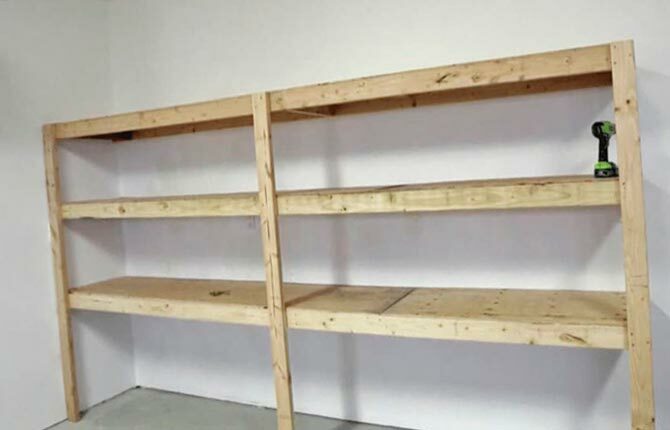
Initially, you need to make a bookcase, for example, 1 m long, 50 cm deep and 2.5 m high. And you need as many such racks as will fit in the length of the garage. First of all, following the instructions, it is necessary to cut the racks and frame elements.
The height of 4 racks is 2.5 m each. They must be cut from a prepared timber 50x50 mm. Parts of the frame structure are cut from the same material, on which the boards that form the shelves will be laid. Therefore, you need to determine the distance between the latter. For example, the same 50 cm. This means that 4 frames are required, the lower of which is installed at a height of 50 cm from the floor.
The elements of the frame structure are 2 bars 1 m long, equal to the length of the rack, and 2 bars 50 cm long, equal to its depth. Since there are 4 frames, it means that you need to cut 8 elements of 1 m each - this is 8 m, and 8 of 50 cm each - this is 4 m. Plus the length of the racks - there are 4 of them of 2.5 m, that is, 10 m. In total, you need 22 m .
Depending on the length of one rail, you can count their number. For example, if the length of one bar is 4 m, then: 22: 4 \u003d 5.5 pcs. Have to buy 6 pcs.
First of all, you need to make frames for the shelves themselves. This is a rectangular structure of 4 parts: 2 beams 1 m long, 2 x 50 cm. They must be laid out on a flat surface: floor, workbench, table, accurately reproducing a rectangle. Here you can use the building corner to align the right angles between the joined elements.
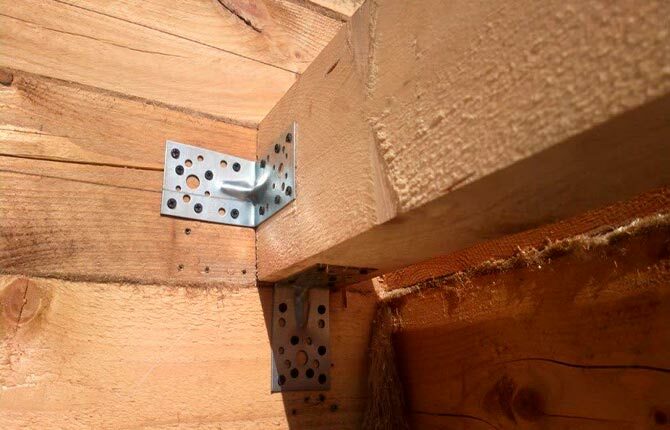
All bars are interconnected with steel fastening corners on self-tapping screws. For example, like in the picture below.
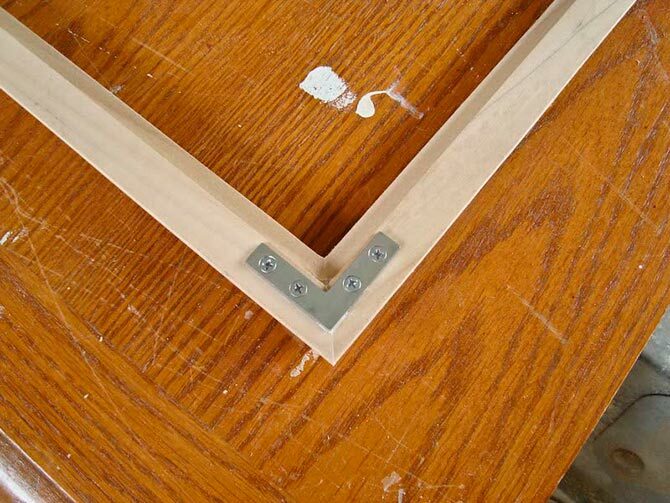
There are other types of corners. They are also reliable fasteners. But for their use, the edges of the bars must be cut at 45º in order to join at a right angle. In this case, the corner is laid along the end surface of the two joined elements. You can see it in the photo below.
You can do without corners. Simply fastening is carried out with long self-tapping screws (at least 80 mm), which are screwed into the ends of the joined bars. Each end has 2 screws.
The racks are cut to the required height of the future shelf, the frames for the horizontal stands are also ready. It remains only to assemble them into a single structure.
It is necessary to lay 2 racks in parallel on a flat surface. Mark them at one end with a pencil at a distance of 50 cm. Attach one finished frame to them and fasten them together with the same steel mounting corners. It is better to install fasteners under the frame structure, so that the corners themselves additionally perform the functions of a supporting shelf.
In the same way, every 50 cm, the remaining 3 structures under the shelves are installed and attached to the support posts. It remains to attach the remaining 2 racks to the semi-finished whatnot. They can be laid directly on top of the structure lying on the floor and attached to the frames with corners on self-tapping screws. You can do the opposite: put a semi-finished rack on the supports laid parallel to each other, turn it over 180⁰.
The multi-level garage shelf is ready. It must be treated with an antiseptic composition that will protect the tree from mold. When the impregnation dries, a flame retardant composition is applied. It also needs to dry out. Further, the entire structure is covered with paint or varnish.
This is how all whatnots are made, which are connected to each other either with self-tapping screws directly, or with perforated inserts in the form of a piece of tape. Fastening the latter is also on self-tapping screws.
There is another option that will help assemble a shelf in a stationary garage. It will be firmly attached to the inside wall of the garage. This will require a board with a section of 30x100 mm. It is attached to the wall horizontally at levels every half a meter. For example, it will be 3-4 boards the entire length of the garage wall.
Next, assemble a structure consisting of the same boards, laid every 50 cm on racks from the same board. The distance between the supports is 1-1.5 m. It turns out a lattice with cells of 50x100 cm. It must be placed vertically at a distance from the wall equal to the depth of the garage rack.
Next, connect with boards attached to the wall with crossbars made of the same material with a section of 30x100 mm. Crossbars are installed at each rack along its entire height at the level of horizontal elements. Fastening is the same - steel corners on self-tapping screws.
This is an economical option because there are no racks against the wall. But at the same time, this type of rack cannot be moved without disassembling it completely.
The last stage in the construction of garage shelves is the installation of flooring. Here you can use boards, plywood, OSB or chipboard, sheet metal, corrugated board and even plastic panels. Any flat material will work here.
You can use a metal mesh. You just need to choose based on the load that a particular material can withstand. At the same time, the flooring itself can be fixed to the frame or laid without fasteners. If boards or panels are selected, then it is better to fix.
Useful tips for planning your garage space
Where to put the shelf, how to distribute inventory and tools on it - there are many questions. Therefore, a few recommendations:
- The best place for shelving is a long wall in the garage.
- If the owner of the garage often uses some tools or other things, they should be placed on shelves located in a convenient place.
- It is better not to store containers filled with liquid substances at the upper levels. May fall, spill, damage the vehicle or injure a person.
- If there are a lot of hand tools in the garage, then it is best to allocate one large zone for it. They can either be laid out in positions, or holes can be made in the bottom where these tools are inserted.
- Car tires are best stored on the floor. To do this, the flooring is removed on the lower stand.
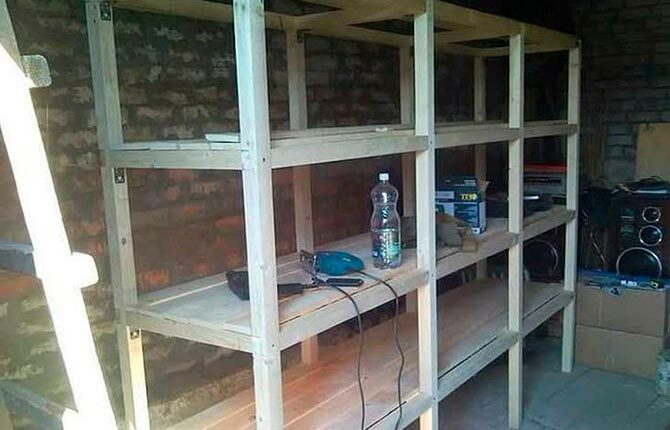
Photo layout options for shelves in the garage
You can arrange shelving in the garage in different ways. The main thing is that the whole space should be convenient to use. Here are some interesting options.
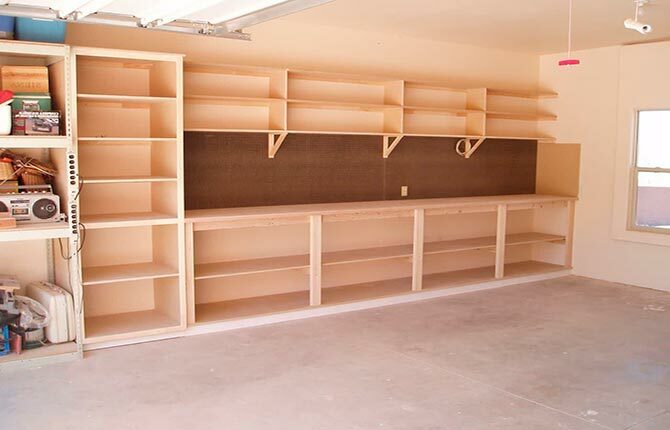
A very convenient option in terms of forming several zones along the wall at once. There is also a workbench, shelves above and below it. A wide pencil case, which will include almost the entire arsenal of tools. Plus - a large open cabinet for a home scrub, which did not fit in a house or apartment.
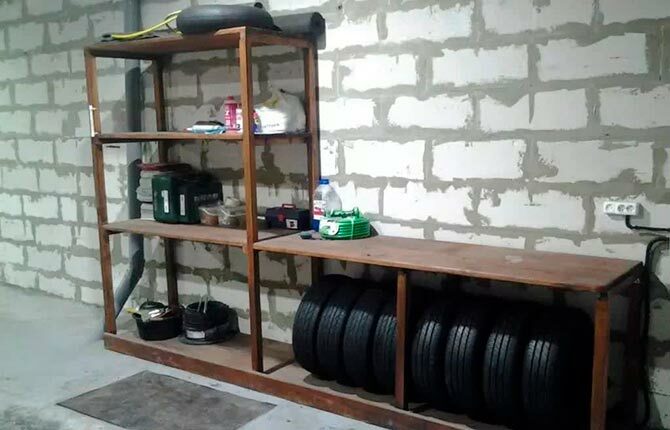
Another option with a workbench, but small. Made from profiled pipe by welding. A storage system for tires, tools and fuels and lubricants has been thought out. Everything is compact, convenient and reliable.
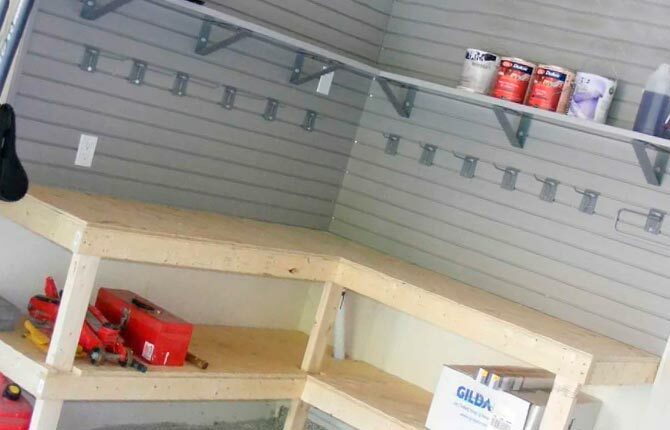
Corner option for the garage, where the wooden workbench is equipped with lower niches. Which is convenient. Attached to the top of the wall is an open corner shelf, a simple structure made of decking, metal brackets, and lots of hooks to accommodate tools. The option is inexpensive, also compact, but functional.
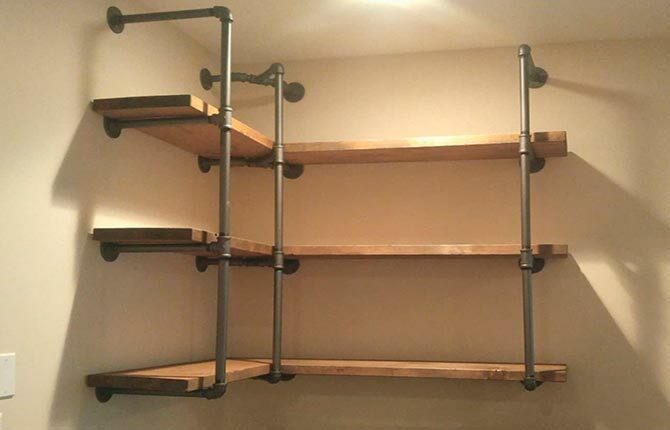
Another corner type is a hanging model made of boards and pipes. These pipes are called furniture. They have a thin wall, but the bearing capacity is surprising. They sell the same fittings (bends, tees, etc.). Any design can be assembled from pipes to fit the size and shape of the garage. They can be wall, floor, corner and others. Convenient for self-manufacturing material.
Surely one of the readers himself made shelving in the garage. Share your experience in the comments - from what you collected, what form you chose, what difficulties you had to face.