Floor mirrors have been known since ancient times. The technology of their manufacture is constantly improving. At the same time, the fashion for the shape and material of the frame is rapidly changing. For those who cannot find a floor mirror for the interior, a simple solution will help - make it yourself. It is desirable to think over the shape, texture and dimensions of the product in advance. At the same stage, the material is selected.
The content of the article:
- List of tools and materials
- Step-by-step instructions for creating a floor mirror
- What mistakes should be avoided
- Original floor mirror ideas
List of tools and materials
There are several ways to make your own floor mirror in a room or corridor. The fastest way is to buy a finished frame to fit the dimensions of the existing mirror sheet. Then it remains to “correct” (shape, decorate with decor, etc.).
Or create a floor mirror from scratch. This approach is longer. But the result will be an individual design floor mirror frame that fits into the overall style of the room and meets the requirements of the customer / craftsman.
To work, you need to choose a base. Experts suggest using materials:
- The frame for the floor mirror made of metal organically fits into the interior, designed in the style of hi-tech, futurism or minimalism with the inherent gray-white colors.
- Sturdy plastic for the floor frame.
- Wood is a classic. Emphasizes the atmosphere of comfort in the room, is not afraid of moderate physical impact, can be easily repaired. Pine is the type of wood that suits those who want to give their floor frame an unusual shape due to its natural softness and pliability. Oak is resistant to mechanical damage. Suitable for families with children or active pets.
- Plywood of sufficient thickness - "cheap and cheerful", convenient in work, decoration.
- Thick wire. It will help to recreate openwork patterns, imitate knitted items (for example, if a floor mirror is made in a knitwear boutique or in a craftswoman's office).
Wood is considered an easy material to work with. To work with a wooden floor frame, you need to prepare the tools:
- Carpenter's square, tape measure / ruler and pencil - will be needed to mark the details on the material web.
- Drill for wood - size 8 mm.
- Milling cutter, straight groove cutter 8 mm.
- Saw face type.
- Grinding machine. It is recommended to use grain 100-180.
- Clamps. The width of the clamp is at least 80 cm.
- Screwdriver with screws.
- Self-tapping screws of different lengths.
- Various fasteners: hooks, loops, hooks.
It is assumed that the floor mirror is held horizontally by the stand. At the same time, it is recommended to have a spare mounting option in case of breakage of the retaining structure.
Additionally, you will need to choose:
- a mirror (the dimensions are chosen by the customer or the master, the classic option would be a mirror sheet 160 cm high and 50 cm wide);
- timber (the base of the floor frame can be made of pine, oak, etc. types of wood);
- 8 pcs. furniture dowel size 8x20 mm;
- glue (together with self-tapping screws, enhances the quality of fastening parts together);
- Chipboard/Fibreboard/Plywood for the backing that holds the floor mirror rectangle in the frame.
Having chosen the necessary materials, having prepared the tools, you can begin to manufacture.
Step-by-step instructions for creating a floor mirror
Quality work does not tolerate haste, great liberties. Masters recommend using a ready-made algorithm that explains step by step how to make a floor mirror with your own hands.
Stages of work:
- Prepare the mirror. If necessary, reduce it with a glass cutter, aligning the sides, removing excess. They give the intended shape, if it is intended to manufacture a figured product.
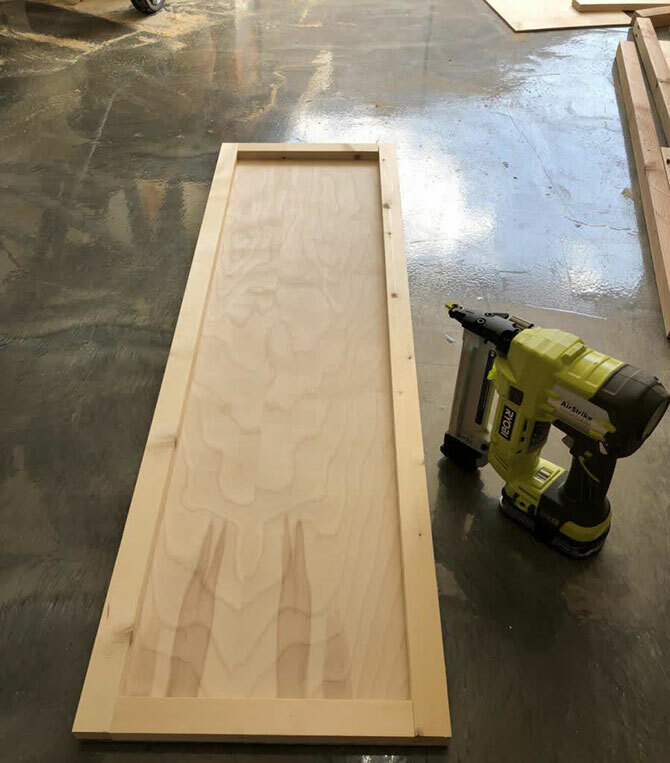
- Pre-selected bars must be aligned in length, width, thickness, sanded. If desired, you can leave the existing flaws in the wood as a "highlight" (a small hollow, a beautiful branch, etc.). On one side of the prepared bars, cut down a piece of wood, forming an angle of 45˚. Due to this, they will fit closer to each other. Notches are formed on the inside for subsequent installation, mounting of a floor mirror.
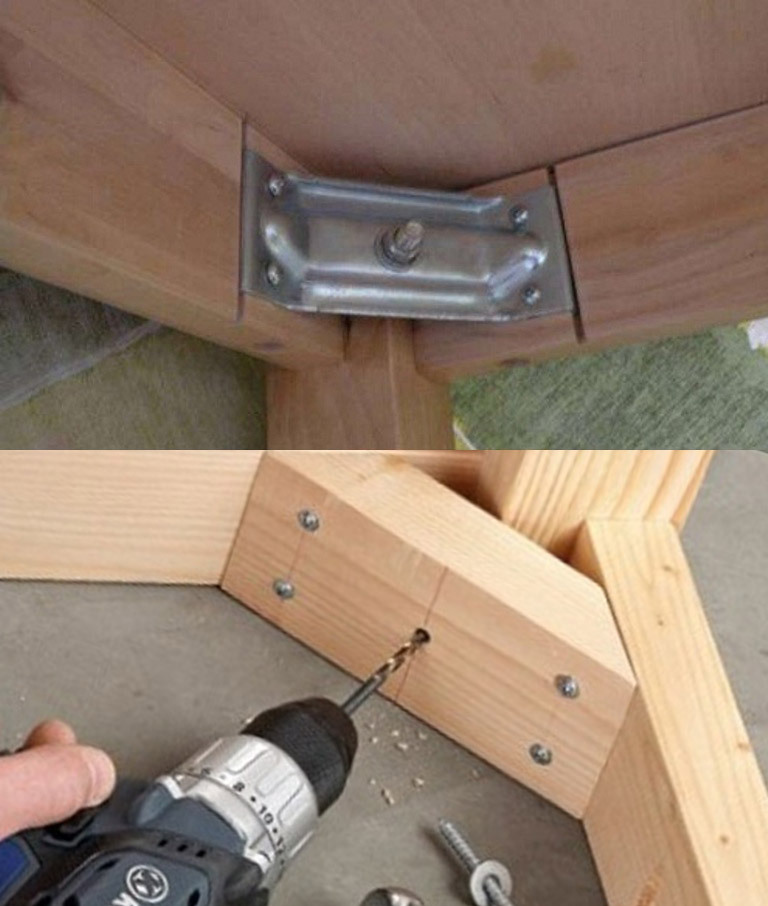
- Using self-tapping screws, glue to fix the bars. The assembled floor frame forms a rectangle of the desired length and width. Seams are recommended to be sanded, increasing operational safety. Masters advise to strengthen the floor structure with metal corners, "putting" them on the screws. Such an addition will prevent the wooden rectangle from warping after prolonged use, temperature changes, and humidity.
- A backdrop for a mirror sheet is made from a sheet of plywood. You can also make floor shelves from it, placing them below, or above, on the sides of the frame.
- The frame made earlier is laid down "face". A mirror sheet is inserted into the sawn recesses, covered with a plywood sheet on top, and fixed. Mountings that are too thin will not be able to support the weight of the floor mirror along with plywood. For fasteners, a thin wooden plinth or metal brackets are suitable.
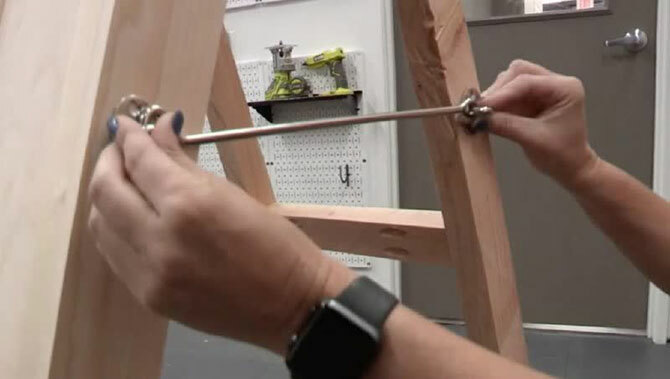
- Formation of the "leg"-stop. You will need to create another frame from bars of smaller thickness. The length and width of the future stand can be varied as desired. To improve stability, metal beams, rods or hooks are used to prevent the main part of the floor mirror, the support from closing or moving apart.
A wooden mirror with a stand needs to be sanded and strengthened. If desired, it can be covered with stain, then varnish for tinting, emphasizing the structure of the tree. Or the frame is covered with paint of the desired shade. Mirror with lights it is better to paint in black or white, and it is preferable to paint the product for a nursery in a bright tone.
A step-by-step master class will help you prepare step by step, work on creating a floor mirror on a stand, preventing mistakes.
What mistakes should be avoided
When creating a large floor mirror for the first time, you can make a number of mistakes. They can be avoided by paying attention to the little things, using the wizard's algorithms.
Among the mistakes of working on the frame, there are frequent ones:
- Variety of material: bars of different thicknesses, a combination according to the characteristics of wood, the use of different structures (wood + plastic, plastic + metal, etc.).
- Floor mirror stand made of thin skirting boards.
- Lack of strengthening between the rack, the main frame, which reduces the degree of stability and safety of using the product.
- Poor quality fasteners/recycled material.
Paying attention to details, slowly adjusting the seams, you can make a product in a single copy. No one else will have this.
Original floor mirror ideas
Making your own at home requires perseverance and care. For those who cannot develop an original idea from scratch, you can start from popular creative options:
- Unusual shape. The classic rectangular frame can be replaced with a figured one. For a children's room, suitable forms of animals from small (raccoon, cat, dog) to large (elephant, hippopotamus, etc.). In the bedroom of a teenager or an adult, you can make a frame of a triangular, round or oval shape.
- Decorate with wooden elements.
- For an illuminated mirror, built-in white light bulbs are perfect for makeup lovers when high-quality lighting is required. In the children's room, it is advisable to install colored light bulbs or an LED strip with a changing glow color around the perimeter.
- You can improve the functionality and make the design more attractive and interesting due to additional shelves on which cosmetics will be placed.
- Decorate the children's room with a design in the form of a cartoon character beloved by the child. To imitate the figure of Winnie the Pooh, it is necessary to make a mirror in a large round frame, in the upper part of which are the "ears" of a fabulous bear.
- Vintage. The accent of frames in vintage style is a pattern, more often a floral one.
- window simulation. The shape of the frame depends on the wishes of the master or the customer. A feature of the window mirror is thin wooden lintels. It can be decorated with a shelf in the lower part, imitating a window sill, or with fabric curtains.
- For a dreamy personality, you can install a cloud-shaped floor mirror by decorating the frame with cotton wool, creating a cloudy relief.
- With a mirror made of wood, you can show your imagination and make a frame from a single piece of wood, boards or thin branches intertwined with each other. The use of rods will give the structure a delicate openwork lightness.
An unusual frame will become a functional solution that fits into the interior, if you use the right decor.
Mirrors have a practical and aesthetic function, which makes them an indispensable accessory in a house, apartment or workshop. The photo-idea will become the basis of an individual project. Detailed instructions will bring it to life.
And how did you decorate the mirror when you made it yourself? Share the link on social networks and bookmark the article.