Difficulty transferring a child to the crib, which is not in the parent's bedroom. The problem is solved in different ways. One way is to build a sleeping structure called a house bed. You can buy ready-made, or you can make it yourself, for example, from lumber. And it's much cheaper than the store-bought version.
The content of the article:
- Drawings and implementations
-
Step by step instructions for creating
- What tools and materials will be needed
- Timber cutting and frame assembly
- Bunk model
- Bed-house with a loft
-
We decorate the bed-house
- For boys
- For girls
Drawings and implementations
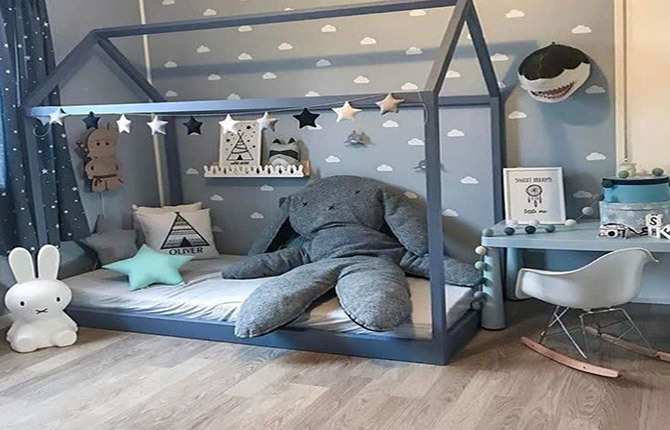
If we talk about diversity, then it is huge. Here you need fantasy and the ability to turn it into reality. The simplest example is a bed-house in the truest sense of the word. This is a frame structure that designates a house with contours. There are walls and a roof. The frame is the base, everything else revolves around it.
For example, you can build storage spaces in the form of retractable drawers under the sunbed. You can make a floor version - it's good for kids. The chances of him falling out of bed are reduced to zero. You can build a two-story structure with two beds. The same two-story building, only the first floor is outdoor, used as a playroom, the second is for sleeping.
There is a different model. This is an ordinary crib, attached to the wall. On the last of the rails, the contours of the roof of the house with a pipe, an entrance to the attic and other attributes are being built. There is no limit to the flight of fantasy, which means that there is no limit to the forms and design features of the bed-house.
But there is a size limit, because this bed is still for children. Therefore, 3 sizes are offered, which can be taken as a basis for making a do-it-yourself children's bed-house:
- 160x70 cm.
- 160x80 cm.
- 190x80 cm.
The first two are for kids, the last one is for teenagers. If the bed-house will be used for a long time, then it is better to choose the third position. The child will grow over the years, while changing the sleeping place will not be necessary for a long time.
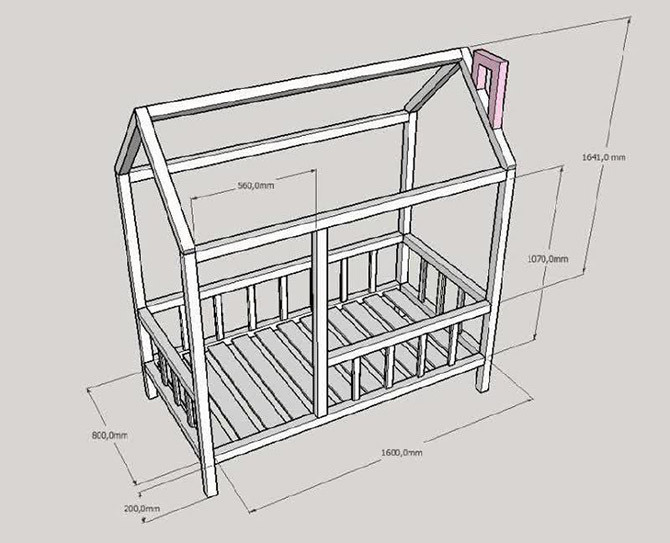
Now about the drawings and diagrams. First you need choose the shape of the bed. For example, will boxes be installed in it or will it be a two-story structure. The easiest option is a one-story no-frills bed-house. Let it not even be outdoor. That is, the sunbed will be raised above the floor for some small distance.
On a blank sheet of paper, you need to draw a bed-house, or rather, its diagram with dimensions. For example, as shown in the photo below. It can be taken as the basis for manufacturing.
Step by step instructions for creating
The whole process of creating a bed-house is divided into 3 stages:
- preparatory;
- assembly;
- finishing.
It is necessary to start building a bed in the form of a house with the preparation of materials and tools.
What tools and materials will be needed
From the materials you need to prepare:
- bar with a section of 50x50 mm;
- self-tapping screws;
- wood glue;
- steel perforated corners;
- antiseptic composition;
- paint or varnish.
From tools:
- wood saw;
- sandpaper;
- screwdriver;
- tape measure with a pencil;
- square;
- hammer;
- drill with a drill;
- miter box.
Lumber is needed of the highest, in extreme cases, the first grade - without knots, cracks and rot. A bed-house with a roof is still being built for children, so it’s better not to save here. At this stage, it is recommended to grind the purchased lumber. When the bed-house is ready, it will not be easy to do. Plus - wood dust in the house, which will also be difficult to remove.
Timber cutting and frame assembly
The drawing clearly indicates the dimensions that must be transferred to the prepared wooden beam. What is a tape measure and a simple pencil used for? According to the dimensions applied with a hacksaw, the bars are cut and numbered in accordance with the numbers on the drawing diagram.
In the drawing, each element of the bed-house must be numbered. During the assembly process, it will not be difficult to find the desired element among a large number of bars of different lengths.
Basically, the cut will be straight, but the roof slopes of the house are joined at an angle. Usually it is 45º, but there are no strict restrictions. The larger the angle, the lower the roof, and vice versa.
When cutting at an angle, a miter box is used - this is a carpentry tool in which grooves for a hacksaw are cut, located at different angles relative to the longitudinal axis of the device. If pruning is carried out at an angle of 45º, then you can do without a miter box by using a construction square.
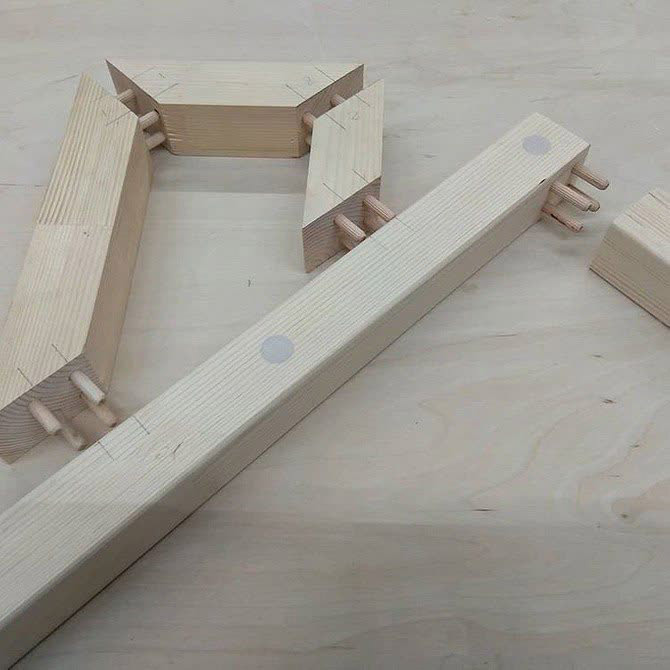
Now you can assemble the frame of the bed-house. Here it is important to decide on fasteners - these will be self-tapping screws and glue, or the last one with dowels. The first method is easier because there are no preparatory operations. The frame elements are joined according to the scheme, where the docking planes are coated with adhesive. After that, self-tapping screws are used - at least 2 for each joint. They can be screwed in directly or at an angle. The second method is better.
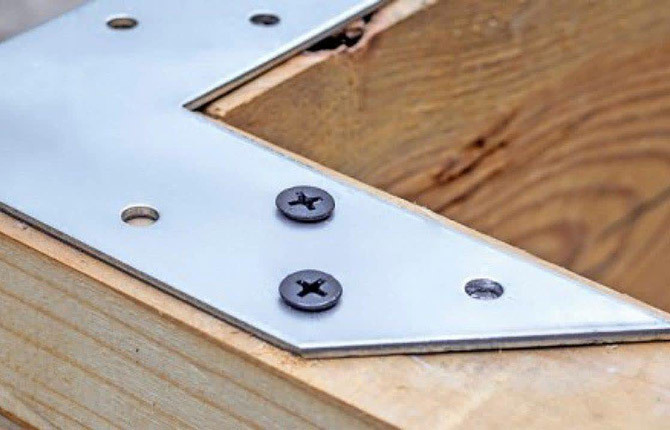
To strengthen the design of the bed-house, the joints are supplemented with metal corners and stripes. They are simply applied to the joint and attached to the frame elements with self-tapping screws of small length - no more than 35 mm. It turns out that the connection of 2 bars is made by three fasteners: glue, self-tapping screws and steel perforated elements. It's safe.
The second method of fastening is on dowels. These are small round sections of wooden blocks. Under them, in the joined planes, holes are drilled with a depth equal to half the length of the dowel.
The process of connecting 2 wooden bars is as follows:
- In one element of the frame of the bed-house, a hole was drilled for the dowel.
- Pour adhesive into hole.
- The dowel itself was inserted there until it stops, if required, a hammer is used.
- Holes are also drilled in the second joined element, where the glue is poured.
- The second element is attached to the first so that their planes are tightly pressed against each other, and the dowel enters the hole of the second.
- The connection is fastened with a clamp for a tighter fit of the planes.
- In this state, the bars should be until the adhesive is completely dry, the drying time is indicated on the packaging of the adhesive.
Now, as for the assembly of the bed-house. You need to start with the manufacture of end sidewalls, the outlines of which indicate the house. These are 2 vertical racks that serve as both legs and bases for attaching the rest of the structure.
They are laid on a flat base parallel to each other and fastened with two crossbars: the lower one is the base for the sunbed, the upper one is part of the side railing. The lower one is located at a distance of 20 cm from the floor. Top from bottom - up to half a meter.
The next step in the step-by-step instructions is the formation of the slopes of the roof of the bed-house. They are installed to vertical racks at an angle. Next, the installation of protective elements between the lower and upper crossbars. This is best done at the top installation stage. First, vertical bars are installed that form a fence. They are attached to the bottom crossbar. Then the top one is mounted on them, which is attached both to them and to the side vertical racks. So, the sidewall of the bed-house is ready. Need to collect more exactly the same.
Now they need to be connected to each other with several bars:
- 2 lower at the level of the lower crossbars of the sidewalls;
- 2 upper at the level of the upper ends of the support posts;
- one will perform a ridge beam in the construction of the house.
Another bar is installed at the level of the enclosing structure of the bed-house. But before its installation, as in the case of sidewall fencing, vertical fencing bars are installed, on which a horizontal fastening element is mounted.
It remains only to form the basis for the mattress. For this, boards with a thickness of 20-25 mm and a width of 70-80 mm are used. They are simply laid across the structure and attached to the lower bars of the frame with self-tapping screws.
There is another build option. To do this, the base for the mattress is made separately, which is then attached to the sidewalls in finished form. Or a lattice for the mattress is made separately, the frame of the bed-house is assembled separately. Then the grille simply fits inside - it will be removable. The approach to assembling a bed-house can be different. Here to whom as it is convenient. But the goal is the same - a durable and reliable piece of furniture.
You can add various elements to the design, making it more comfortable. For example, sheathe with boards, clapboard, plywood or furniture boards. This is no longer just a bed-house, it is already a full-fledged house that can be painted or finished.

The bed-house made of wood for the child is ready. It remains only to cover it with an antiseptic composition, which will resist the appearance of colonies of harmful microorganisms on the wood. Next, varnish or wax is applied, preferably in two or three layers. Before applying the next layer, the previous one must dry.
As for storage places, which in the children's room will not be superfluous. They can also be made with your own hands from plywood sheets. Drawers are located under the sunbed, so you need to leave free space under it when making a bed-house. 30-40 centimeters will be enough.
Drawers are best made on wheels. They will be a separate element, not related to the design of the bed. But over time, traces will remain from the wheels on the floor. The sunbed will be higher, but not so much that this height causes big problems.
Bunk model
Making a bunk bed is also easy. In fact, these are two single-tier frames covered with a roof. It’s just that the sidewalls are made higher so that two sun loungers fit on them - one above the other. In this design, not only the height changes, but also the length, because you have to take into account the place for the location of the stairs to the second floor. She can be played in different ways.
One of the options is a side ladder, which is made in the form of a hidden chest of drawers. Its risers are the sides of the drawers that you need to pull to open the drawer. The lower the step, the larger the box.
Bed-house with a loft
This is also a two-tier structure, only the place to sleep is on the second floor. And the bottom area is the play area. For a small apartment, this is an ideal model, because there are two zones at once on one small area.
A bed with an attic is being built in the same way as a bunk bed, it is also a double bed. The only thing missing is the mattress slat at the bottom. Here you can not just play, here you can even organize a place for themed games.
You need to put a small table and a chair, next to it is a bedside table on which pencils, an album, board games and so on are located. Such a play area is small, but for one child, not a teenager, it will be just right.

We decorate the bed-house
The options for designing a bed-house are limitless. The basic model is a structure covered with a colorless varnish, on which lies a mattress, a blanket, a bedspread and a pillow. It's boring.
You can use colorful bedspreads and pillows, but this will only solve the problem for a while. After all, a bed-house is a place of rest where a child not only sleeps, but also learns something. Therefore, it is worth considering several design options with photographs for clarity.
For boys
One of the most popular design themes for boys is nautical. To do this, you need to paint the bed-house in a marine color, hang pictures with a seascape and ships on the wall. Find stencils with starfish and horses, apply them also on the walls or cut them out of paper, color them and hang them on the frame bars.
In the store you can find themed toys on this theme. The same steering wheel is also for sale. They can be arranged and hung, creating a marine interior of the room.
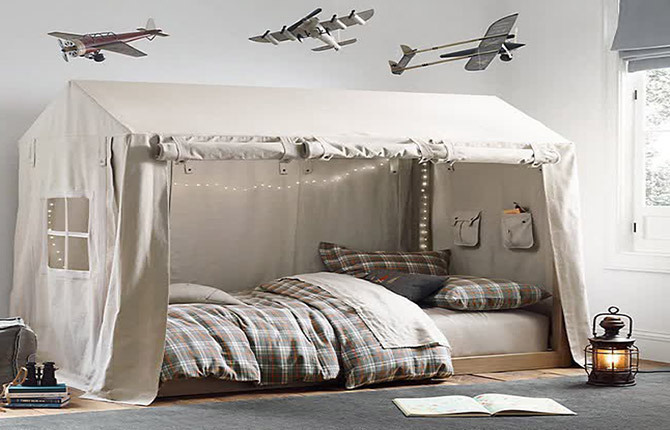
Military themes are also popular. The bed-house can be designed in the form of an army headquarters or a military tent. To do this, you will have to sew or buy a protective greenish tent. You don't need to do anything inside it. But outside you need to come up with a military entourage. For example, hang models of aircraft on the ceiling, install a lamp in the form of a kerosene lamp on the floor, and pictures with military equipment or toy weapons on the walls.
This design is convenient because the fabric tent is removable. You can always take it off and wash it if it gets dirty, and put it back.
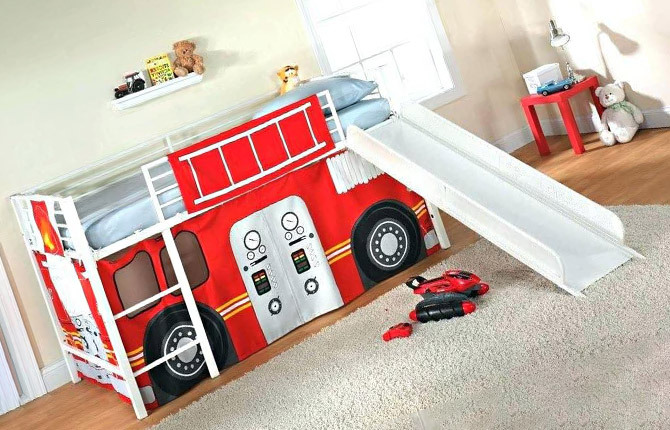
Automotive theme is another popular option. It can be like the car itself or the garage. To convert a bed-house into a car, you need to buy special curtains, as shown in the photo below. They are attached around the perimeter of the frame, and from the outside the bed immediately becomes like a car.
The garage is different. Not everyone may like it, but some boys are ready to do everything to tinker with their father in the garage. A bed-house in this style will make the dream come true.
For girls
A princess is the first thing that comes to mind when thinking about the design of a bed-house for a girl. Delicate tones, thin fabric, flowers, lace and more - all this falls into the design. Even the simplest design can become a princess's sleeping place. Pink and a sheer bed cover are all it takes to transform an ordinary wooden structure and make it her daughter's favorite place.
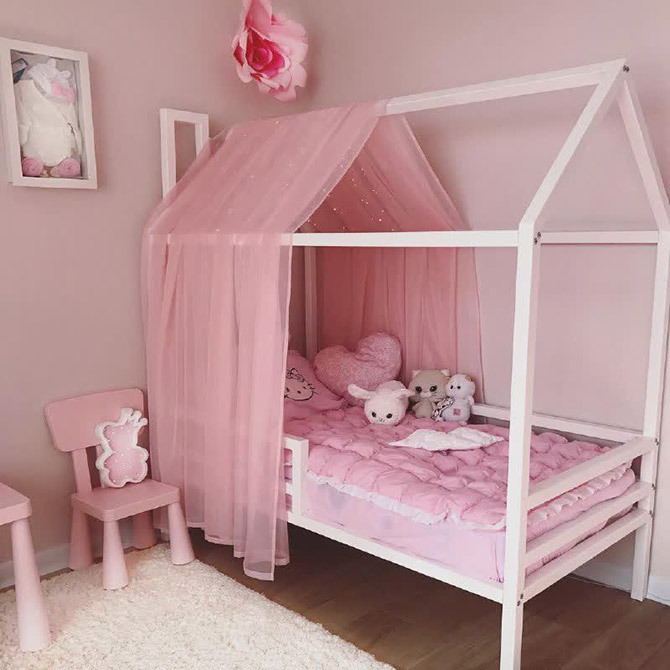
No frills, everything is modest, but spectacular. Lots of air, space and gentle tones.
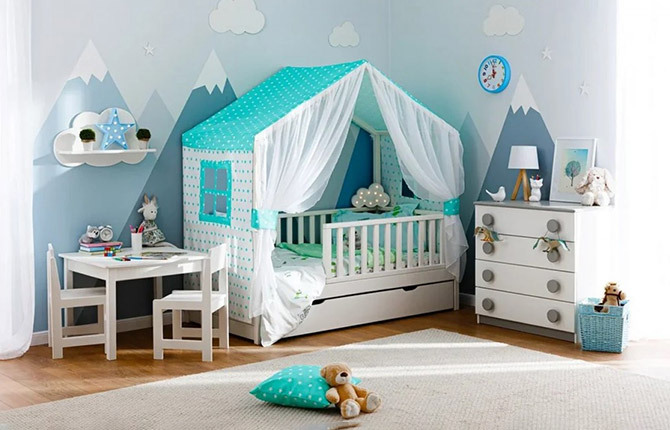
Gently turquoise background also looks unusual. Especially if it is combined with a mountain theme. Mountains painted on the surface of the wall with snow caps emphasize the contours of the bed-house, which is decorated like a tent. Turquoise color sets off white. Both shades create an airy atmosphere. This is complemented by a white transparent tulle that closes the entrance to the tent. Lamps, toys, clocks and paintings - everything accurately emphasizes the mountain theme.
A bed-house in the form of a summer gazebo is another and not the last option. Here you can play with colors, drawings and other design elements. The main thing is to accurately create the illusion of being in the gazebo. For example, in the photo below, the frame is sheathed in fabric with an asterisk pattern. It seems to be nothing unusual, but the gazebo looks original. You can close the curtains and be inside the house already. A kind of transformer.
Before you make a baby bed in the form of a house, you need to imagine the end result. That is, how it will look finally - in paints, drawings and other accessories. Only after that proceed to the implementation of the project.
Of course, after assembly and decoration, you can complement the design of the bed and the interior of the children's room. But it is better to fix for yourself how it will look after finishing.
Dear readers, which of you built a bed-house for your child, or at least tried to do it? Respond in the comments, what did you do, how did the assembly process go, from what, what materials and tools did you use? Everything will be interesting.