It is not uncommon to store a car outdoors. Many masters believe that open storage contributes to a better preservation of the body if there is a private house. Therefore, many avid motorists make a carport even to the country.
The content of the article:
- Choosing the size of the future canopy
- Choosing materials and selecting tools
- We make the foundation
- Laying out the frame
-
How to lay out a platform
- Gravel
- paving slabs
- Concrete
-
Roof types
- Awning
- Polycarbonate
- Decking
- metal tile
-
Carport Installation Instructions
- Preparatory work and measurements
- Installing Machine Canopy Supports
- Strapping and strengthening the frame
- Canopy roofing
- Coating option
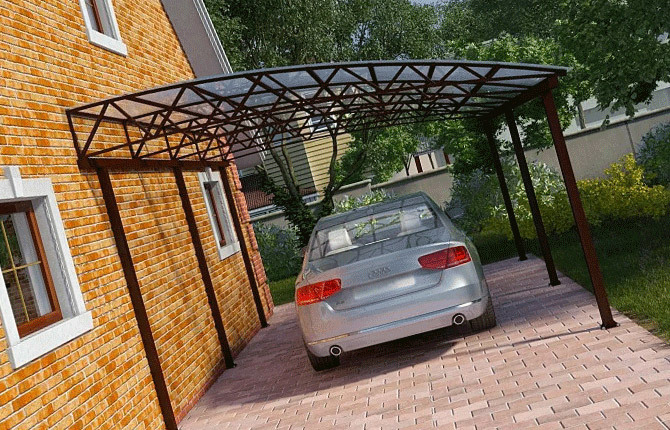
Choosing the size of the future canopy
Usually, the dimensions are planned based on the capabilities of the local area. Therefore, before making a carport, you need to consider all layout options.
There is not much free space for a future carport. Moreover, it is not recommended to do it next to the house - the car will interfere. Therefore, the canopy is made either right outside the entrance gate, or you will have to sacrifice a flower bed, beds.
The optimal dimensions for the construction of a carport for parking:
- For a passenger car - 4x6 m or 4x5.5 m. As a rule, a meter is added to the dimensions of the car from the sides, front and from the side of the trunk.
- For a car with a trailer - 4x8 m, if with a trailer - 12x4 m.
- If a canopy is needed for a bus or a truck, then the size is increased to 4.5x7 m.
The design of the canopy should ensure the free opening of the car doors, while the driver and passengers should not go beyond the hard surface of the site. This must be taken into account if you make a canopy in the form of a visor mounted on the wall of the house.
The height of the canopy is made depending on the type of machine. Under a passenger car, 2.5 m is enough. An air gap of 1-1.2 m should be left between the ceiling and the roof of the car. If the structure is closed at least on both sides by the walls of the house, a gazebo, a summer kitchen, then the roof must be made higher - at least 3.5 m.
Selection for you:
- Gazebo 3 by 3 do it yourself
- How to make a 3 by 4 gazebo with your own hands
- Arbors with their own hands made of wood
- Do-it-yourself brick gazebo
- How to build a comfortable metal gazebo with your own hands
- We build a gazebo from polycarbonate with our own hands
- How to make a gazebo from a profile pipe with your own hands
- We make a gazebo from improvised materials with our own hands
- We build a modern gazebo with a barbecue for a summer residence with our own hands
- How to make a beautiful gazebo from pallets
- Do-it-yourself gazebo with a pitched roof
- DIY hexagonal gazebo
Choosing materials and selecting tools
The canopy is made mainly of profiled pipes of different sections. For vertical supports, a professional pipe with a section from 70x70 mm to 90x90 mm is selected, for a roof frame - 50x50 mm and 50x25 mm.
Racks are often made from a two-inch water pipe, and the frame for the roof can be made in the form of a composite beam of 2 bent arcs, with a section of 20x50 mm.
The crate under the roof is made of wood, usually an inch edged board, or thin profiled pipes 20x40 mm are used. It all depends on the type of roofing.
Of the tools you will need:
- grinder with cutting discs for metal;
- concrete mixer;
- shovel, wheelbarrow;
- electric drill, screwdriver with a set of drills, a cross bit and a hexagon head;
- welding inverter;
- fasteners (self-tapping screws).
For painting, you will need to prepare a primer with a rust converter, enamel for outdoor use. This must be done in advance, before construction. In addition, you need to choose the material for the roofing of the canopy, as well as decide how exactly to make a platform for the car.
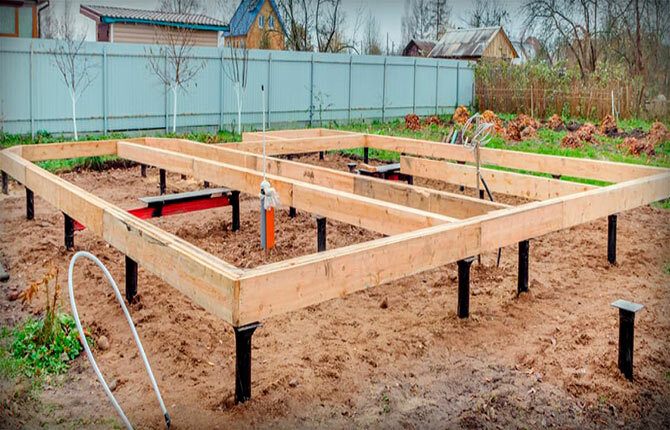
We make the foundation
There are 3 base options. The first is to make supports for the canopy separately from the foundation of the site. In this case, each pillar is concreted separately from the rest, in its own pit. It has to be made deep enough to avoid deflection of the supports under the action of the wind. This method is mainly used for canopies and canopies with a flat pitched roof.
If you make a canopy on a dirt site, for example, in a country house, then such a foundation is best suited because of the low labor intensity of manufacturing, as well as simple concreting technology.
The second option - the supports are poured along with the concrete screed of the site, as in a garage. The depth of embedding pipes is much less, the base is rigid. Such a foundation is made for high canopies with gable, asymmetric or arched roofs.
The third option is a connected foundation. Vertical racks are installed in pits, between which a trench is dug with formwork for concreting or brickwork. On the bottom, they make a strapping of metal supports with horizontal jumpers from a professional pipe 50x50 mm. Pipes are poured with concrete or laid with bricks at the level of the site.
Laying out the frame
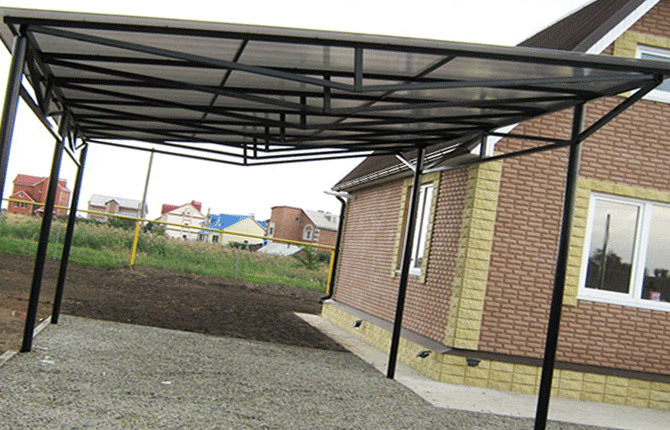
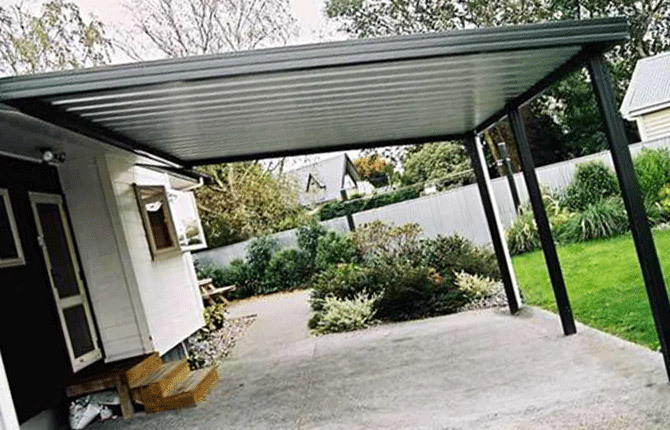
Canopies with a flat pitched roof are made according to the general scheme. After installing the supports, the upper harness is welded, the horizontal crossbars for sewing the wooden crate under the roofing.
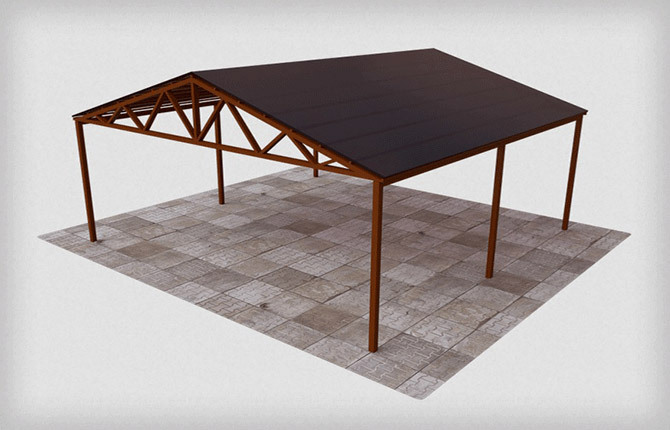
Gable roofs, as a rule, are assembled from ready-made triangles welded in the workshop. It is easier to make a pair of rafters on the ground than to cut and fit to size directly on the roof.
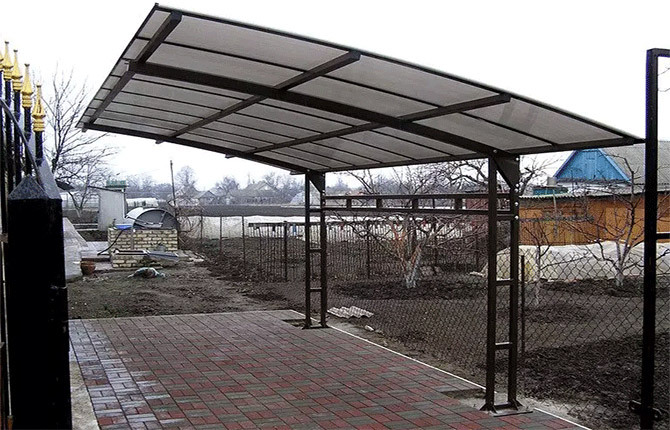
Many car owners make complex arched roofs, often without horizontal bracing. The basis for roofing is bent on a pipe bending machine. Most often they are made from a single profile 70x40 mm.
The design turns out to be beautiful, especially if the roof is made translucent, for example, from cellular polycarbonate. In addition, the arc makes it possible to reduce the height of the canopy, and at the same time the air gap above the machine.
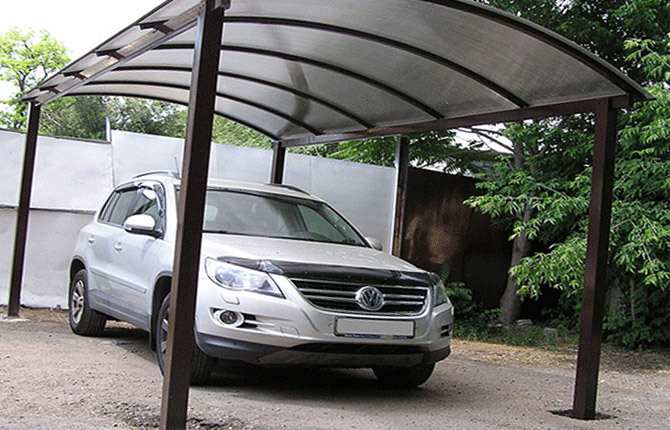
But this scheme has one important drawback - an arch from a single pipe without a horizontal cross member exerts additional expanding (horizontal) pressure on the supports. The more snow in winter, the higher the risk of the roof of the carport falling on the car. The design is beautiful, but it must be done with additional struts and struts.
How to lay out a platform
For a carport, it is important to choose the right platform material. Most often, car owners leave the issue of arranging coverage for the near future. In the best case, they make the layout of the site. It is enough that the car is under the protection of the roof.
But the right surface for the site is not only about protecting the undercarriage. This is also the drainage of rain flows or the fight against dirt on the site.
Gravel
The simplest solution is to cover the area under the car with crushed stone or gravel. This is usually done in suburban areas, cottages. The gravel pad only protects the machine from wet ground. You will still need to do drainage and water drainage.
Drainage gutters must be planned and laid before gravel filling. Usually on the sides, on the back of the canopy. The base under the gravel cushion is covered with sand and clay, rammed. About once a year, under a canopy, you need to do additional planning of gravel in order to get rid of the track rolled by the machine.
paving slabs
Ideal for a carport. But at the same time the most expensive. Therefore, it is necessary to lay tiles simultaneously with the ennoblement of the entire local area. To lay it, you need to remove the soil to a depth of 20 cm, make a pillow and water drainage.
Under a canopy, paving slabs last longer than on paths or at home. The main enemy is moisture and frost, so it is imperative to make a drain for melt and rainwater.
Concrete
The platform for the car can be filled with a concrete screed. For a 4x5 m canopy, at least a cube of concrete is required. Plus - you need to make reinforcement with fiberglass reinforcement. Concrete is convenient in that you can immediately make drainage, form gutters and drain water coming down from the overhangs of the canopy.
The top layer of concrete must be treated with waterproof impregnation, and it is also desirable to make a corrugated knurling of the surface. In winter, you can easily fall on concrete - the canopy blocks the sunlight, so the melt water freezes faster than it is blown out by the wind.
Roof types
The safety of the car's paintwork depends on how well the roofing material is chosen. If you build a roof that is completely metal, opaque, then the water on the site will be reluctant to leave, only thanks to a draft in the yard.
If you make a transparent roof for the canopy, then moisture and snow will go away faster. But the body of the car, even under a protective canopy, will heat up more.
Awning
A good choice for hot climates. The roof frame of the canopy is made with lacing and frequent lathing from a thin wooden slat. A tent roof for a canopy is valuable for 3 points at once:
- The fabric awning "breathes" and does not heat up to a high temperature.
- Most of the protective awnings for canopies are light shades, which means they reflect the sun's rays well.
- It is possible to organize additional protection of the machine from ultraviolet radiation and heat.
It is enough to pour water over the tent roof, and it will be cool all day under a canopy.
It makes no sense to use an awning for awnings in rainy or snowy climates. The fabric strongly absorbs moisture, drops on the car, and in winter it can be torn from wind and snow.
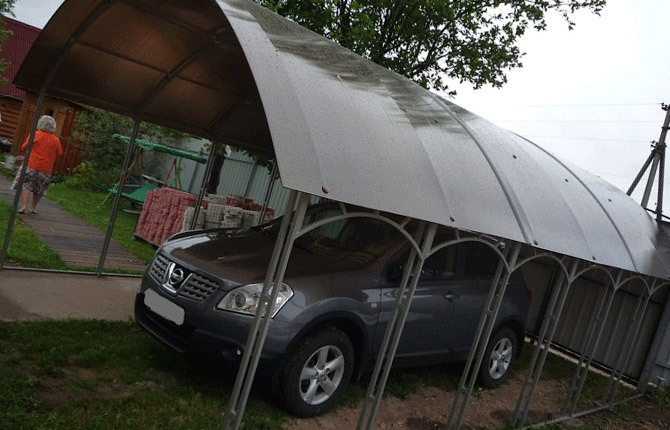
Polycarbonate
Universal type of roofing. Monolithic polycarbonate is expensive, transmits up to 99% of sunlight. Monolith sheets can only be used for roofing if the canopy on the sunny side is at least partially protected by trees or a building.
From cellular polycarbonate, you can make a roof on any canopy with an arched or flat roof. As a rule, the material scatters light well, often being painted in soft shades of green, red, yellow.
A feature of the polycarbonate roof is its low strength. It does not withstand hail impacts, and also quickly becomes covered with cracks if it is laid without a protective film.
Decking
A typical roofing material for utility rooms. Profiled sheeting is massively used for fencing territories, roofs and frame buildings are made from it. The main advantage is that it is easy to fix it on the roof of any structure, except for the arched one.
Flaws:
- High windage. If the roof is not done correctly, then the sheets are often torn off by strong winds, which can damage the car.
- Insufficient strength, it is necessary to make a reinforced crate, otherwise a thick layer of snow will push through the roof joint, and the car will be flooded with melt water.
The owner can lay the roof from corrugated board on the canopy without any problems himself, on his own. It makes sense to make a roof from a profiled sheet, since for the price this is one of the most affordable coverage options.
metal tile
The coating is massively used for the roofs of residential buildings, cottages, gazebos, saunas. Due to the stamped profile, which imitates the relief of tiled masonry, the metal tile sheet has a higher rigidity. Gusts of wind are practically not afraid. Therefore, roofing on awnings and canopies is often done without filing with boards.
Flaws:
- High price.
- Difficulty in cutting, you need to use a special tool.
- You can make roofs with a slope angle of only more than 20O.
It makes sense to use a metal tile as a roof covering only for sheds attached to the house, and if the building itself has a roof of the same color texture.
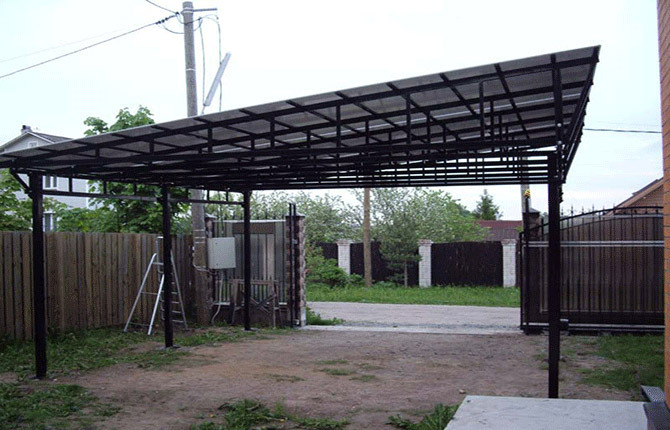
Carport Installation Instructions
Before starting work, you need to check the size of the check-in. Simply put, will the car be able to drive under the conditional canopy without any hassle, taking into account the location of the pillars. It is clear that the canopy is being built without a fence, but in winter, snow and even snowdrifts may appear.
Preparatory work and measurements
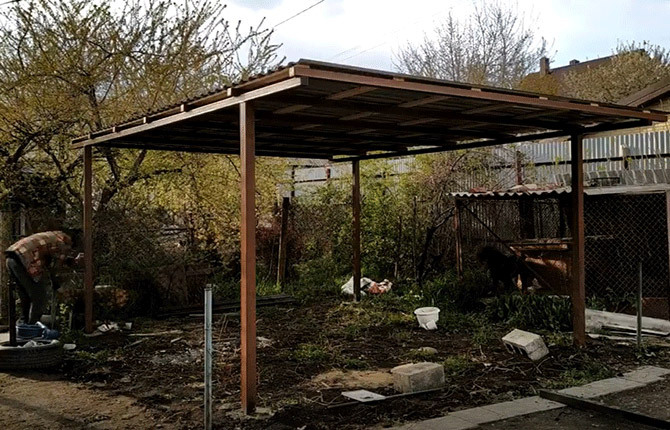
The canopy will be 4x5.5 m in size, the average height is 250 cm. This is the size of the roof, the markings for the pits will need to be reduced by 20 cm on each side of the rectangle.
For marking, 4 pegs are driven into the ground at a distance of 4 m and 5.5 m from each other. Then the cords are pulled around the perimeter. The thread is not tied, but simply wrapped around the head of the peg so that you can change the location without untying the cord.
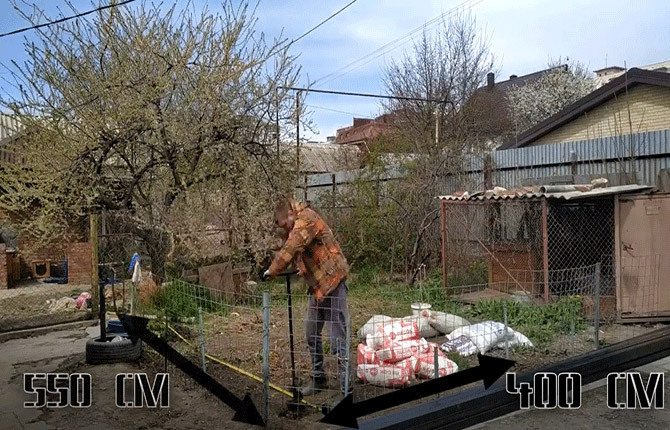
The next step is to align the contour. The difference in the lengths of the diagonals should be no more than 5 mm. Pits for supports can be dug with a shovel, made with a garden drill. Depth - up to 70 cm, no less. A layer of sand with clay (5 cm) is poured to the bottom, carefully compacted. Next, a plastic film is laid, on top of which small gravel (5 cm) is poured.
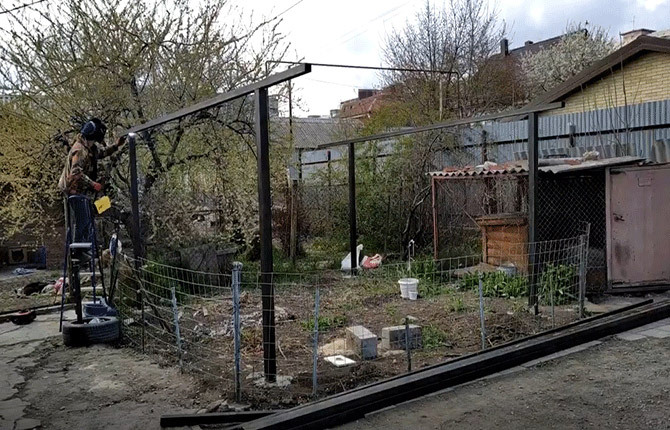
Installing Machine Canopy Supports
Vertical poles for a canopy are cut in advance. You can ask at the warehouse when buying to cut the pipe square (80x80 mm) into blanks of 3 m. It’s easier to transport in the car. The height of the supports on the left is 250 cm, on the right - 240 cm, 50 and 60 cm, respectively, will go into the foundation concrete.
Each support must be installed in a pit on rubble and immediately aligned vertically. It is not necessary to hammer fragments of bricks into the pit, it is better to support them with several pieces of slab or scraps of boards.

As soon as all 4 supports are aligned, freshly prepared concrete is poured into the pit. It must be fluid. About 3 more days you need to wait until the concrete grabs and settles.
Strapping and strengthening the frame
The heads of the supports must be tied with a square professional pipe 50x50 mm. Two pieces of 5 m are immediately welded to the tops of the supports. A small error will not affect the stability of the canopy and the protection of the machine, even in heavy snow or gusty winds.
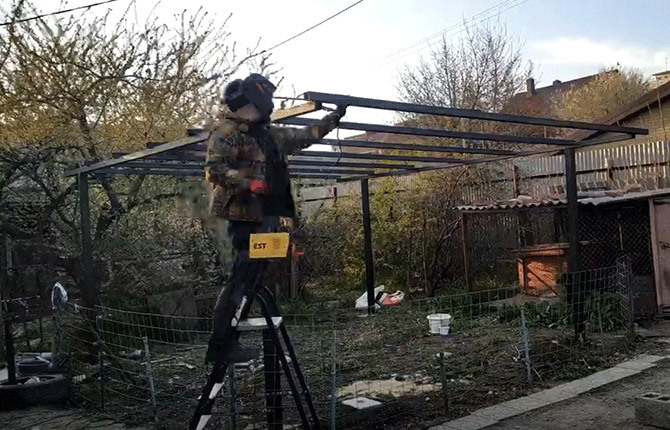
Immediately you need to clean and paint over the welding seams, without waiting for it to rain, or condensation will fall on the metal.
The next step is to mount the steel cross members. For the roof of the canopy, you can use the same square 50x50 mm or a truncated version of 50x25 mm.
To form the slope of the canopy, seven blanks of 4 m each will be required. You will have to order enough metal from the warehouse. It is better not to carry such a long profile on your car.
Canopy roofing
Next, you need to sew a crate of boards. Since it is planned to protect the car from rain and birds with the help of corrugated board, it is better to use a spruce board 150x25 mm. It will take 40 m.p. whole board. Again, it is better not to cut, but to buy whole blanks of 6 m each. In this case, the material can be delivered by your own car.
Sheets of corrugated board measuring 1.18x4 m are laid with an overlap perpendicular to the arrival of the car. The size of the profiled sheet is chosen so that the laying of the roof can be done with your own hands, without assistants.
If protection for the car is being built on a site with dense buildings of neighboring houses, then you can get by with a simplified crate, as in this case. If it is planned to build a canopy in a country house or in an open area with a strong wind, then the crate must be made continuous with boards or slabs.
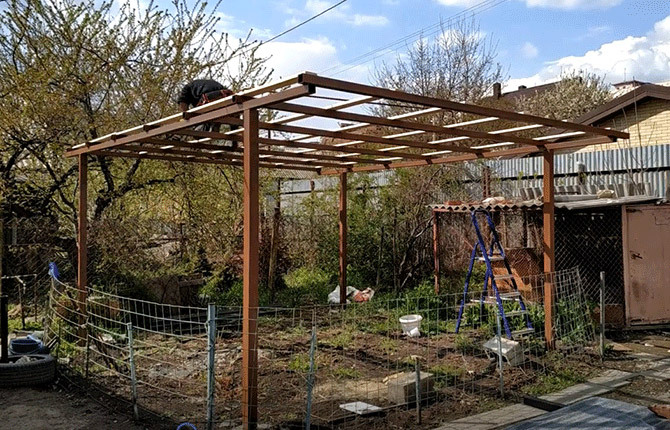
The roof turns out to be an unusual shape. Instead of the classic version with a slope from the side of the facade to the back, a flat slope to the side turned out. This was done intentionally, as it is possible to drain rainwater through a gutter to the "wild" side of the site, and not to a concrete path. The project plans to install a barrel to collect rainwater.
Coating option
As practice shows, asphalt pavement with pressed limestone chips is best suited for car storage. You can make the site yourself or agree with road workers. You can roll up the site with an asphalt mixture, fill it and compact it in an hour in good weather.
If you make a coating of tiles, then the price will triple, a concrete screed is about 40% cheaper than a tiled one.
Most craftsmen prefer to make yard buildings with their own hands. It's not difficult, but you need to remember that if you make a carport with your own hands, with a foundation and sewn walls (from the wind), then such a structure can be qualified as capital, which means that it is necessary to enter data about it in the passport for home ownership.
Tell us about your experience in building canopies - what design can be considered the most successful? Save the article to your bookmarks bar so that useful tips from it are always available to you.