There are several effective ways to insulate the ceiling on the balcony. In the simplest case, foam is purchased and glued to the prepared surface. You can also assemble a frame from a metal profile and lay a vapor barrier, mineral wool or foam. A step-by-step description of each technology and tips for choosing a heater can be found in this article.
The content of the article
-
The choice of insulation
- Styrofoam
- Foil Styrofoam
- Penoplex
- Mineral wool
-
How to insulate the ceiling
- fixing on the surface
- Wireframe creation
The choice of insulation
When it is planned to insulate the ceiling on a balcony or on a loggia, the first question arises of choosing the right material. For finishing, the following types of heaters are usually used:
- Styrofoam;
- polystyrene foam with foil coating;
- extruded polystyrene foam - aka penoplex;
- mineral wool.
Each type has its own characteristics, advantages and disadvantages. You can use any material, but you need to take into account the properties in order to properly install.
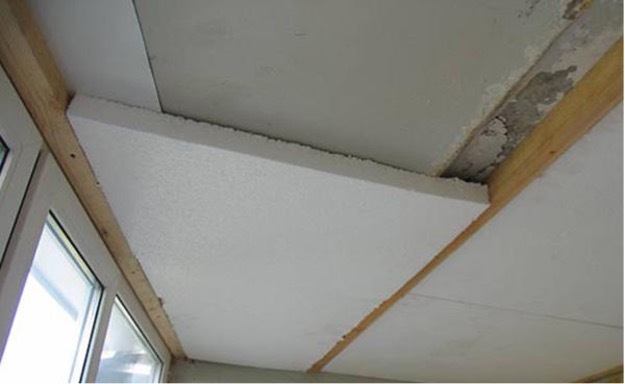
Styrofoam
Often the ceiling insulation on the loggia is performed using foam. It is characterized by low density and ease of installation. When choosing a specific type, you need to take into account such a characteristic as density. For example, in the case of finishing with decorative panels (MDF, PVC, drywall), raw materials with an indicator of 15 kg / m3 are taken. If it is planned putty – a denser material of 25 kg/m3 is needed.
If you insulate the ceiling on the balcony with foam, you can take advantage of all its advantages:
- good protection from the cold;
- low price - in fact, this is the most budget option;
- light weight - no heavy load on the ceiling;
- simple installation;
- resistance to temperature changes;
- can be installed under the roof, directly on concrete, used as the main or intermediate layer of insulation, if necessary, combined with any other materials.
But you need to keep in mind that the foam is fragile and not resistant to fire. If these shortcomings are critical, it is worth considering other options than insulating the ceiling on the balcony. It should also be remembered that the material is destroyed by direct contact with the sun's rays, so the exterior finish in this case is required.
Foil Styrofoam
On the basis of polystyrene, better heaters are obtained, for example, foil polystyrene foam. It is denser, so it provides better protection from the cold. If you choose this method, how to insulate the ceiling on the balcony with your own hands, its advantages are obvious:
- strength;
- low weight due to low density;
- good sound insulation;
- resistance to temperature changes;
- moisture resistance;
- resistance to chemicals.
The only significant drawback is the flammability of polystyrene foam. It can also be attacked by rodents and organic solvents such as benzene. However, for a city apartment, these factors do not matter.
Penoplex
Considering how to insulate the ceiling on the loggia, it is worth considering extruded polystyrene foam, which is also called penoplex. This is another type of advanced foam that has high strength and greater resistance to fire. Its main advantages are the following:
- does not absorb moisture;
- strong and durable;
- easy to install;
- even a small layer perfectly protects from the cold.
There is no doubt whether it is necessary to insulate the ceiling on the loggia. Moreover, Penoplex copes with this task much better than the same foam. Such material is more expensive, but the ceiling area is small, so repairs will be inexpensive.
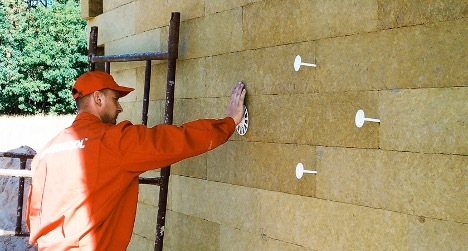
Mineral wool
Do-it-yourself ceiling insulation on the balcony can also be done with traditional material - mineral wool. It has its own advantages:
- affordable price;
- even a small layer is enough for good thermal insulation;
- noise protection;
- safe chemical composition;
- easy installation - no need to pre-level the surface.

Although such a heater for the ceiling on the balcony is not without drawbacks:
- absorbs moisture well and collapses (installation of reliable waterproofing is required - then this problem can be solved);
- has a high density, so the installation of a wooden crate is required;
- during installation, you need to use a respirator, gloves and a mask.
How to insulate the ceiling
Thermal insulation of the balcony ceiling with penoplex or other materials is carried out in two ways:
- Fixing on the prepared surface with glue or dowels.
- Pre-framework.
The first method is simpler and is suitable for foam, polystyrene or foil polystyrene foam. The materials are lightweight, so they do not need to create an additional structure.
The second method is used when laying mineral wool and other dense insulation. They are more massive, so for reliable fastening you will need to assemble a frame from a metal profile or wooden slats.
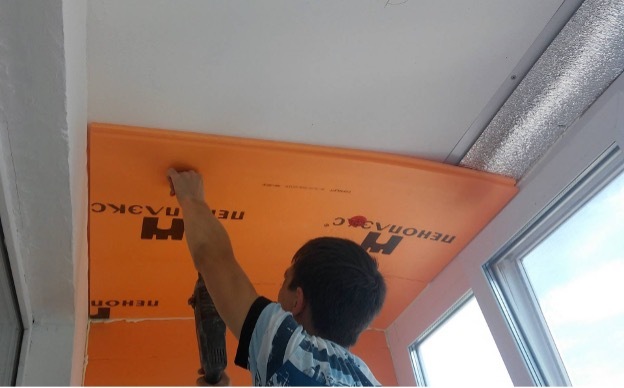
fixing on the surface
If you plan to insulate the ceiling on the balcony with your own hands in the first way, you will need to stock up on such tools and materials:
- ladder;
- polyurethane foam with a gun;
- saw;
- perforator;
- dowel;
- ruler, tape measure;
- glue;
- construction level;
- pencil.
The main steps are:
- Take measurements, prepare the surface, clean it from contaminants.
- A layer of vapor barrier is laid, for example, isolon with a foil coating (it should be facing outward).
- Glue the joints with metallic tape.
- Cut foam or polystyrene, stack them end-to-end.
- Fix with glue.
- Further reinforced with dowels.
- Perform finishing work.
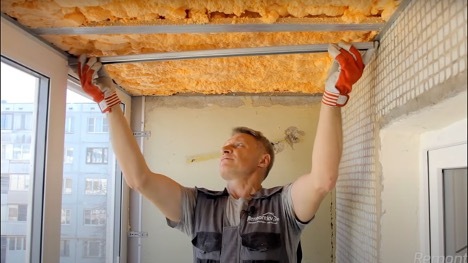
Wireframe creation
In this case, you will need the same tools, but in addition you need to stock up on materials to create a frame. It can be a metal profile or wooden slats. The step by step instructions are:
- Prepare the surface, clean from dirt.
- Take measurements and make markings on the ceiling.
- The glue is diluted and foil polyethylene is fixed on it.
- Next, foam or polystyrene foam is cut and laid in the gaps between the racks of the frame.
- Reinforce with dowels.
- Mount the frame from a profile or wood.
- The last stage is finishing.
From this review it is clear how to insulate the ceiling on the loggia or on the balcony. The easiest option is to glue foam sheets. If you protect it well from the sun, the material will last for many years. But a more durable way is to assemble the frame and put, for example, polystyrene foam into it. In both cases, it is imperative to take care of vapor barrier and high-quality finishing.