A micrometer is a device that allows you to take very accurate readings of length or other dimensions down to hundredths of a millimeter. To correctly carry out the work, you need to know how to use a micrometer, as well as how to set it to zero. This is discussed in detail in the article.
The content of the article
- Device device
- Tool preparation
- Measurement instruction
- How to take care of the instrument
Device device
To correctly understand how to measure with a micrometer, you need to understand its device. The device is designed to measure linear dimensions, such as length. It allows you to obtain high-precision results down to hundredths of a millimeter. With this tool, various parameters are evaluated, including the cross section or diameter.
If you correctly understand how to measure with a micrometer, this will solve various problems:
- fitting elements;
- duplication of details;
- size control.
In practice, smooth instruments are most often used. Moreover, they are used both in the professional sphere and in everyday life. The tool consists of several elements - a clamp with a screw, a heel, a bracket, a drum and others, as shown in the diagram.
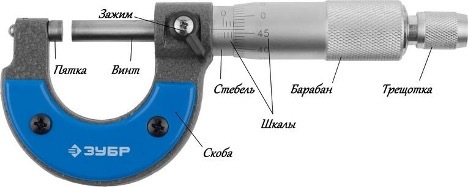
The object to be measured is placed close to the heel and fixed with a clip. The measurement scale is applied to the stem, according to which the number of millimeters is determined with an accuracy of hundredths.
There is a horizontal scale on the scale, it is under the cylinder. When the screw is tightened, part of this line is exposed. There is a straight line on the scale, which is a reference risk. On each side there are divisions in 1 mm increments.
The length of the scale depends on the device, but the instructions for use are the same. For example, one can learn how to use a 0-25 mm and 0-30 mm micrometer at the same time, since the rules are the same.
Tool preparation
First you need to understand how to use a micrometer correctly. To do this, the device is prepared for operation. The sequence of actions is as follows:
- First you need to put a zero mark - this is always done before work in order to ensure accuracy.
- All surfaces for measurement (drum, clamp) are wiped from dust.
- The drum is unscrewed with a screw and separated from the stem.
- Then it is rotated so that the zero point and the reference risk coincide completely - this is the “0” position. To verify this, you need to look at the scale exactly from the side of the drum and at a right angle, as shown in the micrometer designation diagram.
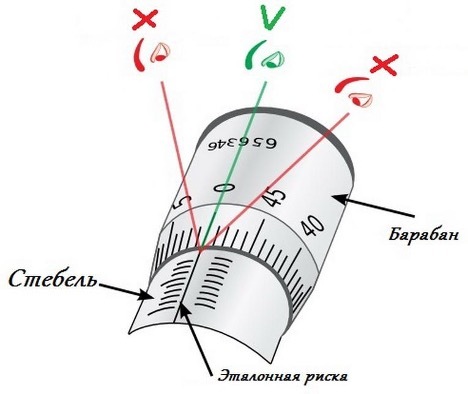
- After the divisions stand perfectly even, they are fixed. Now the micrometer device is ready for work.
Measurement instruction
Usually they produce a mechanical micrometer, how to use which is described in this section. First, you can carry out a test measurement on the example of any metal part, such as a drill or a nail. Moreover, it is better to take such an object, the parameters of which are not known in advance.
Instructions on how to use a micrometer look like this:
- First, the part must be placed between the heel and the screw.
- Then the drum is rotated and the screw is advanced - the device is opened for measuring.
- Clamp the object as much as possible by rotating the ratchet nut.
- After a click is heard, the rotation is stopped.
- See what the values are. To do this, you need to know what a micrometer is. First, the values are counted on a horizontal scale and the values \u200b\u200bare added to them vertically.
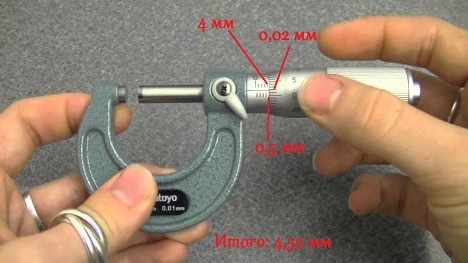
For example, consider the option shown in the photo. On a horizontal scale from 0, it turned out 4 whole divisions. Then pay attention to hundredths - in this case 0.5 mm. Therefore, in total it turns out 4 + 0.5 = 4.5 mm. Next, you need to calculate the remainder of the hundredths vertically. In this example, 2 divisions are visible, which coincided with the reference risk, that is, 0.02 mm. Thus, the thickness will be 4.52 mm.
Important
Do not clamp the part by rotating the drum. In this case, the object may be strongly compressed, which will result in incorrect data. Therefore, you need to fix it only with a ratchet, which will give a signal after reaching the limit. That's how it should be done micrometer measurement.
How to take care of the instrument
A micrometer is a fairly simple instrument, but it needs careful maintenance, because the accuracy of the measurement depends on it. If the ends are covered with even fine dust, the error increases. Therefore, you need to know what the micrometer consists of and store it in a separate box, which is usually included. The device is covered with clean foam rubber or other material. This is especially important if field work is planned.
Now it is clear how to adjust the micrometer in order to correctly measure any parameter. To work, the part is pressed against the heel and then rotate the ratchet nut until it clicks. After that, readings are taken, adding horizontal and vertical values.
