The installation of cast-iron heating radiators is carried out independently with the appropriate experience. Moreover, the owners of apartments in an apartment building will first need to obtain permission from the management company. The article details step-by-step installation instructions, mounting types, as well as the pros and cons of cast iron batteries.
The content of the article
- Is it worth installing cast iron radiators: the pros and cons
- Radiator Assembly
- Markup and measurements
- Installation process
Is it worth installing cast iron radiators: the pros and cons
Cast iron radiators are classic batteries that were widely used 30-40 years ago. Despite the fact that recently they have been massively replaced by metal ones, such batteries are still found in houses and apartments. Moreover, the installation of cast-iron radiators of a new model today also enjoys a certain popularity.
The reasons for this are quite simple:
- affordable price;
- long-term preservation of heat even in the event of an accident;
- a large area makes it possible to dry clothes;
- high strength and durability;
- a large cross-sectional area eliminates severe blockages - cleaning is required quite rarely;
- corrosion resistance.
However, the installation of cast-iron heating radiators has a number of disadvantages:
- very large weight - difficult transportation and lifting to the floor;
- appearance is not so stylish, old-fashioned;
- painting required after installation.
Radiator Assembly
Installation of cast iron batteries is carried out in several stages, and assembly is not a mandatory step. But if the battery is purchased in parts, the sections must first be assembled. The main elements are shown in the diagram.
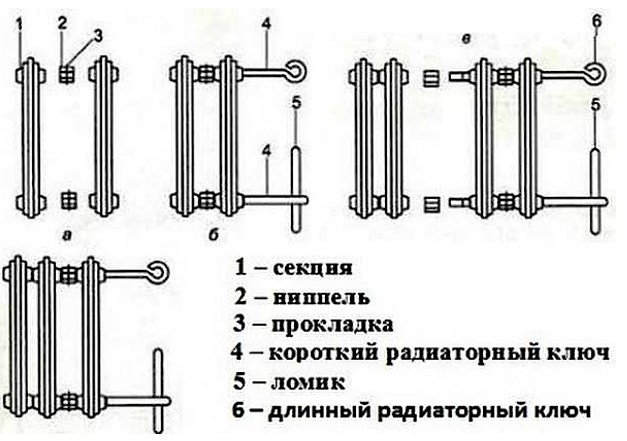
Replacing cast iron batteries with pre-assembly involves the use of such tools and fixtures:
- a set of paronite gaskets;
- sealant resistant to heat and antifreeze (if used as a coolant);
- key for radiators;
- a set of nipples;
- Workbench.
It is possible to assemble cast-iron heating radiators with your own hands, for this they act as follows:
- First, a sealant composition is applied to the thread of the nipple-nut.
- For convenience, the first section is placed on a flat surface, for example, on a table.
- A nipple-nut is screwed on each side, and only 1-2 turns. To figure out how to install a cast-iron battery, you must remember the direction of the thread on each side - right or left
- A paronite gasket is fixed on the nipple, and if it is not there, you can simply wind flax around the thread. Moreover, if it is of the left type, they move counterclockwise or vice versa.
- In order for the installation of the cast-iron radiator to be successful, it is required to attach section 2 to the installed nipples so that it fits snugly.
- A special key for the radiator is inserted into one of the nipples. With its help, only one complete revolution is performed.
- Similarly, the key is inserted into the second nipple and one circle is made. It is best if two workers do it at the same time. moreover, it is necessary to complete exactly one circle, and not 2-3, because otherwise the section may warp and collapse.
- Before the connection of cast-iron heating radiators begins, the remaining sections are assembled in the same way. The nipples should be screwed in turn until they stop and tighten them, after inserting the lever into the key ring.
Markup and measurements
The device of a cast-iron heating radiator and the rules for its placement do not differ from the requirements for conventional batteries. Before installation, it is necessary to take measurements and make markings, guided by the following standards:
- the battery is placed exactly in the center of the window with a permissible deviation in one of the sides of no more than 2 cm (for this, a vertical line is drawn strictly in the middle of the window opening);
- the height from the floor can be different, but not less than 8 cm and not more than 14 cm;
- it is important to take into account the interval from the radiator to the window sill - a value in the range of 10-12 cm;
- if the connection of cast-iron batteries and installation are correctly performed, then the distance from the radiator to the wall should be from 3 to 5 cm.
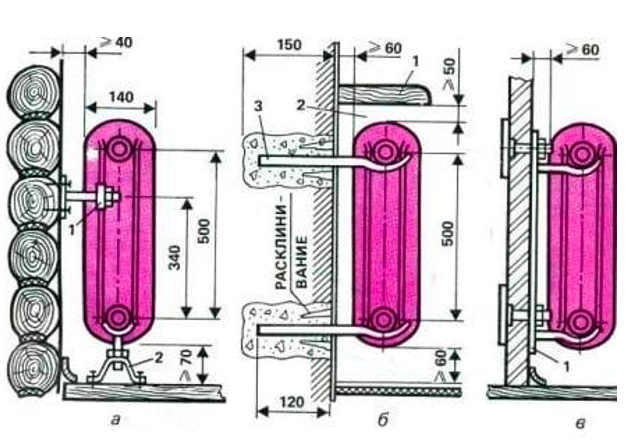
Taking into account the specified requirements, put marks under the windowsill. You also need to determine the location of the brackets. first, for this, lines are drawn that go along the levels of the supports. The top line goes 5-7 cm lower than the marks under the windowsill. The lower line similarly goes 5-7 cm higher than the marks made. The quantity is determined as follows: one bracket at the top and bottom for each mount.
As it can be used:
- bracket - a metal part with a bar fixed to it (across);
- hooks (they are threaded at their end and screwed into a dowel mounted in the wall);
- floor fixer - installed in a special hole, fastened with screws and bolts with nuts, so that each support can be adjusted in height.
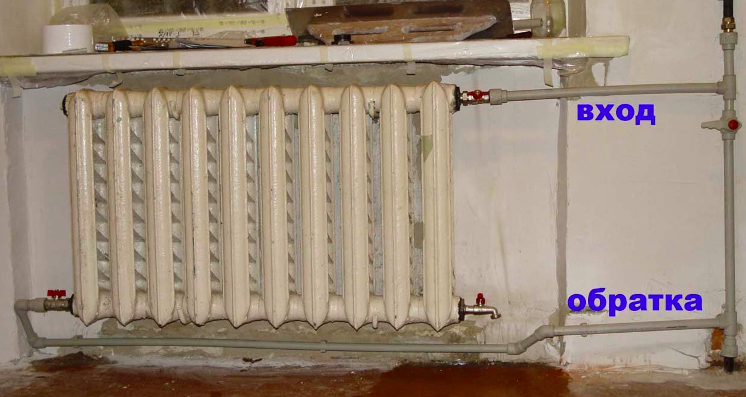
Installation process
The connection of cast-iron batteries to each other is carried out manually, and after assembly they proceed directly to the installation. First, it is important to understand what the wall is made of. If it is concrete, stone or brick, it will easily withstand even heavy cast iron. Therefore, you can use the classic version of fasteners, which is carried out in 3 stages:
- First, markup is made and holes are drilled with a perforator.
- Dowels are installed in the holes formed.
- Hooks or screws are screwed into them.
If the wall material is different, for example, SIP panels, you need to figure out how to properly install a cast-iron battery. The procedure is as follows:
- According to the pre-made markup, several through holes are formed in the vertical direction.
- Take a bar with a length parameter equal to the height of the bracket. Apply it on the other side of the wall and fix it with bolts.
- Brackets should be applied to the wall surface and the holes aligned. Thanks to the coincidence, bolts can be inserted into them. Nuts are put on top.
- Now you need to figure out how to hang a cast-iron battery. It is mounted on brackets and fixed with bolts.
- Since through holes were previously made, on the other side of the wall it is necessary to completely seal them with a cement mixture, and then partially replace the finishing material, for example, siding.
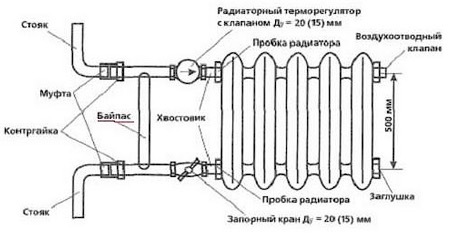
Regardless of the wall material, further installation of cast-iron radiators goes like this:
- Put the battery on the mounts.
- A fitting from a set of shutoff valves is screwed into each hole. To make the connection tight, a sealant is applied to the surface of the thread.
- A Mayevsky crane is installed to the upper hole on the right or left.
- A plug is installed on the last fourth hole.
- Shutoff valves are attached to the pipes, and tow is placed on the surface of the thread.
- Next, you need to attach the valve to the fitting and tighten with a wrench until it stops.
When the connection of the cast-iron battery is completed, it is required to check its performance and tightness. To do this, open the taps and carefully inspect the radiator. It is necessary to make sure that there are no leaks, in the absence of even small drops. You should also understand how well the sections heat up (evenly or not, all or not).
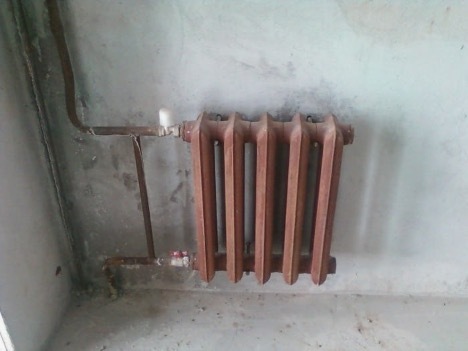
If necessary, the position of the battery can be adjusted - this possibility is provided by fixing cast-iron radiators to the wall. All these actions can be performed independently, but only with experience. But if there are problems, for example, with tightness, it is better to invite an experienced specialist so that there are no emergencies in the future.
