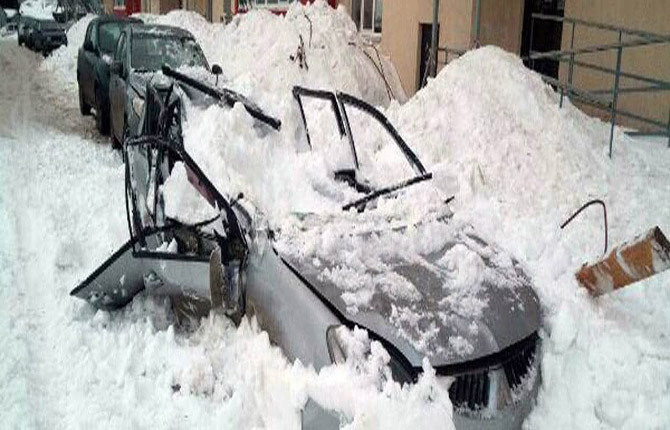
Most regions experience a lot of snow in winter. Precipitation can accumulate on the roofing in large quantities, and then the snow drifts go down. An avalanche can not only cause harm by damaging property and parked cars, but also pose a danger to the health or life of passers-by. You can avoid such situations if you know the technology and nuances of how to install snow guards on the roof.
The content of the article:
-
What are snow guards and why are they needed?
- Types of snow guards
- Where to install snow guards on the roof
- What functions do snow guards perform?
-
Preparatory work before installation
- Tools
- Sketch development
-
Installation depending on roof type
- Metal tiles
- Corrugated sheet
- Seam roofing
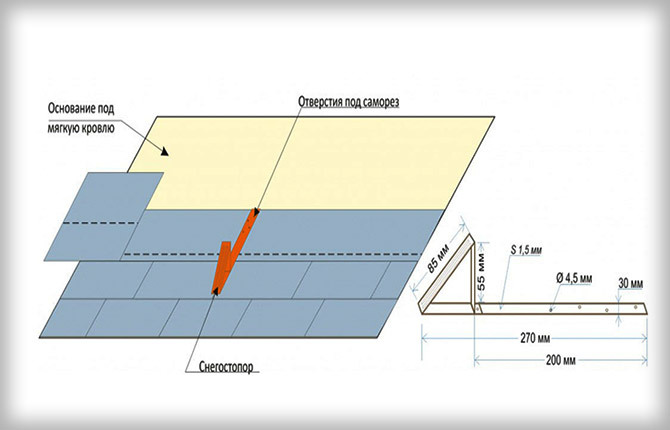
- Soft roof
- Installation of tubular snow guards
- Installation of corner snow barriers
- Installation of snow yokes
- Installation of log snow guards
- Installation of lattice snow guards
-
Typical mistakes when installing snow guards
- Bracket failure
- Leaks
What are snow guards and why are they needed?
Snow retainers or snow retention system is a design that prevents snow accumulations from sliding off the roof. Other names: snow-stopper, snow-stopper. They are especially relevant during winter thaws or with the onset of spring.
At this time, under the influence of sunlight, the roofing surface heats up. The layer of snow closest to it gradually melts. In the evening, the temperature drops again, and the wet snow becomes freezing, freezing in the roof. If this cycle is repeated several times, then at a certain period of time the snow masses will lose adhesion to the metal and slide down the slope.
But it is not always necessary to install snow guards on the roof of a house. It all depends on the materials with which the roofing surface is covered. If they have a rough structure, then even on a flat roof they will be able to hold back accumulations of ice and snow quite well. Such materials include bitumen shingles and ondulin.
If a smooth-textured material was used to form the roof, it has a steep slope and there is usually a lot of precipitation in the winter months - there are good reasons for installing snow guards with your own hands.
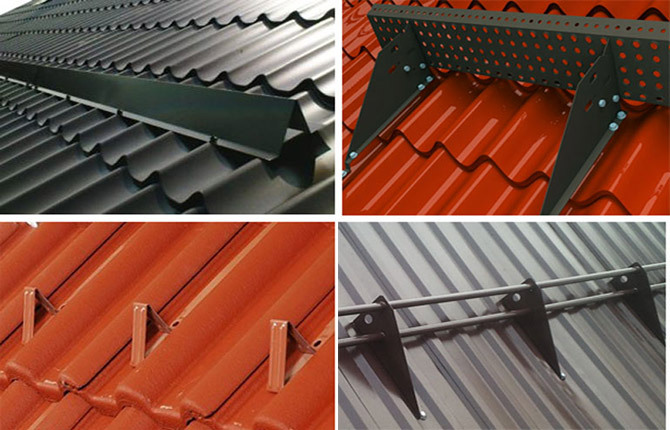
Types of snow guards
Before installing snow guards on the roof, you will need to study the systems of these structures. Manufacturers produce ready-made snow-passing and snow-blocking systems. They are made from durable materials (metal), as they must withstand increased loads.
Kinds:
- Corner ones. These are corners made of stainless steel. They can be painted in any color so as not to visually stand out on the roof. Suitable for installation on metal tiles, etc. The optimal arrangement is a checkerboard pattern, in 2-3 rows. The price for 1 corner snow guard is 100-150 rubles. If you have the skills to work with metal, then you can make a snow guard yourself from an iron sheet. But in terms of efficiency, it ranks last among all existing ones. Not suitable for steep roofs or for homes located in areas that receive a lot of snow.
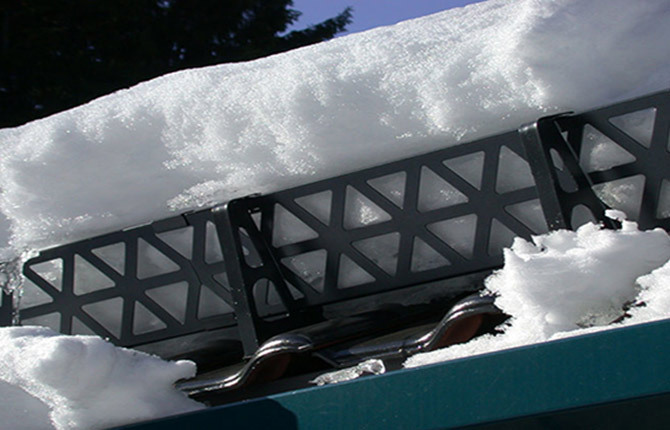
- Lattice. This design belongs to snow cutters, as it has the form of a lattice. She cannot stop the snow layer, but she cuts it into small pieces, thereby preventing a large piece from falling down. It is fixed to the roof using brackets. The smaller the distance between the bars of the grid, the smaller the snowball will be cut into portions. Lattice snow guards are suitable for roofs with a slope of up to 45 degrees.
- Lamellar. The structure is made of plates (metal). They don't cut the snow, they hold it back. Ideally, when exposed to UV rays, it should turn into water and drain. Plate snow retainers are mounted on the roof with brackets. It is important that such a system is not installed on slopes of 50-60 degrees. It will not withstand the strong pressure of snow and will break. Not only the snow retainer itself can be damaged, but also the roof.
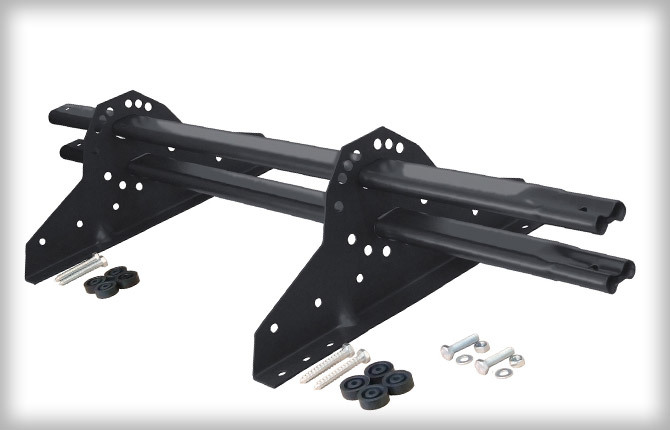
- Tubular.They consist of 2 pipes (diameter 6-10 cm), connected to each other at a short distance. They run parallel to each other. When the snow layer passes between two snow retention pipes, it is divided into thin plates. Since they are small, they do not pose a danger to people passing below if they fall. Tubular snow retainers are fixed to the roof with long roofing screws and special holders.
- Rope ropes. Installed as additional elements in combination with tubular or lattice snow retainers for roofs. This is also an option for a soft roof. The placement pattern is checkerboard, at a distance of 50 cm.
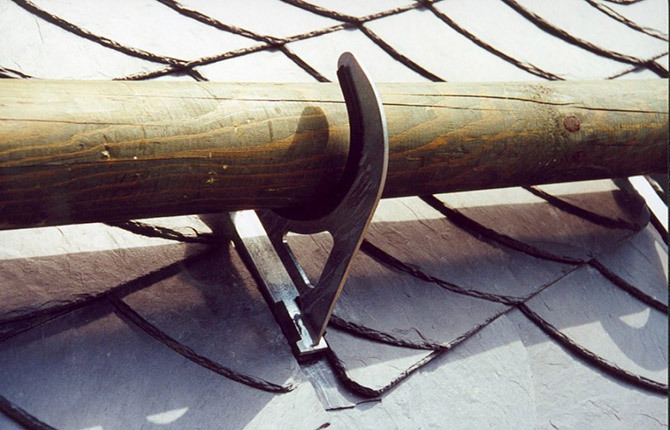
- Log.Logs are rarely used as snow retainers (on wooden roofs). Hooks are used for installation. They are fixed to the rafters or sheathing. The thicker the tree trunk, the more snow it can withstand. Important - the logs on the hooks are placed at a level of 3 cm from the roofing. This is necessary so that during melting the snow can easily fall into them in small parts.
The most expensive of this list are lattice and tubular snow retainers. A 3-meter long structure can cost 1000-1500 rubles. To save some money, you can install snow guards only in potentially dangerous places where snow melting can cause real harm.
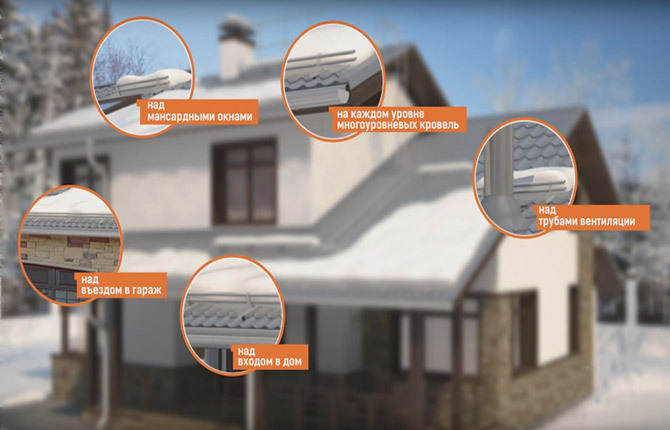
Where to install snow guards on the roof
If install snow guards It is not possible completely along the perimeter of the roof, then they need to be installed in the most dangerous places, above:
- entrances to the house;
- canopy, fence;
- garage doors;
- an enclosure where a pet is kept;
- wires;
- chimneys, ventilation holes;
- attic;
- above antennas, satellite dishes, other equipment that is located on the roof of a house or on walls, etc.
Installing snow guards on the roof of a house is a simple process. You can do it yourself without resorting to the help of professionals. But before that, you need to study the basic installation rules depending on the material (tiles, corrugated sheets, slate, etc.) and the type of system for retaining snow layers.
What functions do snow guards perform?
Correct installation of snow guards on the roof will help solve several problems at once:
- protection of gutters from breakage;
- portioned descent of ice and snow from the roof;
- extend the service life of the roofing;
- minimize the risk of injury to passersby or damage to property due to melting snow layers;
- safety when clearing snow from the roof.
In addition to their direct functions, roof snow retainers also perform decorative functions. If you choose the right model, it can give the roof a finished look. Snow guards look good on a roof covered with metal tiles or corrugated sheets.
Preparatory work before installation
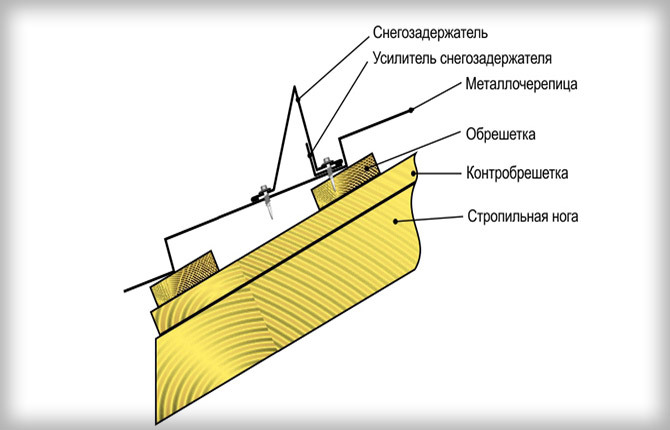
To properly install snow guards on the roof of a house, you first need to draw up a drawing showing the exact location of the elements. It is also important to ensure that the rafter system will support the structure. The lathing in the areas where snow guards are supposed to be installed is inspected. If necessary, they are strengthened by installing additional strips.
Why this step is important - when screwing stoppers with self-tapping screws, they should not go into the void under the roofing. Otherwise, the snow retainers will simply fall off when a certain amount of snow hits them. They will also damage the roof.

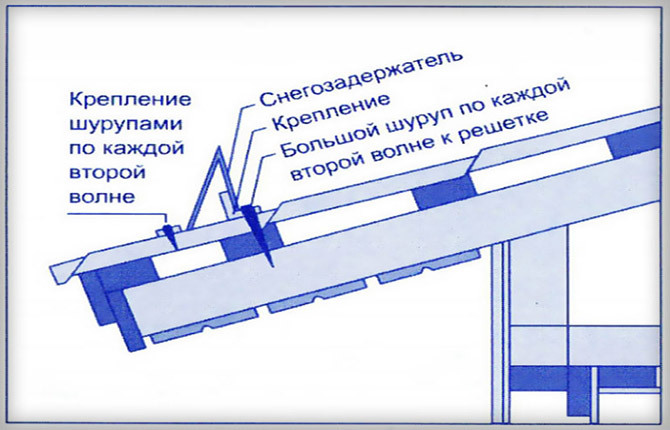
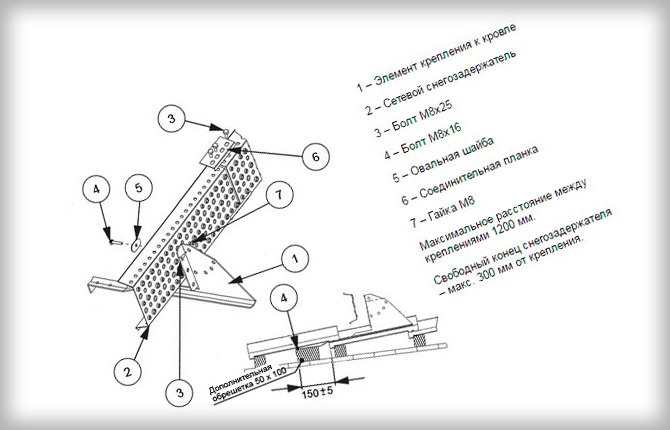
Then comes the marking according to the diagram. If the installation is carried out on metal tiles, according to the rules, the brackets should rest against the wave step of 3-4 rows. If another roofing material is laid on the roof, other standards apply - securing the structure at a distance of at least 40 cm from the eaves overhang. If you look at SNiP, then large values are indicated there - at least 60 cm. To mark the installation locations of snow guards on the roof, you can use a stretched rope.
Another important point is that the snow retainer on the roof is mounted above the load-bearing wall. This will add strength. If according to the diagram above there are several more levels, then each subsequent one is fixed at a distance of 1.5-2 meters. The number of rows directly depends on the steepness of the slope. The steeper it is, the closer the stoppers need to be attached to each other. Lattice and tubular types are mounted linearly, and yoke and corner types are installed in a checkerboard pattern.
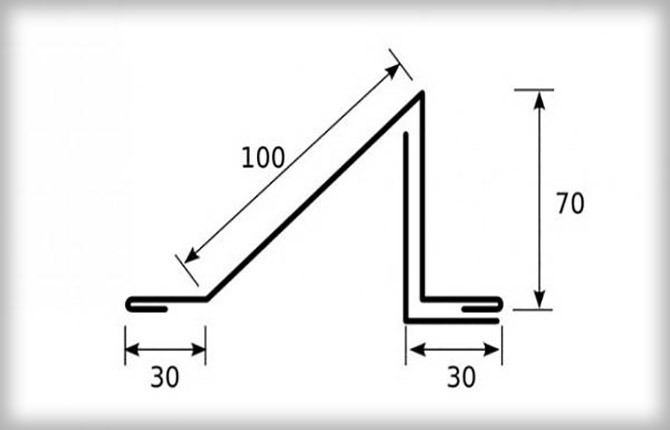
Sketch of a corner snow guard for making yourself
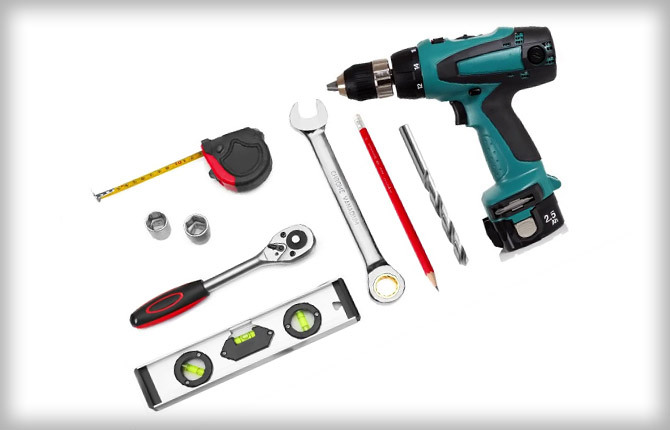
Tools
To install snow guards on the roof, you need to prepare a set of tools:
- selected stoppers;
- brackets, rubber seals;
- plumb line;
- spanners;
- screwdriver;
- twine;
- roulette;
- metal scissors;
- building level;
- roofing repair kit;
- fittings for attaching the selected type of snow guards.
If factory-made stoppers were chosen for installation, then the manufacturers supply them with a set of accessories: fasteners, plugs and other things that are necessary during the installation process. For homemade ones, you have to buy everything yourself as needed.
Sketch development
Sketch development is an important step before installation. Create a sketch with dimensions, installation locations, distance from the eaves and other elements installed on the roof. You also need to specify the distance between the rows of stoppers.
Since the brackets are mounted on the sheathing, its step must be noted in the sketch. This will allow you to avoid the unpleasant situation when you drilled a hole in the roof covering, but there was no block underneath. It turns out that there is simply nothing to attach snow guards to on the roof.
Installation depending on roof type
Instructions for installing snow stoppers on the roof differ depending on the type of stopper and type of covering.
Metal tiles
It is best to install corner, tubular and lattice systems on metal tiles. The technique for installing them is practically the same.
Step-by-step instruction:
- Determine the installation location of the stopper on the roof. Make markings.
- The corner is applied to the marking line. It is important to place the part so that its base is located on the ridges of the metal tile profile. The upper part should form an angle of 90 degrees with the roof.
- The top of the corner is fixed with self-tapping screws. In this case, their optimal size is 0.5-0.7 cm. This is enough to securely secure the snow retainer to the beam located under the roofing.
- The base of the corner is screwed to the covering.
Using the same scheme, all other snow guards are screwed onto the roof.
Corrugated sheet
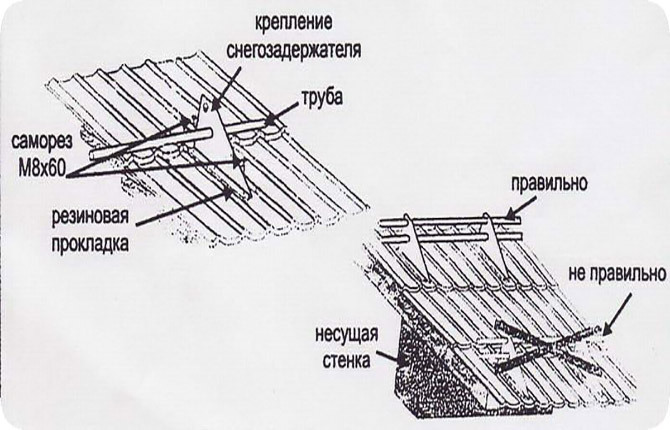
The corrugated sheet has a smooth surface, so snow masses easily roll down from it. Installing snow guards on a roof with such a coating is simply necessary. The best option is tubular stoppers.
Step-by-step installation instructions:
- Select the location where the snow guards will be installed. According to the rules, there must be a load-bearing wall underneath them. If not, then a strong beam will do. This is necessary, since the sheathing must rest against something thick that can withstand increased loads.
- The sheathing under the areas where the protective elements are fixed must be continuous. It is also recommended to strengthen it.
- Make markings. Place marks in the places where the brackets will be attached. It is important that they are located at the bottom of the “wave”. Comply with the requirements for the distance between supporting elements. According to the rules, they should not be installed at a distance of more than 90 cm.
- To drill mounting holes for brackets at the established marks, you need to prepare a drill for metal. The length is selected independently, but take into account that it is necessary that during the drilling process the sheathing bars are not touched and remain intact.
- Place sealed gaskets on the drilled holes from below and above, insert screws and install the brackets. Once installed, secure them firmly.
- Pipes are inserted into the supports. An important rule is that they should not protrude beyond the bracket by more than 30 cm. If they are longer, cut them off.
- To ensure that the structure lasts a long time and performs its functions 100%, close the pipe openings so that moisture does not enter there and cause corrosion. You can use plugs for this. If there are none, you can simply flatten the ends of the pipes.
You can install tubular snow guards on a roof made of corrugated sheets yourself. There is no need to involve specialists for this purpose.
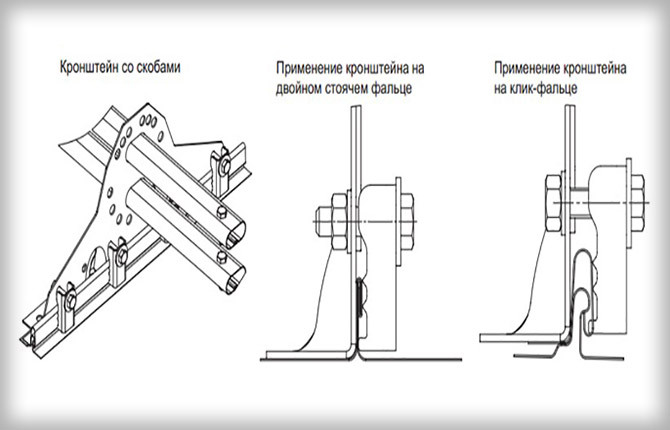
Seam roofing
This roof is also smooth, so the presence of a snow retention system is mandatory for it. Or you cannot avoid constant ice melting. Experts recommend installing stoppers at the eaves, this is especially true for areas under which entrances, attics, etc. are located.
A good option is a tubular snow retainer.
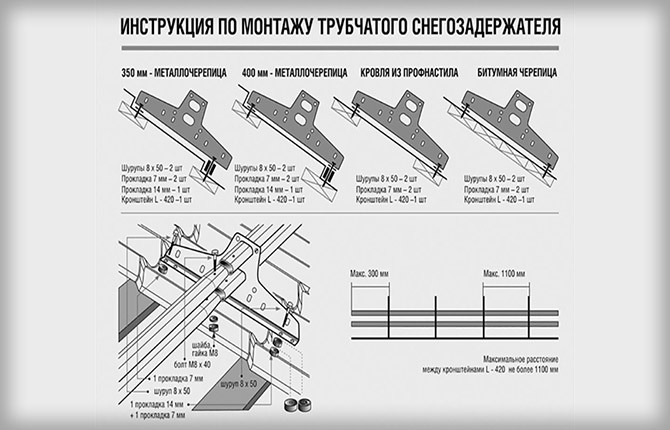
List for installation of one system:
- universal brackets – 2 pcs.;
- pipes (1 meter) – 2 pcs.;
- M8 nuts – 10 pcs.;
- M8x35 bolts – 10 pcs.;
- washer A8 – 10 pcs.;
- brackets for fastening to rebated covering – 8 pcs.
This list is necessary if a person does not want to buy a ready-made structure, but assemble it himself.
Installation algorithm:
- Determine the location of installation of snow guards on a roof with a seam roof. Systems are not placed on eaves - this is an unreliable place. It is better to move the stoppers closer to the edge or ridge so that they are above the load-bearing wall.
- Marking. Place the brackets on the roof taking into account the distance between the folds. The distance between elements should not be more than 90 cm. The last bracket should be at a distance of 30 cm or less from the edge of the pipe.
- The bracket is fixed to the rebate surface with bolts and staples. To install one such element you will need 4 clamps.
- When the brackets are securely fixed, pipes are inserted into them and secured with bolts. Do the same as in the instructions above - seal them with plugs or flatten them.
The shape of the fasteners in the design is identical. Therefore, they are suitable for installation on roofs with left or right seams.
Soft roof
The surface of a soft roof is slightly rough and has a mineral coating, so it holds snow well. On such a roof you can install any type of snow retainer - lattice, tubular, corner.
Installation of stoppers is carried out when laying soft tiles. According to the installation rules, the elements are fixed with nails in the central part of the shingle so that the fastening strip can overlap the next tab.
The entire system must be covered with bitumen mastic. In fact, the method of installing snow guards does not differ from those described above. The only caveat is that when installing triangle yokes, lathing is not required.
Installation of the system is not required if the soft roof slope is less than 15 degrees. Snow masses practically cannot come down from it.
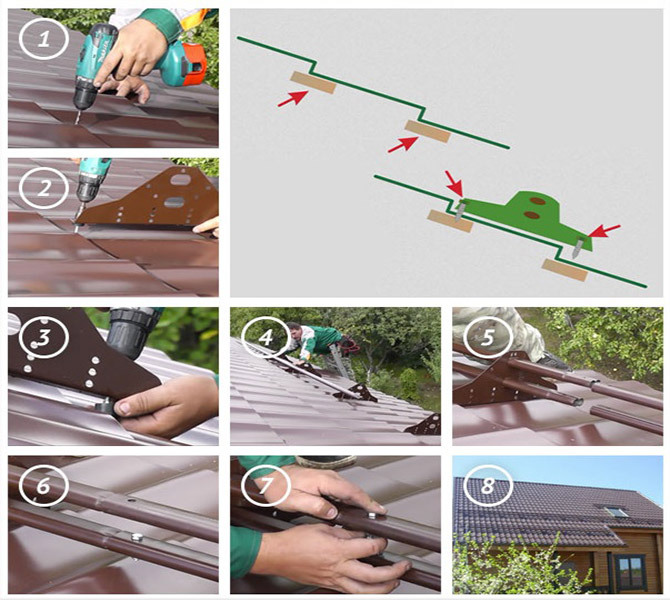
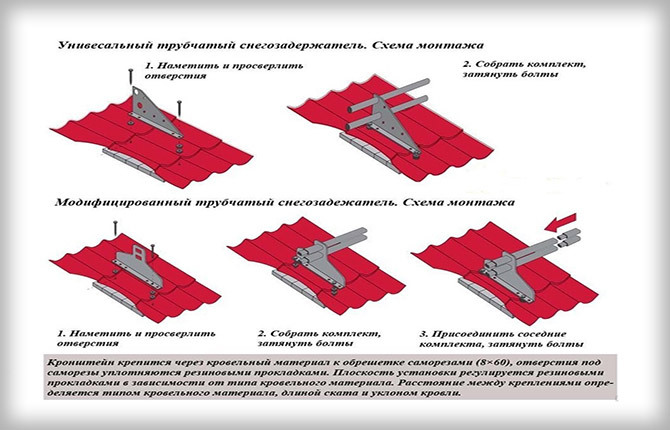
Installation of tubular snow guards
The system is installed on roofs made of material with a smooth texture. A necessary condition for proper installation is compliance with a step of 90 cm. The best option is if the installation is carried out on a continuous sheathing. But in the event that the roofing has already been laid, bars are used to securely fix the brackets.
Work algorithm:
- Place marks on the roof where the brackets will be mounted. The first of them is mounted on a load-bearing wall for reliability.
- At the extreme points, make small fasteners from scrap materials. Pull the cord between them. This is necessary to maintain a straight line.
- Use a metal drill to drill holes in the profile for installing fasteners.
- Prepare self-tapping screws and rubber gaskets for them. Screw the first ones into the holes. Complete them with rubber pads on top (7 mm) and bottom (14 mm).
- After installation, insert the pipes into the brackets. Secure the plugs in them.
The pipes in the system are joined in a tongue-and-groove manner.
Installation of corner snow barriers
Before installing such a system, you need to make sure that the rafter structure is able to support it. Otherwise, it is fraught with serious consequences. Corner snow retainers are chosen for roofs whose slope does not exceed 20 degrees. Or they can be mounted with stronger options - tubular or lattice.
Installation rules:
- The vertical part of the corner should always face the roof ridge.
- The elements of the system are arranged in a checkerboard pattern.
- The distance between the corners is 0.5-0.7 m.
- The corners can be positioned in a straight line if they are only an addition to the main snow retention system.
Work algorithm:
- Roof markings. Pull the mounting cord between the fastening points.
- Auxiliary system - the corners are attached to the upper wave of the profile. Fixed with small self-tapping screws.
- The main system is fixation to the bars with long self-tapping screws for reliability. The bottom shelf is fixed with short screws through the wave.
To install the system, it is better to take self-tapping screws with a self-sealing gasket.
Installation of snow yokes
Snow yokes are installed on roofs with a slight angle of inclination (up to 15 degrees) or on bitumen shingles. If this particular type is chosen, then it is important to take into account that its installation, according to the rules, can only be carried out at the stage of laying the roofing. The reason is that the elements of the system are fixed directly to the sheathing.
Some models of rope stoppers have a hook. It is needed so that the element can simply be hooked onto the edge of the sheathing. In this case, there is no need for self-tapping screws for fastening.
Yoke stoppers can be installed on metal tiles or corrugated sheets. But you need to ensure the strength of the fastening. That's why they use wooden blocks.
Installation of log snow guards
Log snow guards are an option for wooden roofs. They are rarely installed on roofs made of slate, metal tiles and other materials. They look especially good on shingle roofs.
Installation is simple. You need to buy suitable logs and secure them to the sheathing or rafters. The optimal log diameter is 15 cm. If installation is carried out according to technology, there will be a gap of 3 cm between the tree and the roof. It will be enough so that during melting the snow does not linger on the roof, but flows down.
The installation technology is almost identical to the installation of pipe snow retainers on the roof. But you need to take not brackets, but hooks on which the logs will be laid. The hooks to the roof are fixed with self-tapping screws. After strengthening the structure, logs are laid on it. The step between log snow guards is 50-100 cm.
Installation of lattice snow guards
This option is suitable for roofs with an angle of inclination from 35 to 40 degrees. Manufacturers produce ready-made systems, the height of which varies from 10 to 20 cm. Installation to the roof is carried out using brackets and screws (with a rubber washer to ensure a tight connection).
Lattice systems can withstand heavy loads. The installation technology is not much different from the installation of tubular snow retainers. But there are nuances:
- To install lattice stoppers, you need to make a strong frame. To secure the grille to the brackets, take M8*16 mm bolts, and for fixing M8*25 mm.
- For installation, galvanized screws are used.
- If it is possible in the system to adjust the level of inclination of the grate, which consists of 2 parts, then one part is fixed to the roofing, bolted around the perimeter.
Everything else, including the markup, will be identical.
Typical mistakes when installing snow guards
Since snow guards are usually not installed by professionals, various errors are possible during the process. Some of them can even cause damage to the roof covering and costly repairs.
Bracket failure
If the bracket is installed correctly, then it can be pulled out from the roofing only in one case - by applying excessive force. A breakdown can occur for the following reasons:
- the owner of the house used screws that were too short during installation;
- the slope is long, and only a number of snow guards are installed;
- the grille is not reinforced enough;
- The slope of the roof is too steep, and the owner installed grill stoppers on it.
In the latter case, excessive pressure from the snow mass will simply tear off the brackets.
Leaks
Leaks in places where screws are screwed in are possible in the following cases:
- No special sealing gaskets were used.
- To save money during installation, homemade rubber gaskets were used. Such parts can withstand no more than 2 seasons, after which they collapse.
- The screws are either too loose or too tight.
To prevent leaks, it is recommended to apply sealant under the screw caps.
The installation of snow retainers must be carried out strictly according to technology, otherwise the structure simply will not withstand the onslaught of snow and will break under the pressure of snow masses. Correct calculations are also equally important. If you have no experience in carrying out construction work, it is better to entrust this to professionals.
Have you ever installed such systems? Which type did you choose? Tell us about your experience in the comments. Save the article so you don’t lose useful data.