When installing the roof, it is necessary to take care of the organization of under-roof ventilation in advance. Such measures will help to preserve their thermal insulation material and prevent premature wear and deterioration. truss system.
The main element that provides air circulation is a roof aerator. Let us consider in more detail its structure, installation rules and importance in ensuring the normal movement of air in the space under the roof.
Content:
- Roof aerator ↓
- Description ↓
- Principle of operation ↓
- Application area ↓
- Advantages and disadvantages ↓
- Types of roofing aerators ↓
- Installation of a roof aerator ↓
- Necessary materials and tools ↓
- Walkthrough ↓
- The cost of aerators ↓
- Tips for choosing and installing roof aerators ↓

Roof aerator
The roof aerator is an external ventilation outlet on the roof surface. Through it, the accumulation of vapors is removed to the external environment.
Moisture formation occurs as a result of heating the air from the floors above the living quarters, which, rising above, is rapidly cooled by contact with cold roofing materials. During this cooling, condensation forms - droplets of moisture deposited on the surface of the elements of the rafter system and the roof.
We specify the benefits of using a roof aerator:
- Removes moist airrising from residential premises, preventing its subsidence on structures, roofing materials and insulation.
- Ventilates the under-roof spaceby removing accumulated moisture.
- Creates optimal mode for the normal functioning of each component of the roof and attic space, thereby increasing their service life.
- Prevents corrosion metal tile sheets and prevents the formation of swelling when using rolled materials on flat roofs.
- Allows for normal movement air with a complex architectural shape of the roof, especially at kinks and sudden elevations.
- Creates conditions for conservation heat-insulating properties of insulation for a long time.
Description
The modern construction market presents many types of aerators designed for different types of roofing materials.
It is worth noting that all of them are united by several common features:
- the design of the device is a pipe having a diameter of 63-110 mm;
- the top of the pipe is covered with a special umbrella to prevent the ingress of rain and snow;
- a sealed mounting system to the roof surface is provided.
In addition to the described point aerators, skates are also used. They provide uniform ventilation over the entire surface of the subroofing cake.
If you decide to use just such devices, then you should remember that with a complex shape of the roof, point aerators cannot be dispensed with. Since in difficult places problem areas can remain without airing.

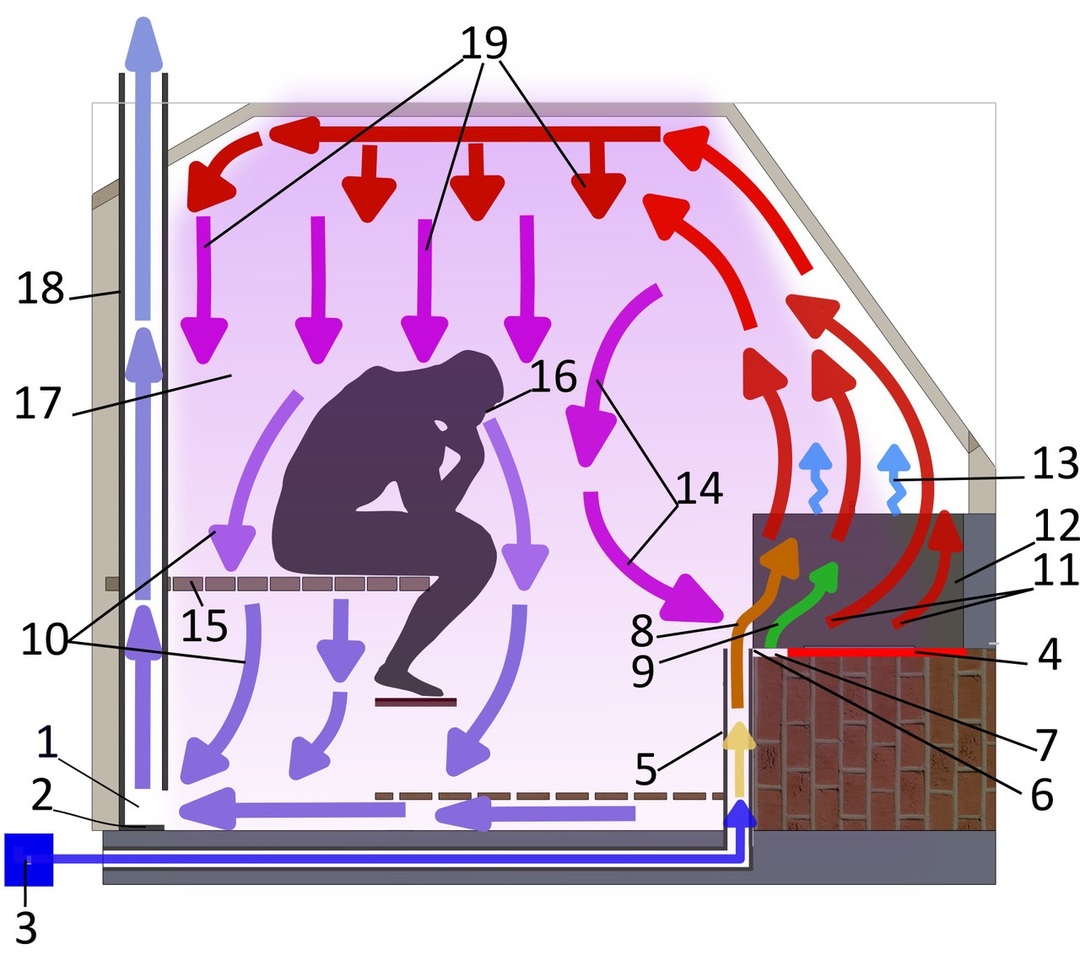
Principle of operation
The work of aerators is based on two fundamental principles:
- Creating traction in the pipe.
- Pressure differences inside the under-roof space and on the street.
Normal air circulation is unthinkable without spotlights in the overhangs of the roof. Thanks to them, the movement of air masses takes place: cold from the external environment tend to get into the warm space under the roof and displace heated and humid air from there.
Such circulation in the winter period occurs continuously, during the summer heat, the roofing materials do not overheat, which also positively affects their service life and the microclimate of the attic.
Application area
Such aerators are used to provide ventilation for the insulated roof. If insulation is not used, then the use of such devices is also justified, because removal of excess moisture should be complete.
Many manufacturing companies offer a wide range of aerators designed for different types of roofing materials, namely for:
- metal tiles with large, low and medium wave heights;
- shingles;
- rebate roofs;
- natural tiles.
The type of material determines the method of attaching the aerator and, accordingly, fasteners are used.
Among the options for a roof ventilation device, it is possible to combine both the simultaneous use of ridge and point aerators, and it is completely possible to refuse to use such a device in the ridge.
The decision to use only point exits should be accompanied by an appropriate calculation of their number per roof area and strict adherence to the distance from the ridge.

Advantages and disadvantages
Installation of roof aerators has more positive than negative sides. Since there are several types of roof ventilation, we summarize their characteristics.
Let's start with the benefits, list them:
- ease of installation;
- attractive appearance, the ability to hide the aerator (continuous type) or choose a spot to the color of the roofing;
- durability;
- ensuring reliable ventilation of the under-roof space;
- protection against swelling of rolled soft coatings;
- effective removal of moisture-saturated air;
- elimination of the threat of damage to roof structures and materials, from damage by fungi;
- the possibility of drying the old roof.
The weaknesses of aerators include the following properties:
- point aerators are not always able to provide proper ventilation of all sections of the under-roof space, sometimes there are “dead zones with stagnant moist air;
- continuous aerators must be mounted during the installation of the roof, since subsequently this cannot be done without complete dismantling.
Types of roofing aerators
According to the method of ventilation, aerators can be divided into two main types: continuous and point. Continuous analogues are installed in the roof ridge along its entire length and provide ventilation of the space under the roof. They are invisible to prying eyes and durable. From the penetration of precipitation and insects there is a protection in the form of a sponge filter.
Point aerators have several options. Depending on the location, they are divided into pitched and ridge. Pitched devices are located no further than 60 cm from the roof ridge, as well as in its problem areas. Skate options are mounted on the roof ridge with a certain step.
In turn, pitched aerators are of the following types:
- KTV valve;
- fungal aerators of natural draft;
- the same with a built-in fan.
Flat roof valves (another name for KTV) are small devices that resemble tiles and are protected from insects by nets. They are used on roofs with a slope of no more than 25 degrees.
Fungal aerators use in cases when the roof is flat. The built-in fan helps to activate air exchange in the under-roof space.

Installation of a roof aerator
Consider the basic rules and installation steps for example pitched aerators. We list the requirements for installing such devices:
- The distance from the roof ridge to the installation site should not exceed 60 cm.
- Aerators are installed in increments of 12 meters (no more).
- For a roof area of 60 square meters, one device is enough, but if the roof is flat, then an increase of this indicator to 100 square meters is permissible.
- With a large slope of the roof and a significant difference in height between the ridge or valley and the surface of the roof, aerators are installed parallel to the ridge and the dividing border of the valley.
The installation process itself can be divided into the following stages:
- A hole is cut out on the roof surfacecorresponding to the size of the aerator (according to the template that comes with the kit). The depth of the cutout should correspond to the insulation and pass through the roofing “pie”).
- If a wet insulation is detected in this area it should be replaced with a new one that meets the established requirements.
- To ensure a reliable and tight junction of the aerator to the surface of the roof must be applied to its base (passage element), as well as rubber lining ring special compound (sealant or mastic) recommended by the manufacturer in instructions.
- After installing the feed-through element in place his “skirt” is attached to the roof with self-tapping screws. Important: the screws must twist sequentially on opposite sides.
- In the passage element is installed vent pipebut with a fungus that protects against atmospheric precipitation.
Necessary materials and tools
We will analyze the installation sequence using the example of a roofing aerator in the form of a fungus for a metal tile. Preparation of tools before work will relieve unpleasant surprises during the installation of the aerator.
We list the minimum required devices:
- construction marker;
- drill;
- construction knife;
- scissors for metal;
- building level;
- hacksaw for metal;
- screwdriver;
- sealant (preferably silicone) with a gun.
Each manufacturer attaches the instructions to the roof aerator kit, according to which the installation is carried out. You should pay attention to the presence of a passage element in the set and, if it is missing, then purchase a suitable one.
Walkthrough

Despite the fact that the installation process of different aerators may be slightly different, in general terms, the sequence of actions is as follows:
- A hole is cut out. The template supplied in the kit is applied to the surface of the roofing sheet and circled with a construction marker.
- Drill holes near the contour.
- When cutting, it is best to use scissors for metal and in no case use a grinder. This is due to the fact that during sparks hot sparks fly off, damaging the polymer coating of the sheet, thereby opening up the corrosion path. In the places of the cut, the metal is heated and not only the polymer layer is destroyed, but also galvanized.
- A rubber o-ring is applied to the waterproofing material and encircled in the inner loop. A cruciate incision is made in the middle, then, holding the material with your hand, the outlined oval is cut out.
- Sealant is applied to the sealant, then it is installed in the hole and secured with screws. For this, it is more convenient to use a screwdriver.
- Installation of a passage element is made so that the loops of the o-ring coincide with the pins on the element itself.
- The outlet pipe is mounted in the passage element and is rigidly fixed. To achieve a reliable connection, cut a hole in the bushing by ¼ less than the diameter of the outlet pipe. Sometimes the kit is completely ready for installation and nothing needs to be cut.
- The outlet pipe should be checked for verticality. with the help of the building level and only after meeting the plumb position, fasten with screws.
The cost of aerators
The price of various aerators varies in a wide range: from several hundred rubles to two or more thousand. Sometimes you have to complete the kit yourself, buying all the components from one manufacturer separately in the store.

Tips for choosing and installing roof aerators
- Consider ventilation of the roof space at the design stage of the roof. It must be borne in mind that spot aerators must be designed for the roofing material used.
- To ensure proper air circulation under soft roof, in the insulation a hole is cut corresponding to the size of the ventilation pipe, which is filled with expanded clay or gravel.
- Installation of ventilation outlets is carried out at positive temperature. After rain until the roof dries, working on the roof is life threatening. In dry weather, it is allowed to be on the roof only in non-slip shoes with rubberized flexible soles.
- The main criterion for choosing an aerator is certified products from a well-known manufacturer. Upon purchase, special attention should be paid to the complete set and the absence of mechanical damage (scratches and deformations).
- With insufficient knowledge and lack of experience, it is better to entrust this responsible work to professionals. Otherwise, you can make a lot of mistakes before professional experience comes. Guaranteed quality work - cooperation with campaigns that draw up a contract for the services provided. The total cost of installing a roof and a ventilation device will be more expensive, but it will more than pay for possible malfunctions detected during operation after unknown builders.
- In the period of general use of the Internet, with a great desire, you can find a lot of information, having studied that the probability of performing work at the proper level is very high. If you have time and a great desire, then installing a roof aerator will not be difficult.