Modern cars, like most other devices, are electrical installations equipped with wiring, their own power sources and lighting devices. For a number of reasons, many car owners are faced with the question: how to remove the interior light with their own hands. Whether for the modernization of lighting fixtures or the replacement of cracked housing elements.
Content
- Reasons to replace the interior light
- What to look for before removing the ceiling light?
- Step-by-step instructions for dismantling the lighting
- Related videos
Reasons to replace the interior light
As a rule, most drivers do not pay attention to the salon cover, while his work completely suits them.
Therefore, the procedure for dismantling the ceiling light can be due to the following reasons:
- Salon lighting ceased to burn - it occurs both due to a burnout of the bulb, and due to the lack of contact at the entrance of the lamp itself.
- Inadequate lighting - in most cases, it is caused by the fact that low-power or outdated devices are installed in the plafond, which give a low luminous flux. It can also occur due to the burning out of any part of the lighting devices in the ceiling.
- Lamp flickering - occurs due to poor contact or a malfunction of the LED lamp driver. To diagnose the cause, it is necessary to remove the light cover.
- Broken glass of the diffuser or cracked body of the lampshade is caused by sloppy actions of both the driver and passengers. It also occurs during the natural aging of plastic and the loss of its mechanical properties.
Regardless of what reason led to the need to dismantle the lampshade, you should refer to this procedure as carefully as possible, as due to careless actions, both the lamp itself and the casing can easily suffer the ceiling. Which will entail additional costs for their repair and restoration.
What to look for before removing the ceiling light?
Before working with the side or center lamp, be sure to remove the power terminal from the vehicle’s battery, as this may result in a short circuit in the circuit. Which can lead to additional damage and, it would seem, a simple procedure will cause a number of unforeseen costs.
Before you remove the light, you will need to inspect the outside of the attachment point of the diffuser to the body. As a rule, these are small cavities in which you can stick a screwdriver or some other flat object.

In each car model, they can radically differ. But the most common are mechanical clamps and spring clips. The mechanical clamp can easily be opened using a screwdriver or other flat object. The spring latch can also be opened by pressing on it with a screwdriver or other object that can penetrate the hole.
It should be noted that at this stage the movement of the diffuser should be as easy as possible. If after disengagement in the lock you cannot easily separate the diffuser from the body of the lampshade, then somewhere there remains an unhooked mount. Therefore, it is better to check the entire case again, it is quite possible that somewhere there was an unnoticed lock, perhaps it is covered by a casing or a sticker. There is also the possibility that during the opening of the castle on one side, on the opposite side, the castle could return back to the groove.
Since with sufficient force, you can simply break the diffuser, damage the body of the lampshade or tear it from the place of fixation. Depending on the design features, the outer glass can be removed separately, leaving the ceiling in the socket, or the entire lamp may fall out completely.
To remove glass, you can use:
- A screwdriver or a knife - are selected in accordance with the characteristics of the lamp;
- With a special spatula - as a rule, it is supplied with a plafond or sold in specialized stores;
- Manually - if the design allows, you can remove the diffuser by hand, pushing on certain areas of the lampshade or on the latches.
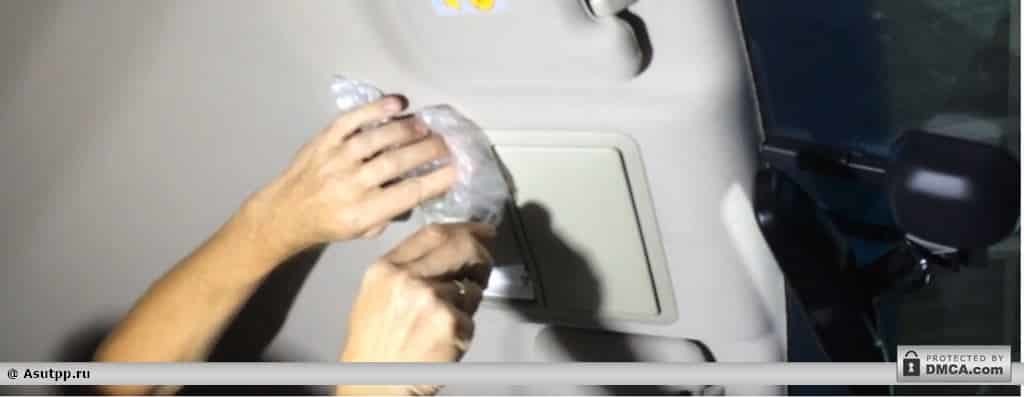
It should be noted that the impact of a metal tool on plastic elements is fraught with the appearance of scratches and the subsequent loss of the ceiling of the external aesthetics. To prevent such phenomena, a plastic bag can be placed under the screwdriver so that it is between the screwdriver and the case.
In order to figure out how to remove the interior light, consider this manipulation using a specific example.
Step-by-step instructions for dismantling the lighting
To do this, consider upgrading the interior lighting. The following example shows the replacement of a conventional incandescent light bulb in a lampshade with a more modern and efficient LED board NIGHTON ML-6. This replacement will be relevant for the interior of the car Chevrolet Aveo, Daewoo Matiz, ZAZ VIDA with the same lighting shades. This technology for dismantling the lampshade will be relevant for other brands of cars. Carefully study the external design of the lamp.

As you can see, near the switch there is a small groove highlighted in red in the figure. In order to remove the diffuser, it must be pry off with any flat object. In this example, you use a knife to pry off the lampshade and apply a small force towards the interior.

Please note that the knife should easily enter the hole, but at the same time you will need a sufficient width. Since a thin web creates a large load at the pressure point. Also, force should not be allowed only from the edge, since slipping can cause plastic chipping and you will damage the light cover. Gently push and remove the diffuser.

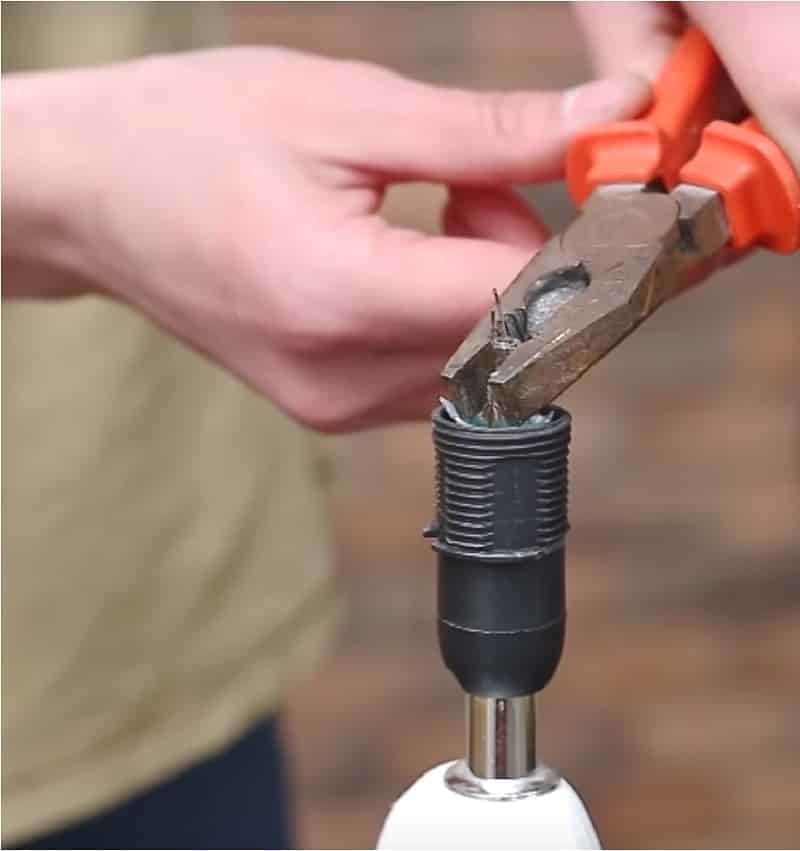
As you see in the picture, the lamp itself without glass will be in front of you. In this example, the casing is bolted on both sides of the lamp lighting the lampshade. To remove them, you will need a Phillips screwdriver of the appropriate size.

To remove the fastening screws, jerky movements are not allowed that can damage the bolt or cause the screwdriver to slip. If excessive force occurs, you should first remove the lamp, so as not to break it with a screwdriver and not damage your hands or eyes with fragments.

When unscrewing the second screw, it is better to hold the case with your fingers to prevent it from falling out uncontrollably. Since it is also possible to break the bulb or damage the housing.

After removing the bolt, carefully separate the lamp from the casing. At the same time, he should easily move away without any effort. If this does not happen, there may be an additional mount that you missed. Then inspect the surface again, you may need to slightly pry it to determine the place of fixation.

After the lamp is separated from the casing, you must unplug the power cord. If they have a plug-in fixation, then it is enough to open them, if bolted, they must be unscrewed.
Also, immediately notice which wire you are connecting to, since you will need to reconnect them. In this situation, the power wires of the lampshade are multi-colored and they are easy to navigate. If they all have the same color, they can be marked with a marker or electrical tape, depending on what is at hand. The main criterion for such spontaneous marking is that you can easily determine the initial place of connecting the wires in the ceiling.

If everything went smoothly and you have not yet dismantled the lamp, remove it from the mount. In this case, do not apply force to the glass bulb, if the lamp does not come out freely, pry it from under the metal clip near the end.

The NIGHTON ML-6 board mount is clearly suitable for the holes on which the lamp clamps are fixed. Screw it with the same bolts as shown.

The black wire must be connected to the nearest of the ceiling mount bolts. As indicated in the instructions for the lighting board.

A green wire is connected to the extreme contact in the connector, it is considered idle. The remaining pins (red and white) are connected to the power connector.

Consider the figure, the red and white wires are connected to the corresponding terminals of the terminal strip, as shown on the left, so that their color marking matches.

The luminaire is installed in the same socket in the ceiling lining. The mounting bolts are alternately tightened. Please note that an output with a terminal is already underneath one of the bolts, so the bolt should fall into its hole, and not past.

Preliminarily align the protrusions on the diffuser and the holes in the lampshade, indicated by red arrows in the figure. Then put them into each other and gently press down from the side of the switch. The diffuser must be clearly level with the body.

After installation, reconnect the battery terminal and test the functionality of the light.
Related videos
- How to make a DIY repair of an energy-saving lamp?
- How to make a do-it-yourself nightlight
- How to make lighting in the garage with your own hands?
- Do-it-yourself concealed ceiling lighting