The lion's share of the work on home products is done by the refrigerator. Due to constant cooling, this device is able to greatly facilitate life and bring tangible comfort. Because of which, in the event of any malfunction, many ordinary people rush headlong to the experts or to buy a new unit. But repairing the refrigerator with your own hands can solve the problem, which can significantly save the budget.
Content
- The device and principle of operation of the refrigerator
- Fault diagnosis
- Overview of Common Breakdowns
- The refrigerator is leaking
- The refrigerator freezes and frost appears
- The fridge turns on but does not freeze or chill
- The refrigerator does not turn on
- Long work without shutdown
- Increased noise level
- Lack of lighting with the door open
- There is water inside or under the bottom of the refrigerator
- Odor
- Red light is on
- Step-by-step instructions for repairing refrigerator components and systems
- Troubleshooting thermostat
- Leak detection and refrigerant replacement
- Thermal overload relay failure
- Replacing a failed compressor
- Eliminate rattling compressor sounds
- Replacing light bulbs
- Solving problems with temperature sensors
- Drainage system cleaning
- Door alignment
- Control Board Failure
- Evaporator defect
- Change or straighten the rubber band
- Replacing a Blown Temperature Fuse
- Solving problems with the fuser, timer and fan in NoFrost refrigerators
- Start relay repair
- Useful Related Videos
The device and principle of operation of the refrigerator
In order to repair the refrigerator you will need to understand the principle of its operation. First, look at the electrical diagram explaining the principle of operation of the device.

We analyze the notation on it:
- temperature regulator;
- forced defrost button;
- thermal protection relay (includes contacts 3.1 and a bimetal plate 3.2);
- starting motor compressor (consists of a working winding 4.1 and starting 4.2);
- starting relay (includes contacts 5.1 and coil 5.2)
With the closed contacts of the temperature controller and the defrost button, the voltage is supplied through the thermal protective and starting relay to the electric motor. At the time of start-up, the current in the working winding is disproportionately large; when it flows through the coil 5.2, the relay contacts are switched. Then, through the contacts 5.1 of the start relay, the start winding 4.2 closes, reducing the amount of current at the start-up phase. With a decrease in the current load on the working winding, the coil of the starting relay releases the contacts, and the passage of current through the starting winding stops. In the event of excessive heating of the system or at high currents, a thermal protective relay is activated, thereby preventing overheating and subsequent fire.

The compressor moves the refrigerant gas through a system of tubes and capillaries. The inner part of which is called the evaporator, in them due to reduced pressure the gas evaporates and the absorption of thermal energy inside the chamber. After that, the refrigerant from the tubes of the evaporator is transferred to the external circuit of the condenser, where the thermal energy is transferred to the heating of air in the kitchen, and the gas itself is liquefied. The liquid is again pumped into the evaporator, where it absorbs heat, and turning into gas closes the cycle.
Fault diagnosis
Most breakdowns are quite possible to determine in the early stages: these are uncharacteristic sounds, deviations from normal operation, the appearance of a burning smell, and others. A timely response in the key to diagnosing the device allows you to perform all repairs of refrigerators at a low cost. Ignoring such signals can lead to an aggravation of the malfunction with a further failure of the main components, which will entail significant overhaul costs. The entire diagnostic process is based on specific malfunctions or parameters preceding them.
For example, if you cannot turn on the refrigerator, the diagnosis of the problem should start with the presence of voltage in electrical outlet, then check the condition of the electrical plug, power cord, relay and motor status compressor. To fix the problem, you do not need to grab the first part that comes across.
Overview of Common Breakdowns
To eliminate malfunctions arising in refrigeration units, it is necessary to have a minimum understanding of the most common breakdowns. Since self-repair is simply impossible without an adequate response to the problem, study in detail the reasons why certain situations arise.
The refrigerator is leaking
It can be caused by mechanical damage to the case, destruction of the thermal insulation layer and, as a result, violation of the temperature regime. This creates condensation at the site of damage, which flows down the refrigerator. To fix the problem, it is necessary to restore the thermal insulation layer and patch the hole.
The refrigerator freezes and frost appears
If, when you open the door, you become a witness to a frozen layer of hoarfrost and frozen food, then such a situation could arise if:
- The cooling level is too strong, adjustment is required;
- Malfunctions with temperature sensorcompressor installation, etc .;
- The door seal does not fit snugly, which could have occurred due to loss of elasticity;
- Out of order and requires replacement of the thermostat;
- The door does not close until the end due to overcrowding of the cooling chamber.
To check the tightness of the doors, the factory uses a special metal probe, which at home can be replaced with a strip of paper. At the place where the paper penetrates under the magnetic strip, air is sucked in from the outside, which causes the deposition of ice and more hard cooling.
The fridge turns on but does not freeze or chill
This problem may occur due to:
- Malfunctions thermostat or setting the cooling mode to a minimum;
- Failure to configure complex electronic control nodes in modern models;
- Accidental start of defrosting, it is required to completely defrost the refrigerator and turn it on again;
- Sharp loading of double-chamber refrigerators with large volumes of products that he does not have time to cool;
- If there is a refrigerant leak, you need to urgently find the place of damage and repair it;
- Faulty compressor motor or clogged cooling system.
The refrigerator does not turn on
If this is the case, check the electrical circuit for continuity. In this case, the following causes of failure are possible:
- Household appliances are not plugged in, insufficient voltage or the outlet is faulty;
- It is necessary to check the chain of the plug and cord for integrity;
- Damage to the relay or electric motor.
Modern refrigerators Atlant, Samsung and others may not turn on due to malfunctions in the control unit. It is quite difficult to detect such problems at home.
Long work without shutdown
In normal mode, you hear active work for 10 to 20 minutes. Then it should turn off until the next cycle. Otherwise, rapid wear of the rotating elements occurs. The cause of the problem may be:
- A door that is not tightly closed or the hot air of the surrounding area, because of which the required temperature level is not reached in these household appliances;
- The device operates in ultra-severe freezing mode, but such work cannot last longer than regulated by the factory instructions;
- The thermal electronic sensor is out of order;
- Freon leaks from the cooling system.
Increased noise level
For the correct operation of the unit, its installation is carried out using a building level and on a solid foundation. If these requirements have not been met and the refrigerator is unsteady, then third-party noise will occur during operation.
With a reliable installation, the sound may be emitted by the compressor casing, touching the rear wall of the tube, contacts of the protective relay, evaporator fan. To eliminate such situations, it is necessary to adjust the operation of the corresponding elements.
Lack of lighting with the door open
If the lamps do not light up in the refrigerator, then both the lighting devices themselves and the alarm button on the state of opening / closing the doors could fail.
A separate reason may be a lack of power from the mains. Therefore, before you start repairing the refrigerator, you must make sure that voltage is applied to the device.
There is water inside or under the bottom of the refrigerator
Such an incident can be detected in the form of a puddle under the refrigerator or as an accumulation of water inside the chamber. In most cases, it is caused by such reasons:
- Temporary power outagewhich you did not notice;
- Someone set hot or not sufficiently cooled dishes in the cell;
- Clogged drain or tubing in a crying evaporator system;
- Do not tightly closed doors;
- Unsuitable environmental conditions (ventilation of the premises is required, bringing standards to the requirements of the plant).
The above list of faults is relevant for those situations when the device maintains the cooling temperature. If it does not freeze, the reason is due to other factors.
Odor
In addition to the natural factors in the form of products with a specific smell, spoiled dishes and unwashed walls of the refrigerator, an unpleasant odor can occur due to burning plastic, electrical contacts, insulation, etc. If in the first case it is enough to observe vigilance, then in the second there is a real threat of capital breakdown or even fires.
Red light is on
Indicates that one of three failures occurred:
- Faulty temperature controller;
- Problems starting the compressor;
- Freon leak.
Whatever the reason, repairs should not be postponed.
Step-by-step instructions for repairing refrigerator components and systems
After you have decided on the cause of the malfunction, you can proceed to resolve it. Consider the most common options.
Troubleshooting thermostat
Depending on the specific model, the temperature controller can be located both inside the refrigerator and outside. With an internal arrangement, it is enough to remove the temperature adjustment knob and remove the thermostat housing.
In Samsung, LG and other foreign brands, the thermostat can also be checked under the panel to decrease and increase the cooling temperature. But it is placed on the outside of the camera. To determine the performance you will need:
- Disconnect from the network;
- Thaw completely;
- Turn on the refrigerator for maximum freezing, placing the thermometer inside and wait a couple of hours, if the device shows not 5 - 7 ° С, then replacement is inevitable.
To fix the refrigerator, it is enough to purchase a spare part and install a new one instead of the defective part.
Leak detection and refrigerant replacement
Leaks can be detected by several methods:
- Soapy solution - available in case of slight leakage and the presence of liquid refrigerant pressure in the system. At the same time, access to all tubes is provided - the protective cover of the case is removed, the evaporator is defrosted. At the gas outlet, the soap solution will foam.
- Dye - used where the pressure in the circuit does not allow the use of a soap solution. A dye is added to the liquid freon and launched into the system, after which a characteristic color appears at the leak.
Before the new gas is injected from the system, the residual water is preliminarily removed from the system, and if blockages are detected, additional cleaning is performed. Then refueling is carried out. Experts recommend performing this procedure without leakage every 3 to 5 years.
Thermal overload relay failure
In the event of a malfunction of the temperature fuse, premature shutdown of the refrigerator may occur, resulting in a risk of engine overheating. For repairs, you will need to remove the relay and disassemble its case, if the cause is a jammed rod, the issue can be solved independently, if the winding is damaged, you will have to change the entire part.
Replacing a failed compressor
In this case, for repair it is necessary:
- Disconnect the refrigerator from the network;
- Tilt the compressor and start the compressor for a couple of minutes;
- The puncturing valve is fixed to the filter drier, connect the cylinder to the valve and tighten the puncture valve and open it for half a minute;
- Instead of refueling, solder the copper tube;
- Make an incision on the capillary tube;
- Remove the old compressor and install the plugs in the suction and discharge outlet;
- Install a new compressor and solder it, carefully inspect the quality of the solder.

Eliminate rattling compressor sounds
The noise of the compressor can be caused by the loose fit of the metal elements or vice versa, the excessive proximity of certain elements, due to which there is collision and bounce.
For repair, it is necessary to tightly fix the casing, in case of loose fasteners, attach washers for a snug fit and tightening.

In the case of approaching other elements, it is necessary to adjust the devices themselves in the opposite direction or carefully bend the tubes if it is impossible to move the compressor.
Replacing light bulbs
To avoid electrical shock, unplug the refrigerator. Then open the door and check the condition of the lighting device, for example, in Indesit refrigerators, the bulb may become very hot, so you should wait until it cools completely.
For this, it is not necessary to use the same lamp, but you can find an alternative replacement, but accordingly by type: incandescent or halogen. Lamp power should not exceed 30 watts. But before replacing it is worth checking the voltage in the cartridge, because the reason may not be at all in the lamp.
Solving problems with temperature sensors
This part is designed to control the speed of the compressor unit. When they fail, the refrigerator will not be able to maintain the desired temperature. Quite often, such a malfunction occurs in Nord refrigerators; several such elements are included in their composition at once.
But they cannot be disassembled and repaired at home on their own, so after removing the sensor, it will need to be completely replaced.
Drainage system cleaning
There are two options for placing the tube - outside the body and under it. In the first case, cleaning is quite simple: remove the tube and rinse it in hot water, if possible, soften the accumulated weeds.
If it is impossible to remove the handset, it is worth trying to clean it with the brush included in the kit. If he can’t cope, a metal wire previously polished with sandpaper is used for repairs. After cleaning the tube, rinse it with water.

Door alignment
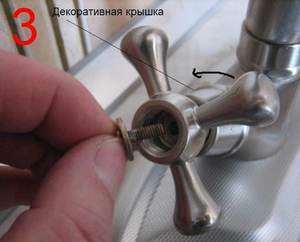
To adjust the position, you need to get to the place of attachment, for example, in LG refrigerators you will need to remove the protective strip, in other models the bolts may be in the public domain. After unscrewing, remove the door, put washers in the necessary nodes and put the door in place. If available, reassemble the decorative structures in the reverse order.
Control Board Failure
It is characterized by complete silence of the refrigerator, despite the fact that the power circuit is fully operational. The control board is one of the most complex devices and one of the most expensive. Replacement in the service center will cost three expensive, so it is better to do the repair yourself. For this:
- Unplug it and turn it on, in the Stinol refrigerators and many other brands, the board is located in the lower left part.

This removes the control board - Unscrew the fixing screws A and remove the latch B;
- After that, you can see the board itself in the case, carefully disconnect the terminals C.

Most often, capacitors deteriorate due to constant power surges, so in order to prevent such a repair in the future, it is better to connect the hoodilnik through the stabilizer. The installation location may differ from one company to another, so first you have to study the layout of the refrigerator.
Evaporator defect
It manifests itself in slight freezing, the appearance of a snow coat or rapid spoilage of products. It occurs due to damage or destruction of the walls of the evaporator both from natural processes and from the action of sharp objects.
In addition to replacing the condenser and evaporator at home, you can install an additional one so as not to risk violating the tightness of the freezer. In addition, you can try to repair the existing evaporator, if it seems appropriate to you. In any of the repair options, the refrigerant is drained from the cooling system, and when replacing, the evaporator sensor is turned off so as not to damage it during operation.
Change or straighten the rubber band
A poor seal can cause poor freezing, constant compressor operation and other malfunctions. To replace, take a screwdriver and separate the old rubber band from the plastic surface. Its place should be thoroughly washed and cleaned of glue and old sealant. To replace the seal, take a new strip and insert it into the corresponding groove on the door.
Additional fixation is provided by silicone or mounting foam, the use of glue for this purpose is completely impractical.
Replacing a Blown Temperature Fuse
In most cases, burnout occurs due to overheating of the heating element of the evaporator defrost. It is located in the freezer compartment, to check the health it is enough to use a tester. If an open circuit is detected, the temperature fuse is replaced with a new one. But in addition to this, it is necessary to find out the cause of overheating of the heating element, otherwise the breakdown will recur soon.
Solving problems with the fuser, timer and fan in NoFrost refrigerators
The system of dry freezing provides a number of advantages over drip, but they are determined by additional elements.
To access the contacts and the fan power filter, you must expand the refrigerator. The electric circuit of the refrigerator, which feeds the fan, is called, the stroke of the blades is tested.
If no problems are found, remove the fuser from the connectors and ring the tester. Provided that the resistance is close to zero, we can assume that the fuser is serviceable, otherwise it is replaced.
If both checks did not reveal a malfunction, the reason is in the electronic timer. To repair which at home is impractical - it is completely replaced.
Start relay repair

The relay is fastened either with latches or bolted. After it has been removed, it is necessary to check the stroke of the rod, since it can stick and impede normal movement. The coil status is checked by a tester - if a circuit break is detected, you will have to change all the relays. Replace in the reverse order. The main criterion for both the new part and the repaired is the contact tightness.
It is very interesting to read in addition:
- Do-it-yourself ariston washing machine repair
- DIY vacuum cleaner repair
- DIY home air conditioner diagnostics
- DIY microwave repair at home
Useful Related Videos
- Refrigerator compressor device
- How to make a do-it-yourself infrared heater repair?
- How to repair a multicooker with your own hands?
- How to make a hair dryer repair with your own hands?