When arranging a basement, primary attention is paid to the microclimate. The safety of products, the service life of racks, shelves, the condition of the entire basement depends on how the ventilation of the cellar in the garage works.
To make ventilation correctly, it is enough to comply with simple requirements to ensure reliable air circulation. In the article we will talk about the basic principles of building ventilation in a garage with a basement with your own hands. Consider possible options for its arrangement, nuances and ways to improve air extraction.
The content of the article:
- Appointment of ventilation in the basement of the garage
-
Features of the construction of ventilation systems
- Option # 1 - natural ventilation
- Option # 2 - forced ventilation of the cellar
- Advantages and disadvantages of ventilation systems
-
Step-by-step installation instructions
- Stage # 1 - drilling holes
- Stage # 2 - installation of pipes and fan
- The nuances of arranging ventilation
- Conclusions and useful video on the topic
Appointment of ventilation in the basement of the garage
Underground rooms have an important property - temperature stability due to the low thermal conductivity of the soil. Thanks to this, cellars are widely used for storing vegetables, fruits, and canned food. But underground, there are also unfavorable factors associated with high humidity.
To combat moisture and its consequences in the basement of the garage, ventilation is used, the purpose of which is as follows:
- provides an inflow of cold air from the outside and an outflow of warm air from the cellar, saturated with moisture, poisonous impurities;
- helps to maintain a lower temperature in the basement during the cold season;
- prevents corrosion of metal structures, car body, the formation of mold, mildew;
- increases the shelf life of food.
In addition, the garage contains vapors of technical fluids, exhaust, poisonous gases released during welding and cutting metal. They all have strong penetrating power.
With insufficient ventilation in the garage and the cellar, all these harmful substances can enter the basement, be absorbed by the products stored there. To eliminate the risk of poisoning, it is necessary to periodically check the reliability of the hood.

Installing ventilation will allow you to get rid of excess moisture and condensation in the basement. The exceptions are cases of close location of groundwater and poor waterproofing.
Features of the construction of ventilation systems
Air circulation in the garage cellar can occur in two ways: due to thermal convection, or mechanical movement of air. Depending on this, a distinction is made between natural and forced ventilation.
Option # 1 - natural ventilation
Let's first figure out how to properly make natural ventilation in the basement of the garage in order to keep the room dry, preventing the occurrence of fungus and mold.
The natural ventilation system of the cellar under the garage is the most affordable for self-installation. Saves not only food stocks, but also the car
One of the main conditions for natural air circulation is the temperature difference inside the cellar and outside the garage.
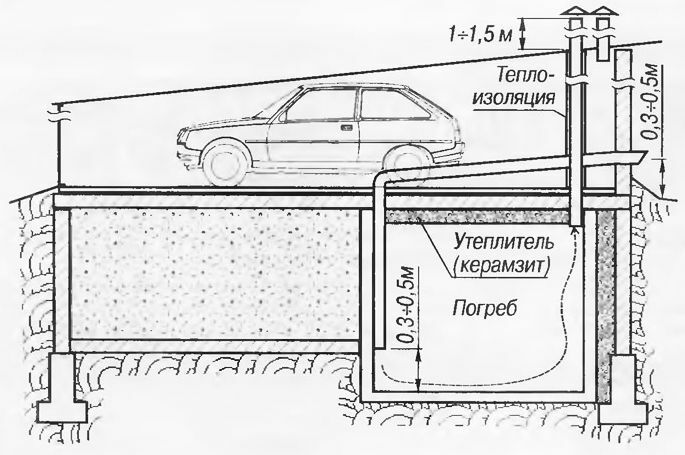
The device of such a system is quite simple, it consists of 2 pipes. One serves for the influx of cold air from the street, on the other, warm air is evacuated from the basement.
Since cold air is more dense and heavier than warm air, the supply pipe is lowered to the very bottom of the basement, closer to the floor. The inlet of the hood, on the contrary, is placed under the very ceiling. This allows cold air to naturally displace exhaust air - warmer and lighter, saturated with water vapor and other gases.
But in order for the natural circulation to work reliably, another important condition must be fulfilled: ensure a sufficient pressure difference inside the chimney and outside with a minimum difference temperatures. The higher and longer it is, the greater the volume of light warm air in the pipe, the greater the buoyancy force acting on this volume.
For this reason, the chimney is installed as high as possible. This buoyancy determines the thrust and efficiency of the overall system.

Thermal insulation of the chimney will improve traction and get rid of ice. Any available material is suitable for this: polystyrene, expanded polystyrene, glass wool, basalt fiber and others.
Based on the foregoing, the natural ventilation device in the cellar under the garage is made according to the following principles:
- to cover the entire volume of the basement with air exchange, the supply pipe is located at the floor, and the exhaust pipe is placed diagonally under the ceiling;
- the diameters of the air supply and exhaust pipes must be the same and are selected depending on the basement area - from 100 mm or more;
- the required pressure drop is ensured by installing a sufficiently long vertical chimney with a height of 3 m above the ground;
- to maintain the temperature difference, protectionfromcondensateandice the exhaust pipe is insulated.
To the material of manufacture ventilation pipes no special requirements are imposed, except for resistance to corrosion, moisture and temperature drops. As a rule, it is plastic or asbestos cement.
Option # 2 - forced ventilation of the cellar
Adding to the natural system electric fan can improve its efficiency, regardless of the season.
This ventilation is called forced or mechanical ventilation. It can be used when arranging garage ventilation along with a cellar and a viewing pit.

In most cases, it is sufficient to install one fan in the basement exhaust duct. The power and performance of the device is selected taking into account the volume of the room
To build more efficient systems, fans are placed on both channels, which allows you to flexibly regulate the air supply and exhaust, to maintain the required microclimate.
We also recommend that you familiarize yourself with schemes for the correct arrangement of ventilation in the cellar.
Advantages and disadvantages of ventilation systems
The choice of the type of ventilation system begins with considering its positive and negative aspects. Natural air exchange does not require complex installation and high costs, does not consume energy, does not make noise.
The main disadvantage of such ventilation is its high dependence on seasonal temperature fluctuations. In the warm season, its efficiency is close to zero. It does not allow for increased air circulation in adverse weather conditions.
The forced system is free from these drawbacks, it has the ability to flexibly control the air flow. If necessary, you can install a fan not only on the exhaust duct, but also on the supply duct. Air circulation can be controlled manually, using programmable timers, or special control units that maintain the required microclimate.
The disadvantages of forced ventilation include: more complex installation, less reliability due to the presence of additional devices, electricity consumption, increased material costs.
Step-by-step installation instructions
Consider, for example, the installation sequence of a combined version of natural ventilation with an additional mechanical exhaust.

The duct fan allows you to easily convert a natural ventilation system into a forced ventilation system, and, if necessary, return it to its original form
This will require pieces of plastic pipes with a diameter of 110 mm with rubber seals, a 10 - 15 W duct fan built into the air duct with a 220 V mains supply.
We choose the total length of the exhaust section within 3 - 4 m, the supply section - depending on the depth of the basement and the distance to the exit beyond the perimeter of the garage. You will also need two removable segments of 30 cm. One for the fan, the other for its replacement. If necessary, it is possible to provide for condensate drainage, then a tee and an elbow are additionally required. The latter is also used when turning the pipeline.
From the tools you will need: a hammer drill, a drill, a chisel, a punch, a 125 mm crown for drilling holes in concrete. With a large thickness of the ceiling, the walls will need an extension cord.

Hand punches are a good addition to your hammer drill toolbox. They knock out crushed stone or gravel fractions from concrete, which may occur during drilling, thereby preserving expensive drills (victorious or diamond-coated)
We carry out the arrangement of ventilation in the basement of the garage in two stages.
First, we make all the necessary holes in the concrete floors, brick partitions inside the basement, garage and on the roof. Then we mount the pipes.
Stage # 1 - drilling holes
We adhere to the following sequence of actions:
- Determine the location of the holes in the supply and exhaust pipes in the basement. They should be placed diagonally at different corners of the ceiling or top of the wall. At the same time, the supply pipe should go to the north side of the garage, and the exhaust pipe to the roof, or to the south.
- From the basement we drill the center of the future hole for the hood in the ceiling with a drill.
- At the top, in the garage, mark a 125 mm circle around the drilled center. We make a few holes inside it with a drill. Then we drill with a crown. In case of hitting the reinforcing rods, free them from the concrete with a chisel and cut them off with a saber hacksaw for metal.
- We place the pipe vertically from the resulting hole in the floor to the ceiling, and mark the position of its center. We drill a hole with a drill.
- On the roof of the garage, repeat the operations of point 3.
- Similarly, we make a hole for supplying air to the basement from the street, performing points 2 and 3.
This completes the most laborious part of the work.

It is more convenient to drill concrete floors in sequence from bottom to top. This makes it easier to ensure that the holes align accurately. Remember to use goggles and a respirator
Stage # 2 - installation of pipes and fan
The next stage - the installation of pipes and installation of the fan - is carried out in this order:
- We fix the fan inside one of the removable pipe sections.
- We mount an exhaust section in the garage, connecting three sections. We select the location of the fan based on the convenience of access. The upper pipe should protrude at least one meter above the roof, the lower one should go into the cellar up to the ceiling level. Between them we insert a piece of pipe with a fan, the rotation of which should be directed towards the hood upwards.
- We install the supply pipe by lowering it into the cellar from 0.5 m to 0.2 m above the floor. We bring the entrance part to the north side of the garage, raising it 20 cm above the ground. We finish the hole with a knee or a tee with a protective metal mesh.
- We close the joints of pipes with ceilings with mortar or polyurethane foam.
- We connect the fan and check the draft in the basement by leaning a piece of paper against the exhaust hole.
- We insulate the section of the pipe above the roof with any available material. If the garage is not heated, then the entire chimney must be insulated.
The use of a fan may only be required during the summer months. During the rest of the year, natural air circulation will suffice. To do this, you just need to replace a piece of pipe with a fan for the same piece without it.
The nuances of arranging ventilation
In severe frosts, an intense influx of cold air can lower the temperature in the basement to negative values.
To prevent this from happening, it is necessary to provide a gate valve (gate) with an electric drive and shut off the flow of cold air in time, and at temperatures below -15 degrees and the exhaust of warm air. It is also better not to place stocks in the immediate vicinity of the supply pipe, otherwise they may freeze slightly.
 for ventilation")
Installing valves (dampers) on the supply and exhaust ducts will avoid freezing of products and excessive drying of the cellar. With their help, you can set the optimal ventilation mode for each season.
The performance of natural ventilation, among other factors, is also influenced by the cross-section of the supply and exhaust openings. It is chosen depending on the size of the cellar. To see detailed calculations of the diameter of the ventilation pipe for the cellar, please go to this link.
It is recommended to start the inlet of the supply pipe with a bend or a tee to prevent rainwater from entering and to cover it with a metal mesh from rodents, amphibians, insects.
To increase traction and prevent it from blocking by gusts of wind, it is recommended to install at the end of the chimney deflector. In addition, it protects against atmospheric precipitation and increases ventilation efficiency by 15 - 20%.

The presence of wind is a prerequisite for the normal operation of the deflectors. Therefore, they are installed as high as possible on an open section of the roof.
There are a wide variety of deflector types. From the simplest, in the form of an umbrella, which you can make yourself, to rotating weather vane and turbo deflectors.
In addition to maintaining a low temperature and removing excess moisture, the lack of light also affects the safety of food in the cellar. For this reason, there are no windows in basements. This is also worth remembering when arranging electric lighting - lights that are regularly forgotten to turn off can accelerate food deterioration.
Conclusions and useful video on the topic
Option for arranging cellar ventilation:
The use of deflectors to strengthen the hood in the basement and cellar of the garage:
Homemade deflector tests:
In conclusion, it should be noted that the efforts and costs aimed at arranging ventilation in the basement of the garage will more than pay off in the future with the safety of products. Armed with the information and tools provided, you can do the entire installation yourself.
Are you just going to install ventilation in the garage cellar or improve the existing one and you still have questions that we did not consider in this article? Ask our experts and other site visitors - the contact form is located below.


